1/72 Matchbox PB4Y-2 Privateer
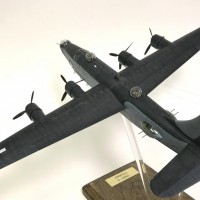
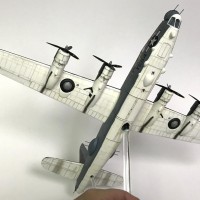
Finally have some pics to post of the finished build. My apologies for the quality - me and my iPhone have a more difficult time with larger subjects!
This was the "enhanced" Privateer build that I posted in the Aircraft WIP thread, and if you're interested in the details, especially all of the scratch building in the turrets and cockpit, here's that link: http://imodeler.com/groups/work-in-progress-aircraft/forum/topic/1-72-privateer-enhanced-matchbox-build/
My inspiration for this build was last year's Oklahoma City contest when I encountered Ben Fulcher's 1/48 Privateer (I think it won best of show - rightfully so!) Here's my post about Ben's build: http://imodeler.com/2017/06/148-privateer-soonercon-an-inspiration-for-my-next-build/
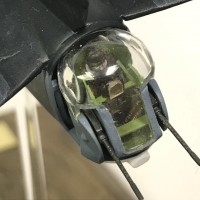
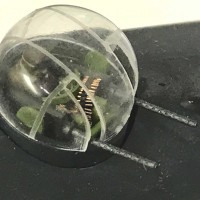
I had the Matchbox kit, which is basically a huge blank canvas for paint work, and the only areas lending themselves to detailed work - and what would naturally attract the eye - were all the areas under glass - the cockpit and turrets. There was absolutely NOTHING in those areas (other than the cockpit) worth looking at, so I scratch built them from the ground up, and used two sets of Falcon vac-formed clear parts for everything except the tail turret. I used Quickboost barrels, but everything else was styrene, wire, clear acetate and tape.
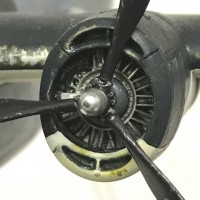
I also secured a set of resin engines/nacelles, and a set of resin props.
The only extra details I added in the cockpit were all the throttle and engine controls, some details behind the pilots seats on the rear bulkhead, sun visors, and a center upper console and some wiring up against the canopy. Paint and decals sufficed for the instrument panels. The pilots, upper turret and blister turret gunners came with the kit, but I had to use some spares box pilots for the nose and tail gunner.
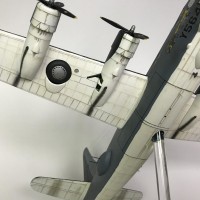
I used some sections of drilled out sidewinders to create the exhaust vents beneath the engine nacelles. Other additions were the lights between the bomb bays, the whisker antennae and the aerials, and rigging was with Uschi line. For all the small windows I used Krystal Klear.
For as big a canvas as this is, there are almost no panel lines or other details. What lines were there I highlighted, then drew in everything else with .02 lead pencil (for major lines) and pastel chalk powders applied with a glue applicator brush (only use I've ever found for those brushes!). I ended up getting the dark blue darker than I wanted, and under a coat of dullcoat the panel line work just about disappeared, so I went back and applied white artists oils to almost every individual panel on the upper surface, which helped bring back the appearance of all the panel line demarkation. I lightened the control surfaces with some Tamiya weathering masters and even used some Flory's "snow" wash. I used zinc chromate yellow and metalizer paints (brushed from the jar) for the chipping. Weathering was just about everything in my toolbox - Tamiya weathering sets, pastel chalks, Pitt pens, oils and some other fluids.
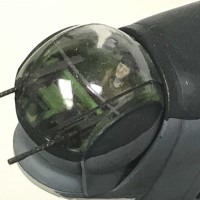
I think I mentioned my two problems with the build before: silvering of the decals (despite all of the techniques used to remedy) and my gaff in installing the canopy and front deck section. You have to cut out a portion of the front deck to use the Falcon replacement, and under test fitting it went down great. However, once I got super glue on it and put it in place, I failed to notice that I had it misplaced slightly on top of the front edge, as I was focused on trying to get the rear section "spread" to dry properly against the rear edge (which is the only reason I used super glue instead of white glue like I normally do). Once I realized my mistake I didn't want to try to pry it off or use glue solvent, so tried to file it down as far as I could. You can see from the close up pic that it's still noticeable.
Overall I'm pleased. Looks much better up close and personal than in my mediocre photos! Took about 7 months of work, so now I'm going to focus on some small builds with very little enhancement (ok - after I finish the Airfix Pe-2 ...)
This was also my Nose Art group build contribution. This "Blunderbuss" Privateer is one of the few aircraft from WWII that seemed to have nose art only on the starboard side, so it's hard to see well once in my display case!
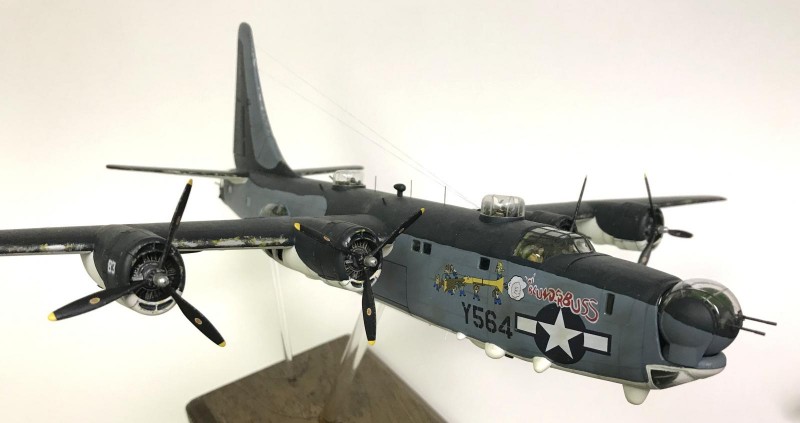

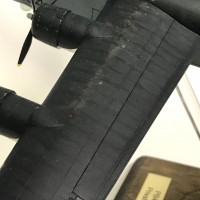
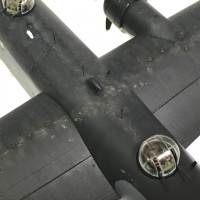

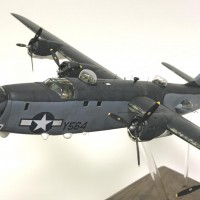

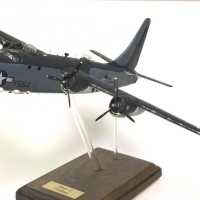
This is marvellous, Greg. Have really enjoyed the build thread and she looks just as good, and more, than I thought she might. Great how you have found the interest in the paintwork in all those wide open spaces. Excellent work, and a real joy.
Turned out great, Greg...and the photos are equally as pleasing - no apologies necessary in that regard. Very nice results all around from what I can see.
This is a WINNER Greg.It looks AWESOME! A B 24 Liberator on steroids! It looks great in the Navy camouflage. Great paint job and weathering!
Wow Greg I'll bet this takes pride of place in your collection, you really nailed it buddy well done.
N.
I also meant to say (as Morne just did) how great I think she looks in Navy colours, a great fit.
Greg, I always liked the paint scheme for these. You did some nice work making this is a wonderful looking model. Well done!
Great looking Privateer Greg. Top stuff.
This is really an outstanding result to an amazing effort. Very, very impressive! (I am definitely glad to see those Emerson turrets without "frames," the most-common mistake modelers make with US gun turrets from the war)
For those who lack Greg's fortitude (and skill) in plowing ahead with all that scratchbuilding, Mike West at Lone Star Models (aka "The Resin Prince of Sugarland") has purchased all the masters from Cobra Company and re-released their resin upgrade set for this kit, which includes all that interior work (or at least enough of it to be seen once assembled). I'm not sure of the price, but Cobra Company's stuff was always good and always worked right in my experience.
A "quickie" solution to that cockpit canopy problem would be an application of putty over the forward edge and a couple minutes with a sanding stick. You should be able to airbrush it away, with any color change explained by "weathering and sun-fading." There's also the argument to be made that 99.9% of those who look at this won't notice.
@tcinla: I thought about your putty solution actually after looking at these pics once I posted. If I hadn't already mounted this puppy on it's stand, I may have attempted it! At this point I'm going with your 99.9% argument!
By the way - thanks for the comments - much appreciated! I think I looked up those Cobra sets, but I didn't want to shell out all that dough...
Fantastic job, Greg! Photos are fine, Detailing's great.
This is an absolute stand out model Greg. Just when you think it can't get better you get to see the underside! The wide shots of the whole plane are my favourites. Stunning workmanship to get that finish!
No one would tell this is a matchbox kit, it looks a far better & newer mould, regardless all you said about it, Greg! Hats off to you Sir
A delight to look at Greg. And a Matchbox kit as well! Super job and all that scratch building really paid off.
Amazing Privateer, Greg! Really love it!
I have been watching you build this masterpiece from the beginning... It has turned out wonderful, and is a plane you hardly ever see built, partly because of the conversion process and the ton of work involved.
The paint work really brings it to life and looks awesome ! Nice choice of markings too.
It really would be great to see one as a new tool kit in 1/48... I buy one (or two) in a heart beat. My eyes don't let me build 1/72 scale kits anymore.
Greg my friend, those stands simply are like icing on the cake... I especially like the details you scratch built into the turrets...
Well done my friend.
@lgardner - thanks Louis - much appreciated!
Hi Greg, really happy to see your finished PB4Y-2. You did her real justice and I commend you for all the work u did to make this a real prize winner. I think they are such cool looking aircraft that does not get enough attention by the model companies. I think I shared this with you in another post but this plane holds the most special part in my heart. This is the aircraft my father was assigned to and crewed during the last 6 months of the war flying long-range patrol out of HI. The stories he shared with me could fill a book and he is no longer with us. He actually had an opportunity to crew many Navy aircraft during his several years serving during WW2 but this was his favorite. He had a negative comment about every plane except this one. He thought the Navy should of kept these flying forever. Seeing your build really sparks those memories of him and his stories. Great Job!
@jjetmec - I remember you mentioning your dad's affiliation with the Privateer. I'm glad this bit of modeling contributes to fond memories for you!
Nice job on that Privateer Greg. Having built that kit a number of years ago, I can fully appreciate all the work you put into your outstanding model. My congratulations on a fine model of the PB4Y-2.
Great build Greg, I like the stand a lot too, very much an action shot!
Nice job, Greg. I’ve had one waiting in my stash for years. Inspiration!
Wow Greg, this is really some great work, well done on this build, it looks really impressive.
Nice job mate, I can only echo the above comments!
Nice work Greg - great to see this kit bought to life! Congratulations.
Looks great Greg! such a impressive weathering on wings
Great build, paintwork and weathering Greg, I started one of these last year which has stalled after I had paint issues. I will get back and finish it one day
Beautiful ! Simply beautiful!
What a superb job you've done Greg. You must be a brave, patient man with good eyesight & nimble fingers to tackle such a good model. Seriously, a superb result. Thanks for all the photos on the WIP postings too.