EJECT, EJECT, EJECT!!
Sometimes in our modeling journey we get involved with builds we had no intention of building but are glad we did. This was one such build for me.
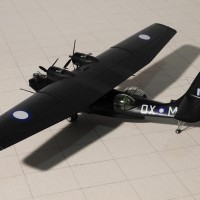
My co-worker, Phil, who was a F-111 munitions maintenance ground crewman, based at Nellis AFB during the 1970's, purchased this kit and asked me if I'd like to build it for him. So after thinking about it for about 2 seconds I said “Ummm, Yeah!, twist my arm.” My first commission build!
Phil is also the person who 3D printed the underwing pods for my PA-48 Enforcer. So, I took this opportunity to use this build as a way to “pay” him back.
History:
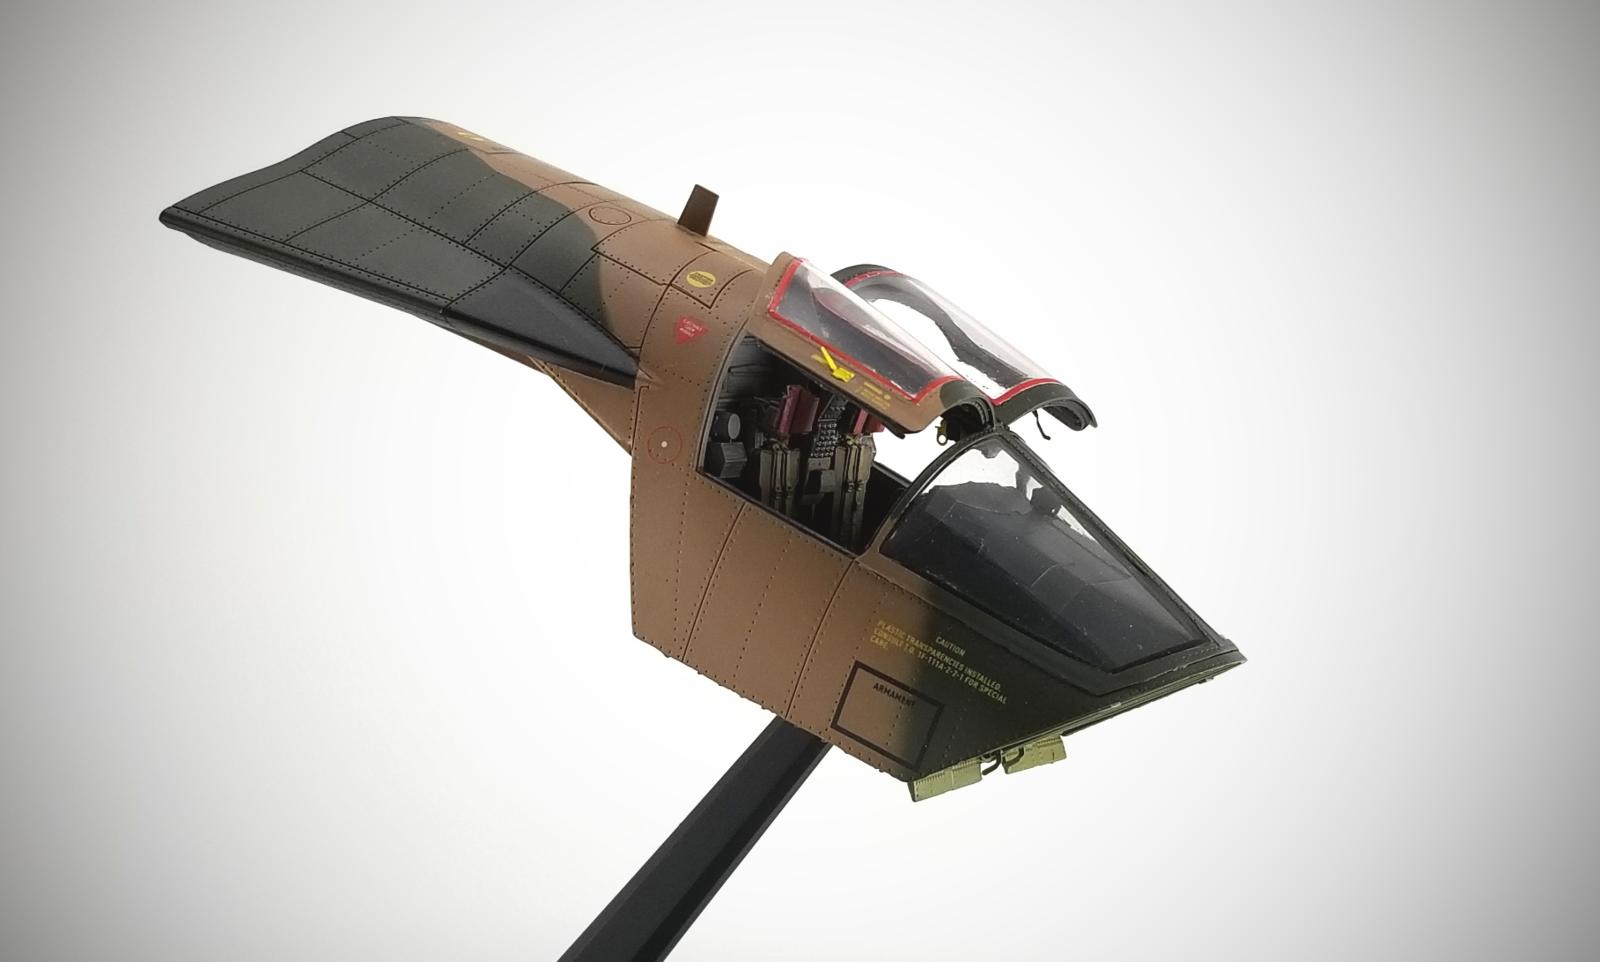
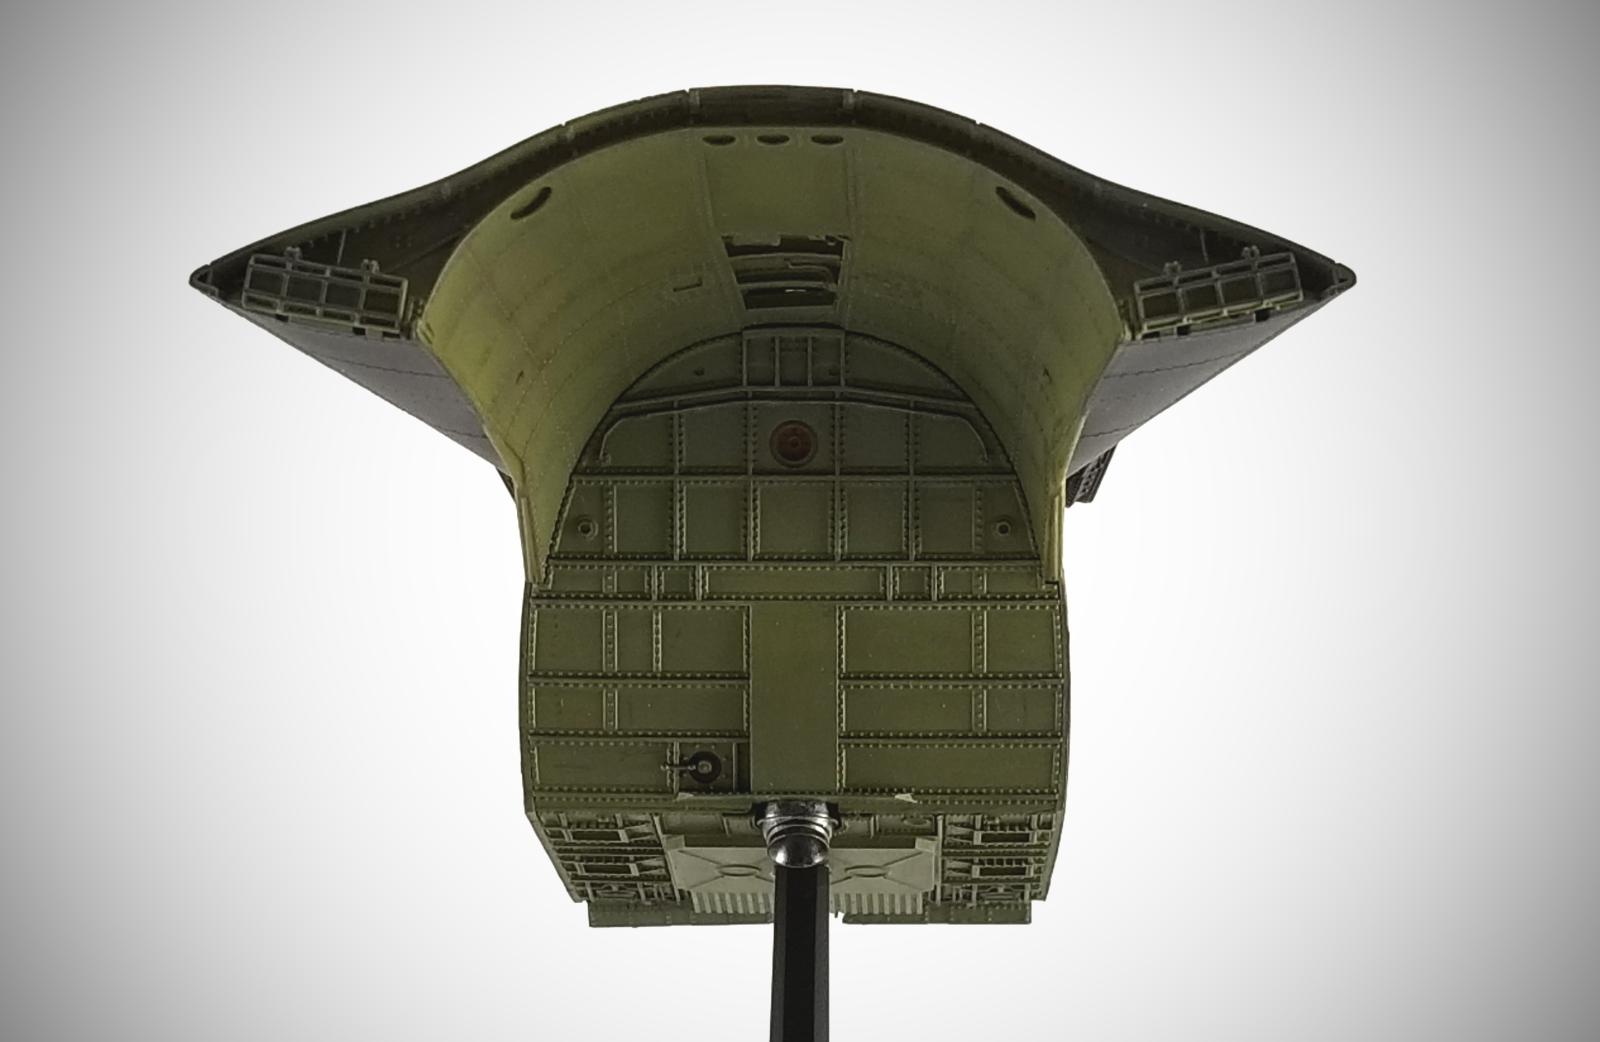
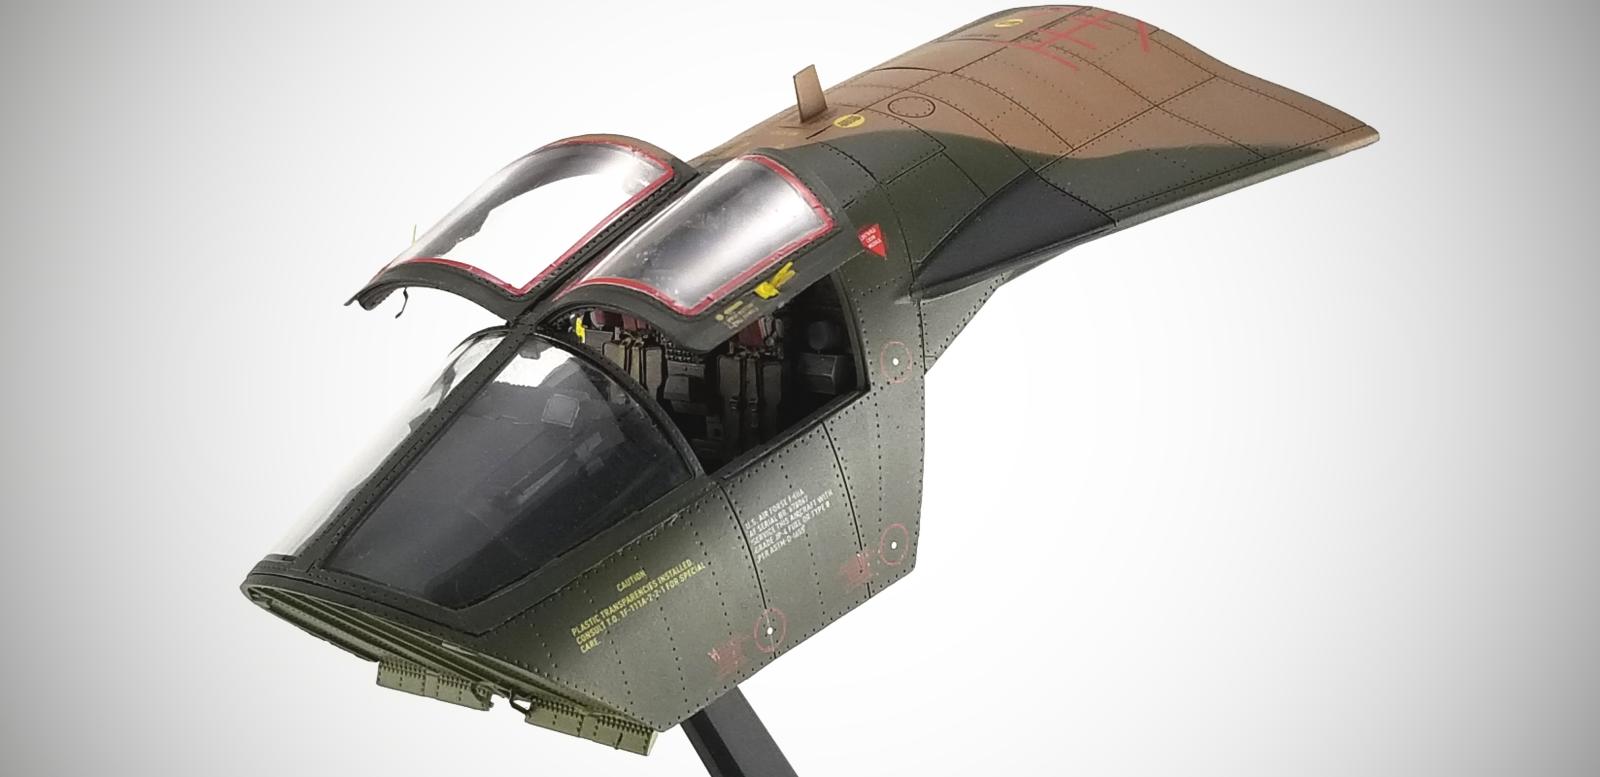
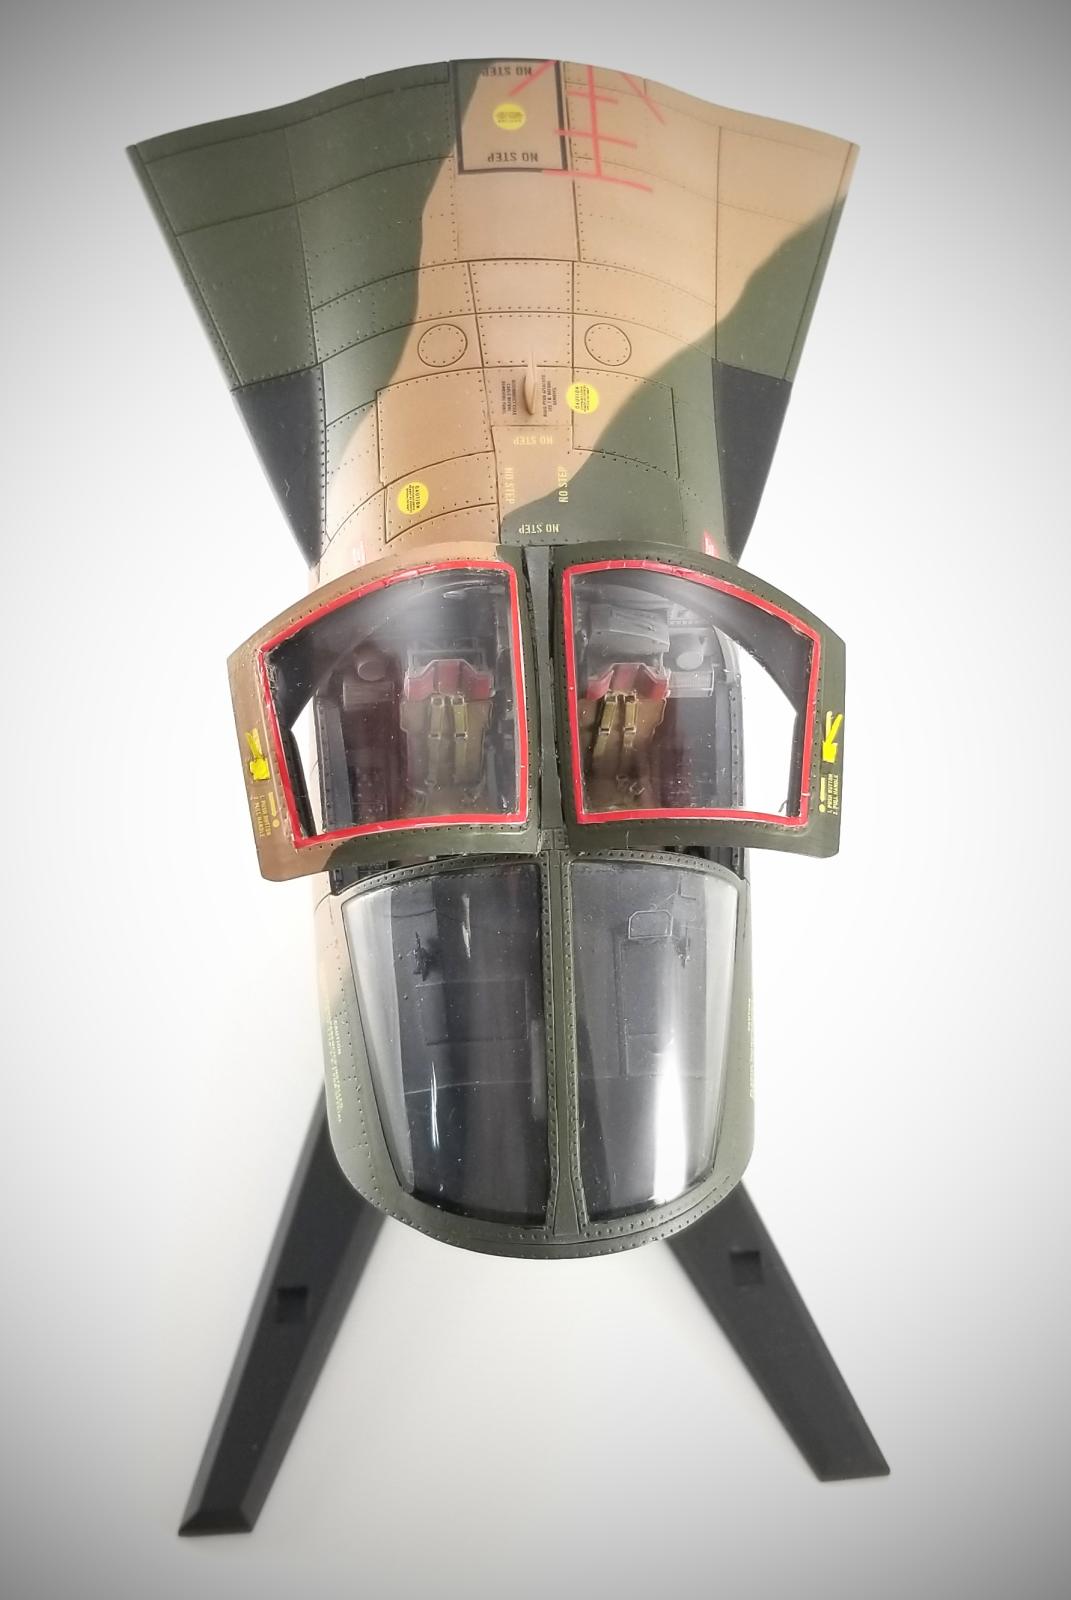
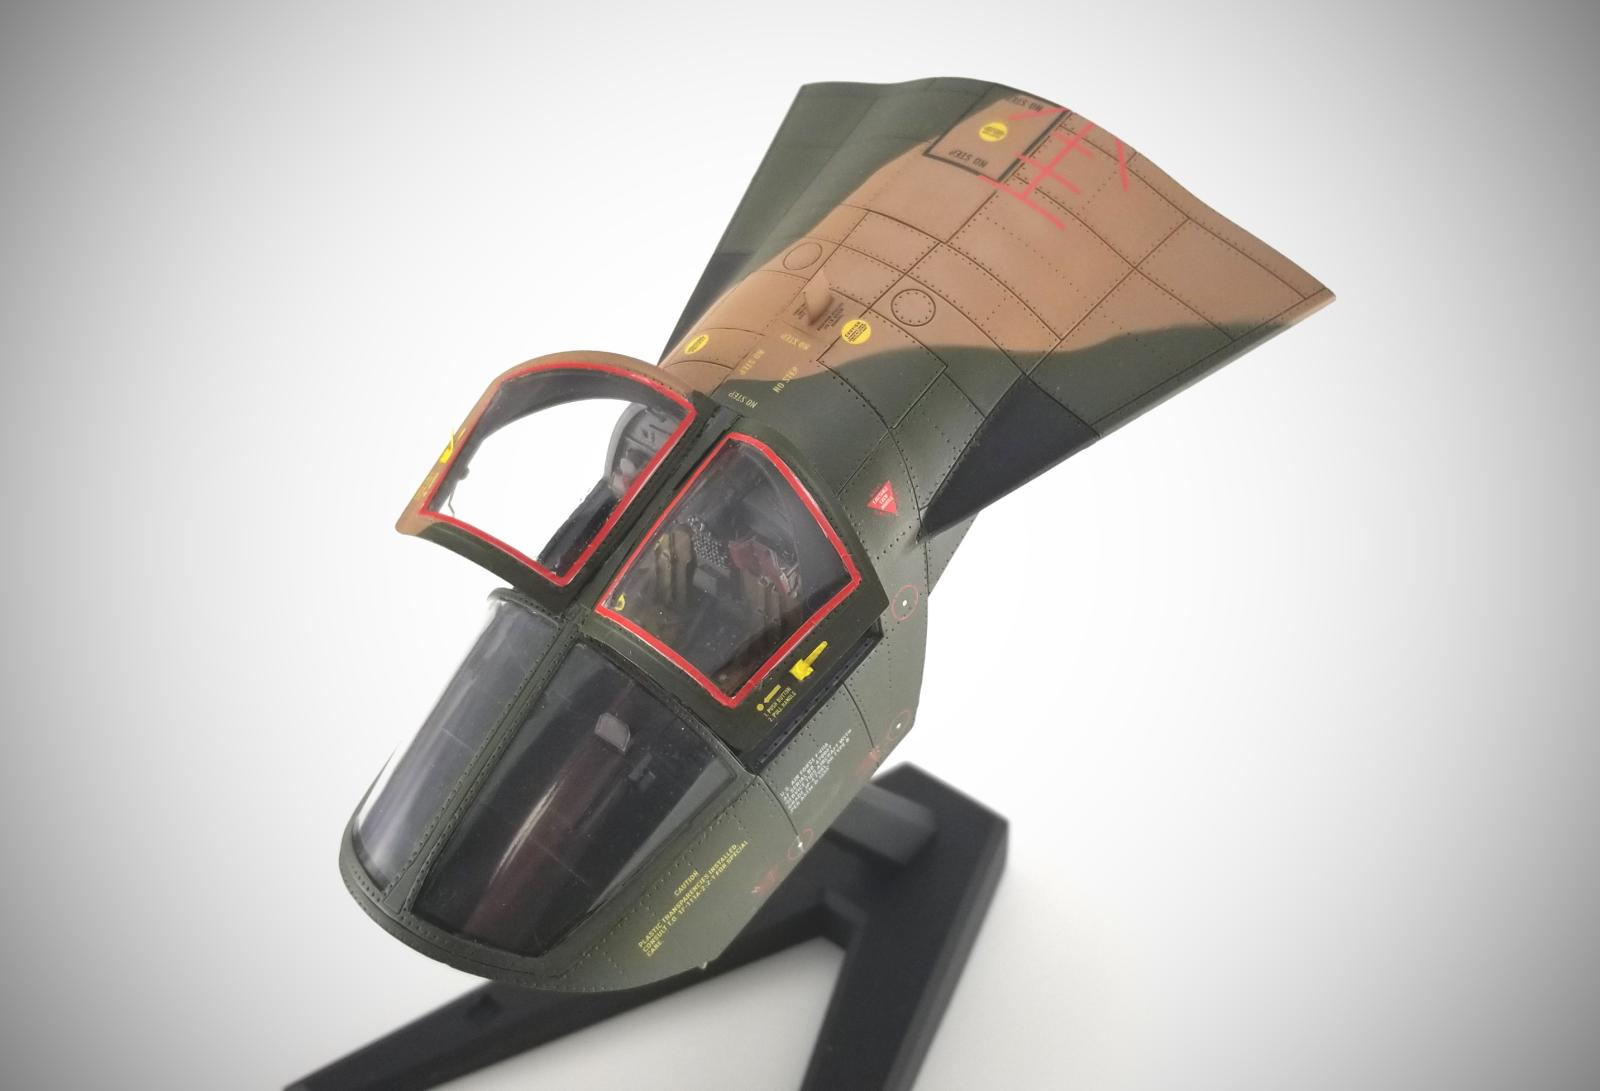
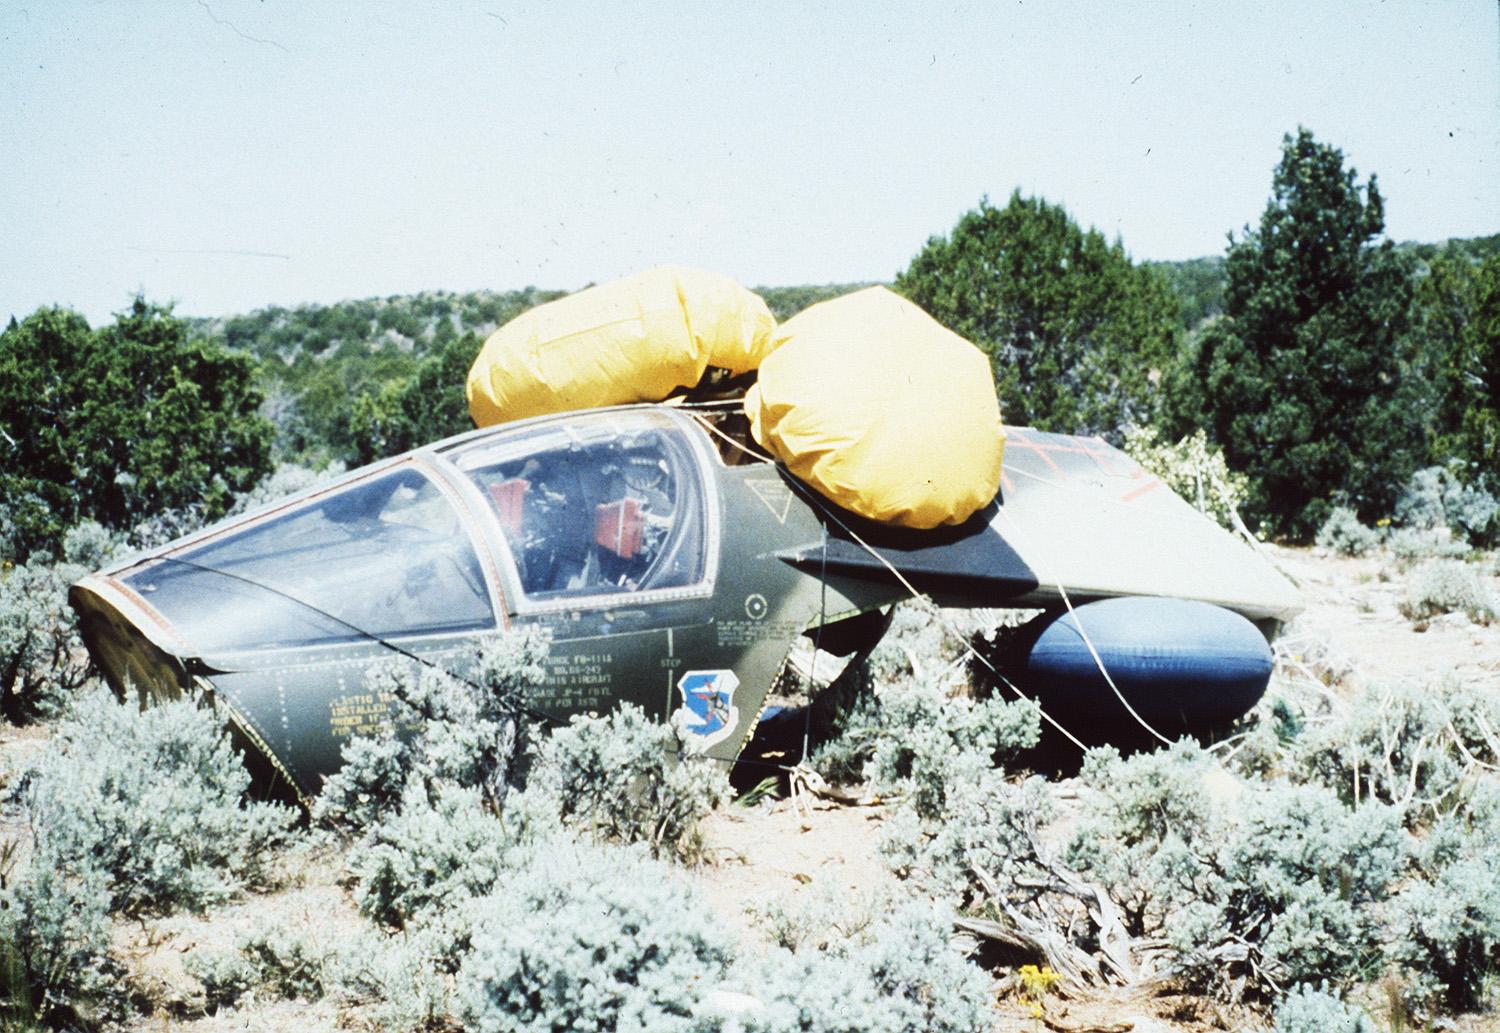
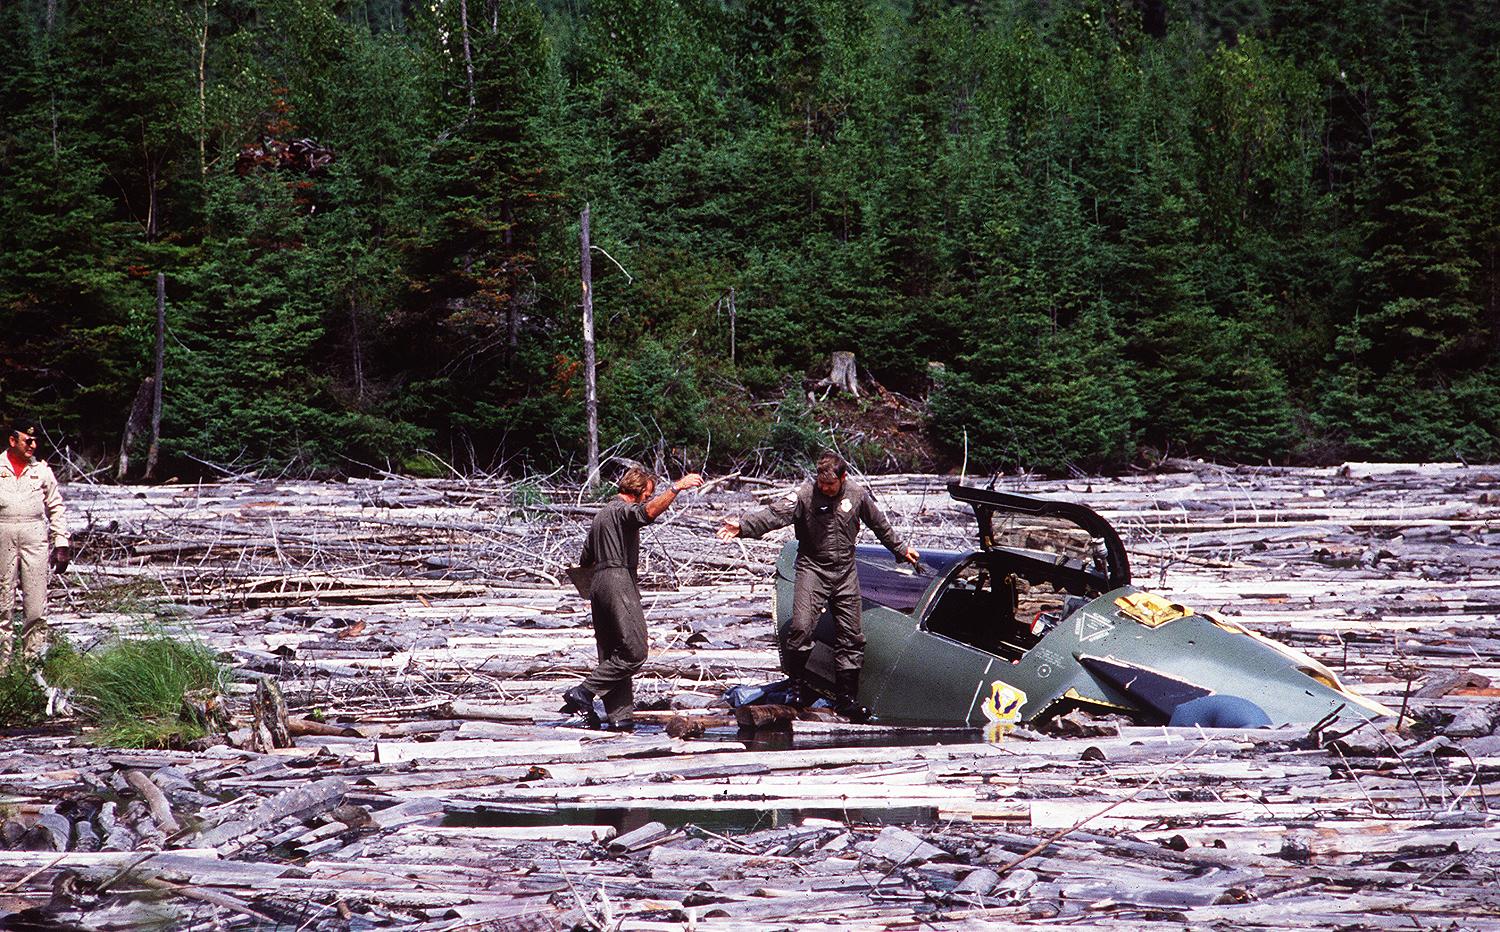
In the event of trouble, the F-111 included an enclosed crew ejection cockpit as means of escape. The crew remained strapped into their seats while rockets ejected the cockpit module away from the aircraft. After ejection a large single parachute was used for descent and an airbag system was deployed to cushion impact on landing. In the event of a water landing this airbag system, and additional airbags if needed, were used as the capsule's flotation system. The system was also designed to be used as a crew survival shelter.
For a more in depth look at this system, check out the following:
http://www.f-111.net/Page-9.html
A very interesting interview with Col. Rob Kyrouac about ejecting from a F-111
https://www.youtube.com/watch?v=S8vfzPswpyA&ab_channel=AircrewInterview
Kit:
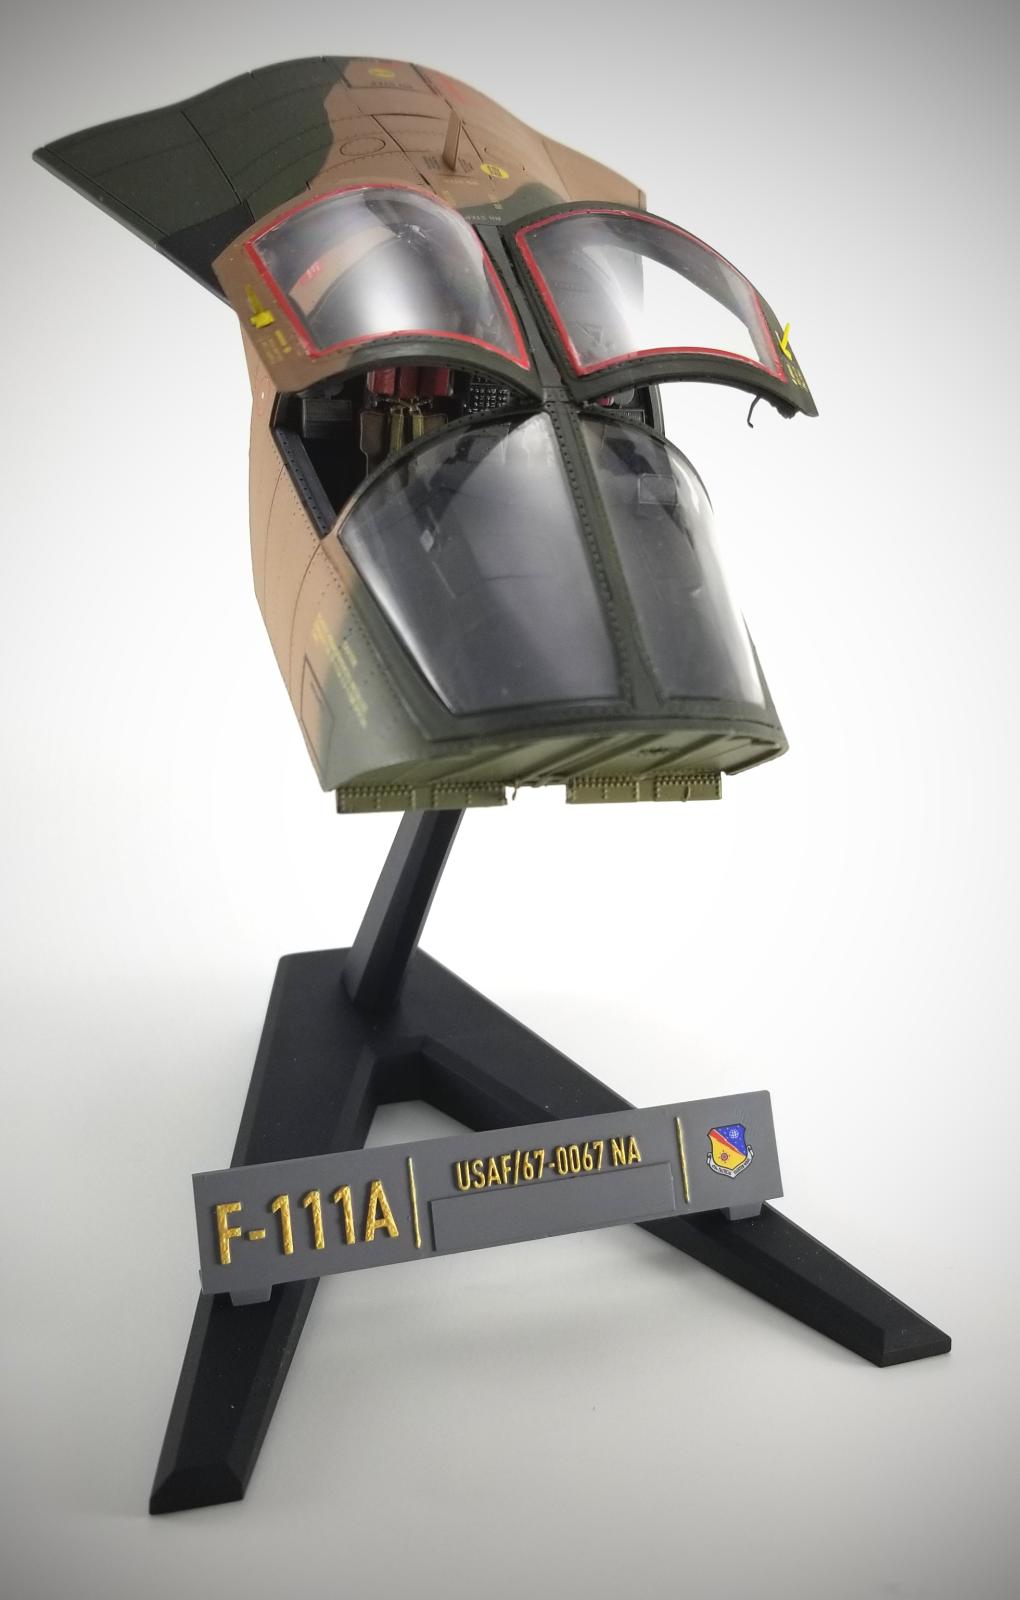
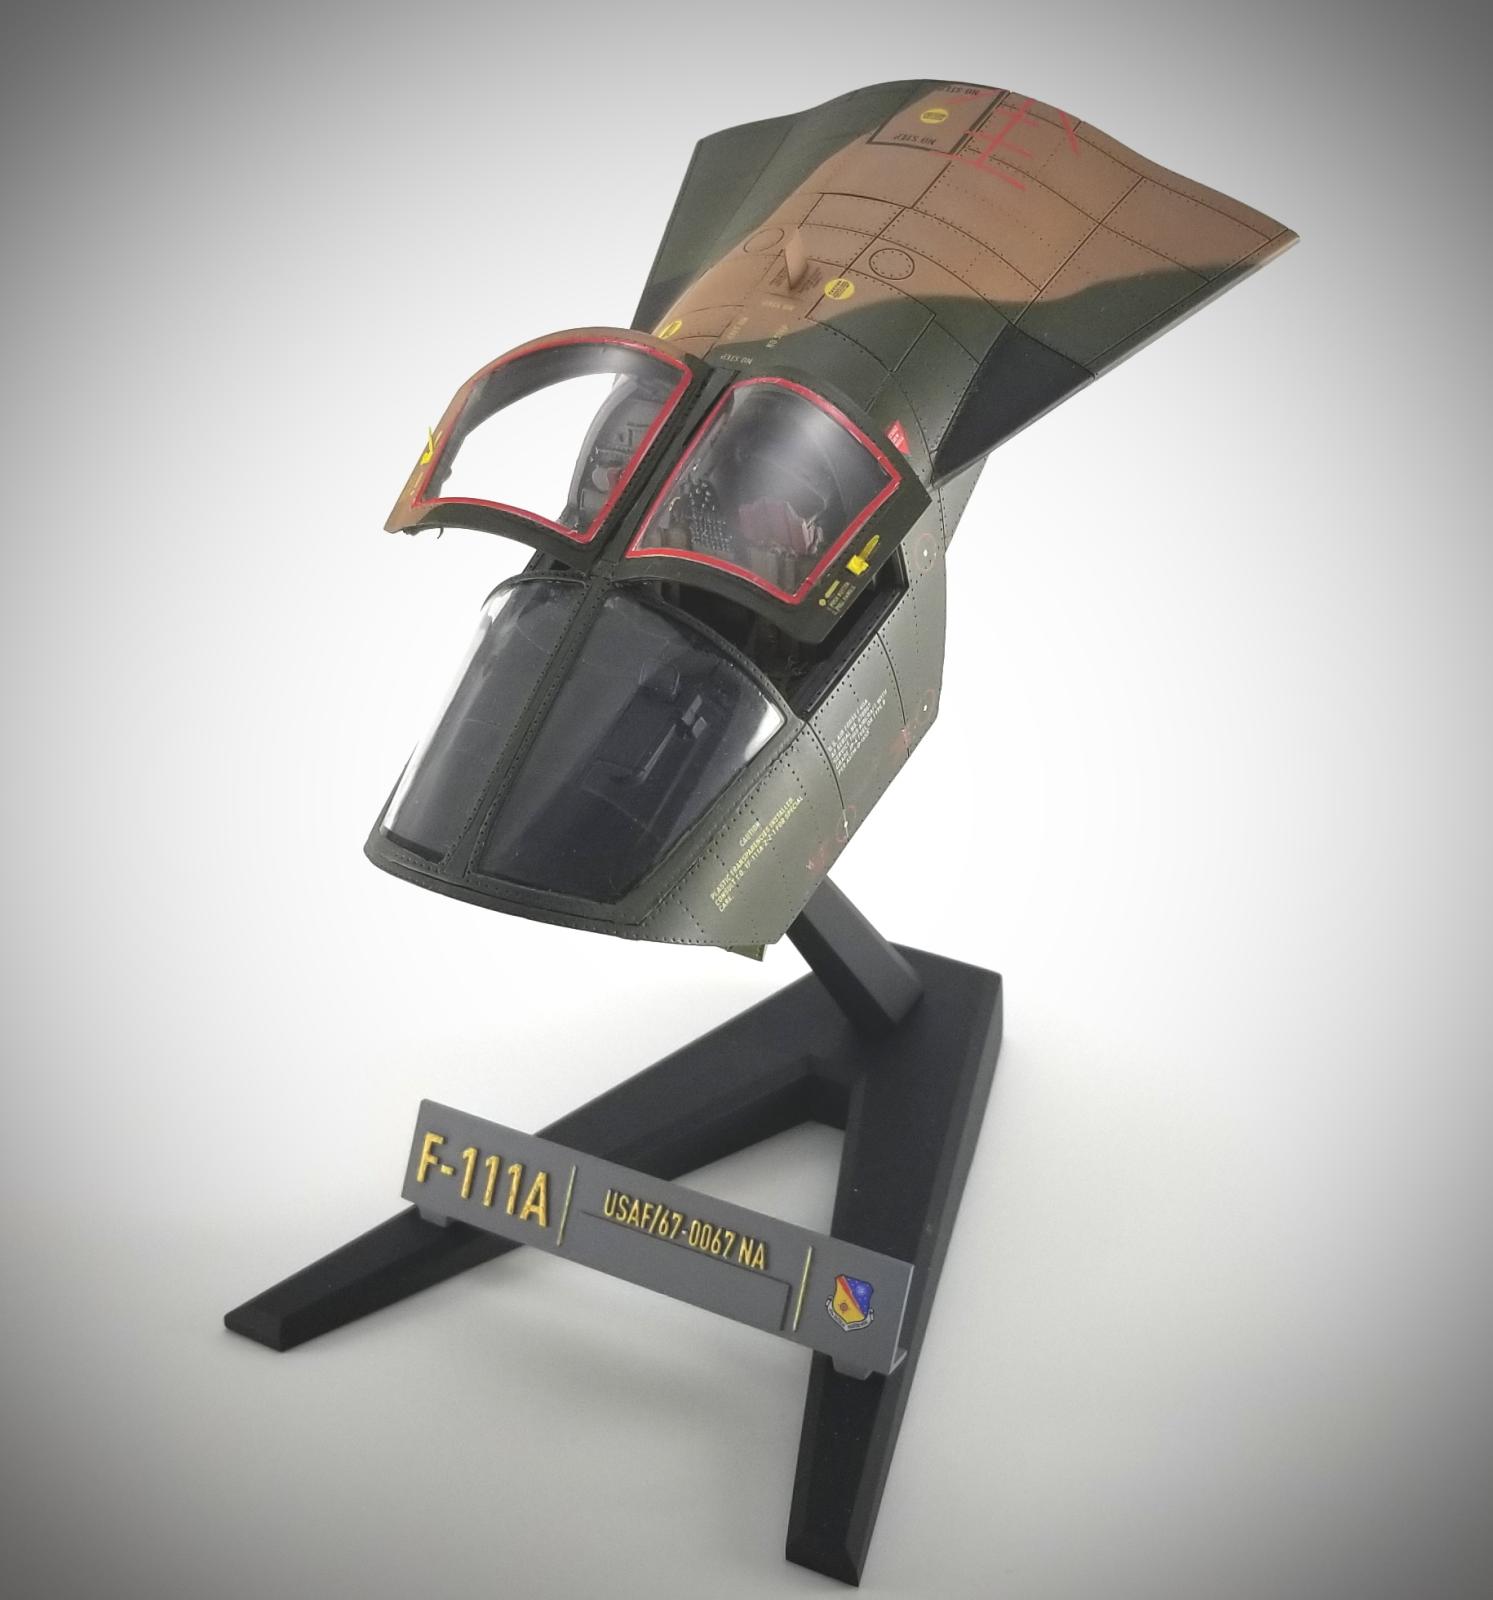
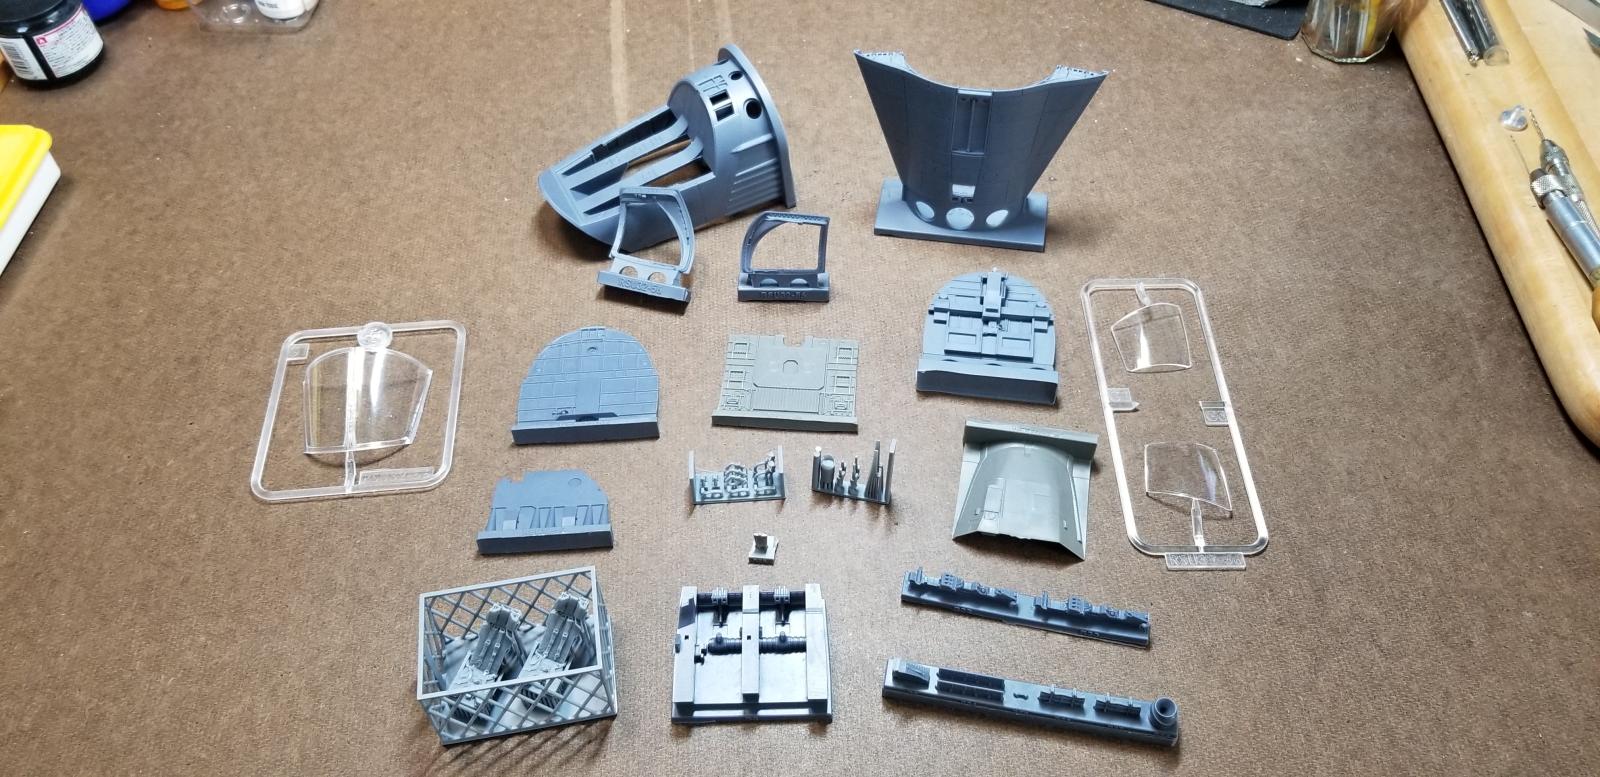
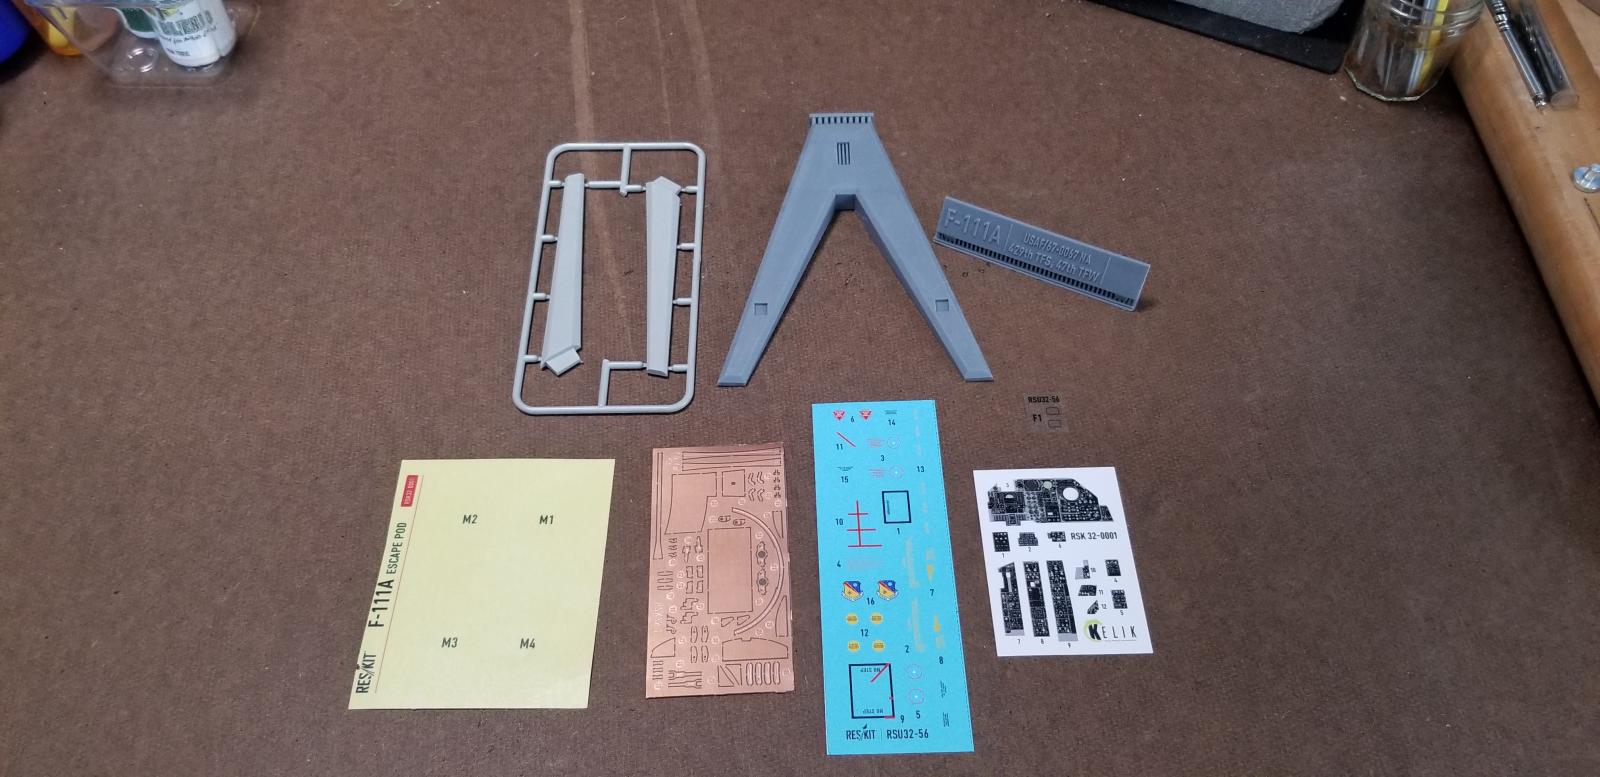
RES-KIT F-111A Escape Crew Module, 1/32, #RSK32-0001
Well thought out, and clear, instructions and painting guide.
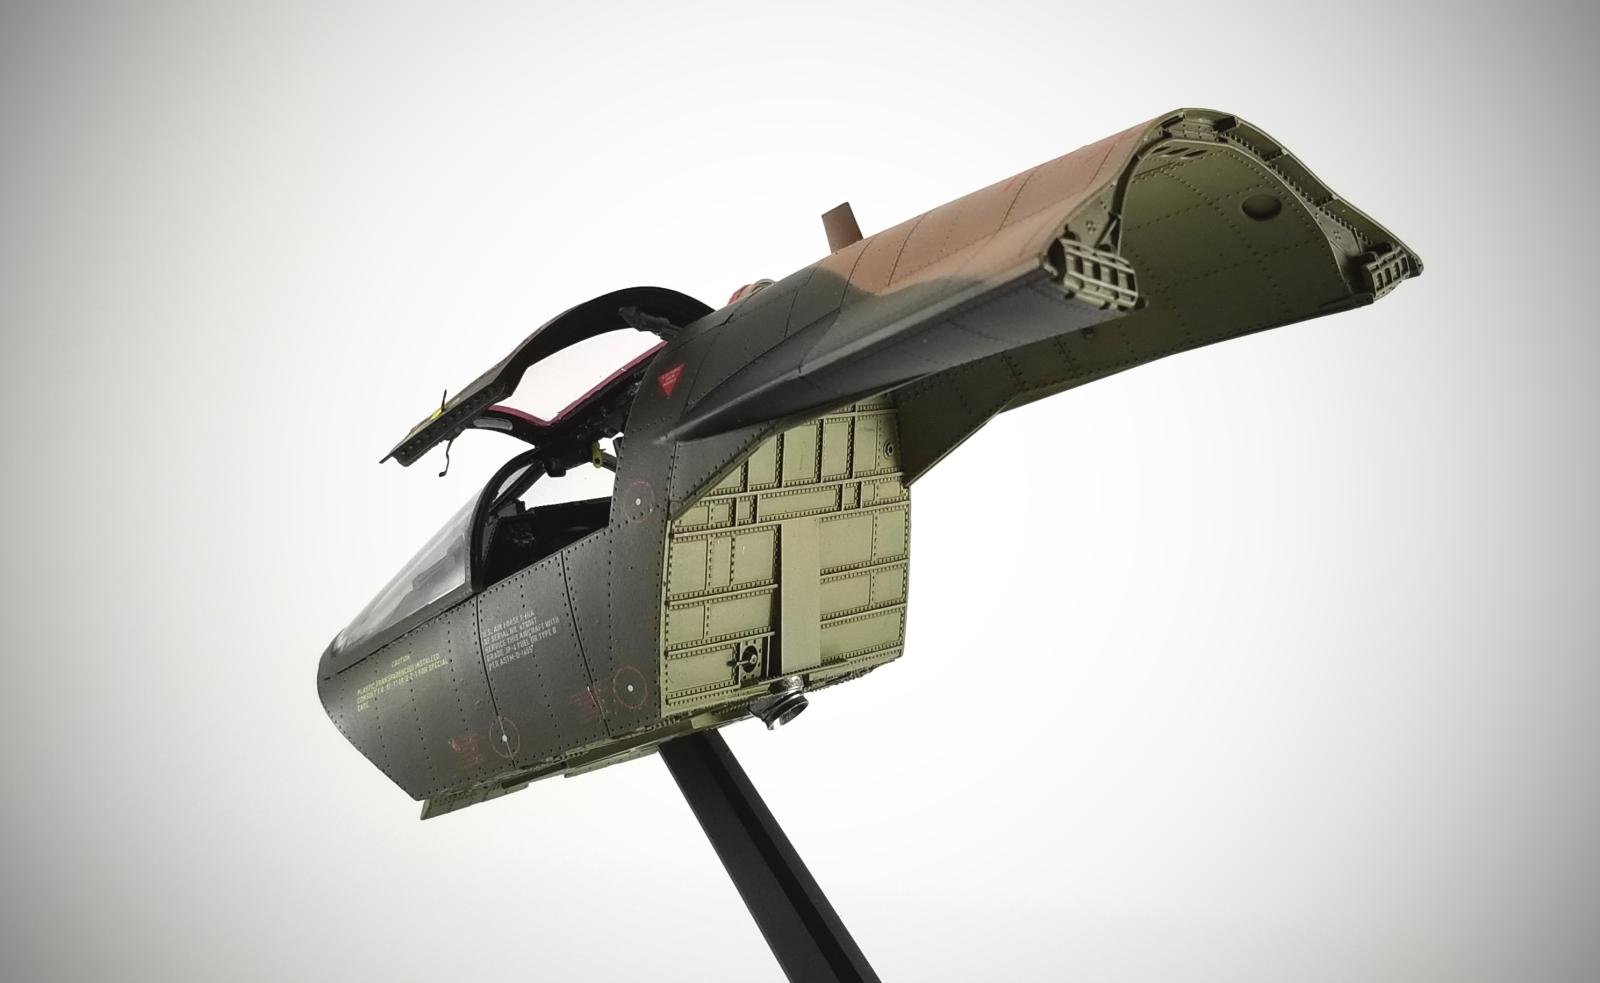
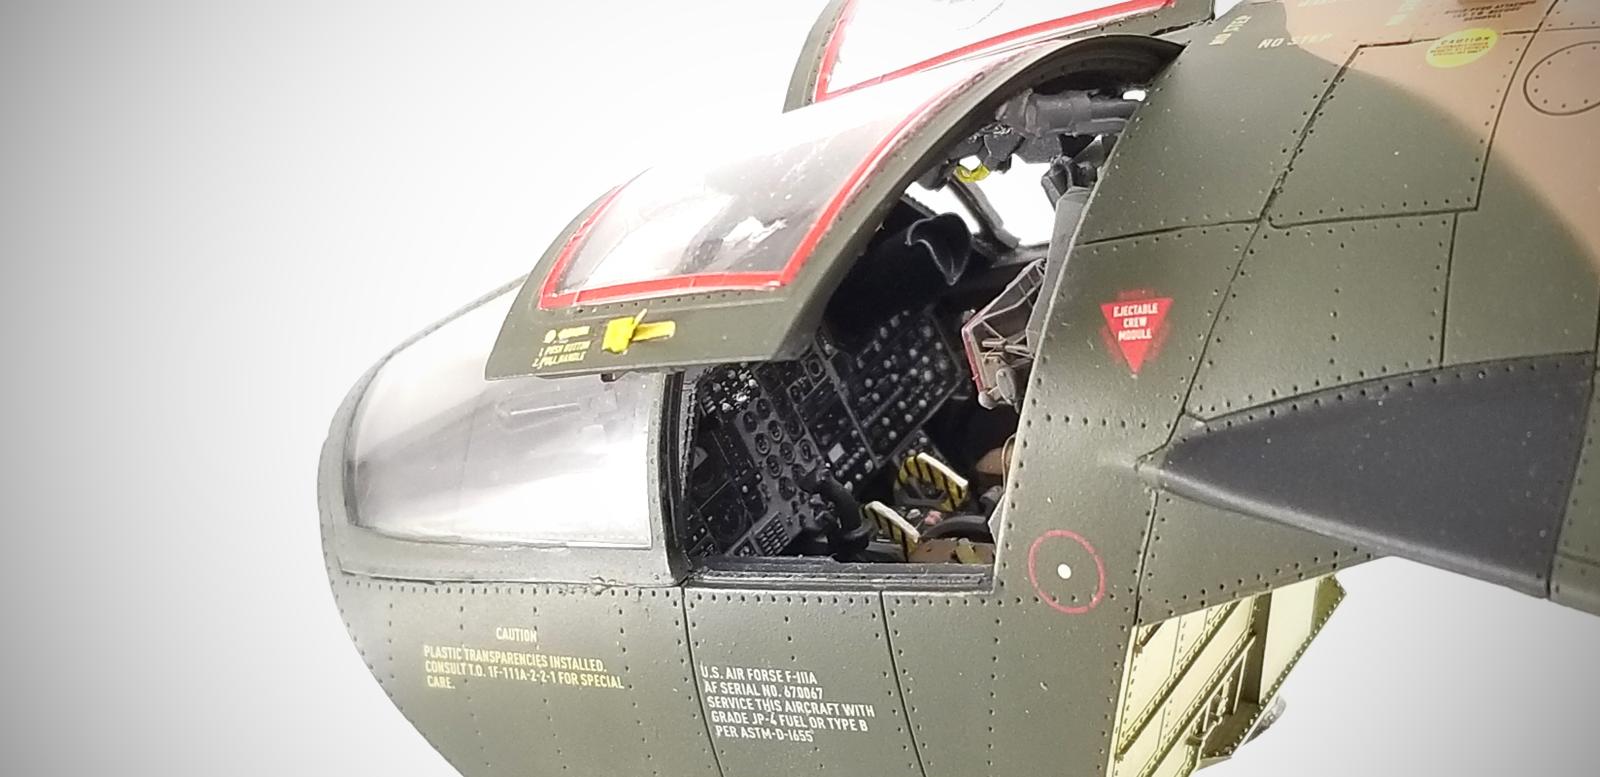
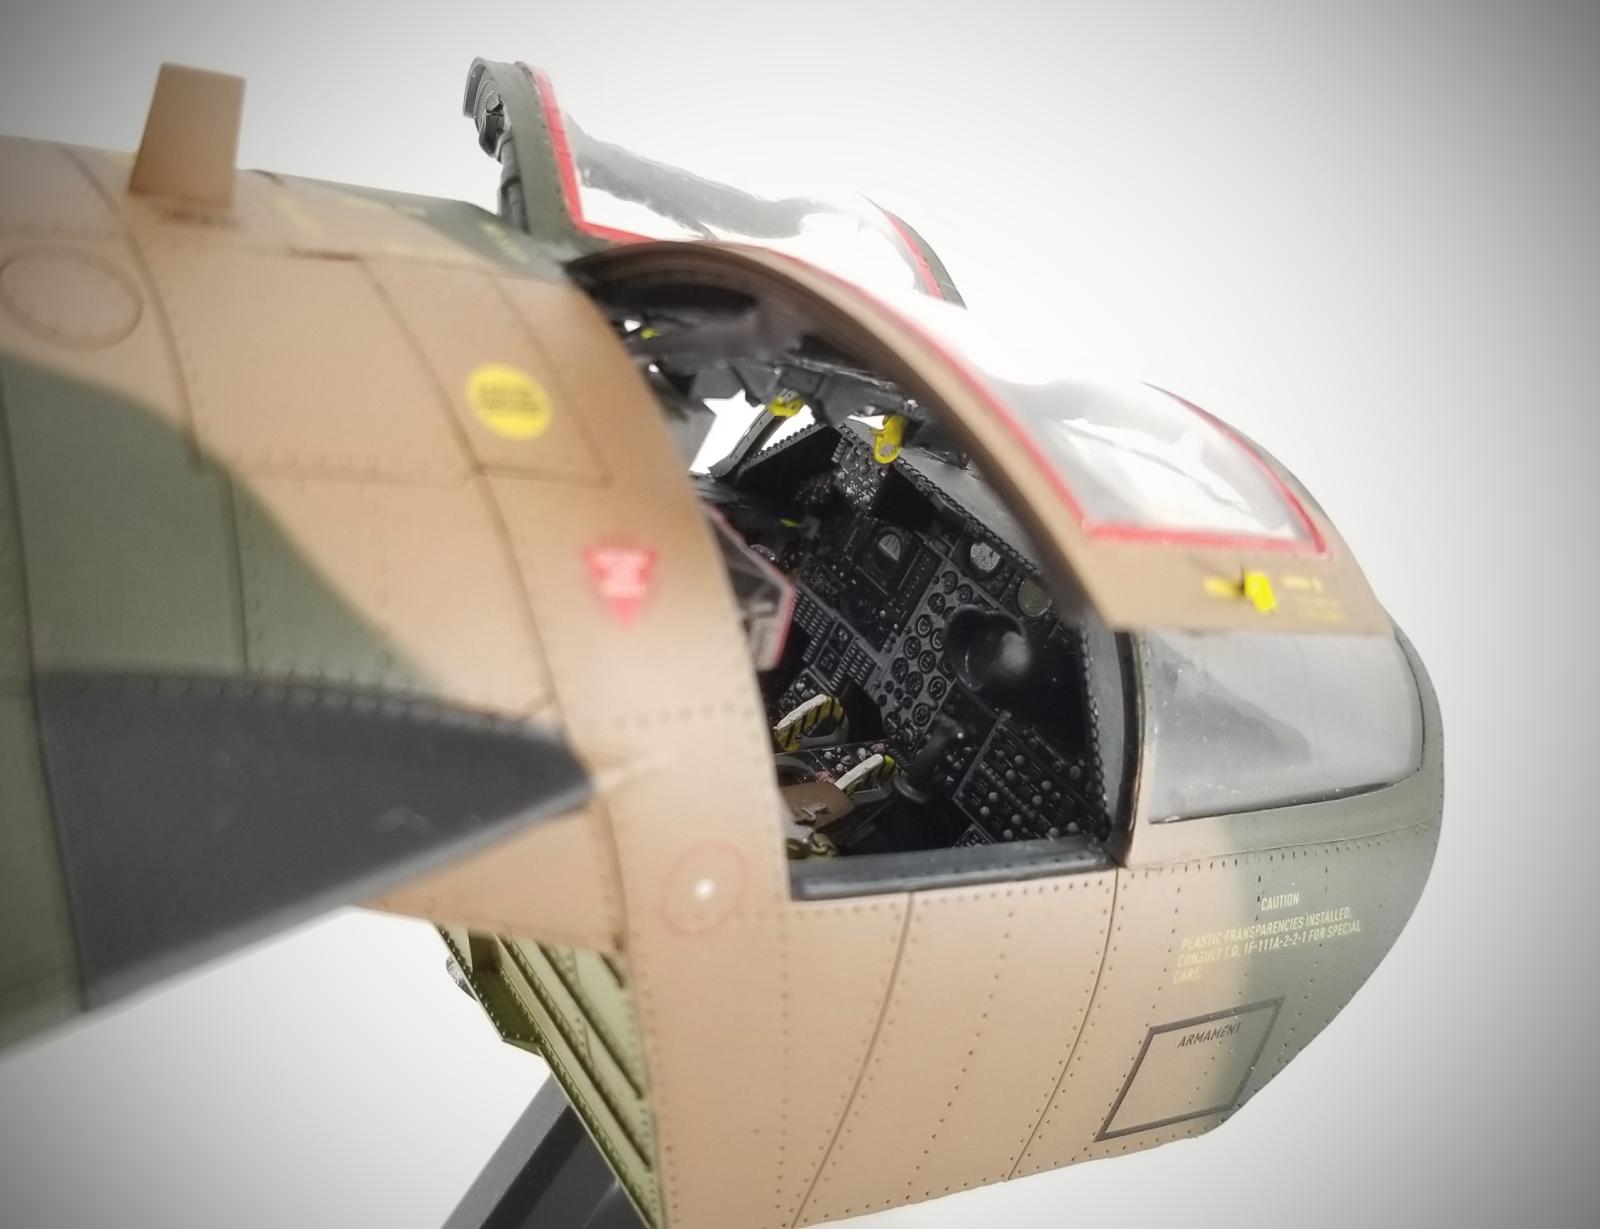
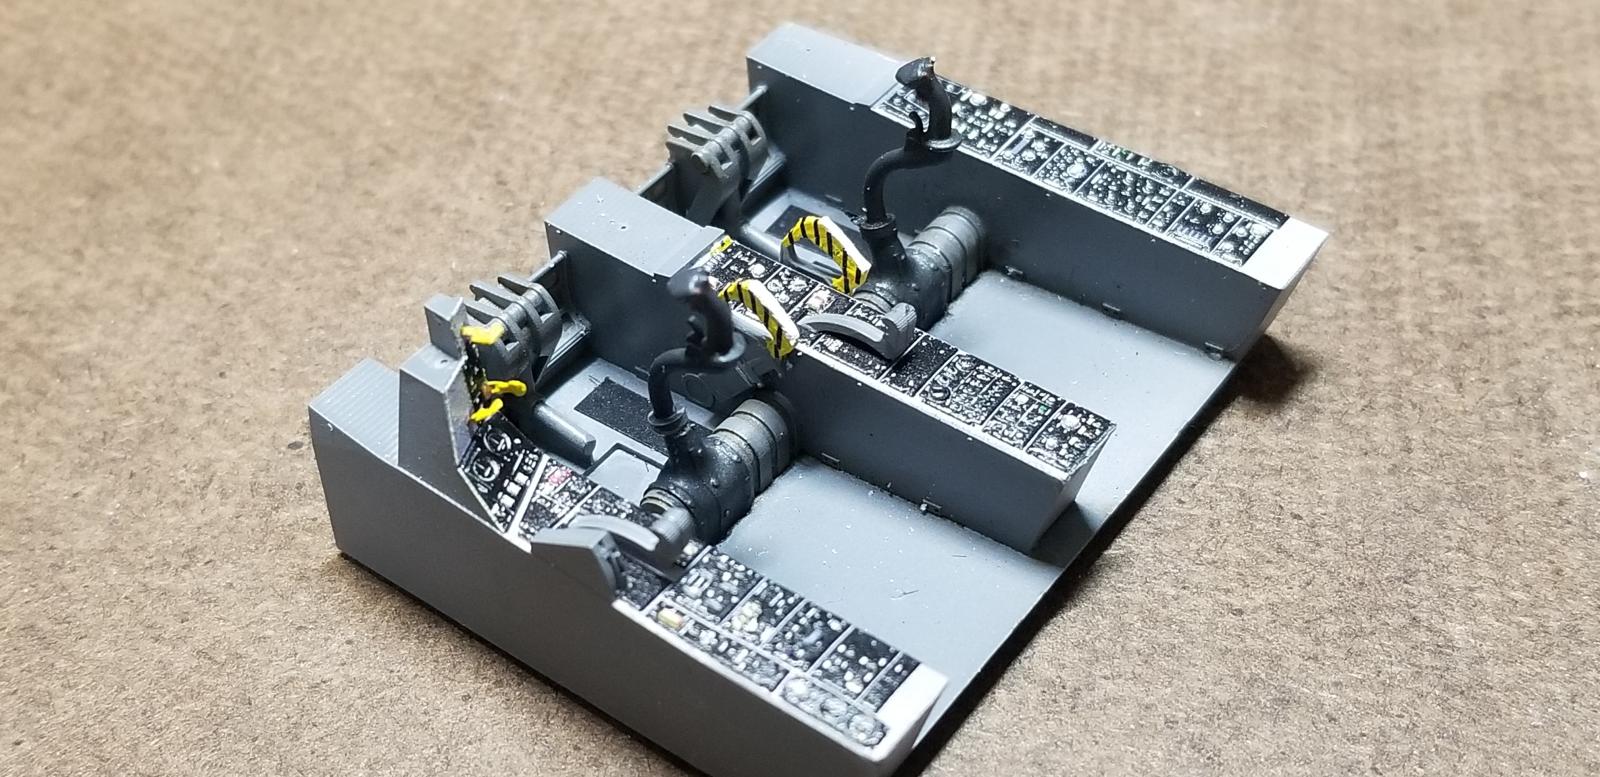
The resin parts are of good quality. Some of the casting blocks are a bit big and take a bit of work to remove, especially the cockpit floor/consoles (R3). It is important to remove the maximum amount of material to the proper thickness because this impacts the assembly of the bottom outer panel.
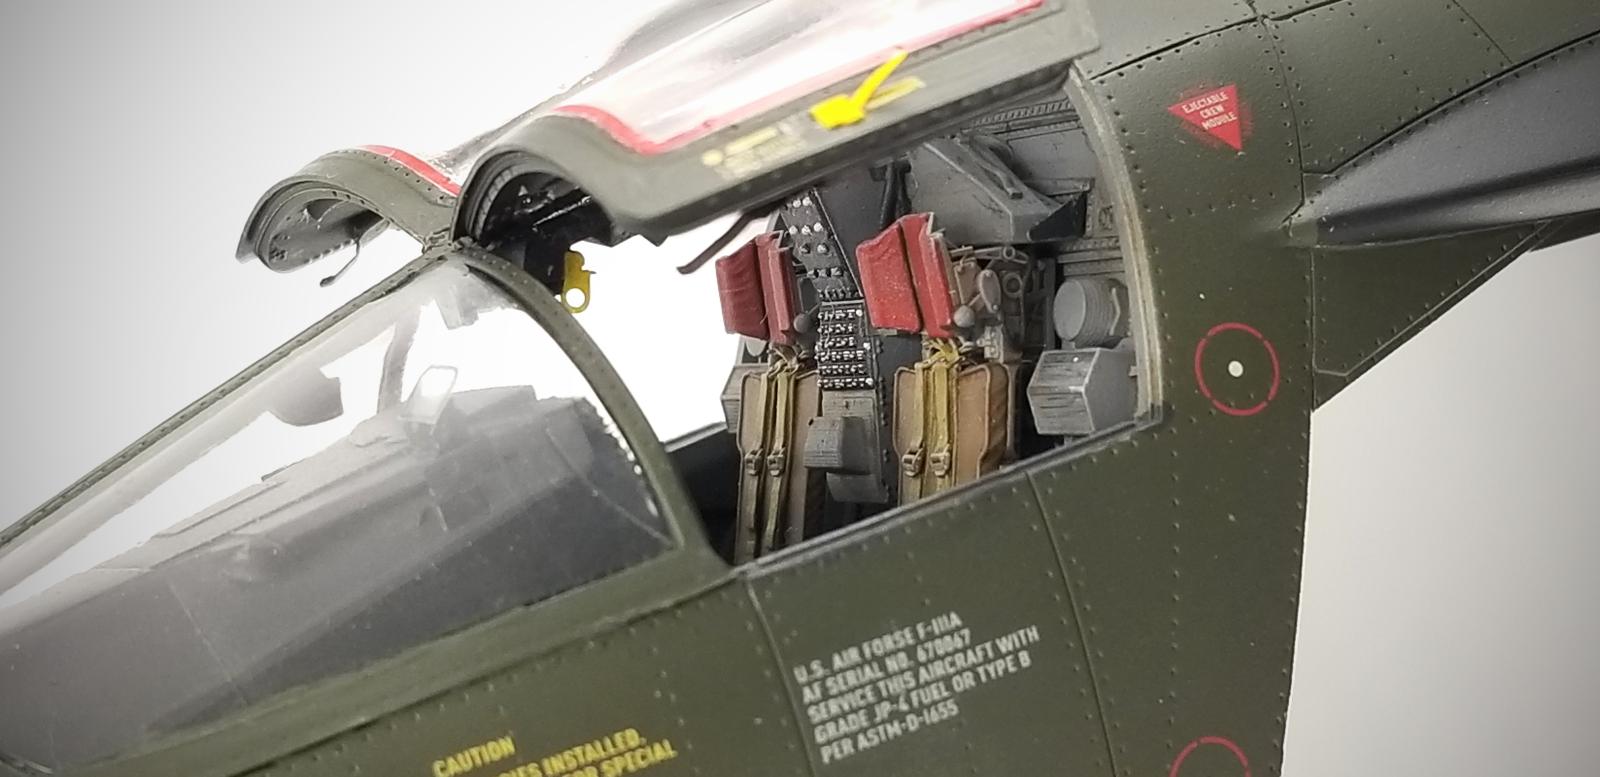
The 3D printed parts were very clean and of good detail. A nice touch was adding multiples of some parts in case of breakage. Some of the parts had a lot of printing supports but all easily removed. But go easy on removal with some of the more delicate parts.
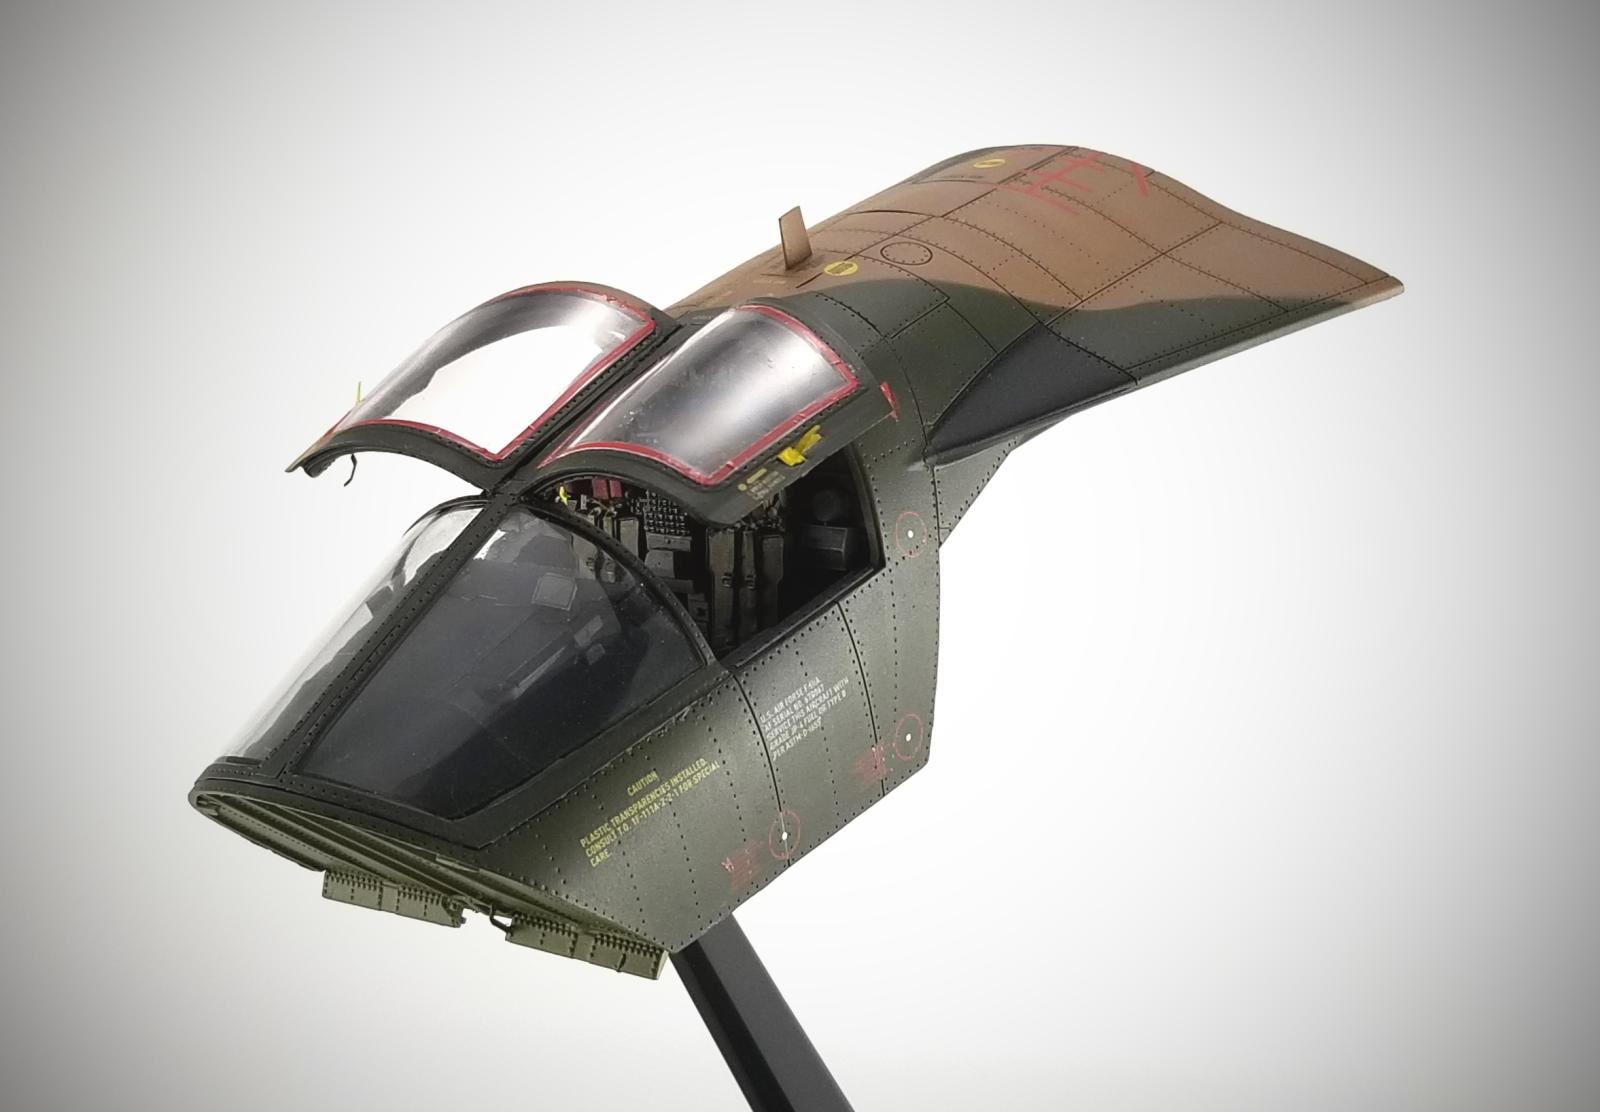
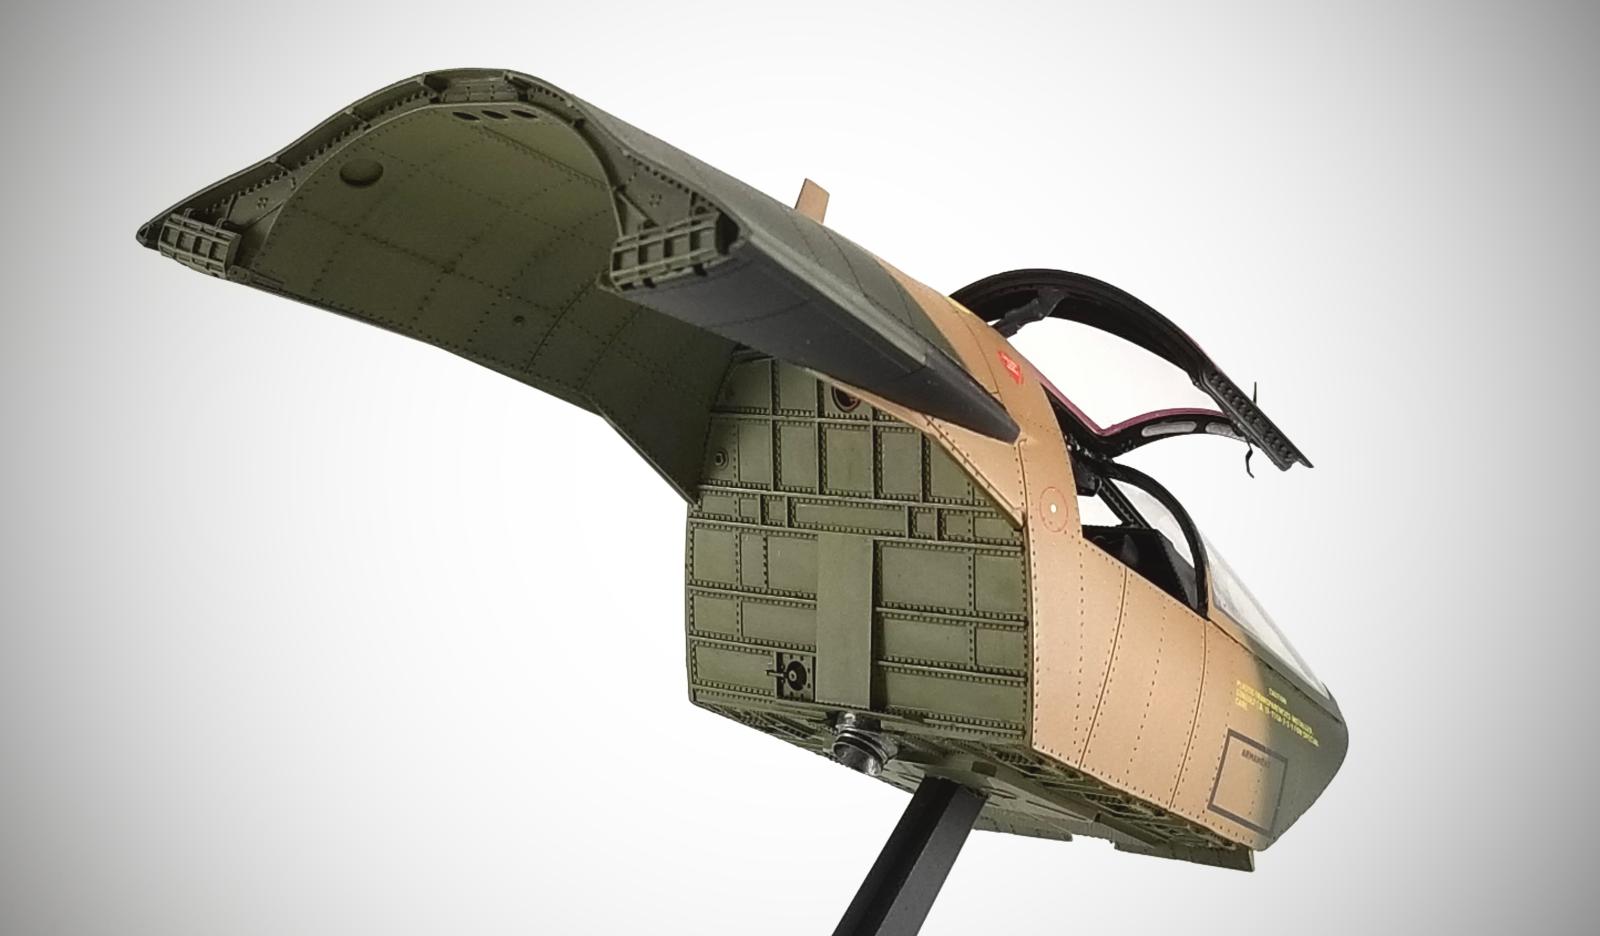
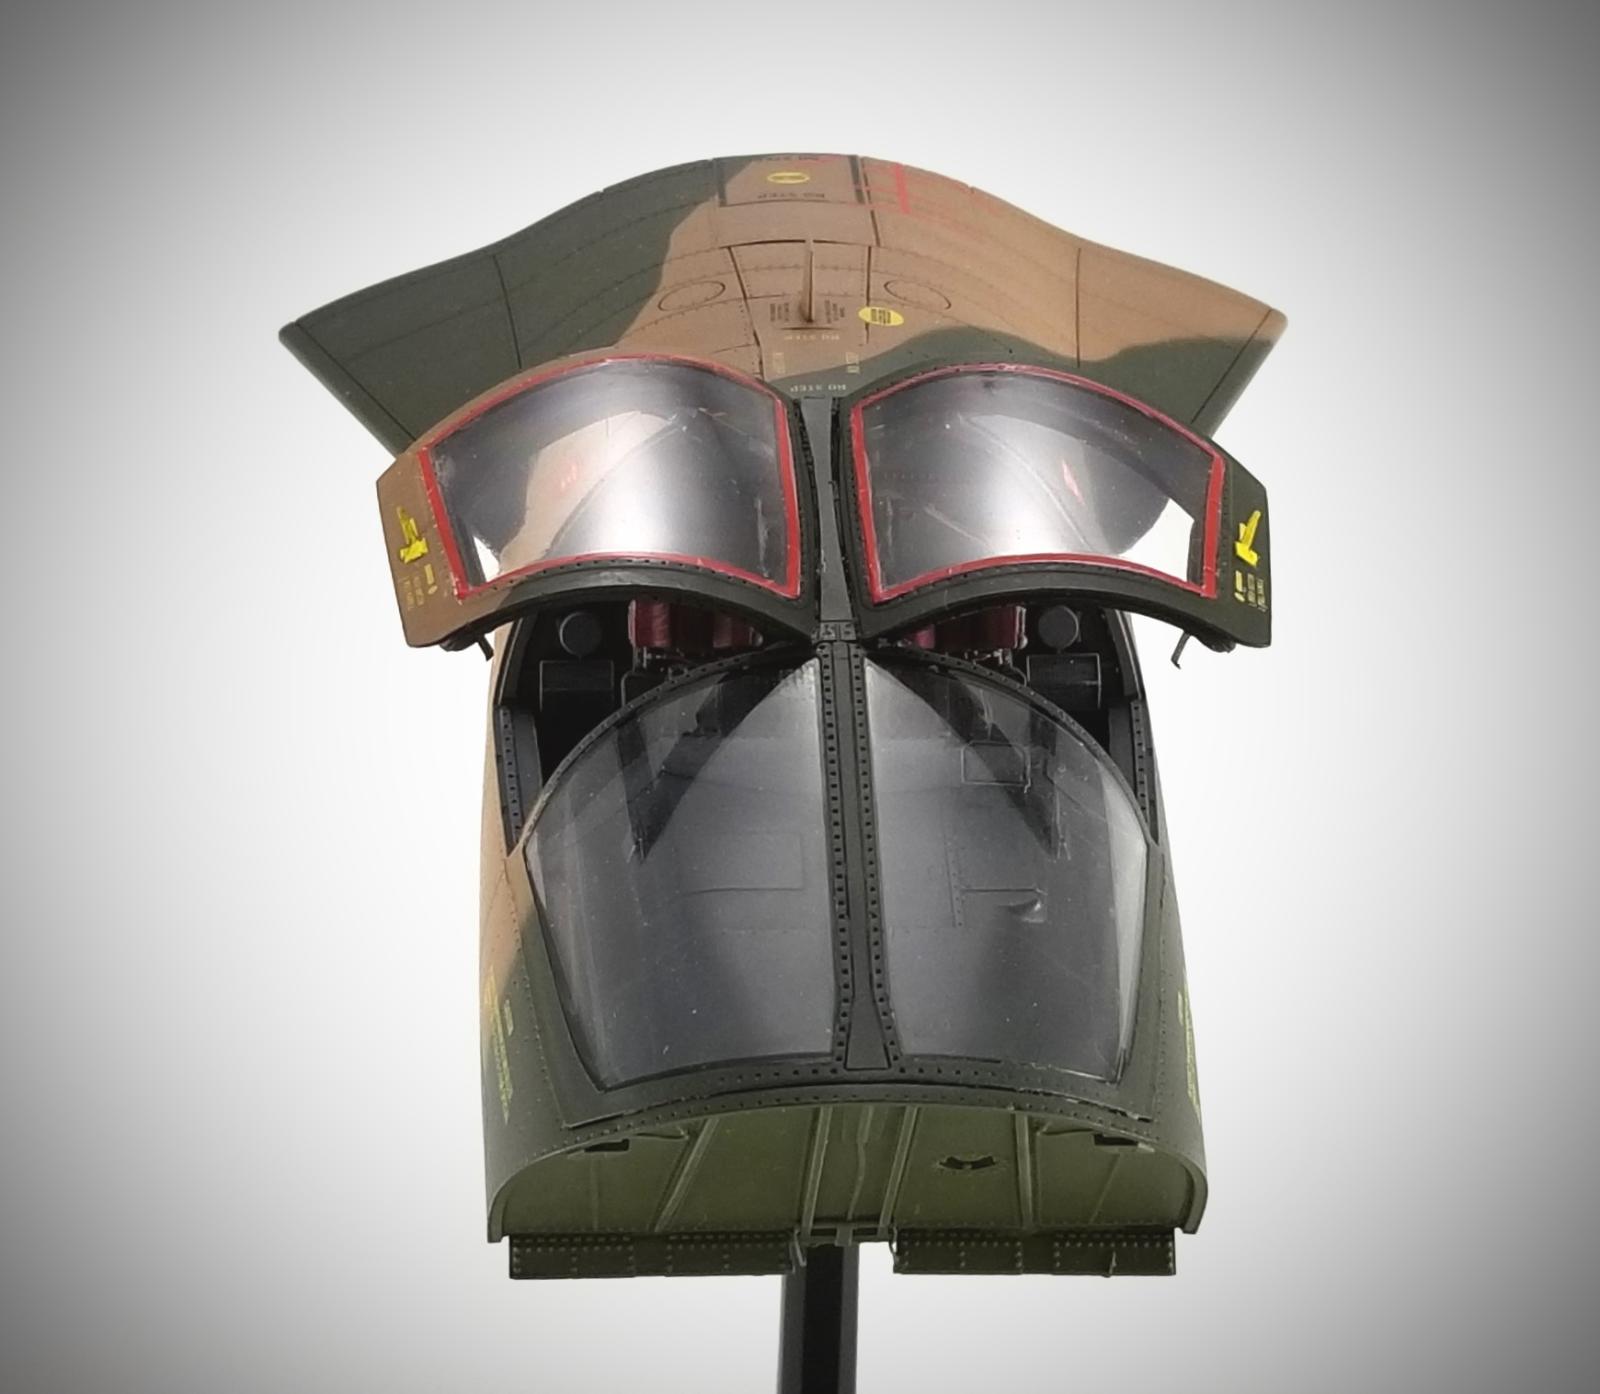
The clears were of good quality. Masks are provided for the two windscreen but none for the door windows.
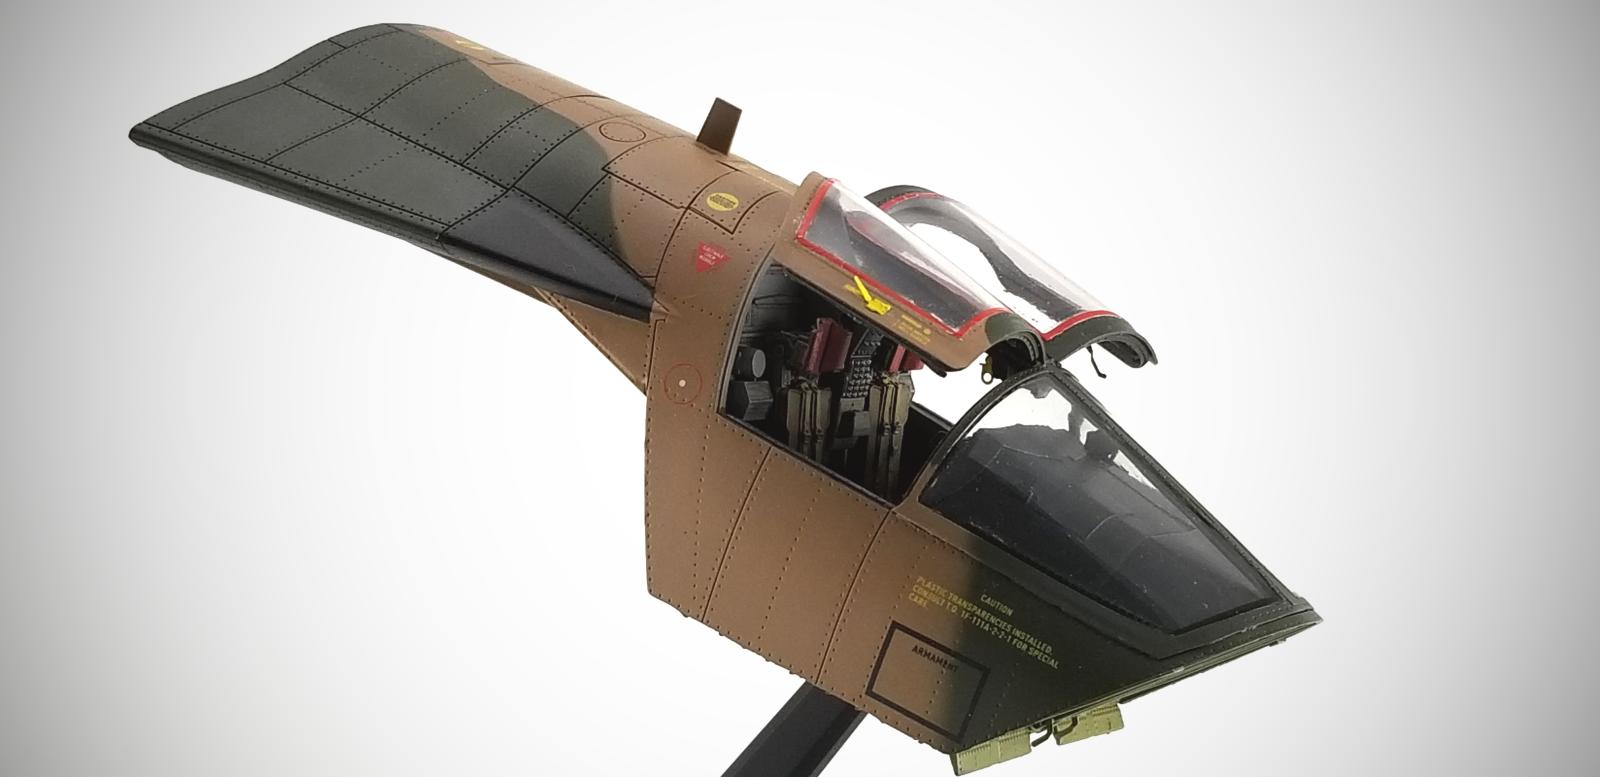
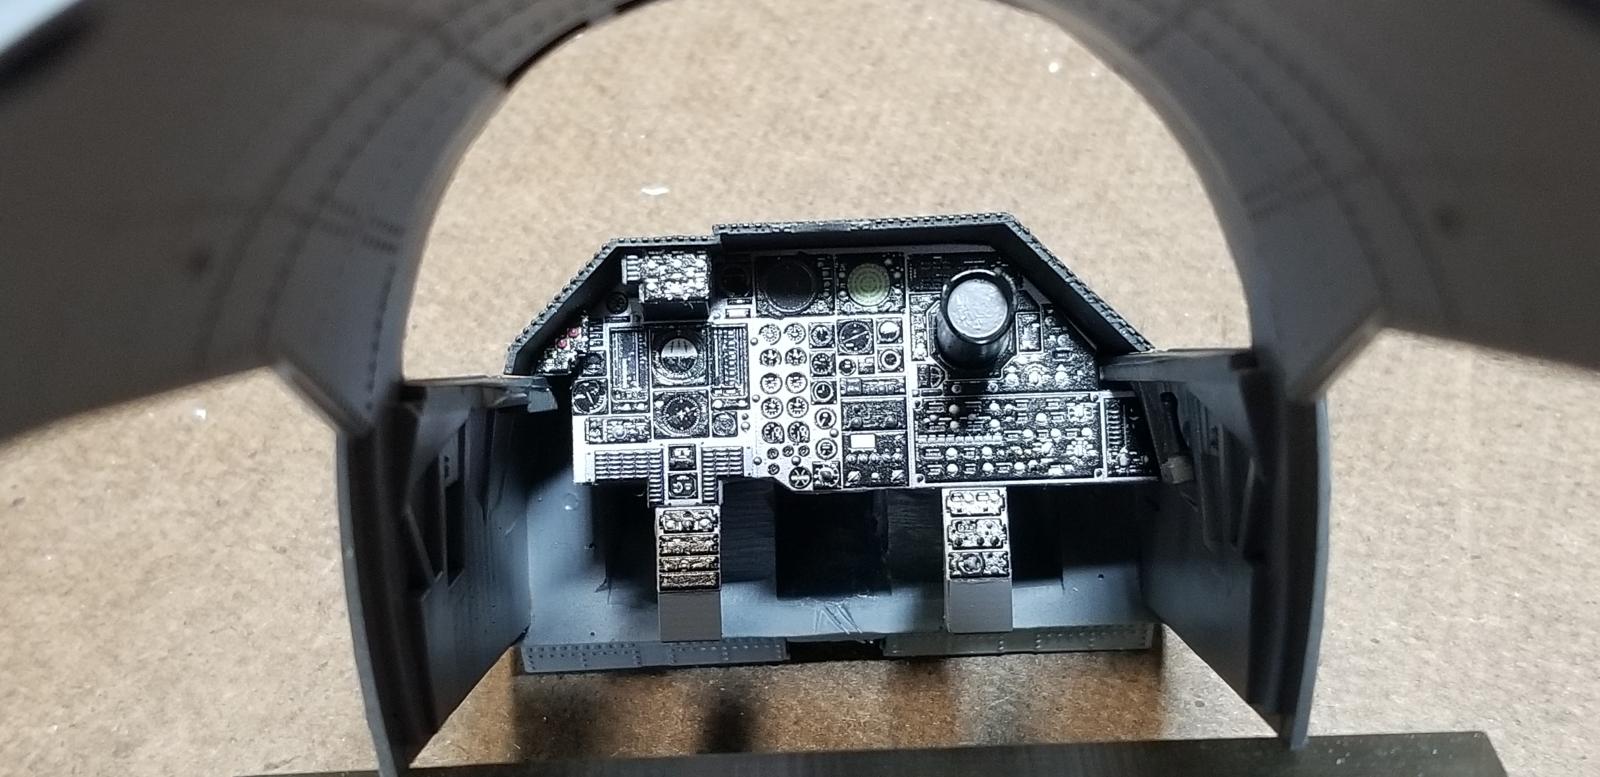
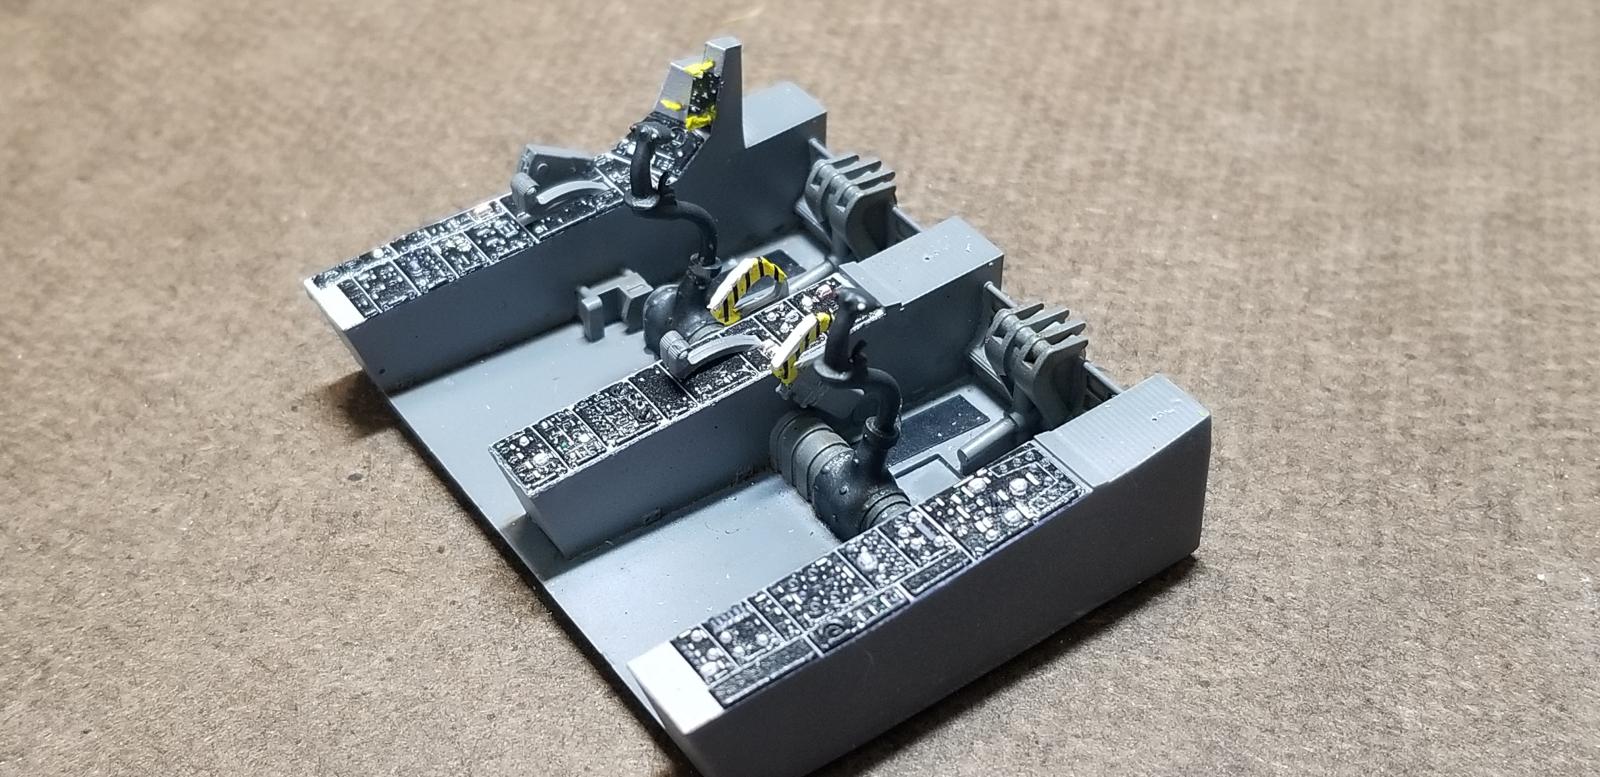
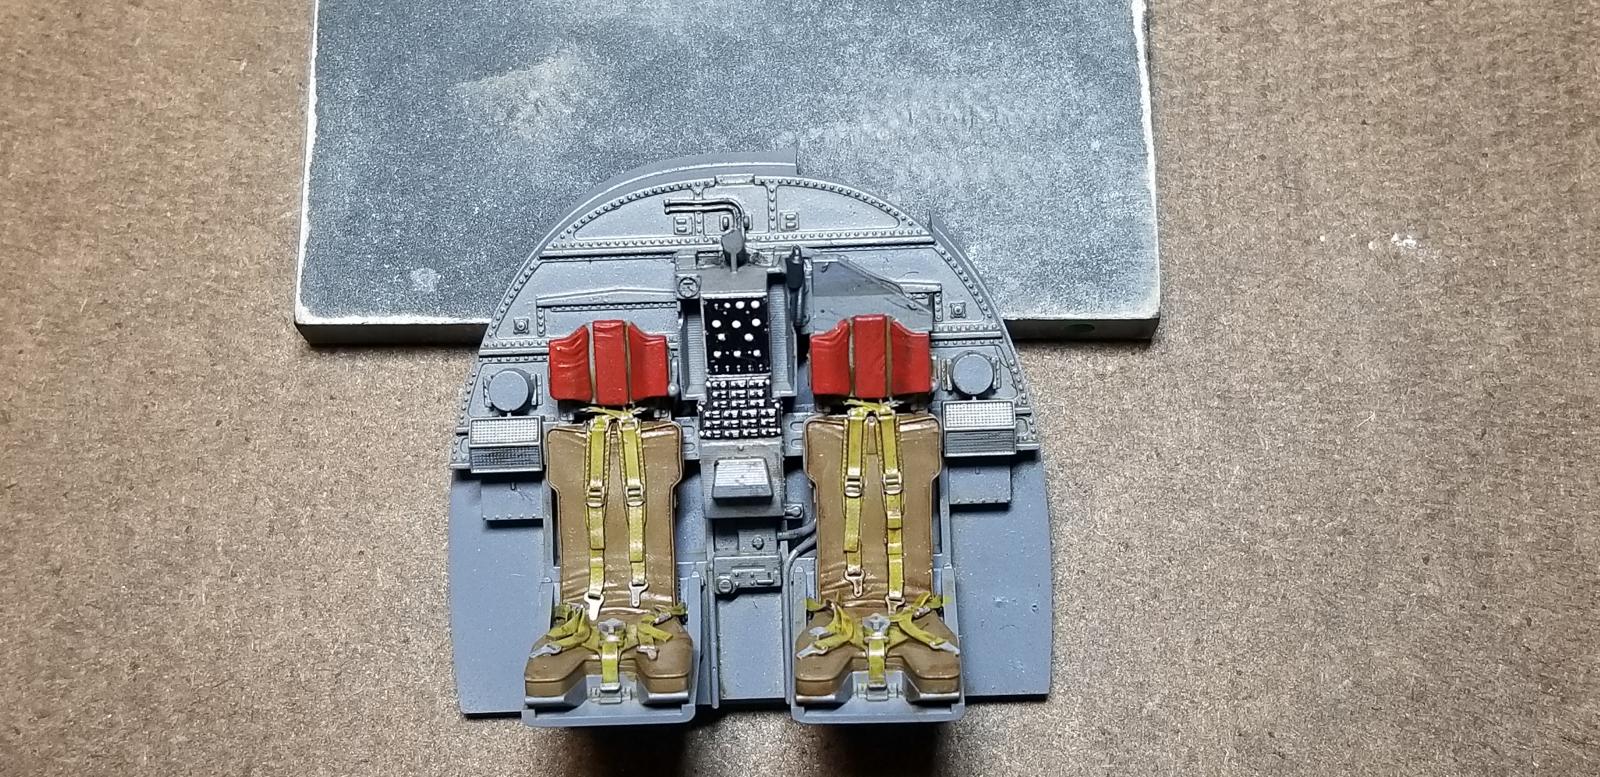
3D instrument/console decals. This was my first try at 3D decals and I will say they were very user friendly and really make the cockpit “come to life”. This will not be my last use of this medium.
The photo-etch parts were easy to use, fit well and add nice detail.
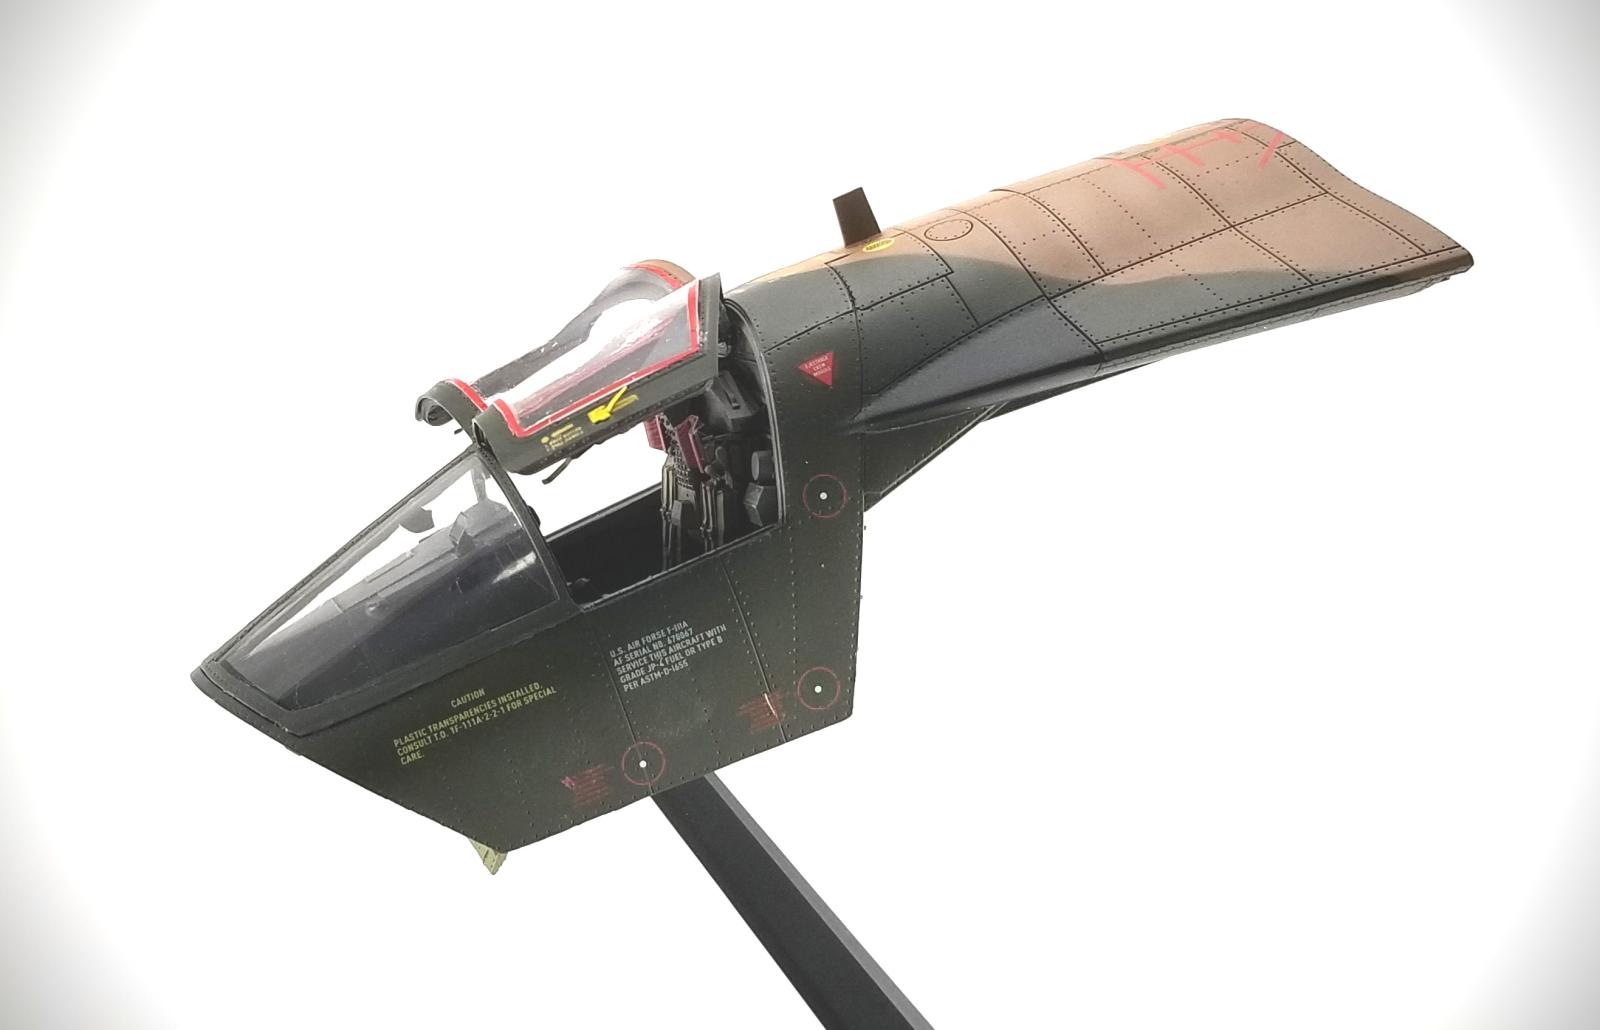
The decals were of good quality and went on smoothly. I could have gotten away without using setting solution, but I still used Micro-sol with no ill effects.
Build:
The kit goes together efficiently and quickly but like most kits thought and care of assembly sequence needs to be taken.
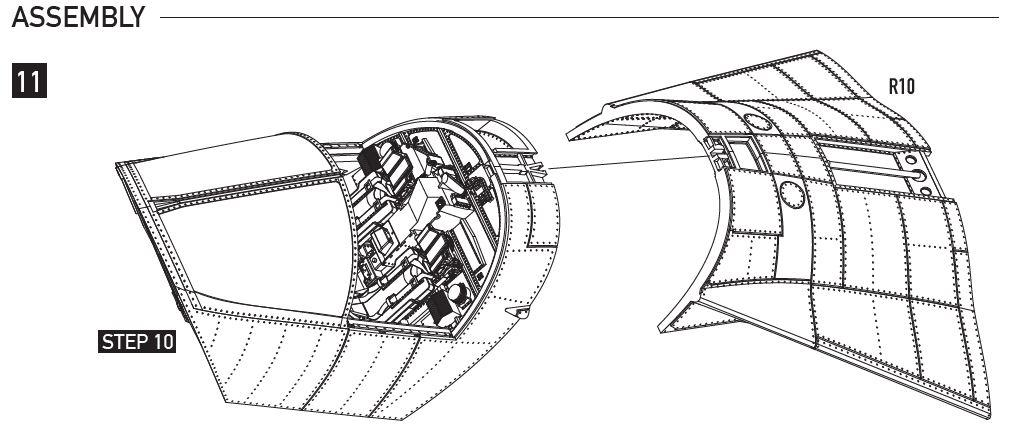
Care needs to be taken to mate the front sub-assembly and back part (R10). I made sure the mating surfaces were as flat as I could get them. Given the weight of the resin parts I thought just a butt contact along the thin surface needed some assembly support, so I added three dowel pins not provided. After assembly I filled the seam with Mr. Surfacer 500, sanded smooth and followed with re-scribing and adding damaged panel lines and rivet detail.
The most troublesome part of the build was the assembly of the door windows to door frames. The fit of the windows to the frames was a bit off and the only gluing surface was edge-to- edge, which made it hard to get a nice snug fit. If I were to build this again, I would try and add some hidden support under the clears for a more robust gluing surface. The kit does not call for the red striping around the window, but I found this to be a realistic feature on some F-111's and used it to “hide” some of the glitches.
The model to display stand could have a more robust contact area.
Paints:
Mr. Surfacer 1200 Gray
Mr. Surfacer 1500 Black
AK Real Color, RC027, Forest Green FS4079
AK Real Color, RC225, Dark Tan FS30219
Mr. Hobby, C351, Zinc Chromate Type I FS34151
Minimal weathering, more of giving depth and accenting, was accomplished with artist oil washes for depth and dry-brushing to highlight.
Despite the few troublesome areas mentioned (what kit does not have them) this was a nice kit to build.
And let's not forget this comes from a manufacturer whose country is currently involved with a war on home turf.
Well done Res Kit!
I'm glad I stepped out of my normal WW2 genre. It let me learn more about a subject I did not have much knowledge with, I used 3D decals for the first time, and I was able to return a favor to Phil. Win Win!
Thanks for checking this out. Until next time, as always…….KEEP IT FUN!

-

- 1. SURFACE PINS WERE ADDED

This is so cool, Gary @gwskat! And the build is super clean, very nice paintjob with the camouflage scheme!
Thanks, Felix! Your comments are much appreciated.
@gwskat - Very cool build. I never knew such a thing existed. Beautiful work Gary!
Thank you, Brian!
This is great, Gary, I’m sure your friend was more than satisfied with result.
Thanks, George. Happy to say, my "customer" was pleased. And more importantly his wife...LOL
Gary: Great job on the F-111A cockpit. Like your buddy, I, too, was stationed at Nellis (1969-72) where I worked avionics on the F-111A (428TFS/474TFW), and, in doing so, I spent A LOT of time working inside the F-111A cockpit; I am old now, but I still remember a lot of the details of that cockpit. I must say that your model is a great representation of the real thing.
Thanks for sharing some of the details of your build, bcause I have the ResKit kit and intend to build it...your tips will nelp, for sure. Your comments about the cockpit hatch windows and the red sealant brings bak memories. I watched as some of these were replaced in our hangar at Nellis; the red seals is RTV (room temperature vulcanising) , and your color is quite close to the real thing.
Great job...Congratulations.
Thank you, Marvin. I'm glad it brought back memories...good ones I hope. Good luck with your build.
Great background comments to your very fine & unique build. Super-duper.
Thank you, Bob
Excellent built. I am hoping they (Reskit) has a 1/72 version soon.
Thank you, Dan
Very nice build and an interesting story on the escape module of the Aardvark!
Thanks for sharing.
Thank you, Alfred
very nice!
Thank you, Federico!
Love it, Gary!
Congratulations!
Thanks, Spiros!
What a great looking little build that really does lend itself to some possible diorama ideas! You did a really nice job on this build and your friend has a great discussion piece to display at home or in his office.
Thanks, Walt!
Not really into jets but I really like this. Your right about 3D decals. I've used them on my last 3 planes and love 'em.
Thank you, Dale.
This too was out of my subject "comfort" zone but sometimes different gets the mojo going again.
Very nicely done! I had the pleasure of flying the F-111 (A's and D's) from 1972 to 1979. I had 101 combat missions in the A model while in the 428 TFS/474TFW/343TFW at Takhli RTAFB...
Thanks, Tom! Glad you like it.
This looks amazing, Gary @gwskat
I did know about this escape module on a F111 but was not aware that a kit was available of it.
You made an exceptional looking module with a lot of details.
Well done on your first comission build, Phil must be very happy with it.
Thanks, John!
Refreshing!
Thanks, Rafi! It was a refreshing build for me too.
A nice project wonderfully executed! Looks great.
Thanks, Greg!
Great concept and execution. Beautifully detailed and yet so simple. Brilliant model and writing, Gary!
Thanks, Paul!
Great build and thanks for the reference pics too!
Thank you, Lee
Wow! This is really a nice (and unusual) model, gary (@gwskat). This is the first time I have seen one of these built. The cockpit looks very realistic, and I especially like how well the instrument decal lays down over the raised detail of the instrument panel. Well done.
Thanks, George. @gblair
The panel and console instruments are the 3D decals applied to smooth resin parts. But I do agree...they look really nice.
3D decals, this gets even better.
Air forse 🙂 🙂
👍👍
Nicely done! There's one of these at the Cradle of Aviation Museum in Long Island NY. It must have been a wild ride ejecting in one.
Thanks, Robert. Hopefully I can get out there to see it some day.
gary sausmikat (@gwskat)
You have a peculiar knack for building things we normally don't see. This is a model I have never seen built before, and it looks like a miniature version of the real thing. I'll bet your friend was very happy with how it turned out. I would be too !
I'll definitely click on a few of the different "like" buttons before I leave. Well done my friend. VERY well done.
Thank you for your comments, Louis.
Awesome! you knocked this out of the park!
Thanks, David!