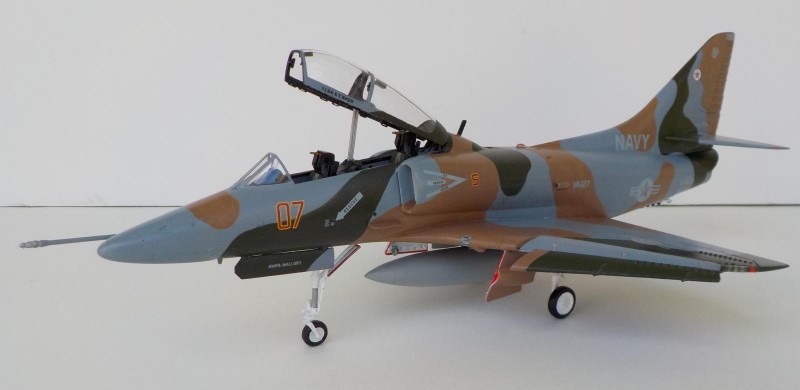
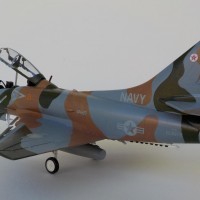
1/48 Classic Airframes TA-4J USN Adversary
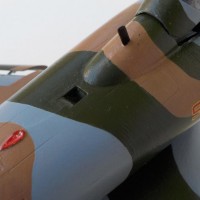
This TA-4J kit was sitting for quite a while, and I finally finished it off at the end of this summer. Airbrushed gray but hand brushed tan and green- with brushed touchups on the gray area. I used Afterburner decals although the same markings are featured on the kit decal sheet. I always liked this particular TA-4J- made a 1/72 version back in my teens.
I love the A-4, and when Hasegawa came out with the 1/48 A-4 series I was aghast that they were not producing a TA-4J. As a result I light-heartedly posted on a nother site for Hasegawa to please release one. I even wrote two letters to the company. When Classic Airframes announced they were releasing a TA-4J I committed to getting 8- USN Adversary and foreign airforces markings danced in my mind. Of course, when Hasegawa released one finally, I got six of them too! I already had 4 Monogram OA-4M's to convert one day. Sadly, no 1/48 OA-4M from Hasegawa yet.
Suffice to say, I was committed to two seat scooters!
The classic Airframes kit was great for its time- a little fiddly, but it is the only 1/48 Skyhawk kit with the details of the leading edge of the wing correct- there is no ledge for the slat to sit in. It slides over the top of the leading edge of the wing.
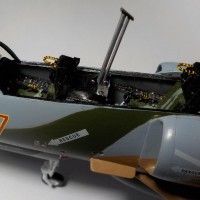
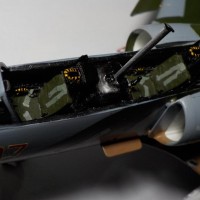
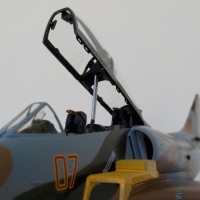
The kit canopy pinches at the rear, where on the real aircraft it does not. The shape of the canopy fairing is not quite right and they missed the vent on the fuselage spine. I will not try to correct the narrowed canopy on any of the CA kits I have, but I mastered a resin insert to correct the profile of the canopy fairing and add the vent to the spine. The resin seats in the Adversary kit have issues, but those were corrected in the USN TA-4J issue kits. I used Hasegawa A-4 seats for the main part of them.
The seats should have ejection travel rails on either side of them- a feature on the TA-4J/F/OA-4M, so I added them. I also added mirrors, canopy loops, and overhead instrument fairings on the interior of the canopy. The kit actuating system has two rods unlike the single post provided in the kit. The CA instructions lead you to think the hood for the rear instrument panel is attached to the top of the panel fairing, but it actually is attached to rear of the coaming at the mid point of the canopy.
The rear of the canopy needed a bulkhead with a hinge behind it to match the real aircraft.
I made use of the Monogram OA-4M boarding ladder- as I plan to do a diorama with some Verlinden USN Airfield accessories.
Thanks for looking!
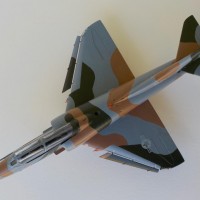
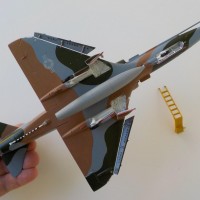
I love Heinemann's Hot Rod!
Great scooter, Dan - I love the way you did the paint & markings!
For more about this great workhorse, see: http://www.historynet.com/heinemanns-hot-rod.htm
Thanks Jeff- I am glad I finally finished it- I was tired of asking myself when I would be finishing the camouflage and moving on to other bits.
Good-lookin' build, Dan...nice work.
Hey Craig, much appreciated!
Like it a lot, Dan. Gotta pull my Hasegawa kit out and finish it - got the Afterburner Decals for the "MiG-17".
Thanks very much Tom- I have a few more adversaries on my build list! I look forward to you building the Mig-17 TA-4J!
Great work, Dan. Make sure you post the dio when you finish it.
I plan to construct the parts and at least photograph them next to the TA-4J first, as a build article. I am hoping at Christmas time I can plan out the base with one more aircraft, the Verlinden parts and some air crew. I have wanted to do a dio for years and years, this will be my first one. I have a VF-17 dio in my head that involves three corsairs and a jeep, and also a VF-84 dio on a carrier deck section with pilots, a jeep, TBM-3/F6F-3P/F4U-1D- my mind is pretty crowded...
Oh and thanks for the kind comment!
very tight work
thanks Bob!
Beauty. Love Adversary/Aggressor aircraft. I did my A-4 using the Hobbycraft kit which, when I was done building was 40% plastic and 60% filler
Thanks George-I will be posting a conversion soon that seems to follow that m.o.
Great looking Scooter!
Thanks Robert, appreciated!
Thanks Bob!
Really like your A-4 and your brush painted camouflage.
Thanks very much Francisco!
Very nice Scooter - nice to see a 2-seater, and an unusual scheme. Well done.
Thanks Greg!