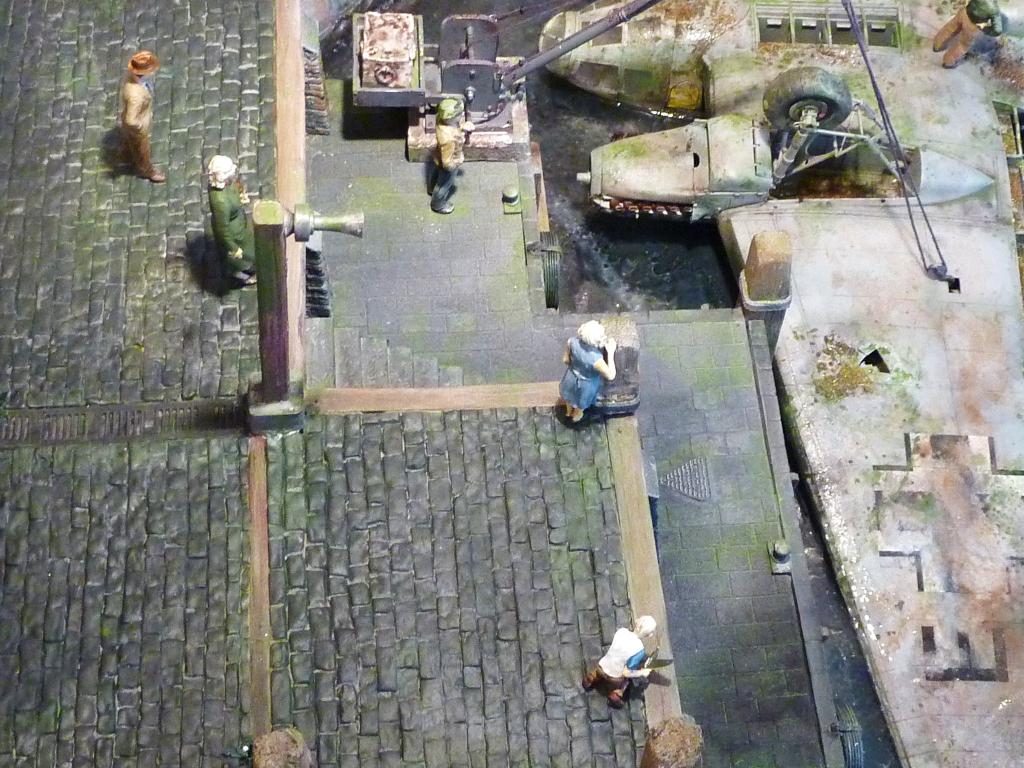
“Big Fish” – Rotterdam Oude Haven, 1952

Here's an aircraft diorama I worked on for about three months (250+ hours). The overall size makes it difficult to photograph, so apart from a few overviews at middle distance I've included several shots of local areas in the scene. Further, I've included photos of the build as it progressed, if that's of interest, under the WIP tabs:
http://imodeler.com/groups/work-in-progress-aircraft/forum/topic/heinkel-harbour-diorama-part-1/
http://imodeler.com/groups/work-in-progress-aircraft/forum/topic/heinkel-harbour-diorama-part-2/.
Basics...
The dimensions are 65 x 95 x 10 cm (26 x 37 x 4 in). Although large, I designed it so that it can be broken down for storage or transport.
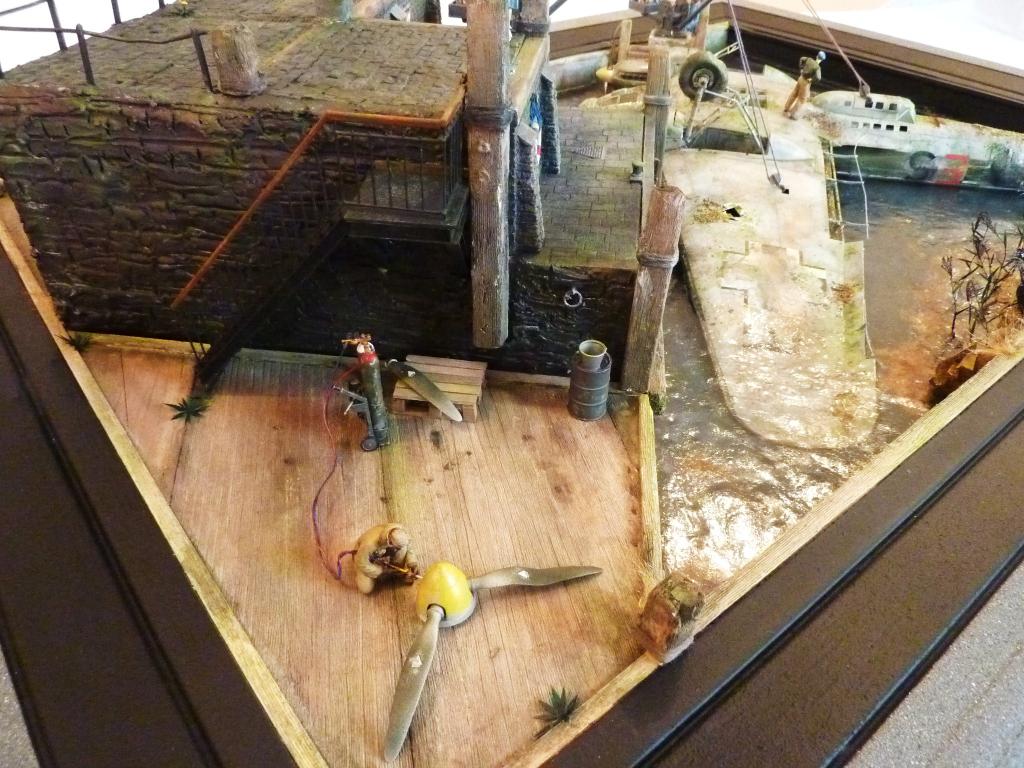
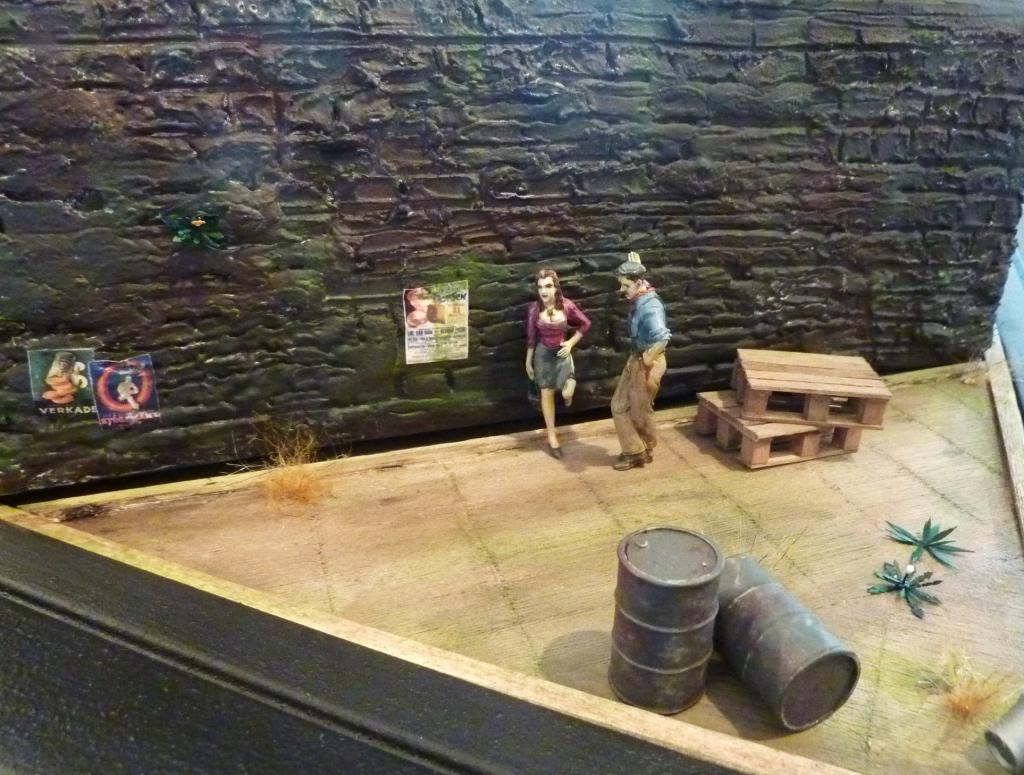
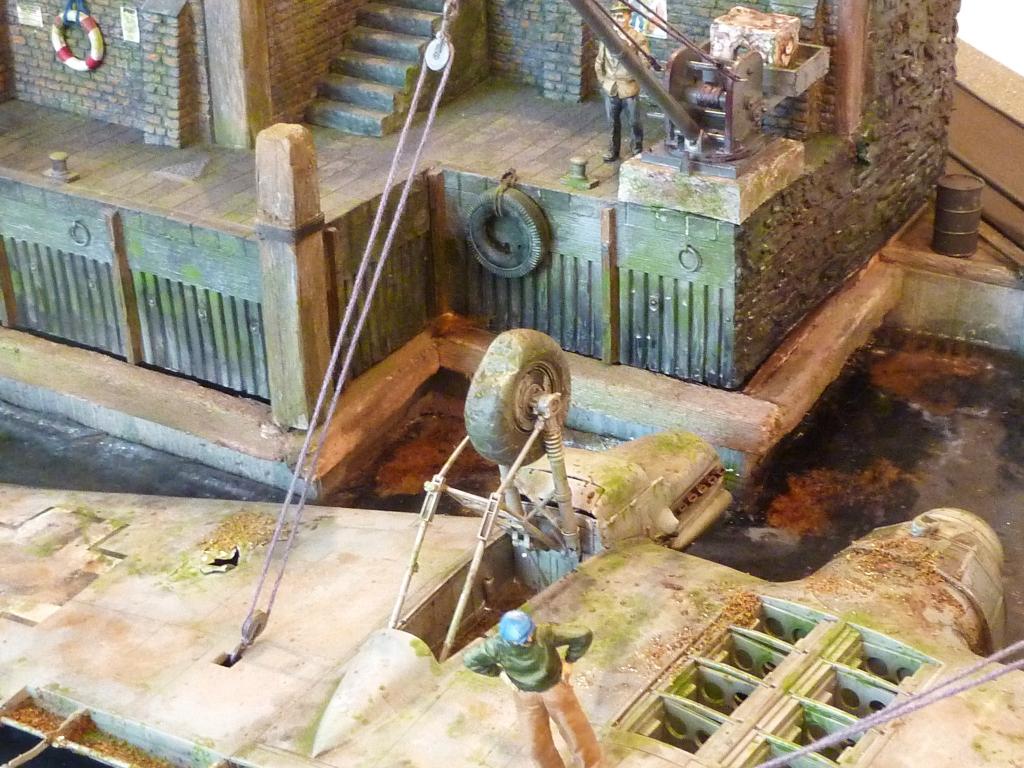
The base is made from PSE timber and MDF sheet, with architrave around the perimeter to give it a more formal appearance. After application of metal braces, screws, and mastics, the frame was primed and the boundary frame element was treated with a textured paint – a rattle-can application – that mimics stone. Effectively, it's a grey base colour with flecks of black, white, and darker grey. As well as being attractive in appearance, it's also tough-wearing.
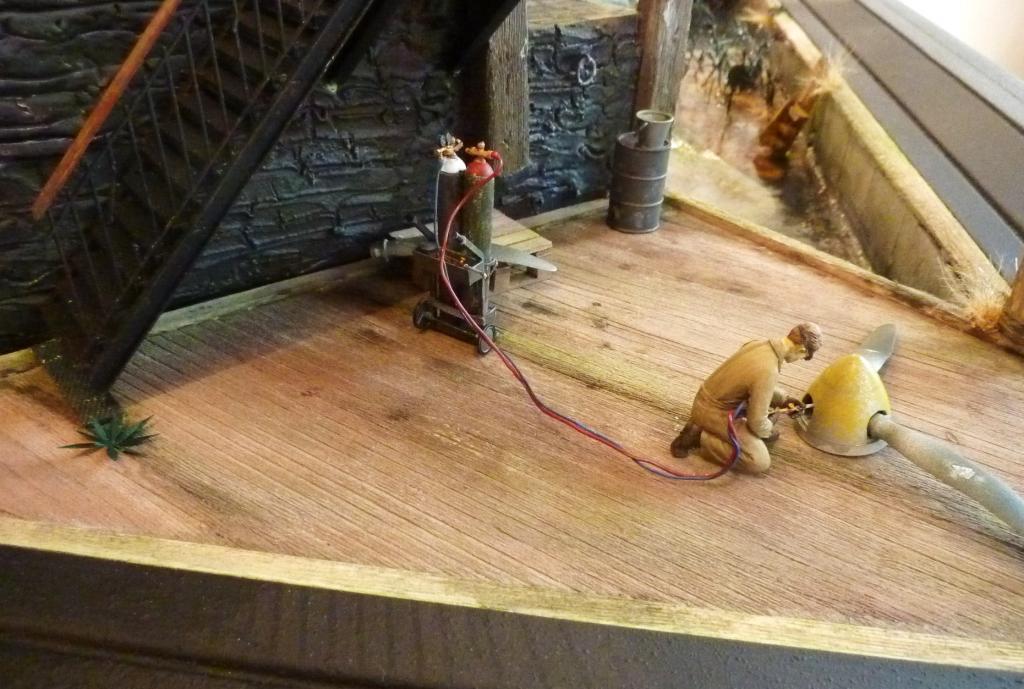
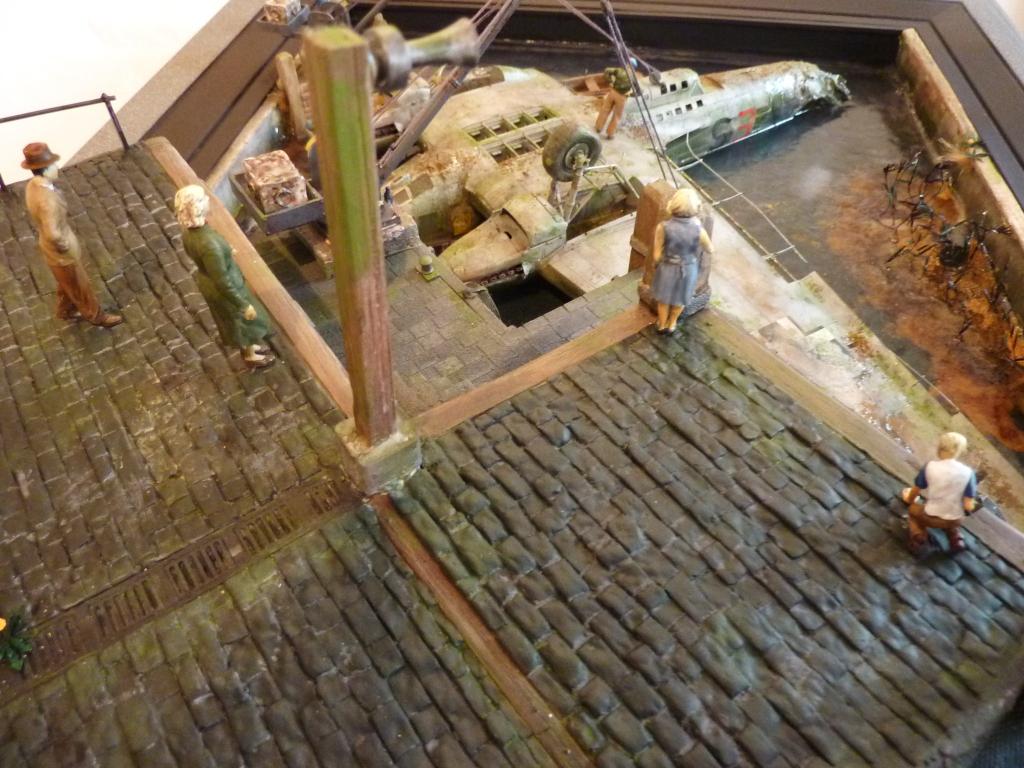
All other individual items on the base – figures, pallets, drums, arc unit, are pinned with a length of brass wire, and fit into marked holes on the base, but not glued. These items are removed and stored together when not in use. The two cranes lift off their bases and are also stored with the other individual pieces.
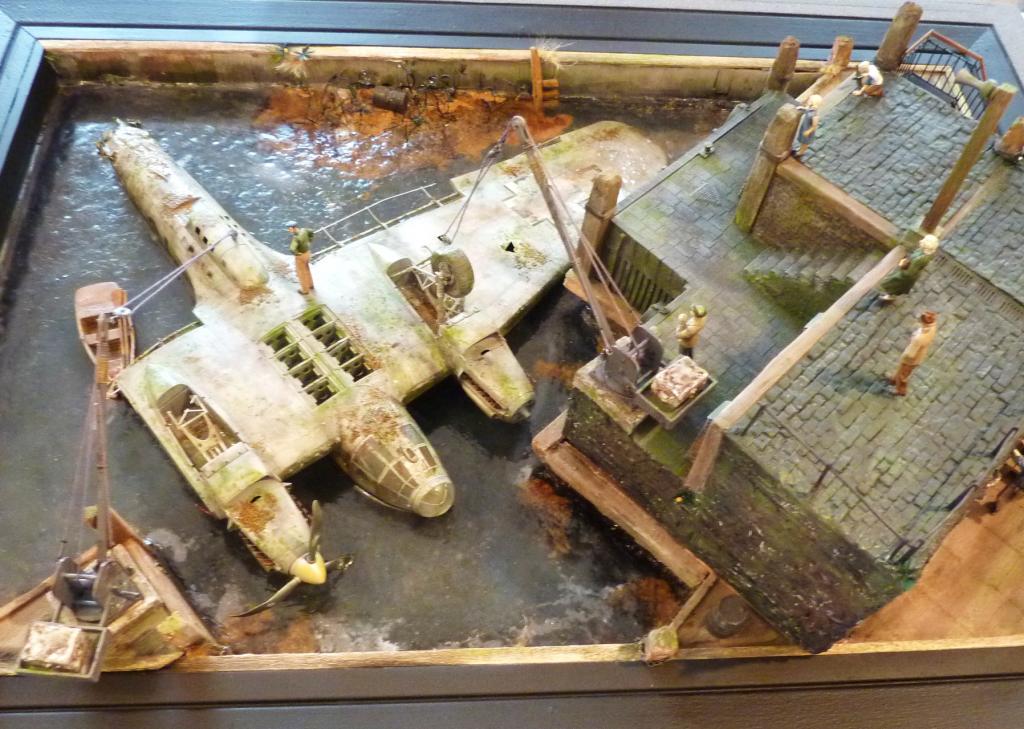
The raised wharf section sits within a rebated area on the planked timber area, and it can be lifted off as a separate model for storage. The figures on the raised section are pinned and glued in place and remain with the unit. When all items are removed, the base can be carried easily, as the profile is fairly flat. For storage, I use a block of polystyrene in place of the wharf unit, so that any plastic wrapping doesn't foul the reed bed or other perimeter plants, which although secure, might otherwise become twisted.
Misc. Modelling...
Apart from commercial kit pieces, the items used in the diorama are basic materials. Balsa sections were used to create the dock area, additional posts on the wharf, and the lined harbour area. They've been scraped and wire-brushed to create a distinct wood-grain effect and painted according to their place in the diorama.
The raised wharf area is resin. I was surprised to find that this rather expensive unit had only the two platform areas with the risers, and a couple of wharf posts – no back or sides! I had to make up a subframe for these areas, which were then faced with balsa sheet and treated with a thick paste filler, which in turn was sculpted to mimic limestone (see WIP photos).
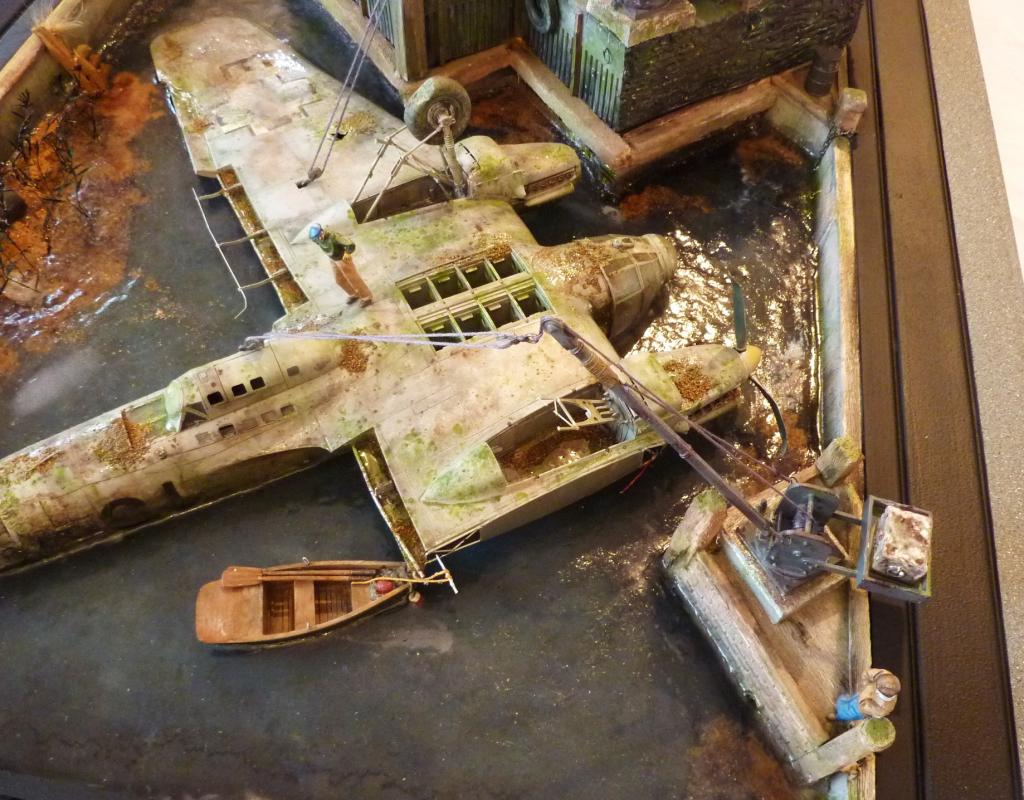
The second crane platform is part-made from a couple of sections of ceramic wharf sections from Verlinden. The two harbour cranes are also from Verlinden.
The pallets are from MIG Productions, the buckets and drums from my stash.
The rail fence along the top of the wharf I scratched from plastic section and brass tube.
The staircase, a little modified, is by MiniArt. It's secured to the side of the wharf and so is removed with the main unit in situ, as required.
Figures are from MiniArt, Black Army Models, Aurora, Evolution Miniatures, Royal Model, and MK35 Editions.
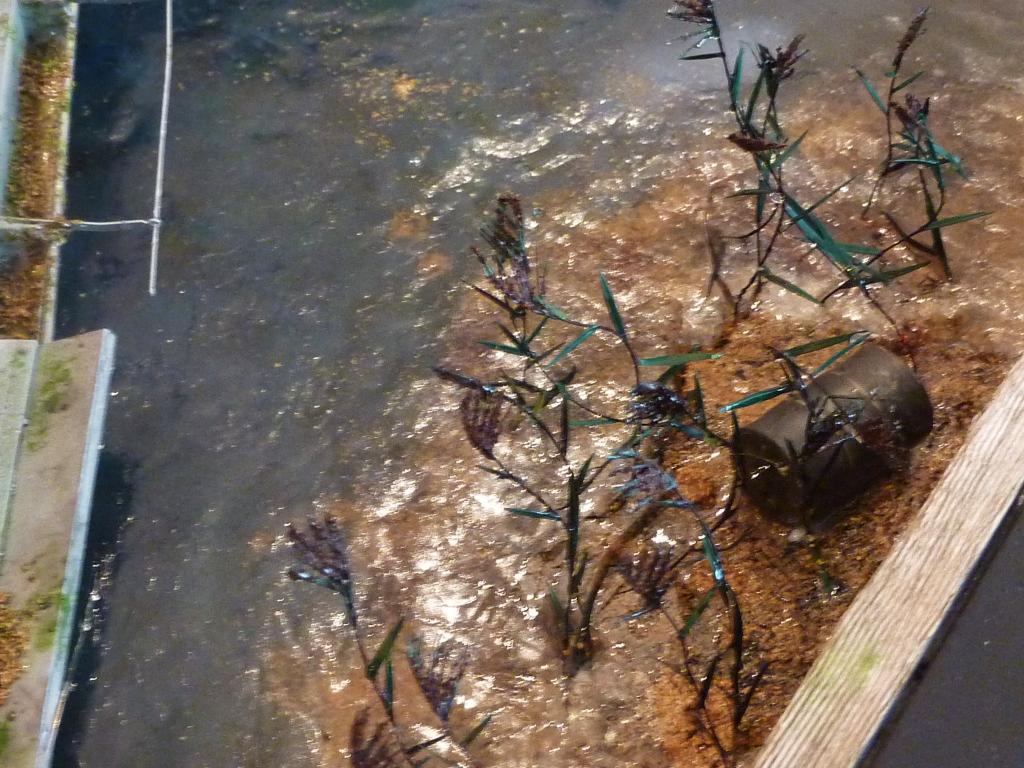
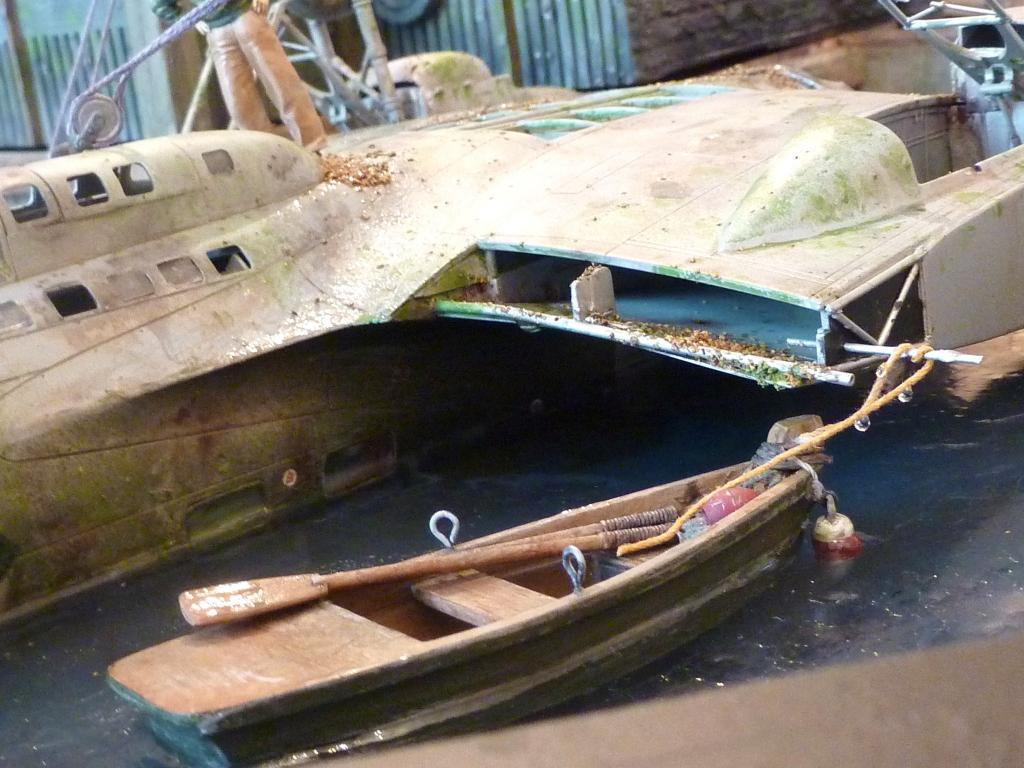
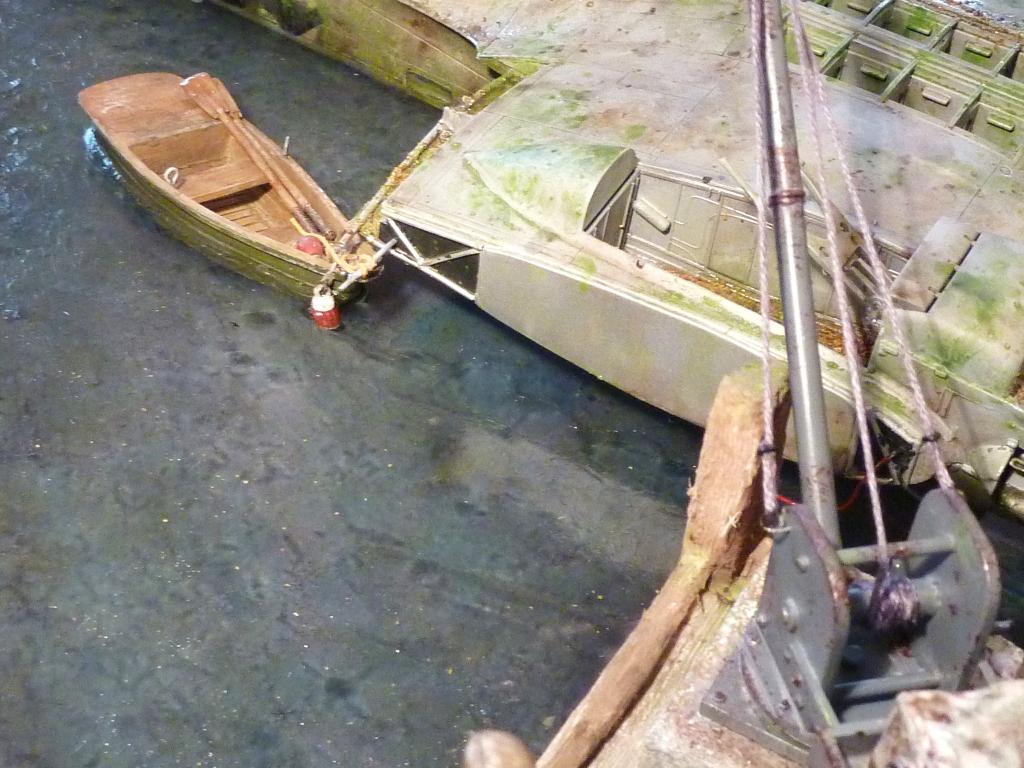
Laser-cut plants (various) and the rowing boat are from Reality in Scale.
The Aircraft...
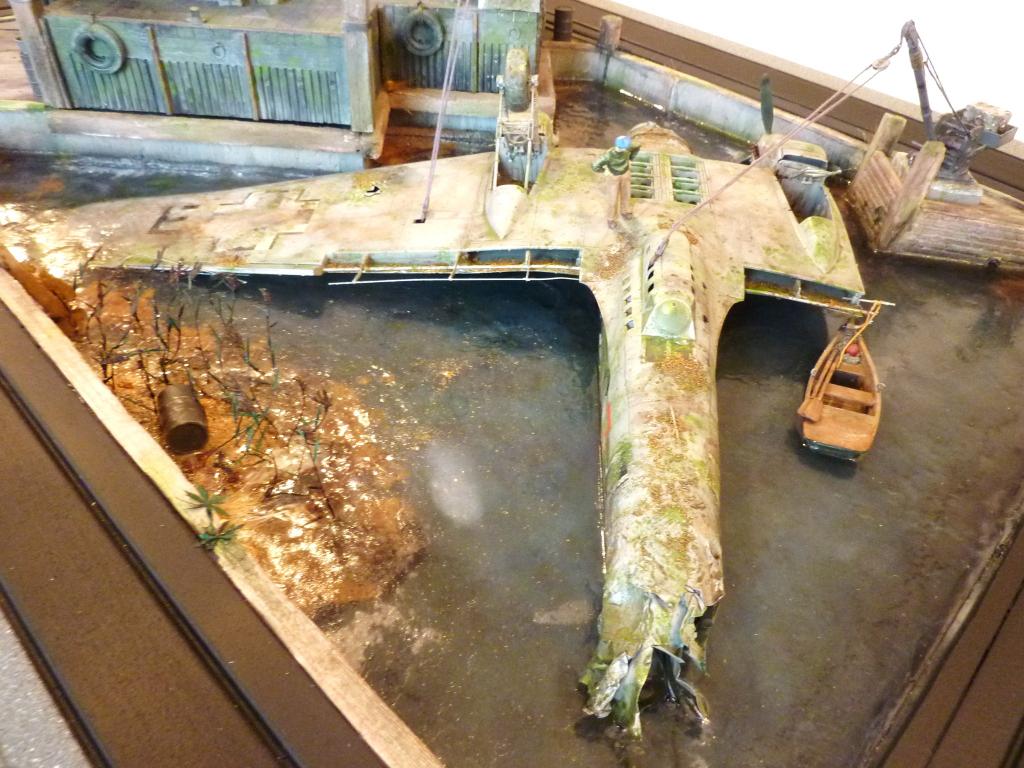
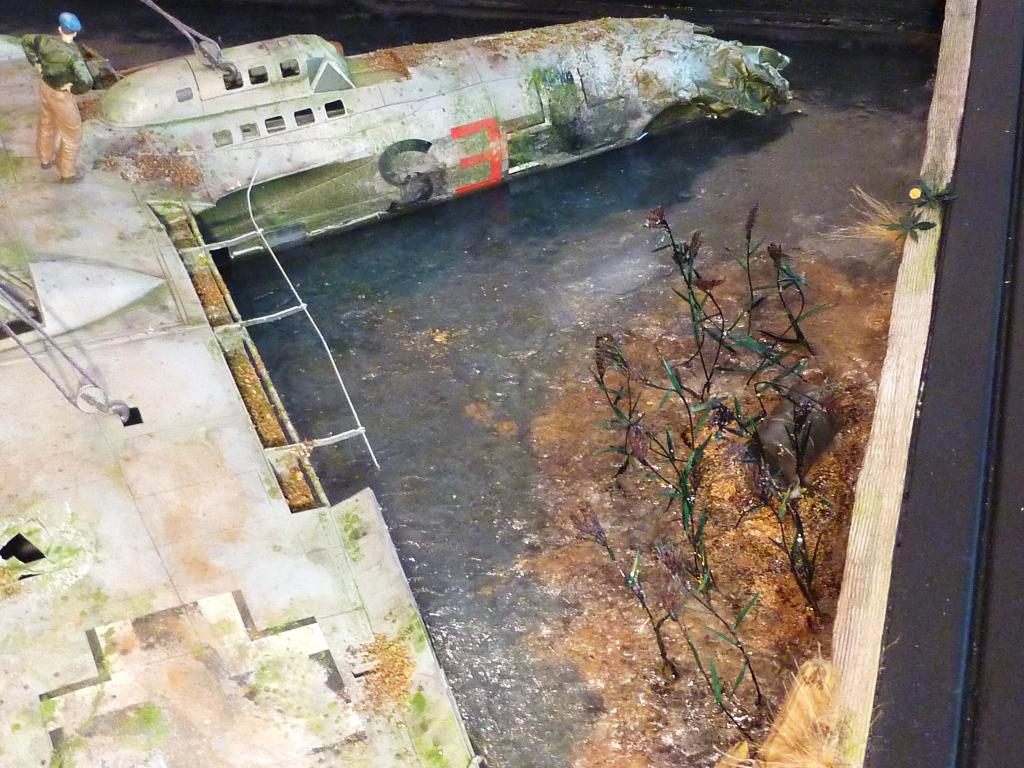
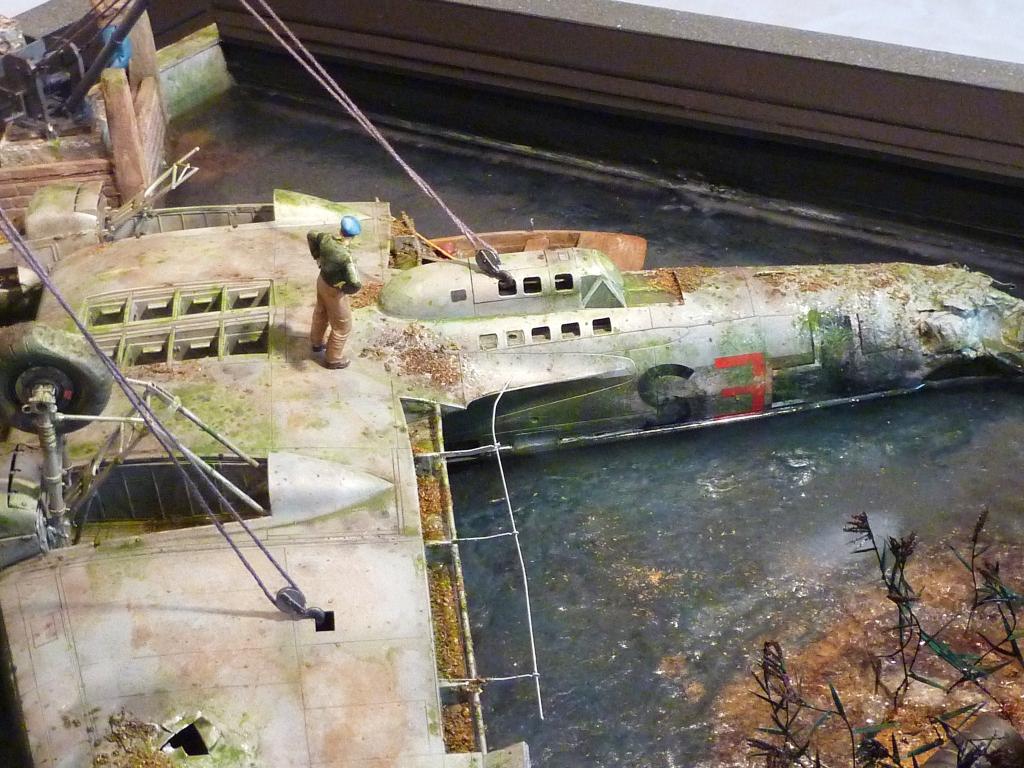
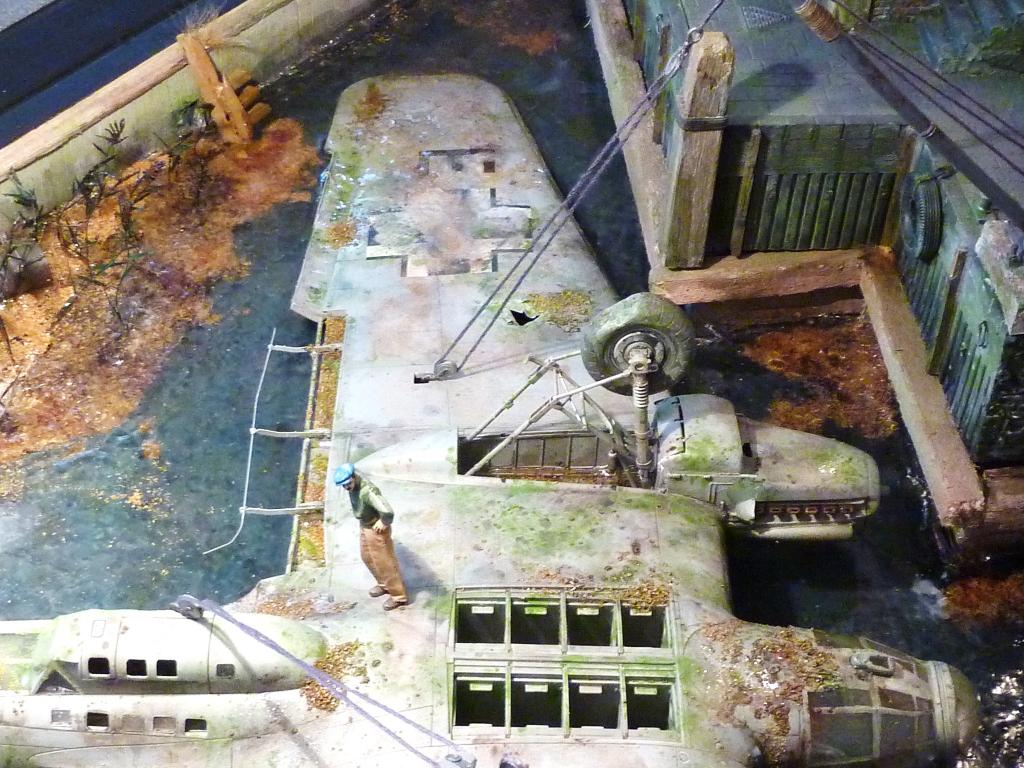
The aircraft is the Revell 1/32 kit of the Heinkel 111-P. As can be readily observed, several kit items weren't required.
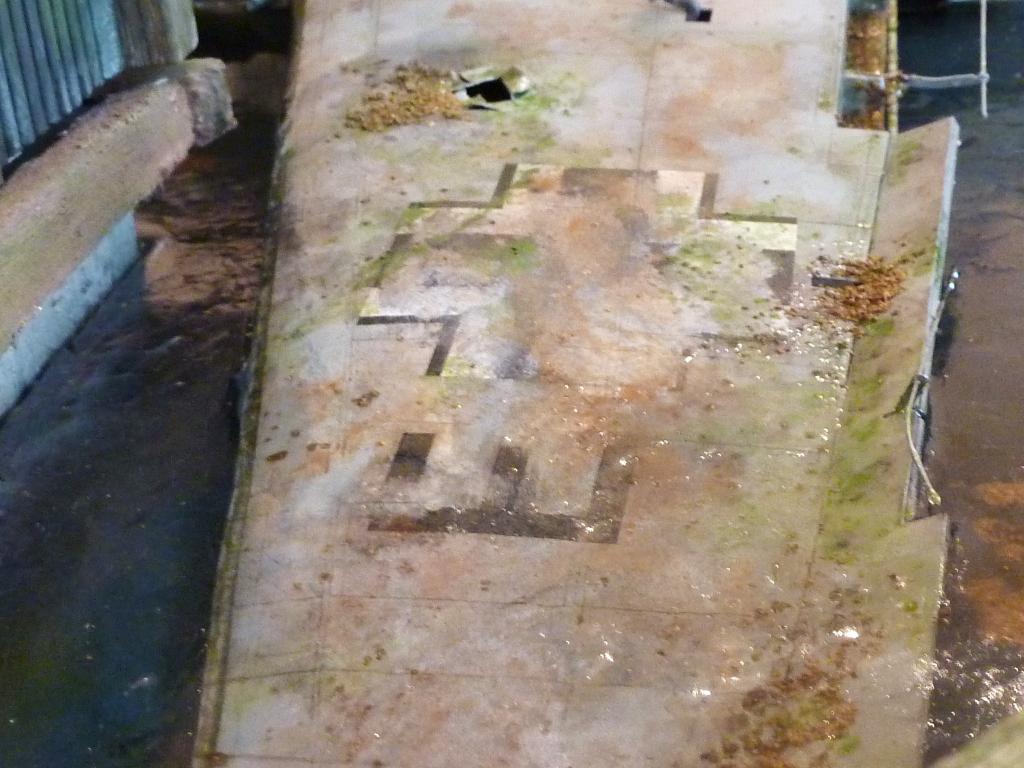
The 'blank' section of port wing root was faced with plastic sheet to mimic the aluminium spar common to Heinkels, and brass tube was cut and fit as inner box-frame,with the spaces between the framework blackened to imitate the darkened inner area of the hollow wing shell.
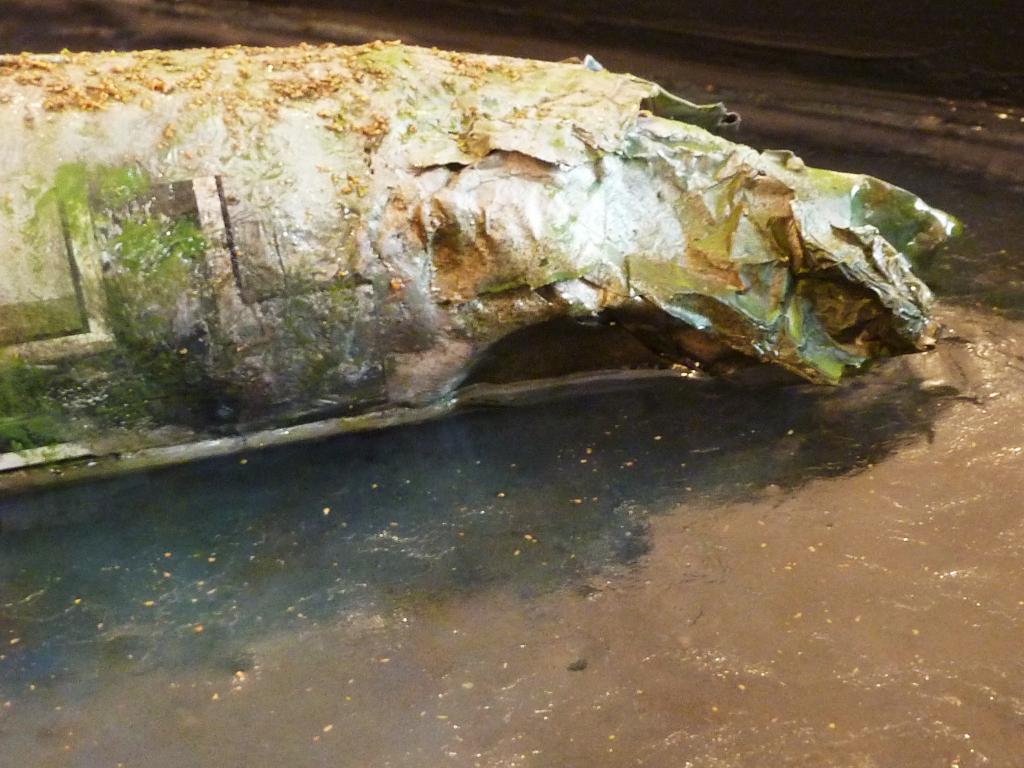
The rear fuselage was cut away, and lead foil was superglued in leaf-layers to replicate blown/damaged aluminium. A thinner foil was finely wrinkled and superglued to the face of the fuselage adjacent the main foils, to mimic surface stress fractures. A little filler was used to bridge abrupt surface breaks.
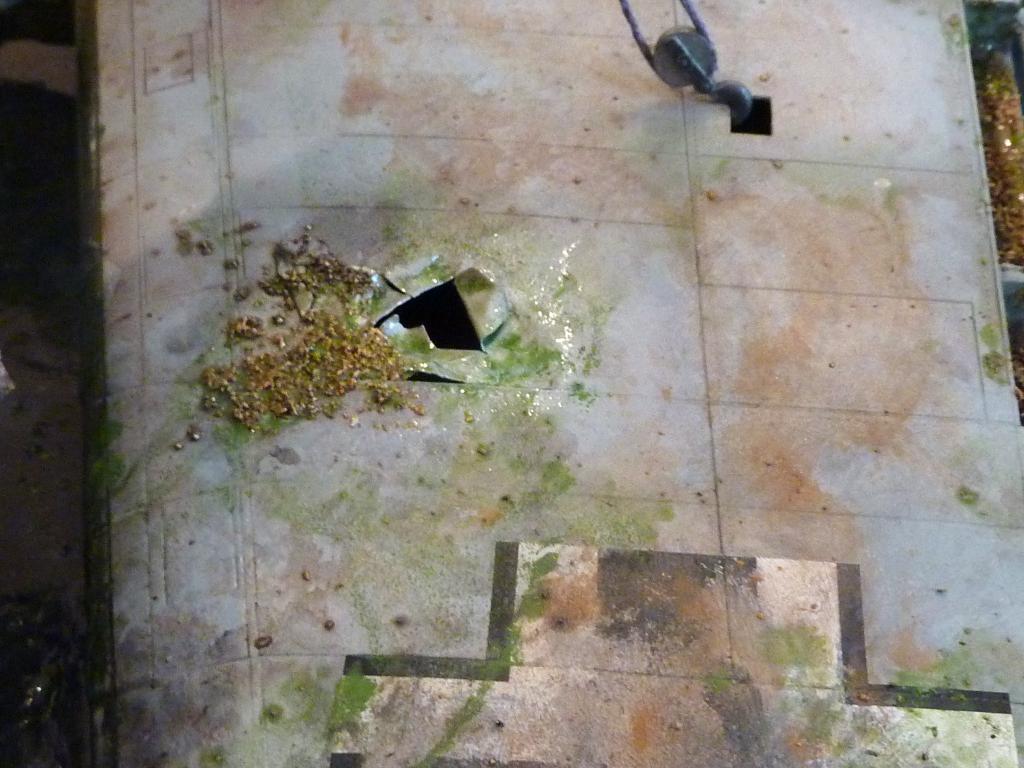
A small rectangular section of starboard wing was cut away and the gap in-filled with foil to replicate shell damage in the wing surface.
The metal bracing and extenders for the wing control surfaces are made from brass wire and pieces of etch from the stash; the etch I think may have been spares from a Trumpeter kit.
After assembling and priming, the kit was spayed with a silver/aluminium, which shows through the camo colours, as the aircraft was meant to be seen as having been lying in salt water for about ten years.
The decals, once in place, were treated with lacquer thinner to dissolve the carrier film, and the whole unit was treated with various greys/browns/greens in enamels thinned heavily with white spirit.
Lead wire is used to replicate broken cables at the wing and rear fuselage areas.
Water...
With the aircraft and rowing boat secured to the painted 'harbour basin', I added water-clear casting resin, in layers, allowing for partial curing times between applications (about an hour). I used 3.5 litres of resin, which because of its density added about three kilograms in weight to the unit.
While the uppermost coat was still a little tacky, I used a small, stiff paintbrush, and 'stabbed' the surface blunt-ended to disturb the smooth resin coat. This created a ripple effect, and through light refraction, a series of highlights and lowlights on the 'sea floor' was created, which had the exact look of natural elements. I sealed the surface with two coats of Klear for consistent finish and protection.
I should add that there were a few issues arising from the process described above, which were more of a technical nature, but which probably aren't of interest here, and so haven't been detailed.
“Big Fish”...
I named the diorama “Big Fish” because of the appearance of the aircraft with the crane cables, the harbour, and the little rowing boat, and placed it at Rotterdam Oude Haven (Old Port) in 1952. I thought it fitting that as Rotterdam had been flattened by a large force of Heinkels in 1941, I should depict one of the raiders 'fished out' into a backwater wharf at low tide, years later, in the presence of people who might well remember its earlier incarnation. As an aside, and as a nod to accuracy, the wharf-area wall posters are Dutch-language related, and the boy's toy airplane carries markings of post-War Dutch aircraft.
I should add, the Revell kit markings don't relate to any aircraft recovered in the manner depicted at Rotterdam or anywhere else, and in that respect the diorama should be treated as an exercise in creative fiction, and modelling.


WOW Rob That looks like a whole lotta work's gone into that one
i like the way you have got the glazing just right it looks like its actually been under water for a few years and the tangled and twisted metal where the tail section broke off looks very realistic 10 out of 10 mate on a great diorama and a great subject you dont see em like this very often
fantastik work Rob.
Mark
Just utterly outstanding Rob.
I love the details, to me they are what bring a dio to life.
That and great skills in building and painting as well.
fantastic scratch building skills on that dike bomber
I followed along on the "WIP" group & have to say the finished project was worth the wait.
The overall content of the diorama is outstanding: not cluttered & definitely tells a story.
Thanks Rob.
Beautifully executed diorama, Rob...your effort(s) are clearly apparent. Great work!
Rob, Great craftsmanship in so many way- the attention to detail is superb! 250 (+) hrs Very well spent!
Rob is very beautiful and original work!
Best regards, Vlad.
Terrific work!
Exceptional workmanship and planning. Builders that think and construct "outside the box" are, in my opinion, at the top of their game. Wonderful!
Wow, what a project! Others seem to have already said it. An impressive job and the way it is built and presented really give it a "moment in time" look to it. Great job, Rob!
Very interesting subject! Well done on the water, looks very real! The lead foil for damaged fuselage/wing skin has worked very well also.
Rob,
Absolutely stunning. Imam so impressed with your craftsmanship. Where you come up with some of the stuff you do is mind boggling. I watched this grow in WIP and you have made a masterfull pice.
Like the others have said, Rob, excellent in every way, and a perfect example of a well thought out diorama.