Monogram 1/48 P-39D1 Airacobra
The Monogram P-39 Airacobra kit was first put out in 1969. At that time, it was one of the most detailed kits out there, and in some respects, still is. It can be built into a number of different versions, and is very well engineered. It had been quite a while since I have built a tricycle landing gear aircraft, and I have a quite few P-39's so I decided to look in the stash and I grabbed the first P-39 I saw. This one was a 1974 issue.
In the Beginning
Opening up the box, one will see that there are a fair amount of parts to this bird. The cockpit and the wheel wells both have very good detail (the wheel wells were not just holes in the lower wing, they actually had a well area with piping), but all the panel lines were raised. You can build three different sub marks of the D model, two with the 37mm cannon (US P-39D1 or D2), or one with the 20mm cannon (British Airacobra 1 or P-400). Everything else looked good, with crisp molding and almost no flash at all. After some very light clean up, the fun began.
Construction
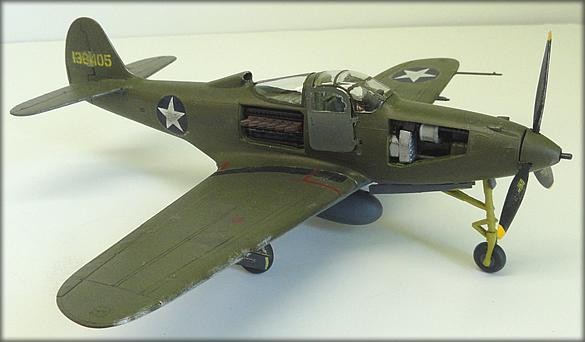
Construction began with the cockpit. This bird's cockpit has quite a bit of detail, as you can leave the right door open if you wish. There is the usual cockpit tub, with seat, joystick, and instrument panel. If you wish to show the front guns, then you have to construct this assembly (which is one fairly large piece) with machine guns, ammo cans, and the cannon. It is at this point that you have to decide which version of aircraft you are going to build, as the 37mm cannon version has to be cut down, because (oddly enough) the 37mm cannon is shorter than the 20mm in length. I had already decided to go with the US version, so I cut down the cannon to the 37mm version. This whole sub-assembly is, in itself, a small kit, which you do have to paint before installing in the aircraft. After this section was done, I installed it in the left hand fuselage piece. Be careful here, as this whole gun assembly, as well as the cockpit section, has to line up pretty well with the mounting tabs in the fuselage if you want to have a good fuselage fit, otherwise you can get a pretty big seam on top. Also, you want to make sure that your propeller will have a good fit as well.
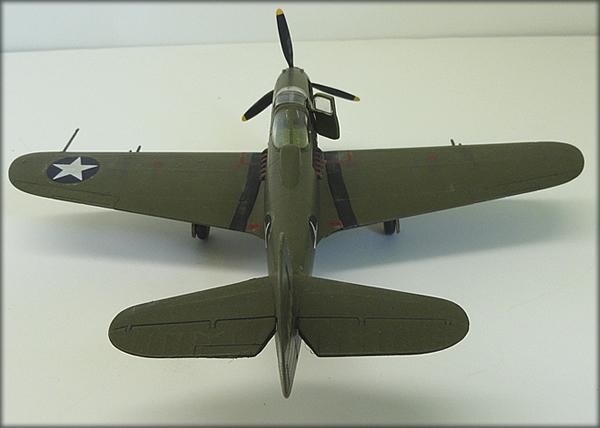
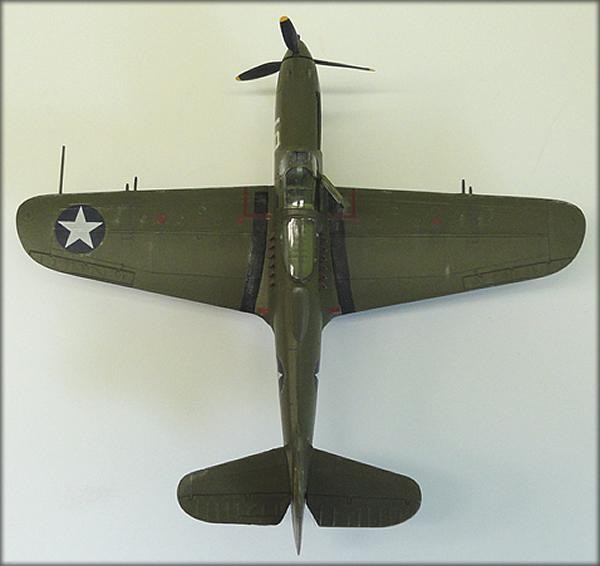
After the interior sections were glued in, I put the main fuselage halves together. While the fuselage was drying, I assembled the wings. Make sure that you install the wings guns first before gluing the wing halves together, as the guns are sandwiched in between the upper and lower wing parts. This work was pretty straight forward, with no real issues at all. While I let the wings set, I went back to the main fuselage, installing the stabilizers and doing seam work. The seams were good, with little work needing to be done.
After both wings and fuselage were set, I glued the two assemblies together, with the fuselage fitting into the wing section. I then did the obligatory seam work on the wing root. While I let these sections dry, I assembled the wheel struts, tires, and all the other small details that need to be done like painting the wheel wells and gear doors. Oddly enough, my research showed that the struts were not left natural aluminum, but were painted zinc chromate, like the wheel wells.
Because you can display this bird with the engine panel off to show the engine, I had to paint the engine block, the plug wires, and the exhaust manifold, as well as the interior back wall. This was not bad, but not really easy to do either, especially the plug wires, which are molded into the block (I actually ended up dry brushing the plug wires, and they came out great). After all was judged to be dried and ready, the painting phase began.
Painting
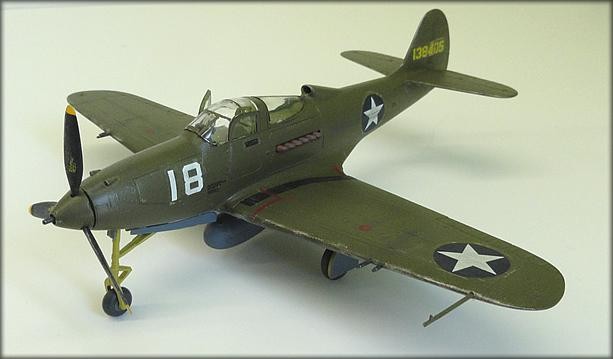
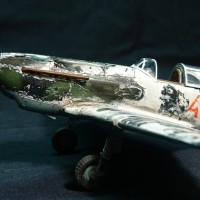
The paint scheme on this bird was the Olive Drab over Neutral Grey early war scheme. The paints I used were Model Master Acrylic Olive Drab (ANA 613), and Pollyscale Neutral Grey (ANA 603). I employed my paint brush and Qtip method of painting, and it came out pretty good and pretty quick. After small touch ups were done, it was off to make this bird part of a squadron.
Decaling and Weathering
The decals I used were the kit decals that came with the model. The aircraft that I decided on was a bird from the 57th fighter squadron based in Alaska. After making sure the model was as dust and dirt free as possible, I sprayed a layer of Glosscote straight out of the can. After letting the Glosscote dry for a day, the decaling phase began. You also get the cool US ARMY lettering for the lower wings.
The decals went down very nice and they all reacted quite well with Microset and Microsol. After making sure the decals were set, I covered everything with another layer of Glosscote to seal the decals and cover any silvering that might have occurred. After a few days for the Glosscote to dry, I laid down a good layer of Dullcote to seal both decals and paint.
After the flat coat was laid down, I did the usual weathering, with aluminum chipping along the all leading edges and the engine cowling. I also did exhaust and gun powder staining, as well as fuel spills. Because this bird was based in Alaska, I did a fair amount of paint chipping and mud stains. I also did a wash of white to fade the upper OD color. I finished the weathering with an overall wash of grimy black over the whole model, then I did a dry brushing of grimy black over most of the decals to tone them down.
Final Assembly
After the final weathering, I painted the hated canopy lines (which there were very few due mainly to the fact that the P-39 had a “car door” type entry), installed all the clear parts with Microscale White glue, and did the inevitable last minute touch ups.
Conclusions
It had been many years since I had built a P-39, but this kit was very fun to build. It was not really hard, considering all the sub-assemblies that there are to build, but overall the kit looks very good when completed. The only real issue I had was at the very end of the build. I had broken off the clear stand that you have to use to keep this old girl from being a tail sitter if you do not use any weight in the nose area. I had to use super glue to get it back on and that gave me the most trouble with this build.
I have two others in the stash, and I am looking forward to constructing another one.
Until next time…
Copyright Kipling Mitchell © All Rights Reserved.

And another great Monogram build, I still think their P-39 has the best look. Great job man! This all makes me want to get on ebay and find some original Monogram molds. I actually have a couple in the stash...
Excellent build, sir...ANYTHING by Monogram is still an outstanding kit for the money.
Well said, Craig! I still love building Monogram kits. They may not be the most detailed kits as opposed to the newer "Shake and Bake" kits but no other manufacturer can claim the dimensional accuracy that Monogram kits possess. With just a little work, a Monogram kit can stand in with the likes of Tamiya, Hasegawa, etc, etc. Just as Kipling has shown here.
I wholeheartedly agree, Seamus...too bad they weren't still producing kits (I know Revell acquired 'em, but to me, they ain't the same somehow).
Great-looking Aircobra! Would have loved to have seen some more close-up pics of the weathering and such. I built this kit years ago - remember it fondly! Now that I'm all 1/72 scale I don't have it anymore, but remember it being a fun build.
A great job on a classic.
Nice posting, Kipling, good write-up and a fine looking model.
I know Kittyhawk produced a fine 1/32 version recently that piqued my interest, but I have to say this 'oldie' stands the test of time albeit in quarter scale. Nice work.
Nice work Kipling - super result!
Nice work. That kit, and Humbrol Authentic enamels, made modeling a lifelong activity for me. Still such great detail almost 50 years later.