1/48 Scale Monogram B-17G Flying Fortress
The Monogram B-17G was the first big multi-engine aircraft model that I ever built when I was a kid. It was big and it had a lot of guns. The bomb bay could not be displayed open, but that was never a concern back then. Also, it had ground crew and a bomb cart, with bombs! This kit actually got me started when I went through my Diorama stage in my teen years.
Now many years later, I am building this large kit again.
In the Beginning
Opening up the box, one will find a large amount of plastic, with large sized wings, fuselage, and stabilizers. There is also the ground crew, bomb cart, and 500 lbs. bombs. This molding is a 1992 issue, so I was a bit surprised to find quite a bit of flash on all the larger pieces. Most of the kit is modeled in silver, except for the interior pieces, such as cockpit, flight deck, and some of the engine sub-assemblies. These were all molded in black. The decal sheet still seemed in good condition, and I planned to build the OD over Neutral Grey version.
After all was clean up and inspected, the building began.
Note: Because of the size of this aircraft, I altered my usual construction and painting pattern a bit. Some painting had to be done as construction went along. Although this is common for interior areas, it is a little different for the exterior areas of this aircraft.
Main Assembly
Aircraft Interior
Assembly began with the cockpit, nose area, and radio operator's stations. There is a lot of detail in this kit for all three of these areas, which are their own small “kits”. Oddly, the waist and the tail gunner positions did not have nearly the detail of the other three areas. I at first thought it was because you really would not see these areas to well through the clear plastic canopies and windows, but once you sealed the fuselage, you would not see too much of the cockpit, and virtually nothing of the radio operators section either.
I began with the cockpit/nose area first. There is a lot to assemble, pilot and co-pilot seats, main cockpit panel and gauges, control yokes, the bombardier seat and table area, bombsite, and chin gun control yoke. All of these small assemblies went together great. Also, the chin turret assembly fit was superb. The Pre-CADD 1975 engineering was very good.
Most of these assemblies were painted US Interior Green, except where noted on the instruction sheet (for example, part of the pilot's seats was aluminum, and the table tops were wood). The cockpit panel was painted flat black, then the gauges were dry brushed with flat aluminum. Moving on to the radio compartment, much the same assembly that was done to the cockpit area was done here. While these areas were drying, I assembled the sparse tail gunner area and installed various small cabinets and other interior parts, and painted the rest of the fuselage US Interior Green. Be careful at this stage to leave the small areas that the nose/cockpit, and radio compartments attach to unpainted so that these assemblies can be glued into the fuselage. I also assembled and installed the rear wheel section. The rear wheel strut was painted flat Aluminum, and the bulkhead that it was attached to was painted Interior Green on one side, and Chromite Yellow on the side facing the rear wheel's wheel well.
Main Wheel Struts
After the rear wheel strut, I worked on the main struts. The main struts are attached to a horizontal bulkhead that covers interior of the aircraft. I painted the side that the struts attach to Zinc Chromite. I then attached the struts and all additional parts for the struts to these bulkheads. Once these assemblies were dry, I glued the bulkheads into the inner engines nacelles on the wing. These bulkheads are glued in by setting them down into the nacelle on the bottom half of the wing assembly from the top, so make sure you do this first before gluing the wing parts together. I almost didn't, and caught myself at the last minute.
Wings and Stabilizers
While the strut assembly was drying, I began the wing and stabilizer assemblies. Both of these assemblies were pretty straight forward. The only real difference being their size. I did tape the wing halves together after brushing on the liquid cement, and let them sit for a good 2 days. I did the same with the stabilizers. After the halves were glued and the seams cleaned up, I painted the wings. This is a little different then my usual routine of building, but because of the size of the aircraft, it seemed the thing to do.
I painted the top of the wings Polyscale Olive Drab 613, and the bottoms Polyscale Neutral Grey 603. In the middle of this, I ran out of the OD, so I ordered another bottle. After I received the new bottle, I noticed that the color seemed to be a different shade. So I laid down a coat of the newer bottle of OD on a small area of the left wing and let it dry for a day. The difference between the two colors was quite noticeable So, I repainted all of the OD sections that I had already done. Since it was only the wings, it was not too bad. The newer shade of OD is lighter, even though the bottle states it is OD 613. While I was doing the wing painting, I also did the outer panels Red (Polyscale RLM 23). I also ran out of this color, and went to order more, only to discover that Pollyscale no longer seems to carry this shade of red, so I checked the rest of the Testors web site (Testors has owned the brand for several years), and I had to order the RLM 23 Red from the Model Masters acrylic brand. Again, I had to repaint the red wing panels because the color was a different shade.
After the painting, I worked on the engines and the cowl covers. The propeller shafts were installed, then the engine blocks themselves were attached. I painted the blocks as per the instructions, then I worked on the engine cowls. I was going to paint the inner cowls yellow chromite, but it seems that they were painted Interior Green, so that is what I did. I then installed the cowls to the wing. The wings were then put aside.
Fuselage
While the wings were drying, I glued the fuselage together and attached the stabilizers. After the usual sanding and some light filling, I painted the Underside Neutral Grey 603, and the upper Olive Drab 613 (from the newer bottle as described above). This actual went together very nicely, but it is at this point where you have to be careful. Before sealing the fuselage, you have to install a number of windows, as well as both cheek guns and their clear assemblies. I did this with healthy amounts of Microscale Krystal Kleer white glue. I then let the Krystal Kleer set for a day. After this. I glued the fuselage together, and held it together with masking tape. It is at this point on that you have to be very careful that you don't break off any of the guns, or push in the windows for the rest of the assembly process.
After the main aircraft painting was done, I masked off the clear areas that I had to put on before final assembly. I did this by using Tamiya masking tape, cut to fit the windows as close as I could get them. I gently burnished them down so as not to push the windows back through into the aircraft interior. After all the masking was complete, I laid down a coat of Testors Glosscote, out of the can. I again left the wings off. While the glosscote was drying, I painted the main wheels, assembled the rest of the turrets, and worked on the bomb cart. Oh, I also did the evil canopy lines for both main aircraft canopies and windows, and the turrets. To my surprise, there were not really all that many canopy lines to paint. But I did discover that there are a lot more compound curves on the turrets and waist gun positions. Because I usually do not use masking on canopy lines, the clean up to a little bit longer than normal
After all was said and done, and the Glosscote was dry, it was off to decaling
Painting and Decals
As I stated above, I painted a lot of the aircraft as I went along, so there was really not a lot to do for painting. There was some touch up (there always is), but for the most part, the painting and decaling phase was just decaling. In this case, I used the kit decals, because I wanted to do Chow Hound, and there were really no aftermarket decals available for the 1/48 B-17G at the time of this build.
The only real issues with the kit decals was their age. These decals were thick, and the milky whiteish glue that keeps the decal on the aircraft had to be wiped off, but basically the decals were not too bad. Only one decal was a little out of register, but other than, all the decals went down good.
After the decals were put on, Microset and Microsol were employed. The decals seem to react well, with no issues. After all decals were set, a sealing pass with Dullcoat out of the can sealed the decals in.
Weathering
After the decals were sealed in, the weathering began. I did quite a bit of research on weathering for B-17's, and I did see a lot of faded paint, dirt and exhaust streaking (in fact, exhaust streaking later became a problem for me on this bird). But I also noticed that a lot of the really badly weathered aircraft had a lot of missions, generally well over 30, and that these aircraft were on their second or third crews. I work with a gentleman whose father was a crew chief in World War II on B-17s in England, and I had the great fortune to be shown several aircraft photos that this man's father took in World War II of the Two B-17's he oversaw. One was OD over NG, and one was natural metal. Both were G models, with the NM one having a Cheyenne tail turret. The aircraft were named "909" and "Sweet 17".
Looking at the photos, I was quite surprised to see that both aircraft were quite clean. They had mission marks, so they were not cherry. The OD aircraft had exhaust streaks and fading paint, but it was not that bad. The NM aircraft had some exhaust streaking, but that was about it. I asked about this, and my coworkers father stated that the crew chiefs always tried to keep the aircraft as clean a possible whenever they could, because an aircraft with peeling paint and dirt on it would create more wind resistance, thus cutting down on flight distance and the aircraft would use more fuel. Also too there was some pride in having a good looking and more important, good working, aircraft that you were in charge of.
With this information in mind, I decided to weather my B-17, but not go whole hog. I did my usual fading technique, but this time it was a little different Because the wing area was so big, I had a little bit of trouble with the white fading wash that I usually employ. I kept putting too much wash on, and when it dried, you could see the brush strokes, and it dried in clumps. So, I got out a small sponge brush, dipped it in clean water, squeezed out any excess, and then did a sponge brushing over the fading wash. This removed the excess white. After this was done, I used a clean cloth and wiped the wings from front to back. After this, I did a wash of oily black using the same technique. Then I did something somewhat new for me.
After the oily black wash had dried, I did a real light dry brush of oily black along the panel lines, again going front to back. I did this on the fuselage as well. This did pop out a little more detail, and it looked good.
The engine and Turbo Supercharged exhaust streaks were then dry brushed on, and this is where I ran into a little bit of trouble, again. All photos of the B-17, including the ones that I mentioned above, show that exhaust streaks were prevalent on the upper wings, particularly where some sort of vents or cooling conduits are located right behind the engines, so I proceeded to do an exhaust streak there. The left wing came out great, but the right wing streaking kept looking like it was painted on with a brush. So, I repainted the area, re-dullcoated it, and tried again. Same result. I could not figure it out, until I looked at the brush I do my dry brushing with. After almost two years, the poor thing had finally given up the ghost. Also, this is a big model, and that pretty much did in my trusty stubble dry brush. So, I dug in my modeling tool box, found another old brush that was past it's prime, cut it down to a stubble, and voila, the exhaust streaks looked much better. After this, I did the exhaust and turbo charger exhaust streaks on the wing bottoms.
Next I dirtied up the decals with a light dry brush of dirty black, and faded with a white wash (this was after I had sealed the decals with Dullcote). The wheels and rear fuselage were muddied up a little bit, and then final assembly began.
Finishing Up
As I stated above, because of the size of this aircraft, I had to do painting and assembly a little out of my normal sequence. I purposely left the wings off until I was sure that I had done all the other assembles that might have been easier and possible to do with the wings off. I assembled and installed the waist guns, then the radio compartments gun assembly. Then there was the upper turret to put in, and the ball turret. I am still debating with myself about gluing the wings on. They do lock into the fuselage quite tightly, but there is a small gap. I have to think about this one.
After this, I finally put the tail guns on, as well as all the other smaller parts like the DF loop, the radio mast, and the small clear window parts for the top of the fuselage Then the nose and main cockpit canopy went on. It was done.
Conclusions
This is a big model. Not as big as the Monogram B-29 or the B-1B, but quite large nonetheless, so if you ever build one, you will need some room.
I like this aircraft for many reasons, but the biggest reason I guess is that it bristles with guns. I love aircraft that have a lot of guns, or, as in the case of the Ju-87G2 Stuka , aircraft with big guns on them! I also realized when I was building this bird is that I truly like building bomber aircraft. There is a lot more detail to bombers in that there are more parts, and, for the most part, I think, they look bad a*s.
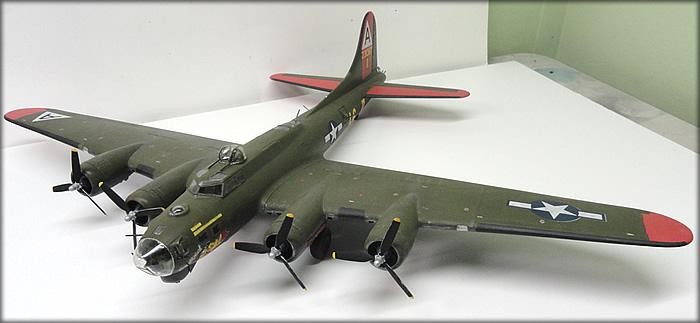
Another winner! Well done!
Very nice B-17, thanks for posting!
You think this is big ,check out the B29 in 1/48 ,I have one on this site ,it's so big it is now in my garage going mildewy because I have nowhere else to keep it,really nice work on your B17 by the way and your excellent write up, very detailed.
N.
Nice work, sir...VERY nice work!
Kipling,
I enjoyed reading your article but, why not show the true mark of your genius by showing more photo's of your lovely B-17. The photo table is rather bare. How about a close up of the top turret? the nose and the tail? A side view showing the main gear etc,etc.
Steve T
A great build!
Nicely done, and I agree with Stephen - more photos!
An enjoyable posting, nice bit of history and good description of your build, and from what we can see from the small number of photographs, your model looks more than convincing. More photographs please!
The Chow-hound flew out of Bassingbourne airfield in the 322 Squadron of the 91st BG. The Memphis Belle also flew from the same airfield and the nose art on both planes (and several others) was done by Tony Starser. On August 8, 1944, the Chow-hound went down with all nine crewmen near the French Village of Lonlay L'Abbaye during a tactical anti-personnel mission ("milk run") to help the Canadians and British break through the German defenses just south of Caen. The Monogram Toy company selected the Chow-hound's nose art and tail number because it was "kid friendly". The company had no idea regarding the fate of the aircraft until I interviewed a retired engineer who worked on the design of the model. The ill-fated "Thompson crew" was the second crew that flew this aircraft. It was named by its first crew because "She always got us back in time for chow". I am currently writing a book about this plane and the several coincidences that followed its demise, including its selection as the Monogram plane. Nice job, by the way. My efforts to build the model were far less exacting.
Post-script: my uncle, Jerry Gillies, was the tail gunner and was the first body recovered and identified by the locals. The village honors the entire crew every year.
That looks fabulous. They are great loking in 1/48. Even better than the Lanc. Having built the much more expensive HK models version, I would be really interested in a comparison of the two given how little interior detail can be seen.