Making a base for the Tamiya M3 Stuart.
I decided to make a simple base for my M3 Stuart quick build. I didn't want just a wooden plinth for the tank to sit in, I wanted to add a bit of landscape too.
Since I'm building mine as an American tank in Tunisia, deciding on a piece of desert was a no brainer. But instead of going for "just sand", I wanted something a little more interesting. So I settled for a dry wadi, a dried up stream and try my hand at some cracked earth.

The plinth.
I marked out the boundaries of the scenery with masking tape.
1 attached image. Click to enlarge.
Black undercoat, so the wood won't show through the cracked earth.
1 attached image. Click to enlarge.
Looks like that'll work...nice job.
Thanks!
Slapped a THICk layer of a sandy color on the base, which was mixed with crackle medium.
In selected spots the same mix but with micro beads added was applied, to give ever so slight height differences.
1 attached image. Click to enlarge.
Which gave me this result when dry.
1 attached image. Click to enlarge.
I sealed this with a coat of unpigmented acrylic. The cracked earth is sone fragile stuff and needs the protection.
1 attached image. Click to enlarge.
Then the base was given a drybrush of a light sandy/bone color.
1 attached image. Click to enlarge.
Next up were dusty pigments. On the left they have been blended in already, on the right not.
1 attached image. Click to enlarge.
Mig pigment fixer went on next, to seal the pigments and make them less pronounced.
1 attached image. Click to enlarge.
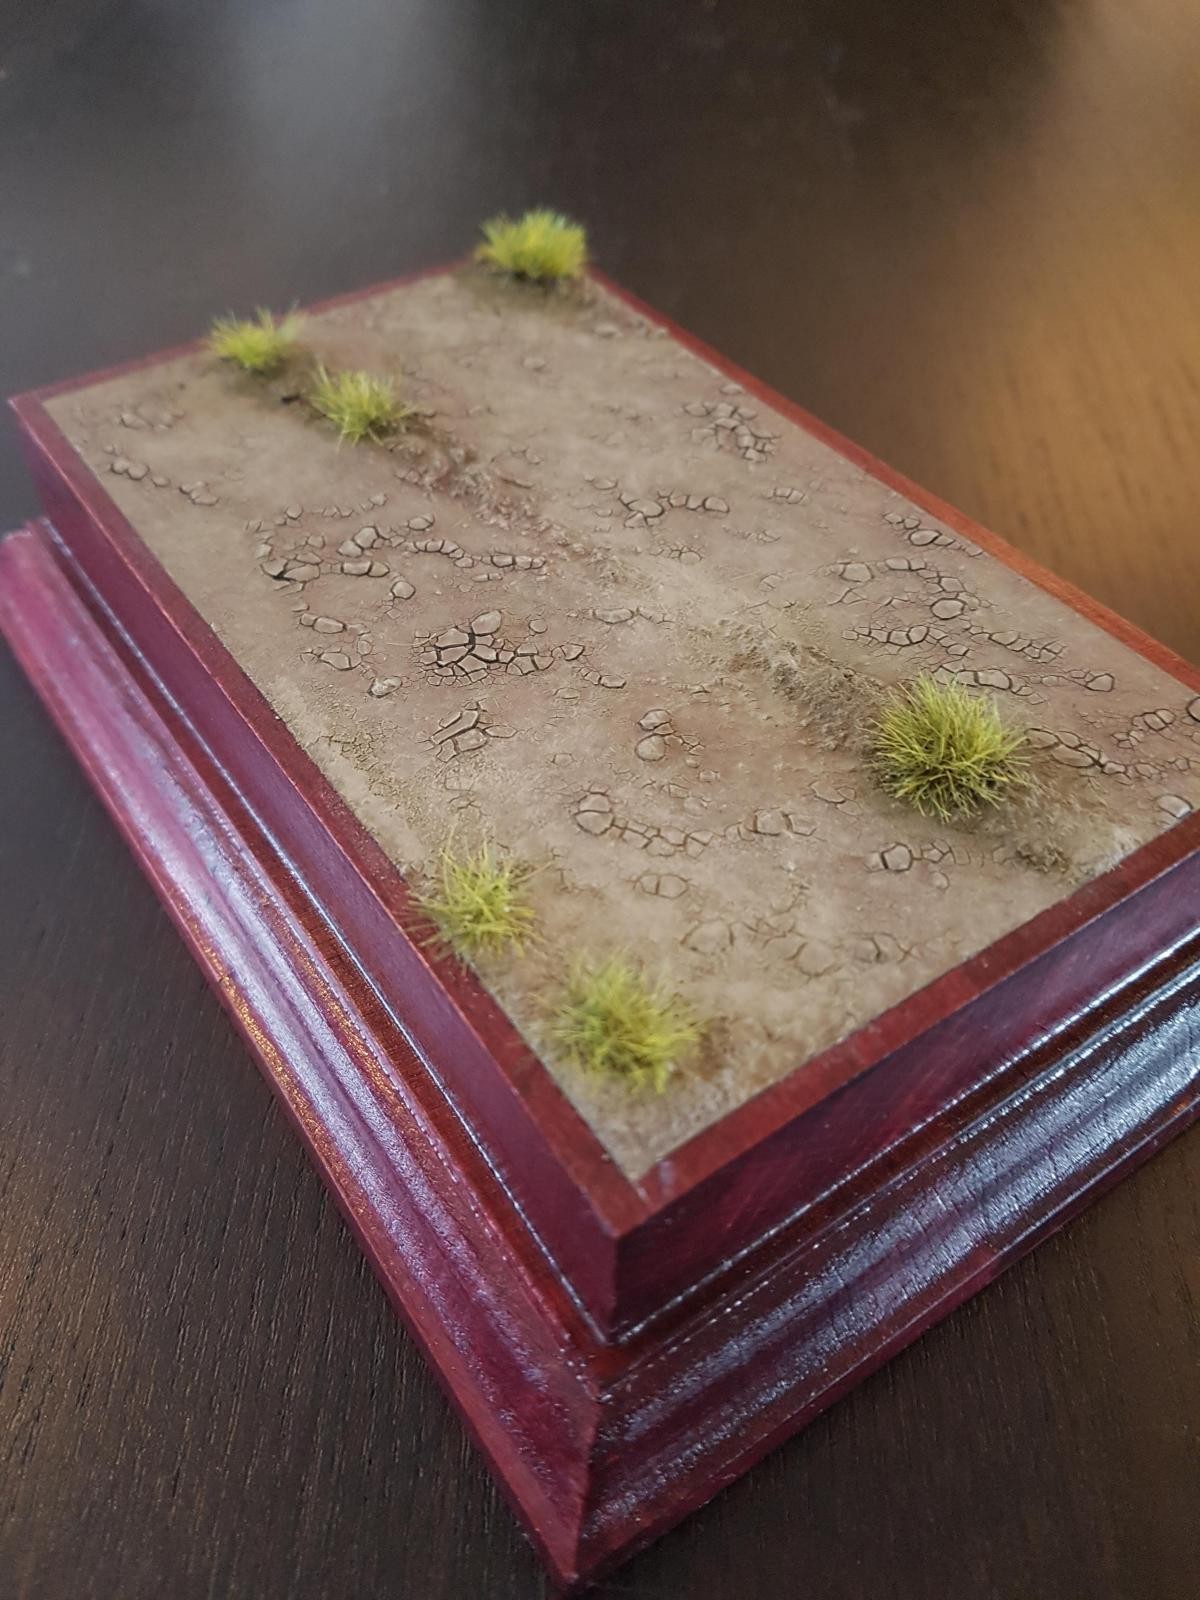
And once dry, this is the result.
A dusty, dry wadi with patchy areas of cracked earth.
1 attached image. Click to enlarge.
This picture was my inspiration.
1 attached image. Click to enlarge.
That is one FINE looking base! How will you do the tracks created by ... the tracks? (Tank tracks)
Seriously, Jay - that's one of the finest bases I've seen. Bravo!
Thank you Jeff!
Cracked earth is usually so dry that it becomes almost rock solid, so the tank won't sink intomthe ground. The M3 has flat, rubber track pads, so all I really need to do, is add a few scuff marks, for lack of a better word, when the tank is in place.
I'll accept that reasoning. However, as an ex-tanker, I assure you that even the light, rubber-padded Stuart would do more than a few scuff marks. But no, it wouldn't sink down into the hardpan. Please don't misunderstand me, Jay - I'm NOT telling you this as criticism - just suggestion and hints. I'm like a critic ... I can't DO the kind of beautiful work you've done, but I can add suggestions about a few things, and tanks are some of those things.
Keep up the good work!
Hi Jeff,
No worries, I appreciate your remarks. I guess me saying scuff marks makes it easy to misinterpret what I mean.
A tank passing over the surface, even a “light” one, will certainly damage it. Where the tracks touched the ground, the surface will be disturbed, so even though the tank doesn't sink, the soil right underneath the surface will become visible. I need to find some good photo reference for that.
But that can wait until the M3 is ready 😉
Very nice work! Just as a posting process suggestion, another way to do a post with running commentary beneath pictures is to add all the pictures first, then within a single post you can insert the pics using the pic number (example -
--- pic17 not found ---
) When you do that, the site pulls the picture out of rotation from the list of pics and inserts into the narrative.You'll notice in my reply above that the site tried to find pic17, which didn't exist on this post! The idea is to use the nomenclature "pic#" within brackets.
That's helpful, thank you.
EXCELLENT looking base. great effects. One question - the jump from the photo of the 'thick layer of sandy color' to the next image of it all dry seems amazing. Can you elaborate a bit more on how those cracks were created. That (to me) is what makes this base look so good. Did the crackle medium create that? I'm not familiar with that product. Really like the effects and hope to use this technique on something at some point !
Hi Paul, that crackle medium really is a plug and play solution. Simply mix with the paint and add to the base. The thicker the layer, the more pronounced the cracks.
So other than adding the stuff, there's nothing you really need to do.
Beautiful, Jay, beautiful.
‘Liked’
Thank you.
Now that is nice. Really nice.
Thank you.
Great step-by-step. Bookmaking this for future reference. Thanks for sharing.
Glad to hear you like it and found it useful.
Likewise, bookmarked.
Thank you.