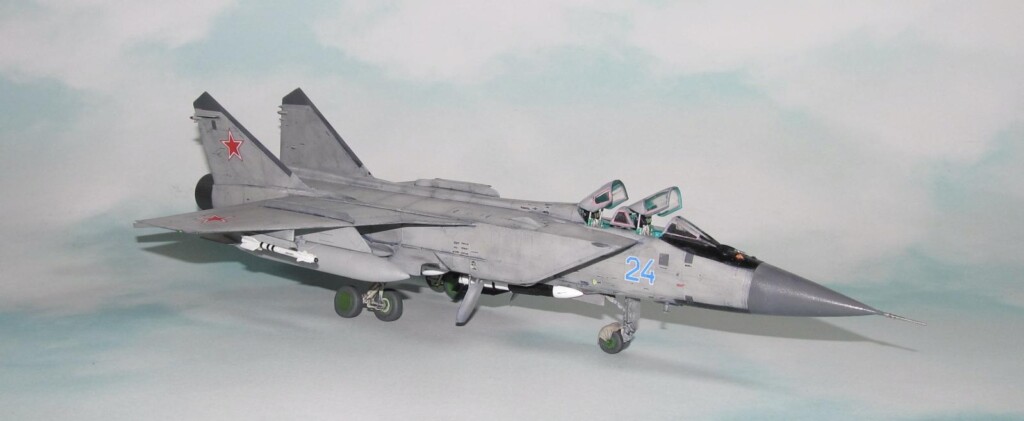
1/72 Trumpeter Mig-31 Foxhound
The Mig-31 (NATO codename: Foxhound) is a two seat long range interceptor designed with four primary missions in mind:
1 Defence of the Motherland from long range cruise missiles and their launch aircraft.
2 Intercept and destroy UAVs and low flying cruise missiles
3 Long range escort of strategic bombers
4 Provide Strategic Air Defence for those areas not covered by land based systems.
It is similar in appearance to the Mig-25, the Mig-31 was designed around two Soloviev D30 Turbofan engines with afterburner. The major difference is that the Mig-25 was a single seat fighter whereas the Mig-31 is a two seater (pilot and weapons system operator) with more fuel for longer range and a better radar. The NATO Codename: Flashdance radar was the first ever phased array radar carried by an aircraft. This radar is used to guide the massive AA-9 Amos missile which has a range of around 40-100 nautical miles depending on the variant. It can also carry a variety of air-to-air and air-to-ground weaponry including the AA-11 Archer, Kh-31 Anti Radiation Missile and fuel tanks. It is no coincidence that SR-71 overflights of the Soviet Union ended soon after the introduction of the Mig-31 into service as it had the speed and weapons range to make intercepts of the Mach 3 spy plane possible.
There is no similarity to the Mig-31 Firefox of literary and movie fame as the real life Mig-31 was never the mind reading Mach 4 killing aerial machine that was described in the book.
Some 519 were made from 1981 to 1994. The Mig-31 is currently still being flown (mostly by Russia) and a few are being flown by Kazakhstan.
It has been said that the Mig-31 and its AA-9 missiles were copied from the F-14 and Phoenix missiles as it has been rumored that the Iranians gave some of the technology to the Soviets but these systems were already in development long before any exchange of technology. However, there are plenty of design similarities between the two to make one wonder.
The Kit
Trumpeter in 2016 released several kits of the Mig-31 that reflect all the variants including one that is equipped with an air-to-ground hypersonic missile which was apparently used in the Ukraine-Russian conflict of 2022. This one is the original Mig-31 as seen in the 1980s before its electronic systems were upgraded.
The kit contains some 340 parts on six large grey plastic sprues and four different types of smaller sprues for various weapons, fuel tanks, ejection seats which are duplicates for a total of 16 grey sprues. There are also two clear sprues for the smaller lights, windscreen and canopy parts. The parts are very clean with no flash and just mold markings.
Also included are two decals sheets A and B. A sheet contains the markings as well as an extensive number of stencils for the plane. B sheet contains the decals for the cockpit and the external stores including missiles.
CONSTRUCTION Part 1
It actually began with the intakes which are a pretty complex assembly. I sprayed some Mr Color (formerly Gunze Aqueous) Silver on the interior of the intake tubes. Once the paint was dry, I ran some Tamiya brown panel line enamel accent to pop out the prominent detail in the off chance it will be seen. The intake tubes were glued together and the fit was pretty good once you have everything installed. The external portions of the intakes were painted Barley Gray (as per Trumpeter's instructions) and glued to the tube portions. I didn't bother with the seams as they were barely noticeable.
Next I worked on the exhausts. A lot of painting of the interior of the exhausts were required as the interior was a mix of bronze green, clear green and metallic grey. Due to the size limitations and accuracy of airbrush, it doesn't look all that real when compared to photos of the actual exhausts.
The wheel wells were painted and assembled next. Mostly silver interiors with some black/brown panel highlights added. One thing I didn't add was the nose landing gear as per instructions because I have a habit of breaking them off. One thing you have to do is sand the edges smooth to get the wheel wells to fit without gaps. I also doused the joins with a lot of Tamiya extra thin glue and clamped them together for a day or two.
The wings were easier to assemble. The leading edges were glued together with CA glue while the interior seams were glued with Tamiya extra thin glue. When the glue was dry, I sanded the leading edges smooth with various grades of 220/400/600 and 1500 wet/dry sandpaper and eliminated the seams.
A week later, I started on the cockpit with the interior parts painted and added the Quinta Studios 3D decal set 72014 for the Mig-31B. It had the correct IP for the original Mig-31 so I used those. First I primed then painted the cockpit parts using AKAN Russian Cockpit Turquoise (primed because I found AKAN paint really does need a primer to stick.) Once the paint was dry, I added the 3D decals to the surface and I found them to be easy to use especially as I had previously cut off most of the surface detail using wood carving tools, but I needed white glue and/or CA glue to hold these things to the surface. Better looking than what I could do with a brush especially at 1/72 scale. The completed cockpit parts were added (no ejection seats) and the nose was assembled (again using CA glue for the exterior seams and Tamiya extra thin for the interior connections.)
Various inserts were added before I glued the nose assembly to the fuselage using Tamiya extra thin (the join is along a panel line.) I then glued the intakes and wings in place. It was then I realized that the fit wasn't all the great especially around the intakes. I spent a fair amount of time sanding/filling the seams along the intakes and nose. This was the worst fitting area of the model much like the 1/48 scale Hasegawa Teen fighter kits. What was worse is that they could have gone along the seam and avoided the need to deal with the seams, but this is just me whining.
The missiles were glued together using CA glue for the exterior seams and Tamiya extra thin cement for the interior parts and fins. The AA-9s required a lot of careful sanding to avoid removing fine details. I selected two wing tanks and glued them together using CA glue. The seams were quickly dealt with.
The landing gear is quite complex so it was assembled based on paint scheme so like color parts were glued together while the seams for the wheels were dealt with. Most of the landing gear was painted Light Gull Grey. I purchased the Eduard masking set which had the wheel masks. I used last of my old school Gunze H320 Green on the wheel hubs to simulate the Mig Green color. The tires were painted XF-69 NATO Black.
I added the various parts like wing fences, antennas and various other parts using CA glue.
The only exterior parts I didn't add were the pitot tube, landing gear, ailerons, the tailfins, pylons and fuel tanks.
COLORS AND MARKINGS
Paint
I filled the various openings with cut sponges and primed the model using Badger Stynylrez primer. Next I loaded up my fine line airbrush with flat white and sprayed in random squiggles in what is known as the current rage in model painting, black basing where the model becomes a mass of black and white squiggles before the base paint is added.
It turns out the Mig-31 has a very basic generic paint scheme which is paint it any color you want as long as it is close to Barley Grey. I sprayed on the Gunze Barley Grey paint in very thin coats in one direction and then perpendicular to that direction. Surprisingly it worked. The thing about the black basing (which I have been doing for a while) is that it gives the paint a subtle worn look that modern jets seem to get before they go to the maintenance depot and repainted. To do this “right” requires a lot of experience airbrushing and thinning the top coat paint a little more than usual. To make things worse, the effect doesn't always show up with digital photography as those color adjusting algorithms/filters smooth things out.
The canopy painting was actually quite difficult because it has a prominent pink sealant around the various windows. The Eduard masking set has masks to allow for painting the pink sealant. First thing I did was mask the windows and primed the parts using Mission Models Clear Primer. Once it was cured, I sprayed on the AKAN Russian Turquoise cockpit color as per photos. Next I sprayed on black primer. After that layer was dry, I finally sprayed on flat black for the windscreen and a light coat of Barley Grey for the exterior color.
I removed the first masks and then added the masks which are 0.5mm less dimension wise than the full size masks. Next I added tape around the exterior of each of the windows. I used my Iwata HP fine airbrush to spray on Mission Models Pink Primer. I was lucky that I managed to center the masks and the pink paint simulating the sealant had the same general thickness. It was the most complicated canopy painting scheme for any airplane model I've built.
The AA-11 missiles were painted flat white and then sprayed a thin coat of Vallejo off white. The AA-9 Amos missiles were a lot more complicated to paint as they had a black and white paint scheme that required a fair amount of masking. It took a couple of touchups to get everything done to my satisfaction.
The external fuel tanks were painted with a straight up standard paint scheme showing less wear than the plane.
After everything dried, an acrylic gloss varnish (Vallejo) was sprayed on to protect the paint from the wash and decal solution.
Decals
There are some 200+ decals for the Mig-31 and various missiles despite the fact I was only building Bort Blue 24. Instead of taking on everything at once and getting bored, I worked on each section of the Mig at one time. These newer Trumpeter decals worked fine.
Weathering and Final Coat
I used Payne's Grey acrylic oil paint for the wash. It was mixed with a small amount of bottle water to provide the correct color and consistency. The wash was slathered all over the seams and details. When it was tacky a few minutes later, I wiped away the excess using damp Q-tips.
I darkened certain areas using Tamiya Enamel Panel Line Black and Dark brown (the excess removed with mineral spirits.)
Easy to type, but it took a couple of hours of work to do.
The final coat was a couple of thin coats of Vallejo flat clear.
FINAL CONSTRUCTION
The ejection seats were painted and the 3D decals were added. They really do work and add details that are normally missed painting as long as you use white glue or CA glue to hold them on. The completed seats were glued in place along with the canopy retraction pieces. Next the control stick and various small cockpit parts like the HUD were added.
The Pitot tube was added, but it needed some CA glue to fill in some gaps which required sanding with various grades of sandpaper.
The prepainted engine nozzles were inserted into the rear and glued in place
Most early Migs had simple landing gear, but the later MIGs from the Mig-23 onward have quite complex landing gear that is a pain to assemble. I added the landing gear I was supposed to add earlier in the build but didn't because I'm not that stupid like I used to be. The pre painted parts were glued on usingTamiya extra thin mostly but I ended up using CA glue to hold the main landing gears into their mounts. I also had to adjust the pieces so they would line up as the assemblies were fiddly.
The ailerons were inserted in place. Bravo to me for not breaking them off as I usually do.
The external stores were next. The various pylons were glued in place and then the weapons and tanks were added. The AA-9 Amos were quite fiddly to assemble as the tiny fins needed to be held in place using CA glue. Once the glue was dry, the missiles were added into the recesses without too much problem.
Next the various external lights were brush painted using flat white first and then painted using clear Vallejo colors.
Lastly the canopies and glass pieces were added. I used white Gorilla glue for extra strength to mount the canopies open.
CONCLUSION
The Trumpeter MIG-31 is not a kit for beginners. It requires a good amount of experience and to do the model justice requires a lot of effort. The model itself has a few difficult spots (seams where the intakes attach and protecting the detail from being ruined by the sanding process) but it is a complex kit thanks in large part to the extensive number of external stores and decals require a lot of patience.
I found that the hype surrounding 3D decals is real and they really make the cockpit stand out and will use them in the future depending on the model. They are easy to use but need something stronger like white glue or CA glue to hold them in place.
Overall I enjoyed building this model and recommend it for those who have an interest in Soviet/Russian jets and Cold War models.


Terrific build. The finish work obviously took lots of time-and commitment.
Thank you! It took longer than I thought as the kit and weathering are pretty complex. You would think a grey jet would be straight forward...
A superb all over build of a challenging kit, Dan! Painting and weathering are supreme!
Excellent, detailed accompanying article, as well!
Congratulations!
Thank you, Spiros. I think this is one of my best results.
Great work on this, Dan, and a superb result.
That thing's big even in 1/72!
Yeah, the size is why I passed on the AMK kit which is actually easier to build from what I've read.
Thanks very much Tom!
Looks good mate!
Impressive build.
Thanks. I consider it one of my best overall.
Nice work, Dan. This plane has got some strange landing gear.
FYI, the Mig-31 has apparently taken on the role of hypersonic missile launcher too.
Thanks very much. Yeah, I had to bin my Trumpeter 1/48 Mig-23 because I messed up the wonky landing gear /shakes head sadly/
Fantastic result, Dan @dbdlee
The shading and painting is perfectly done.
I was surprised by the size of this aircraft, even in 1/72 it is still quite big.
One of those rare moments for me when it all works out. And it is definitely a big one for the scale which is why I didn't get the AMK. Trying to be more selective on the size (lack of storage issues.)
Nice work on this complex kit. It looks very nice. Interesting info of this MiG...
Definitely not a simple one. It was still fun, but it was quite intense to build.
A beautiful build! I built the old Revell version of this and used a set of Begemot decals and stencils, and can testify to the fact that decaling was almost the longest part of the process! You paint work is really nice for the monochromatic scheme.
Thanks very much Greg.
Great article, Dan, and an equally great model.
Thanks George!
Great work, Dan. The fading and mottling techniques look really good. I'm not sure I'd have the patience of the larger missile paint schema, but you did an amazing job on those. Well done!
Thanks! To be fair, I barely did have the patience to paint the missiles. It took some willpower to get there.
Superb scale modeling Dan @dbdlee! 👏 All your efforts paid off in spades sir, that beauty is sumthin' else! 😁
Thanks very much, Gary.