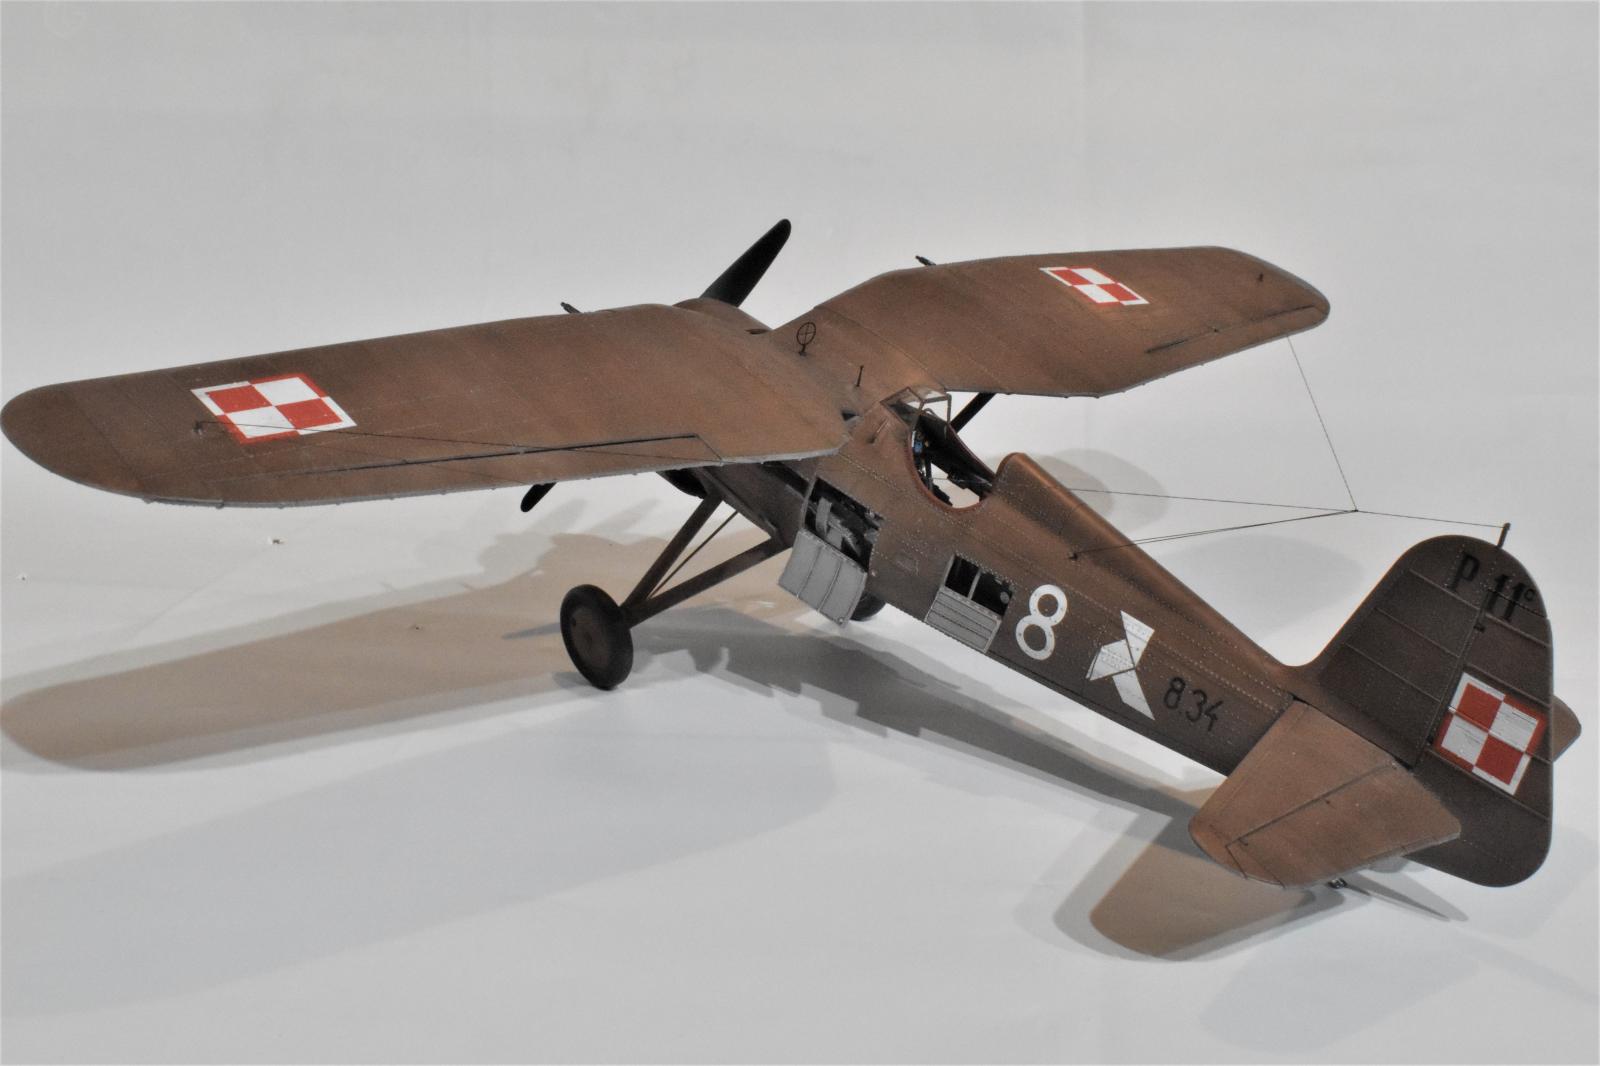
First to fight IBG Big scale PZL P-11c
Well, the first Allied fighter in European WW2 skies anyway. Contrary to some accounts, the Polish Air Force was not destroyed on the ground early, but their aircraft were dispersed to designated War alert fields, having been on a war alert footing. This allowed the prime fighter of the PAF to get into the air in some numbers. 125 Kills were claimed by P-11 types before the collapse so we can assume they got about 60, not bad for an obsolete design. A better accounting of the PZL design history and war service can be found on 'ol Wikerperdia. https://en.wikipedia.org/wiki/PZL_P.11
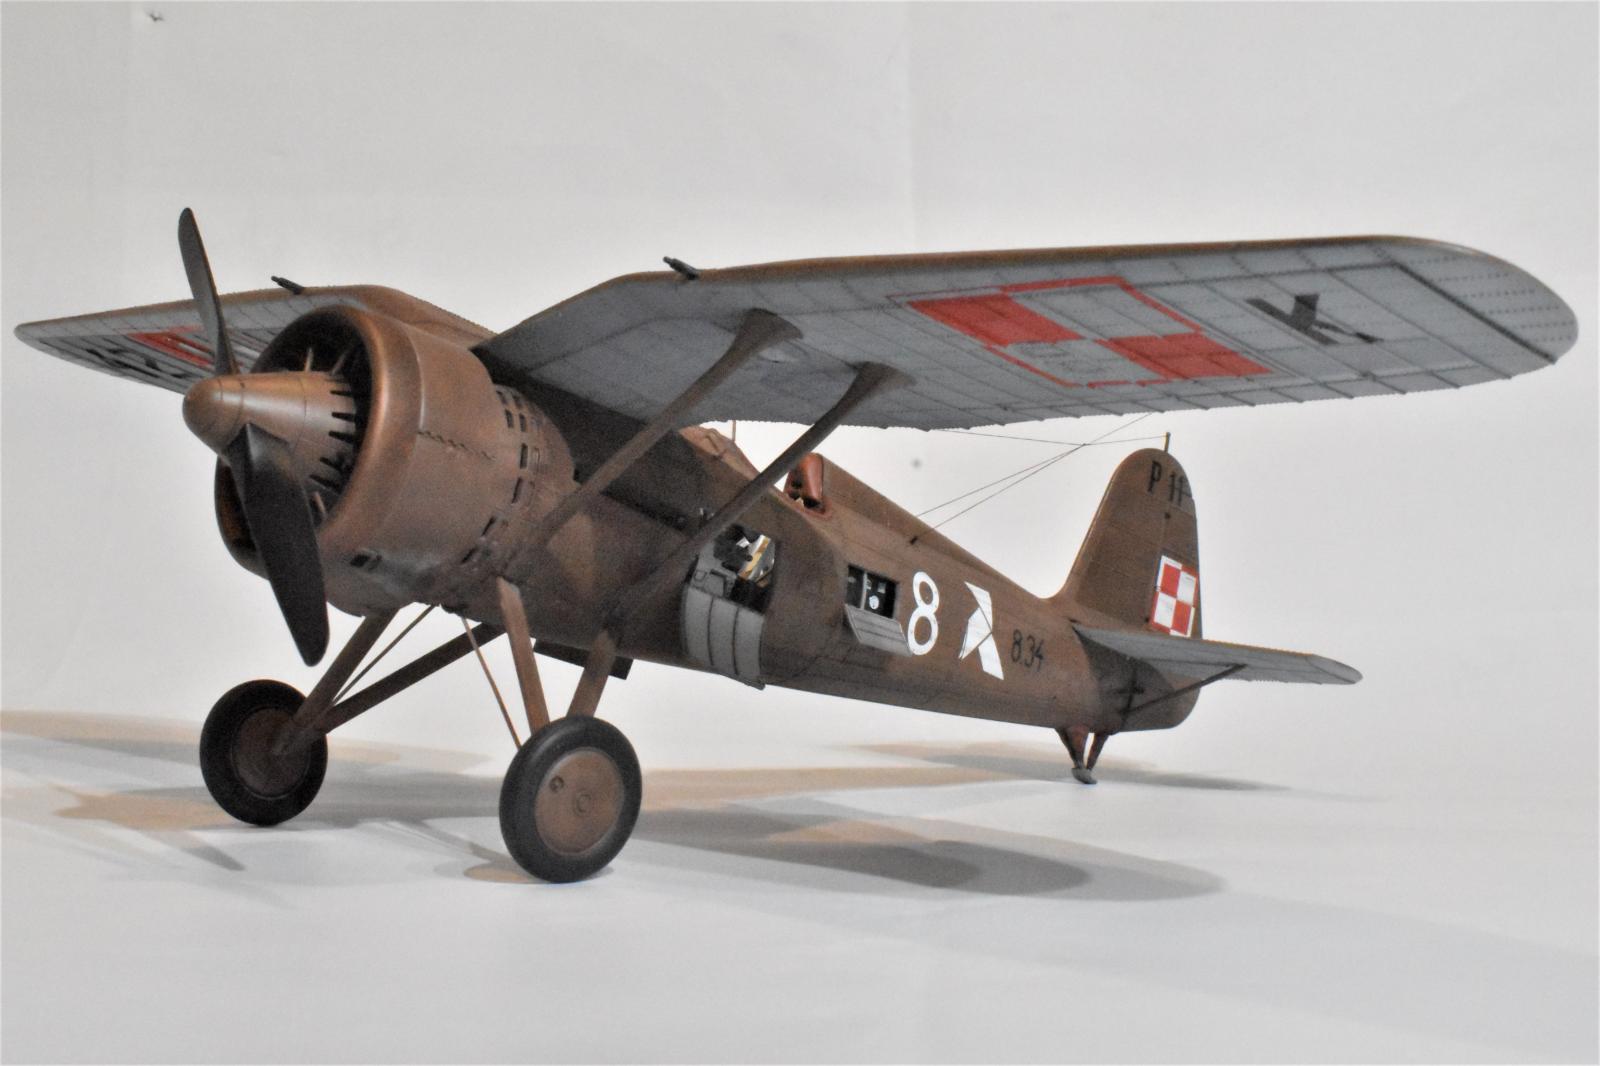
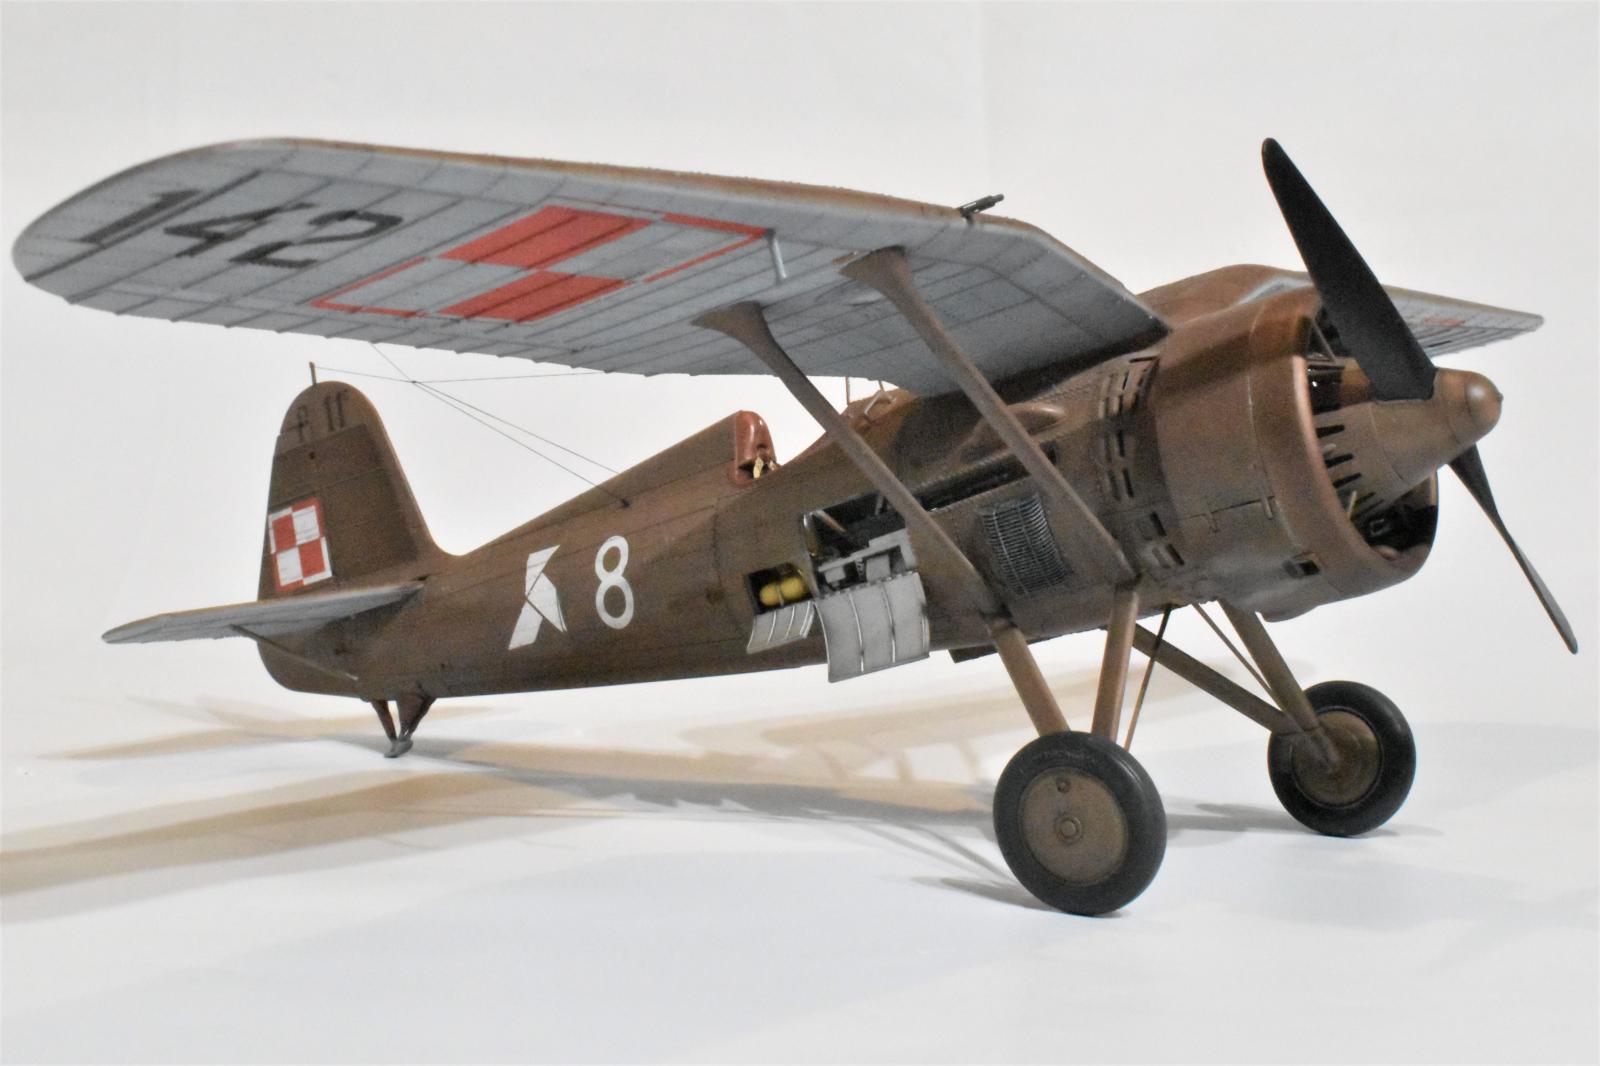
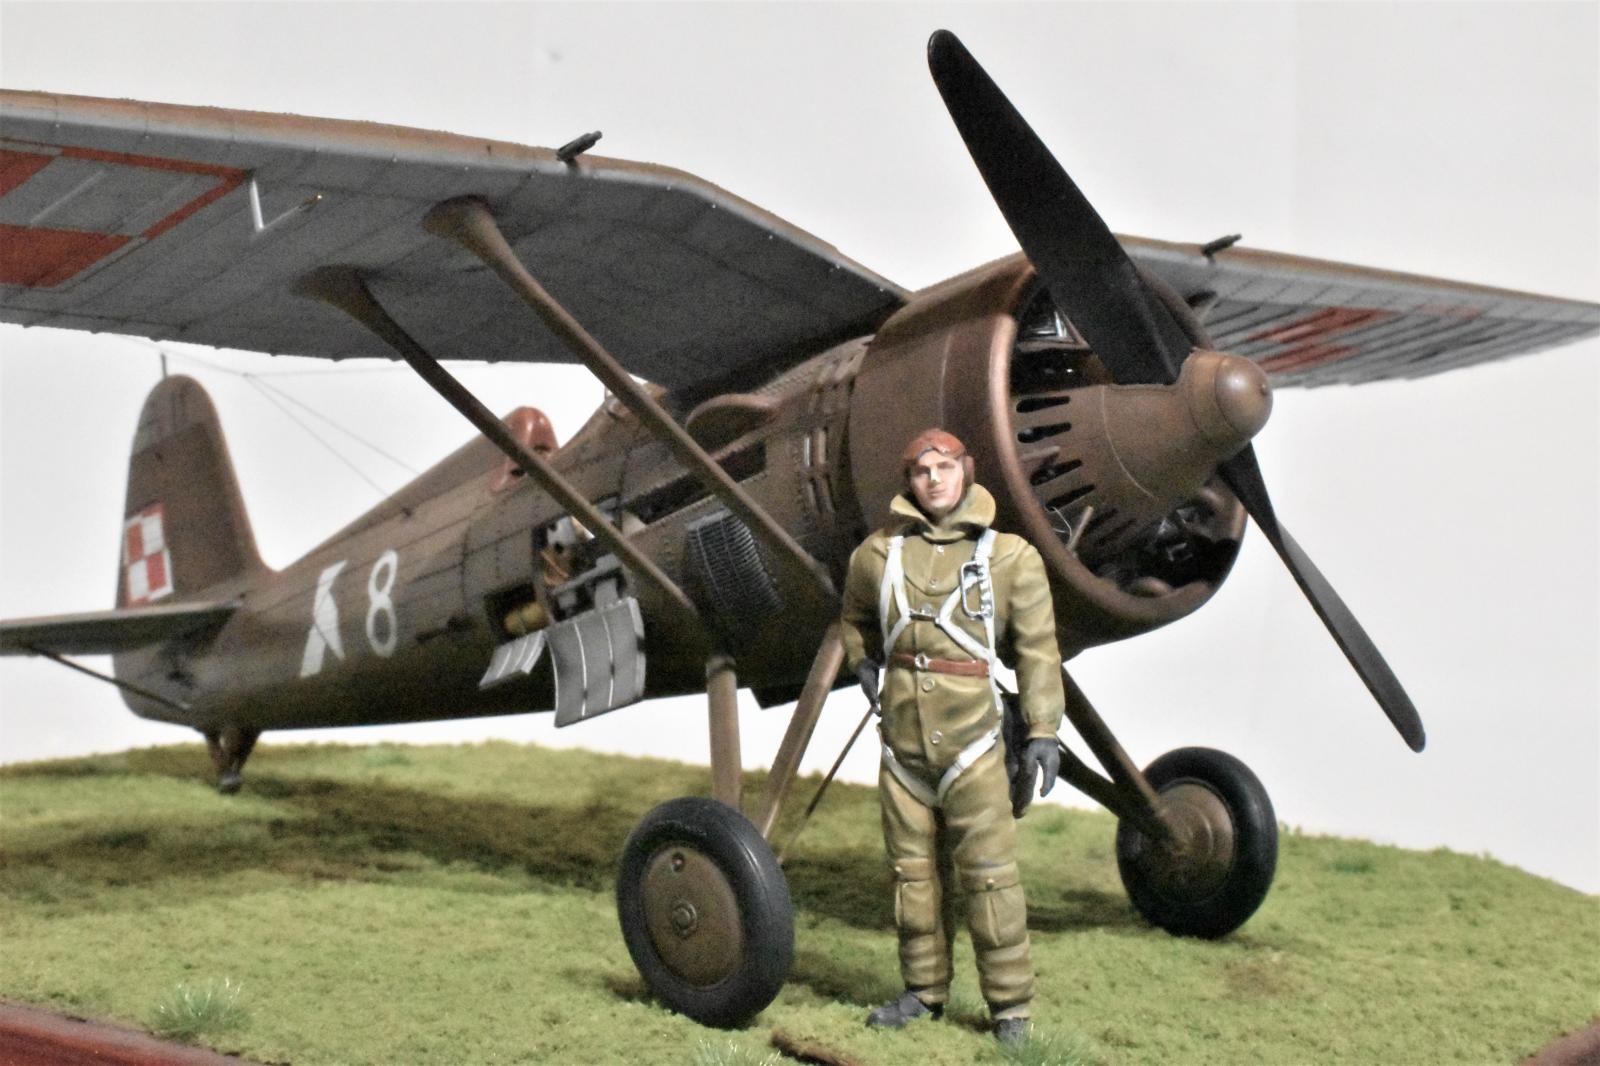
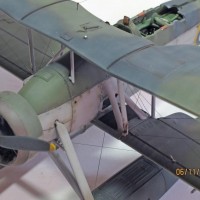
So to the model. Oh the model. Upon first examination of the Polish IBG Company's 1/32 P-11c I was highly stoked. The detail of the corrugated skinning was beautifully done, the many raised rivets looked so cool on the fuselage. The engine was well done, and the interior-busy busy with a lot of etchings. I got the Limited Edition boxing, which included a pilot figure and 3D printed Machine gun barrels. OK, let's go.
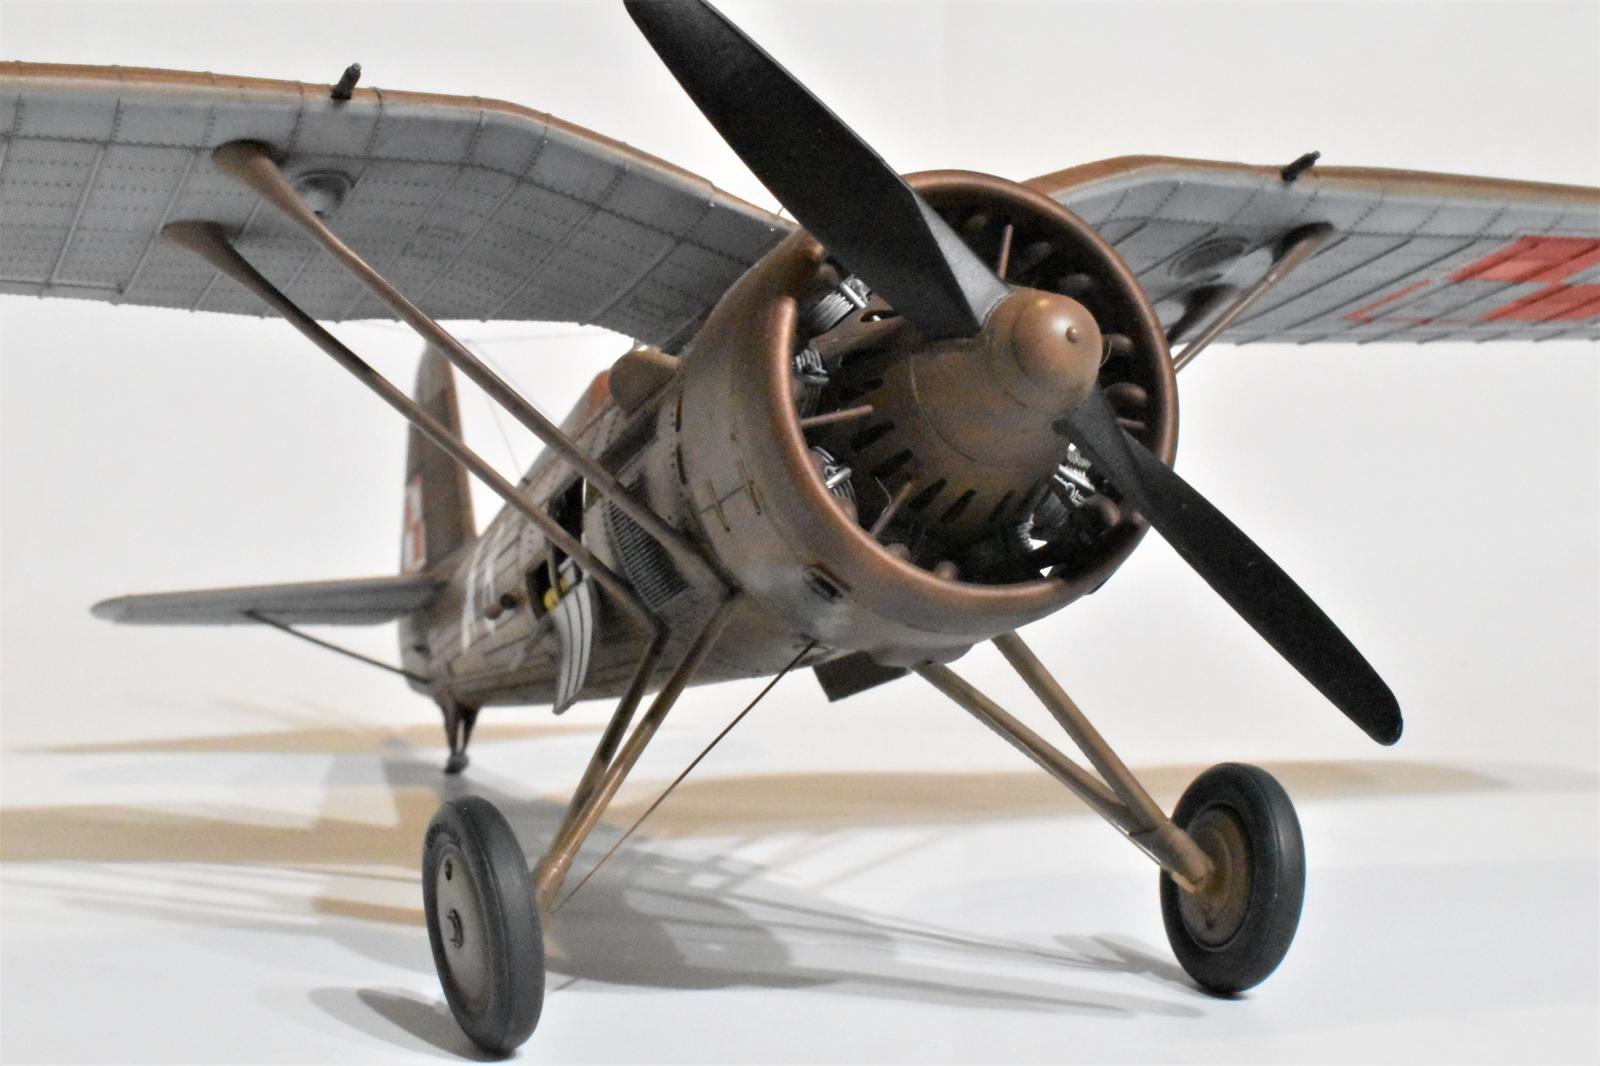
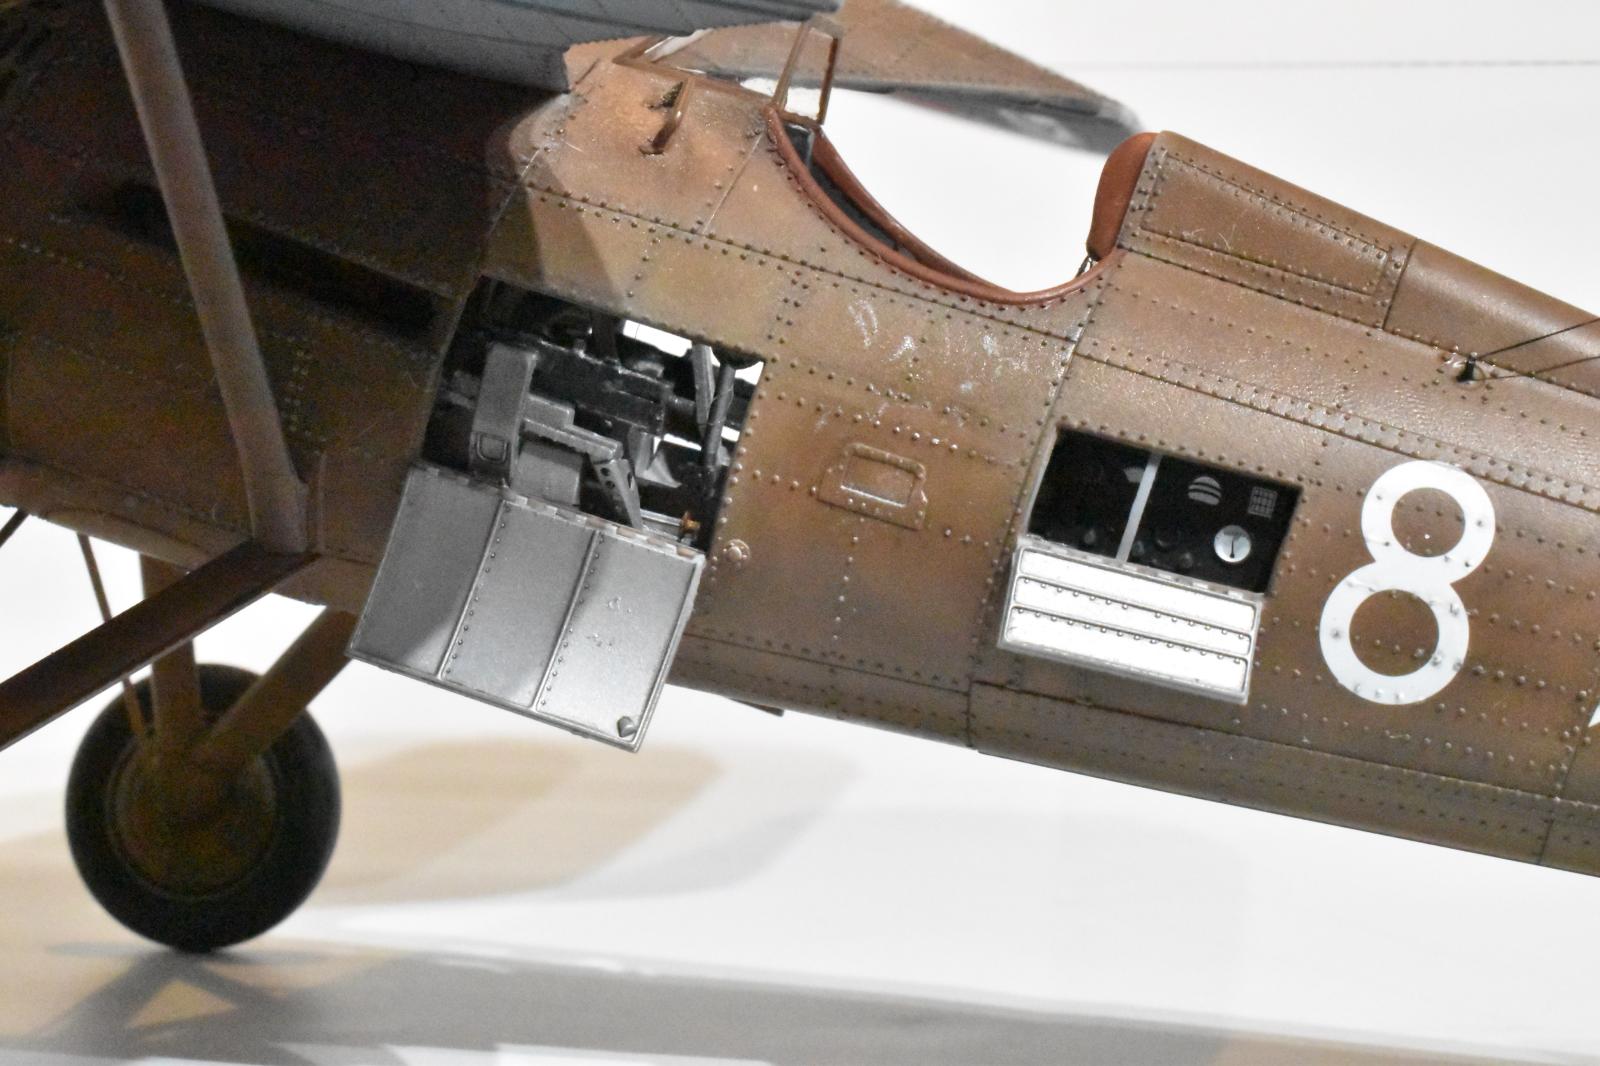
The biggest issue I had with this one was the tiny attachment points on almost every part. Tiny pins, tiny notches, tiny holes. Even the fuselage halves had weird notches on the parts instead of flat surfaces. This made for a LOT of interesting episodes. The engine parts, mounts and especially interior components like the seat, were just a real PIA. Test fitting was impossible, so it's glue and pray, or tear it apart and glue again. The holes/pins on the engine mounts attach to the interior structure and they were not enough to align things, so I snuck in little styrene gussets to get some strength. BUT before these dry, make sure the fairing for the front of the fuselage fits...have fun.
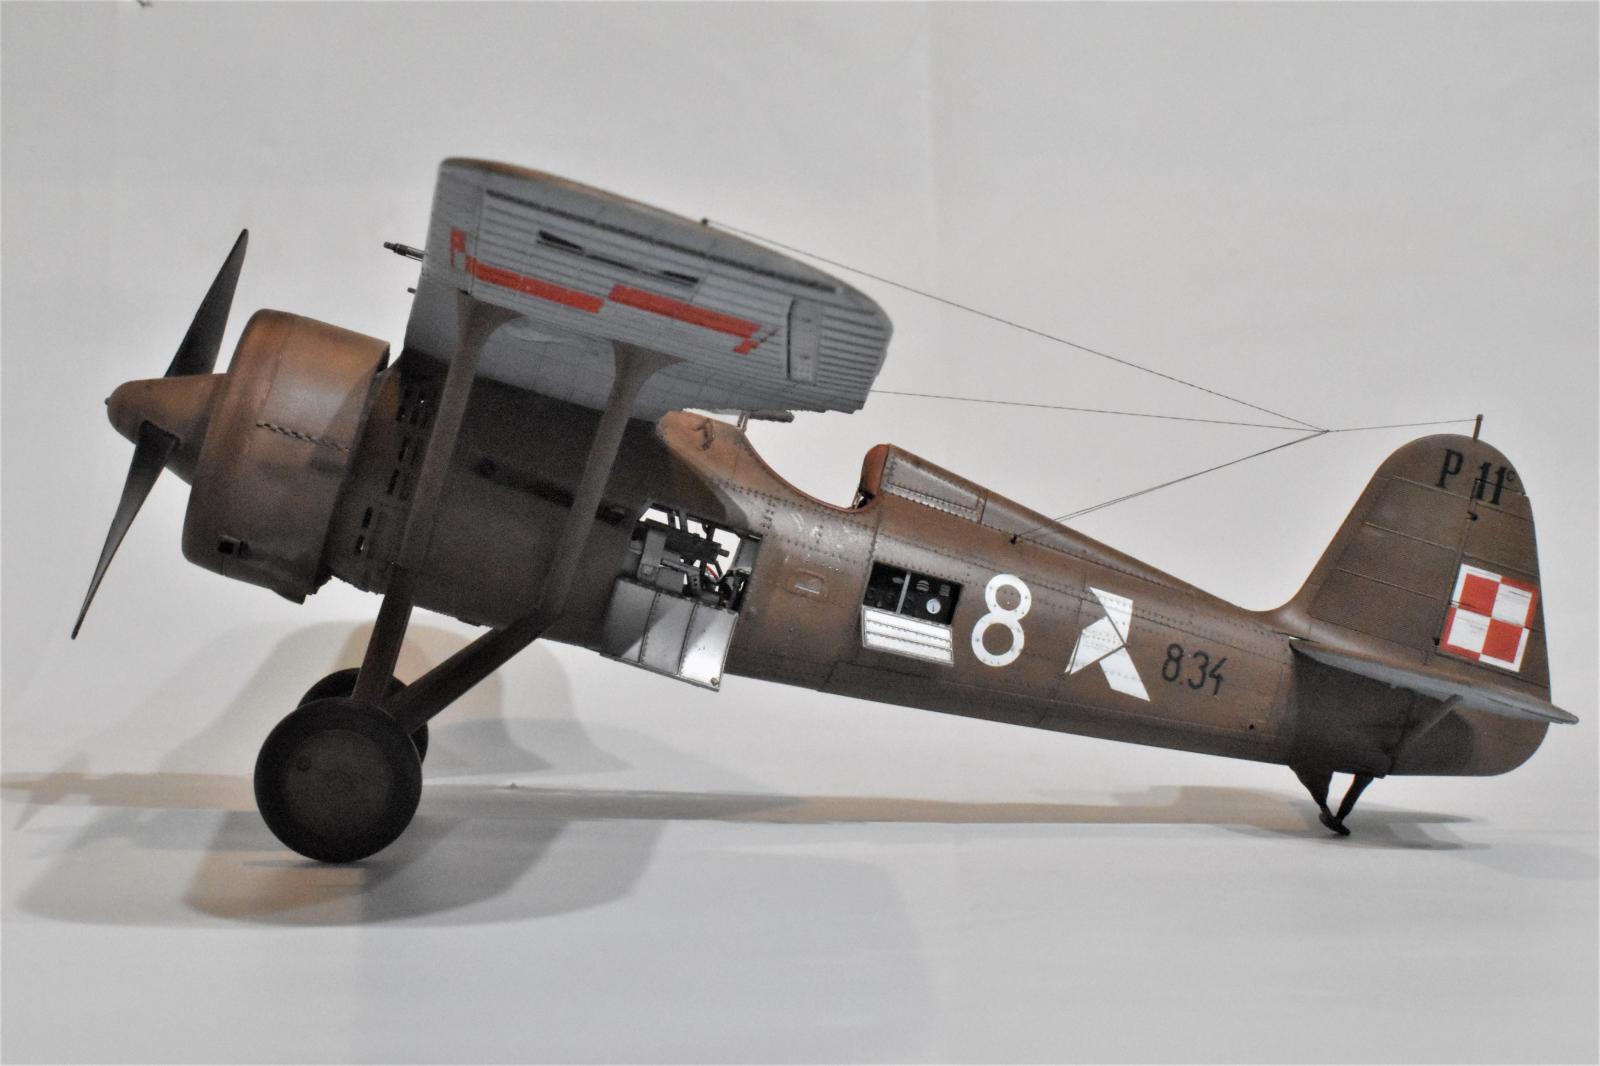
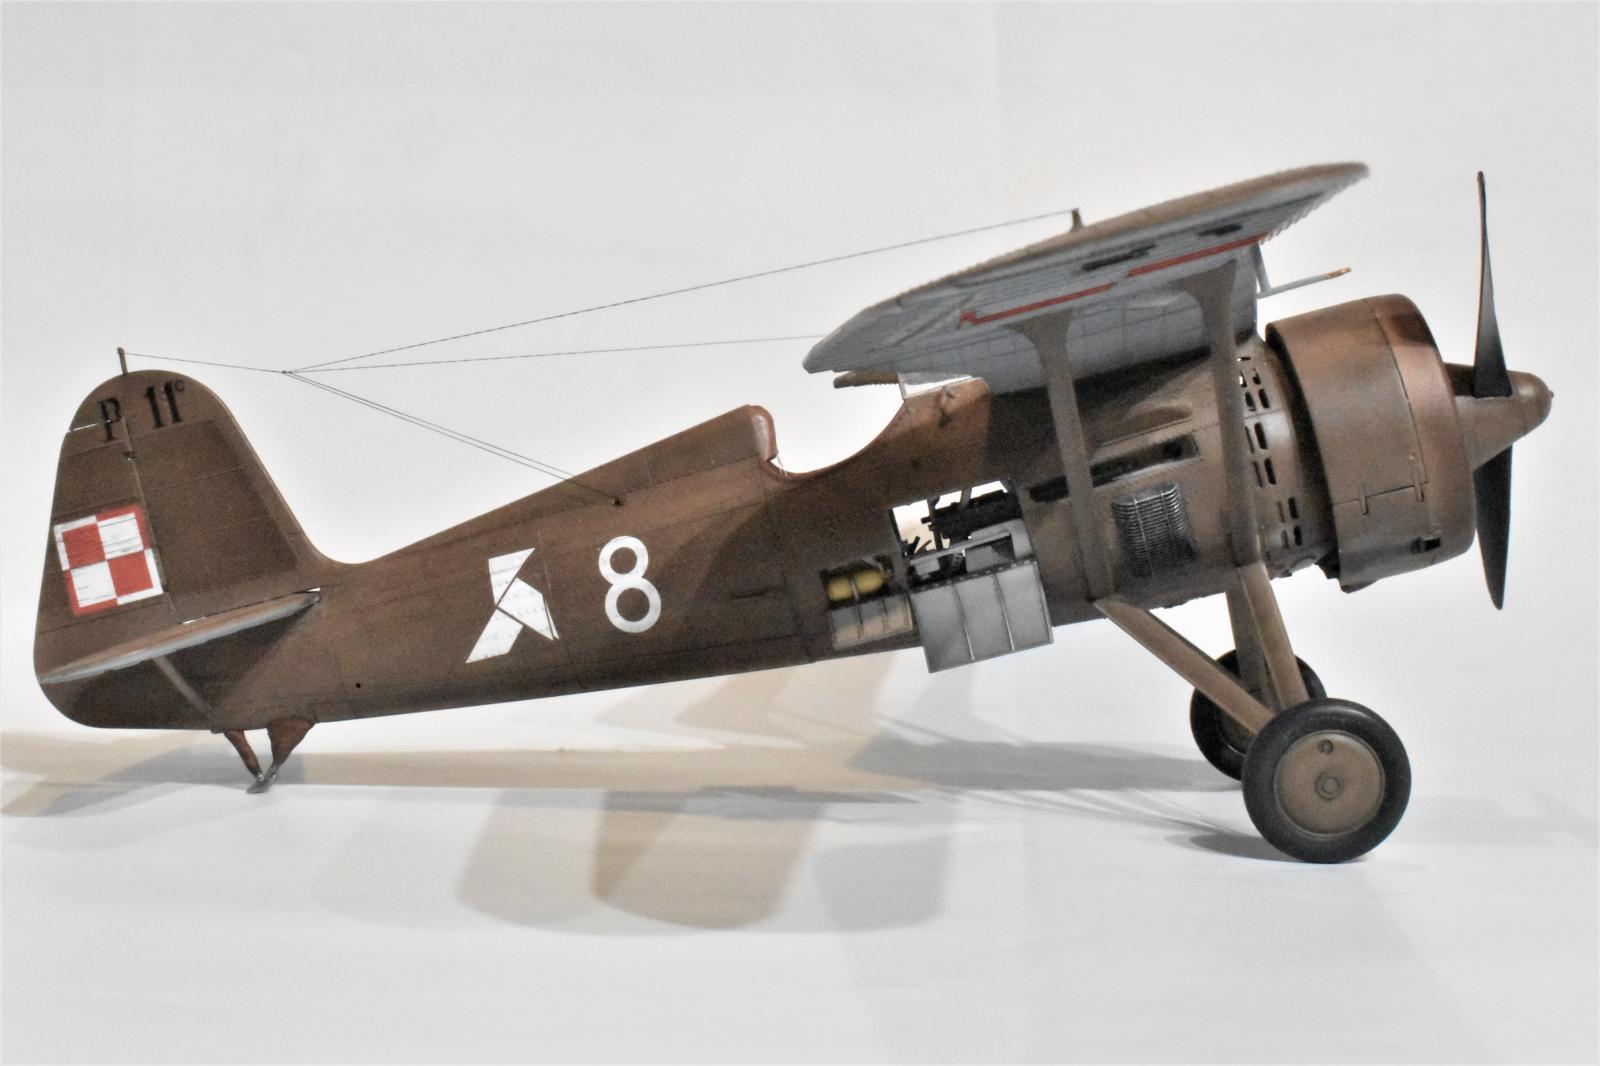
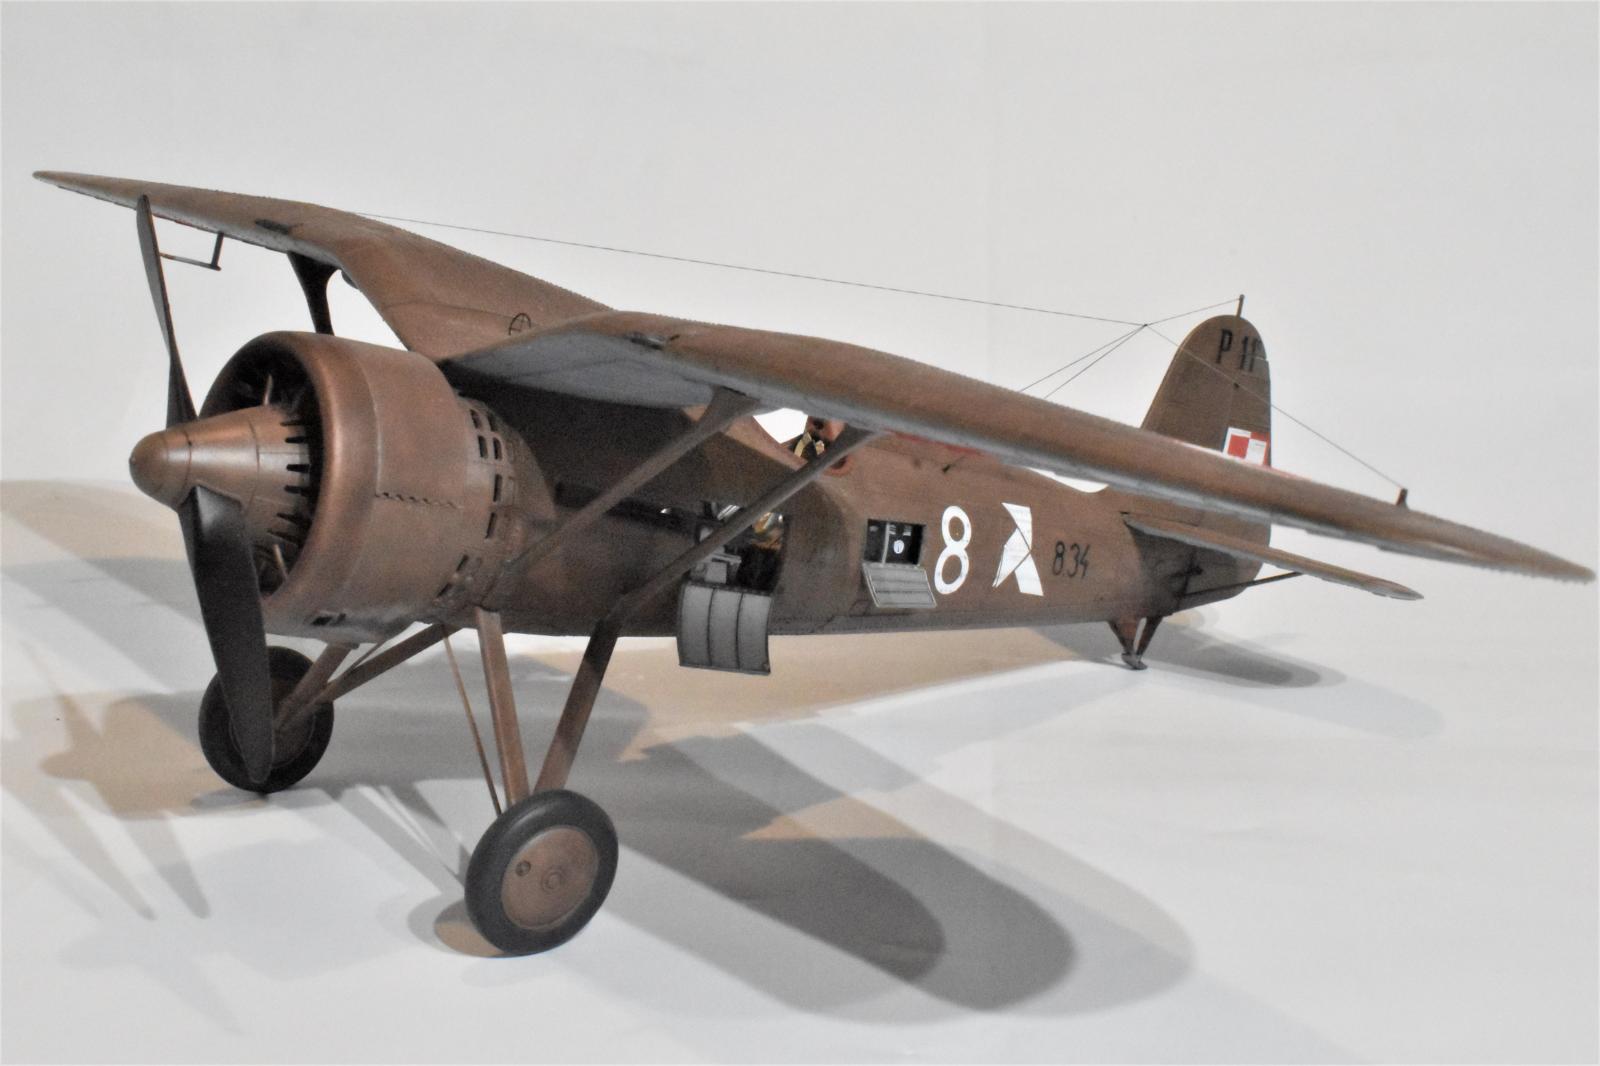
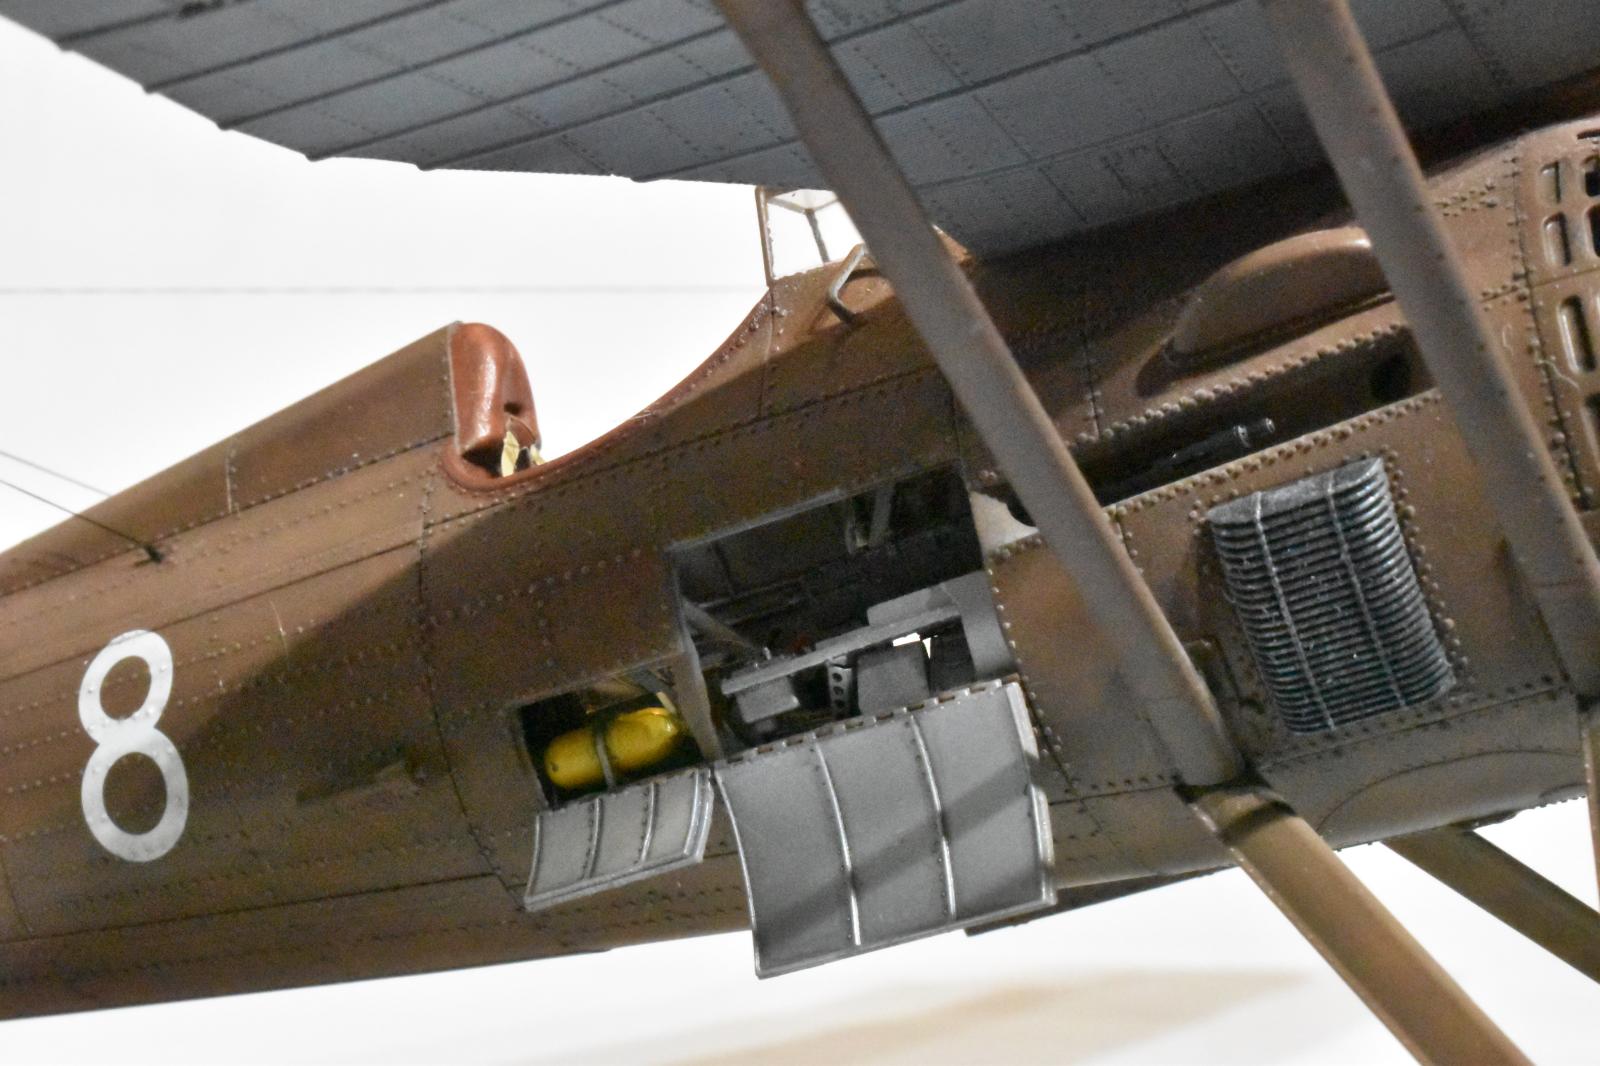
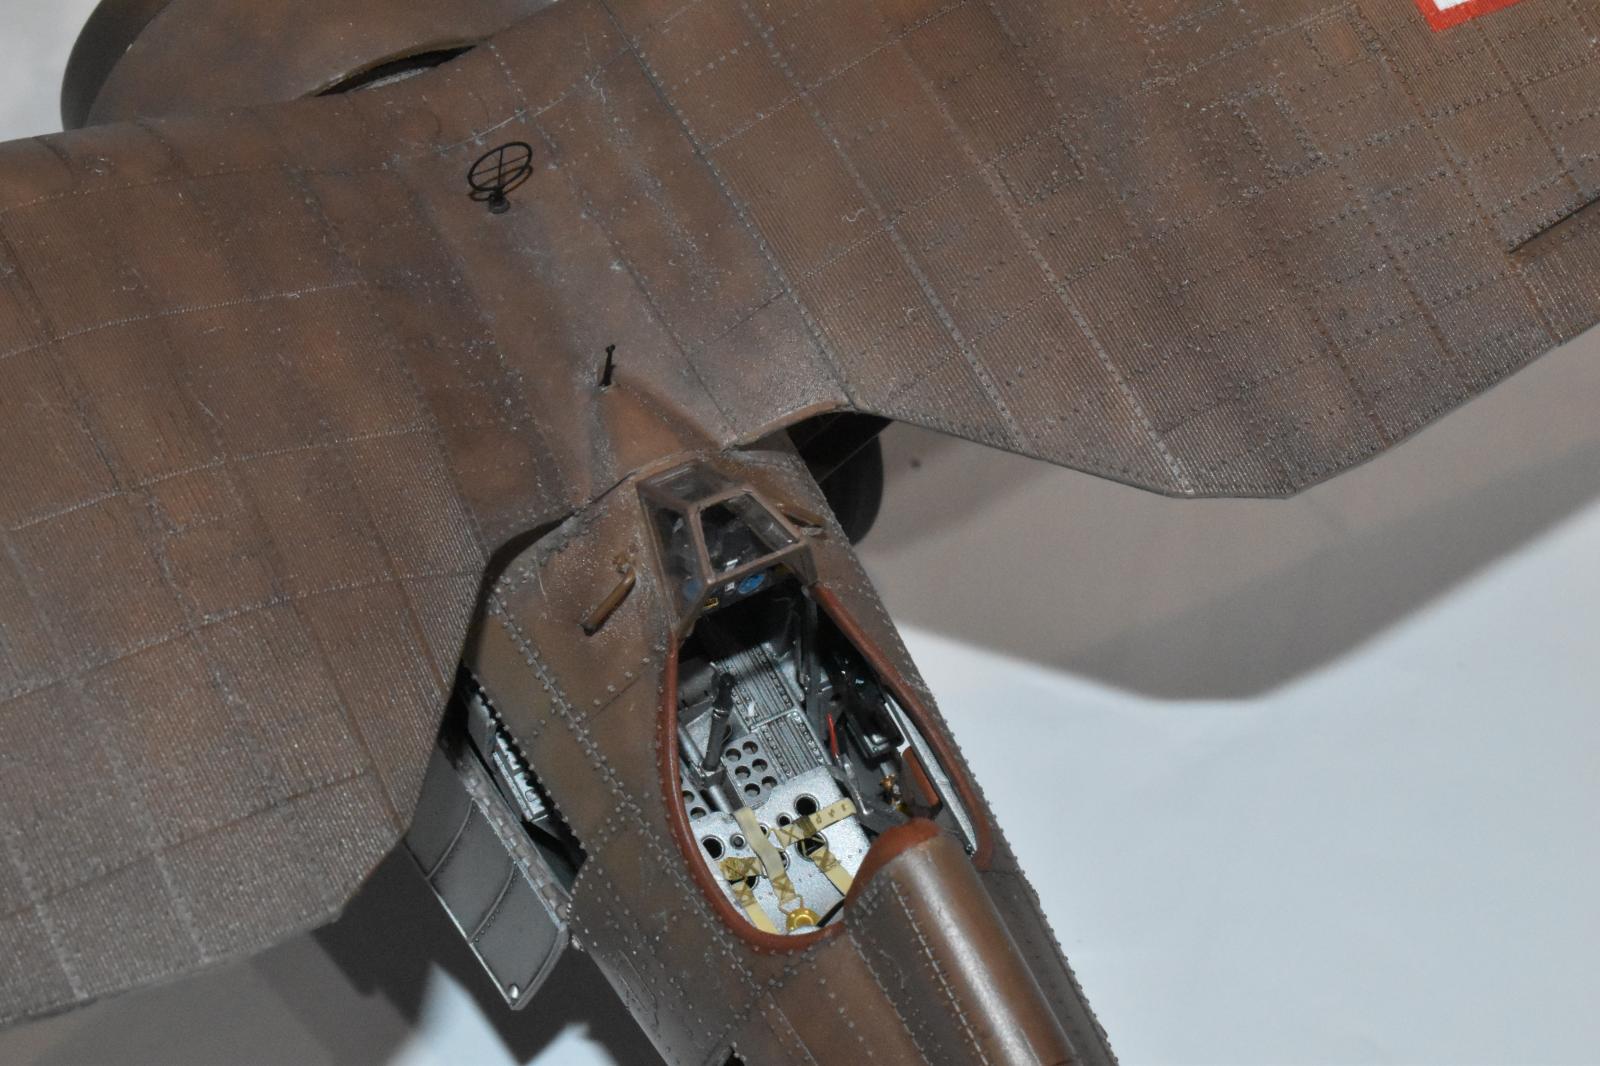
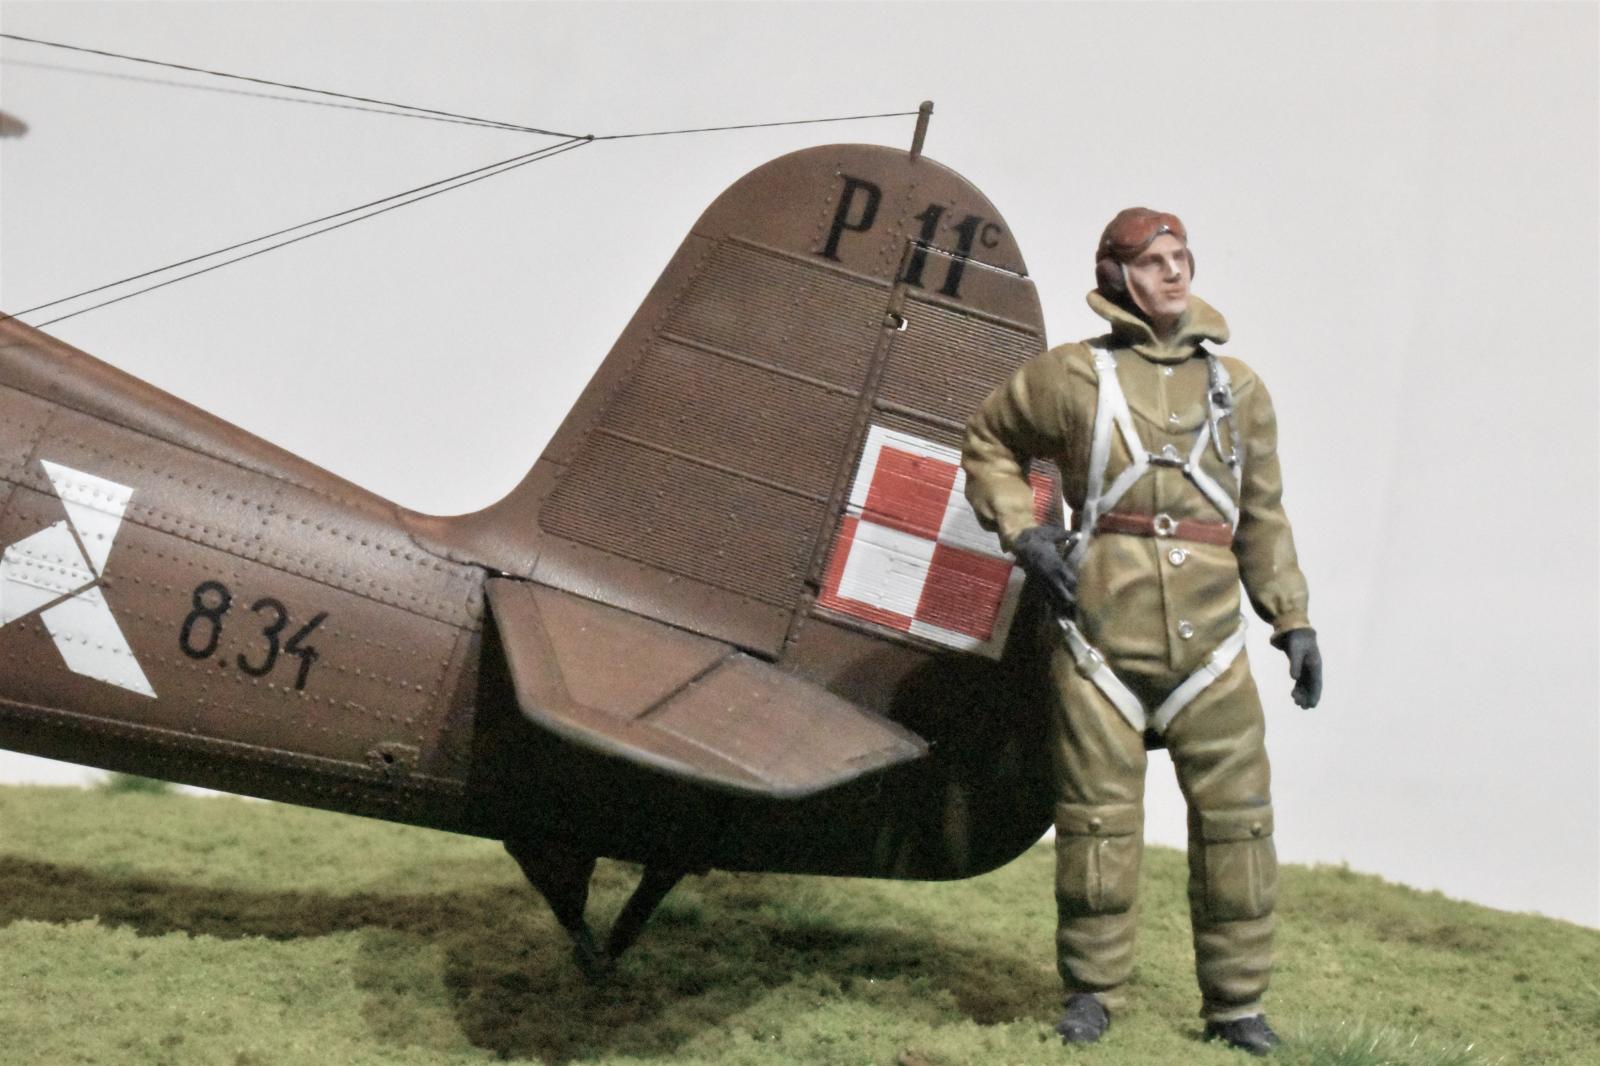
In the meantime I had painted the interior aluminum and some black boxes and a leather mapbox, all the color call outs the instructions gave you. Luckily my kid had a monograph with some good interior shots, including the only survivor in a Polish museum. Turns out there were many colored knobs and widgets, the instrument panel represented with many individual decals, that were quite colorful. The etched seatbelts look good too, and after the fighting, the interior looked pretty good. Four open panels are provided, to show the MG and radio details, and I decided to do these open. Detailed MG ammo feeds and mounts are given, more on these later.
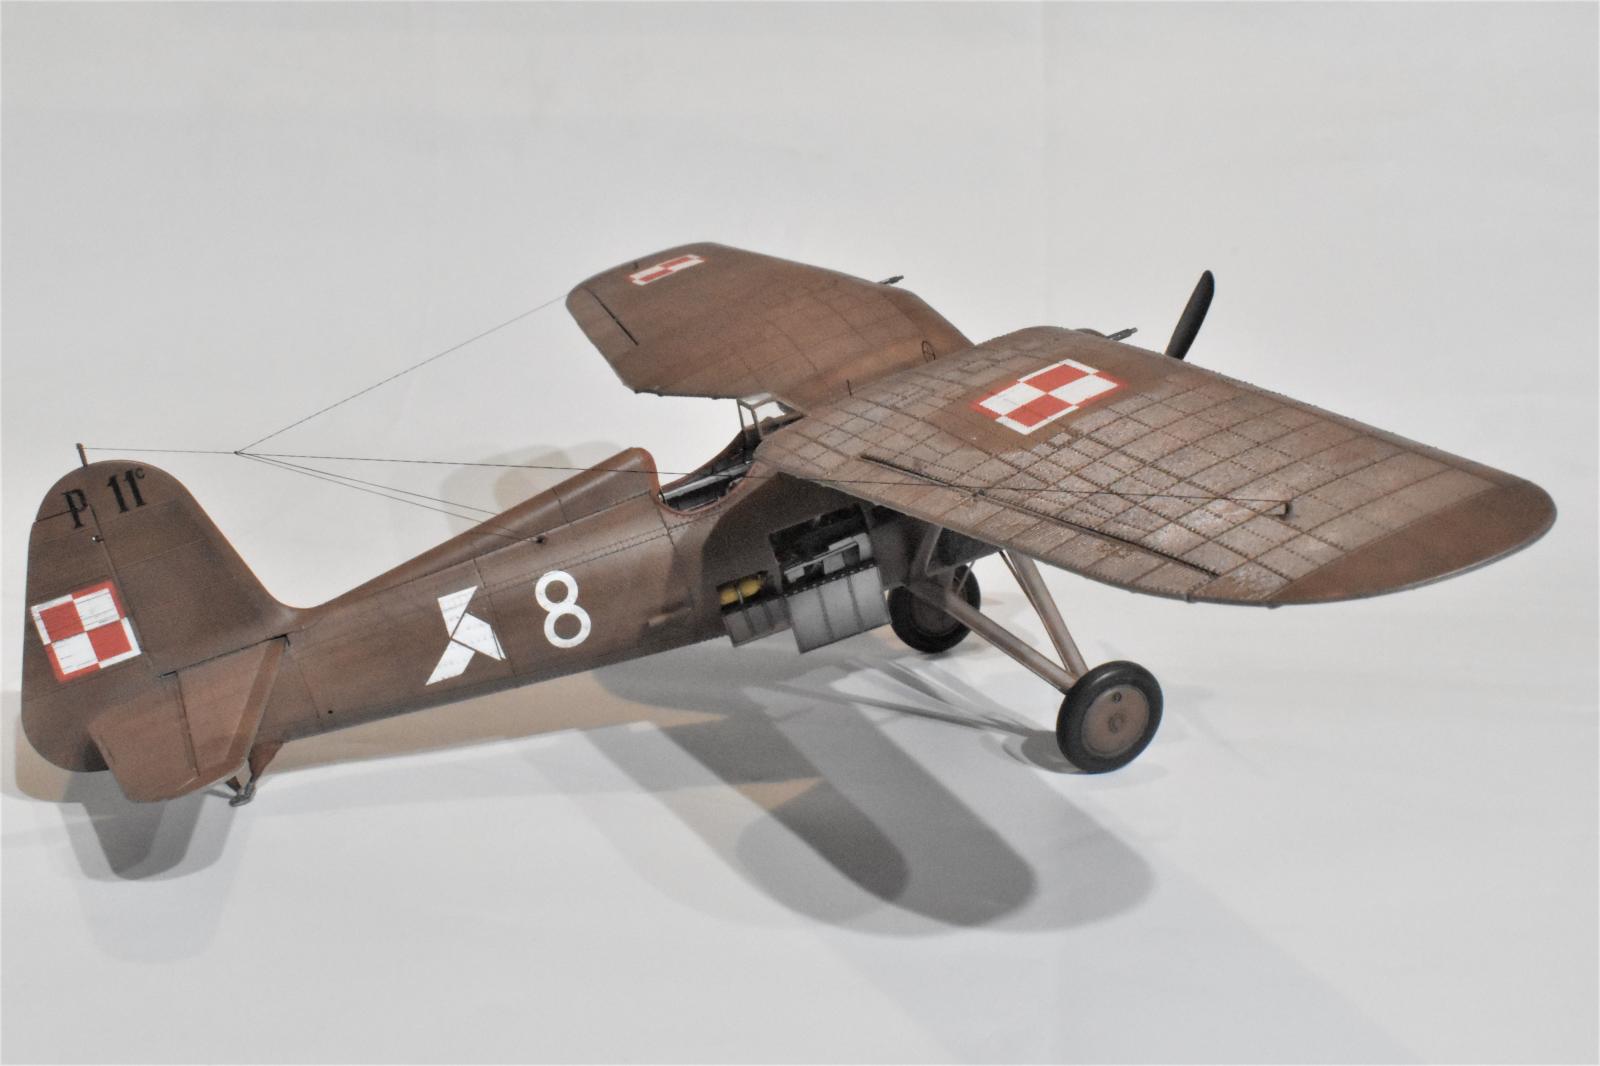
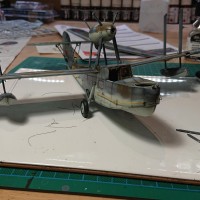
So let's slap the fuselage together and move on. Fiddle, trim, fiddle trim squeeze. The engine mount issues came in at this point. Finally, some semblance of together. The rest is easy now. Hahahahaha. The wing halves fit all right, but the center section...nope. Had to be shimmed out with sheet styrene to match up. Wing to fuselage...nope. trim shim fill repeat. I had intended to paint the wing separate but no dice. I left the struts off to paint separate. Something looks funny. Are the wings drooping? Or does it supposed to look like a seagull? Find a front planview.The Pulawski wing is a shallow triangle in front view, the bottom being pretty flat, and the planview shows the bottom line level. No way those struts are going to put that wing up where it belongs. So Bill the engineer cut and extended the struts with shaved sprue extensions, till they put the wings in the "somewhere close" position. Somewhere along the 68 year old line, I must have picked up some patience I never had, the old Bill woulda flew this one into the bin a while ago.
Painting involved using Hataka's "Orange" (lacquer) line. The Polish khaki looked too light to me so I darkened it with some Polish Armor brown. I am tired now and won't go into the rest of the problems (painting issues, trying to decal over all that wonderful surface detail, landing gear, stabilizers,) except to mention the Machine gun mounting which was another royal PIA involving more shims to hold them in proper place. I managed to glue the inspection doors on without fuss and the antenna turned out pretty good and at last fini. Stan the Polish flyboy painted up very nicely after I repositioned his arm.
After all that it looks "Pretty" good, I can't look too close at it, there are way too many paint and decal issues on this one (No Nationals for YOU!). But I wanted a big P-11 and I have one. Oh remember how neat the fuselage rivets were? Look at the real item. The fuselage is a smooth as a baby's A--. It's a lovely War.
Oh and all the pic files entered beautifully, thanks Ed. Man.
Bill, this is really a beautiful build you've done here, your paint work is excellent and very realistic. I've seen a lot of these built up and they all seem to look the same, however yours really stands out.
Your build is fantastic, the paintjob is downright gorgeous despite having to work with one color basically.
Respect! I always admire modelers who build these old Polish flying junk. Only P11 with Mercury VIII engine was acceptable.
Not good enough for the Nats? Let me say you have a very solid build there, your PZL is highly impressive and I can’t tell any blemish despite the problems you mention during the build/paint. Awesome work Bill, go Nationals, regionals or state exhibits 😉
Artful photography hides sins. 🙂
An absolute winner, Bill @billkoppos
Your paintwork, as well as the detailing, is superb and very realistic.
Well done.
Really nice build. So disappointing to hear about the alignment problems, especially with a kit in this scale and level of detail. I've built the Eduard 1/72nd and didn't have half the issues you describe. Now, about this airplane. Just how in the world were those side fuselage mounted guns supposed to be used?
They just shot through the holes in front of them and then thru blast tubes, out in between the cylinders. Quite a few fighters did this, Gloster Gladiator, Polikarpov I-15 series, Nakajjima Ki-27, I'm sure there's more.
Well done, Bill (@billkoppos). All your headaches and additional effort really paid off. I really thought about getting this when it came out, but I had built a 1/48 P-11C some time ago, and had some issues getting the decals to lay down. I know it was a pain, but your paint and markings look perfect.
Coulda fooled me. This looks pretty darn good. Methinks thou art too hard on thyself.
Thank you Tom. Yeah maybe I am, but after all these years I would like perhaps one perfect one.
I've been doing this for as long as you have been alive, and I can tell you Ain't Nevah Gonna Happen. The best any creative person can hope for is to "get better."
It looks pretty great from where I’m sitting, Bill.
Inspiring, Bill.
Awesome build, Bill!
Despite the troubles you mentioned, I think you did an absolutely marvelous job. That pilot figure looks outstanding!
Nicely done, Bill
Nice work, Bill. The struggle paid off.
Excellent! I have a fascination with this aircraft. I keep meaning to pick up the Arma Hobby 1/48 kit.
Thank You men, for all the positive reviews.
That ain't bad, Bill @billkoppos! It ain't half-bad either. I'd say it's damned good, myself! 👍 Maybe it's not that perfect one, but it's a great model plane! 👏
Excellent! I can see why you had those similar feelings about models that feel like they're never ending. The interior must have taken a very long time to do.
Superb work, Bill. Especially for the skill and persistence you demonstrated in overcoming the build challenges. I really love the tonal variations you got in the camo, which I guess is from the marbling you do in pre-shading. Your model photography is also excellent. Lots of views so it is really hard to believe that there are any visible flaws, even in camera close up. BTW, that one shot - third to last - showing the cockpit painting you did is perfect. It shows how you brought out extraordinary depth and detail in the bare metal look of the major components (also for the open panels and equipment bays you did). Great work overall in every respect - painting, decaling and weathering. This is a plane that really interests me and I had no idea it was kitted in my favorite scale. Thanks for describing the ups and down of the build so well.
Thanks for the positivity Colin. Photos are taken on my kitchen stove, with an old shower curtain as a base. They still need better focus, still fiddling with f-stops and such. I learned to take shots from all angles, and to include the whole thing (getting all the wingtips etc. in) in most of them, for old Scott Van Aiken at Modelling madness, where I used to hang. I came over here because I get a lot more feedback from Youse guys at iMod. Yes I used the marbling, that will be standard from now on. I also decided to still use a "panel line" wash, even though I KNEW it was going to be heck to remove from that corrugated, rivetted surface. And it WAS. It took a few happy hours removing tufts of Q-tip and paper towel from the jungle, there are still some strays left. If you want to tackle this Go for it, but at least you have some ideas of the ruts in the road. When do we see your next project?
I am just at the final canopy masking stage of the Dragon Bf-110c in 1/32nd. Most major assembly and preliminary painting finished. Since I'll be doing it in RLM-79/78 for the desert scheme, airbrushing won't take as long as it does with more complex camo (not much masking necessary). I will also do the marbling thing for pre-shading but I am still learning how. Hoping for a better result result each time I try it. BTW, I use those little micro-fiber cloths (for cleaning glasses) instead of Q-tips or paper towel for oil washes. Not perfect in all respects but pretty absorbent and they don't eave lint. Happy modeling.
Looks good to me Bill, great job at overcoming the challenges of the kit.
That is a real beauty! I'll keep it as a reference for my 1/72 build at some point. I love these more unusual subjects.
Hi Bill, yea people forget about the Polish Airforce, they still forget about what happened next. The Poles in Hurricanes, 303 being the highest scorers with Joseph Frantizec (Honorary Pole according to a Polish friend) being the man. We treated them terribly just to appease Stalin. Mate, a beautiful job. I have built a few IBG kits in 1:72 and even in that scale they are jewel like, but not easy. I have an 11C from Arma to build in 1:48 but this one of yours...You did them proud chap, nice one. PS...Polish khaki...even they don't necessarily know exactly what shade of brown it was...😳❤️