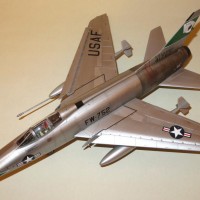
1/48 US Navy SNJ-3 (Revell 1/48 AT-6G): Jim Sullivan Memorial Group
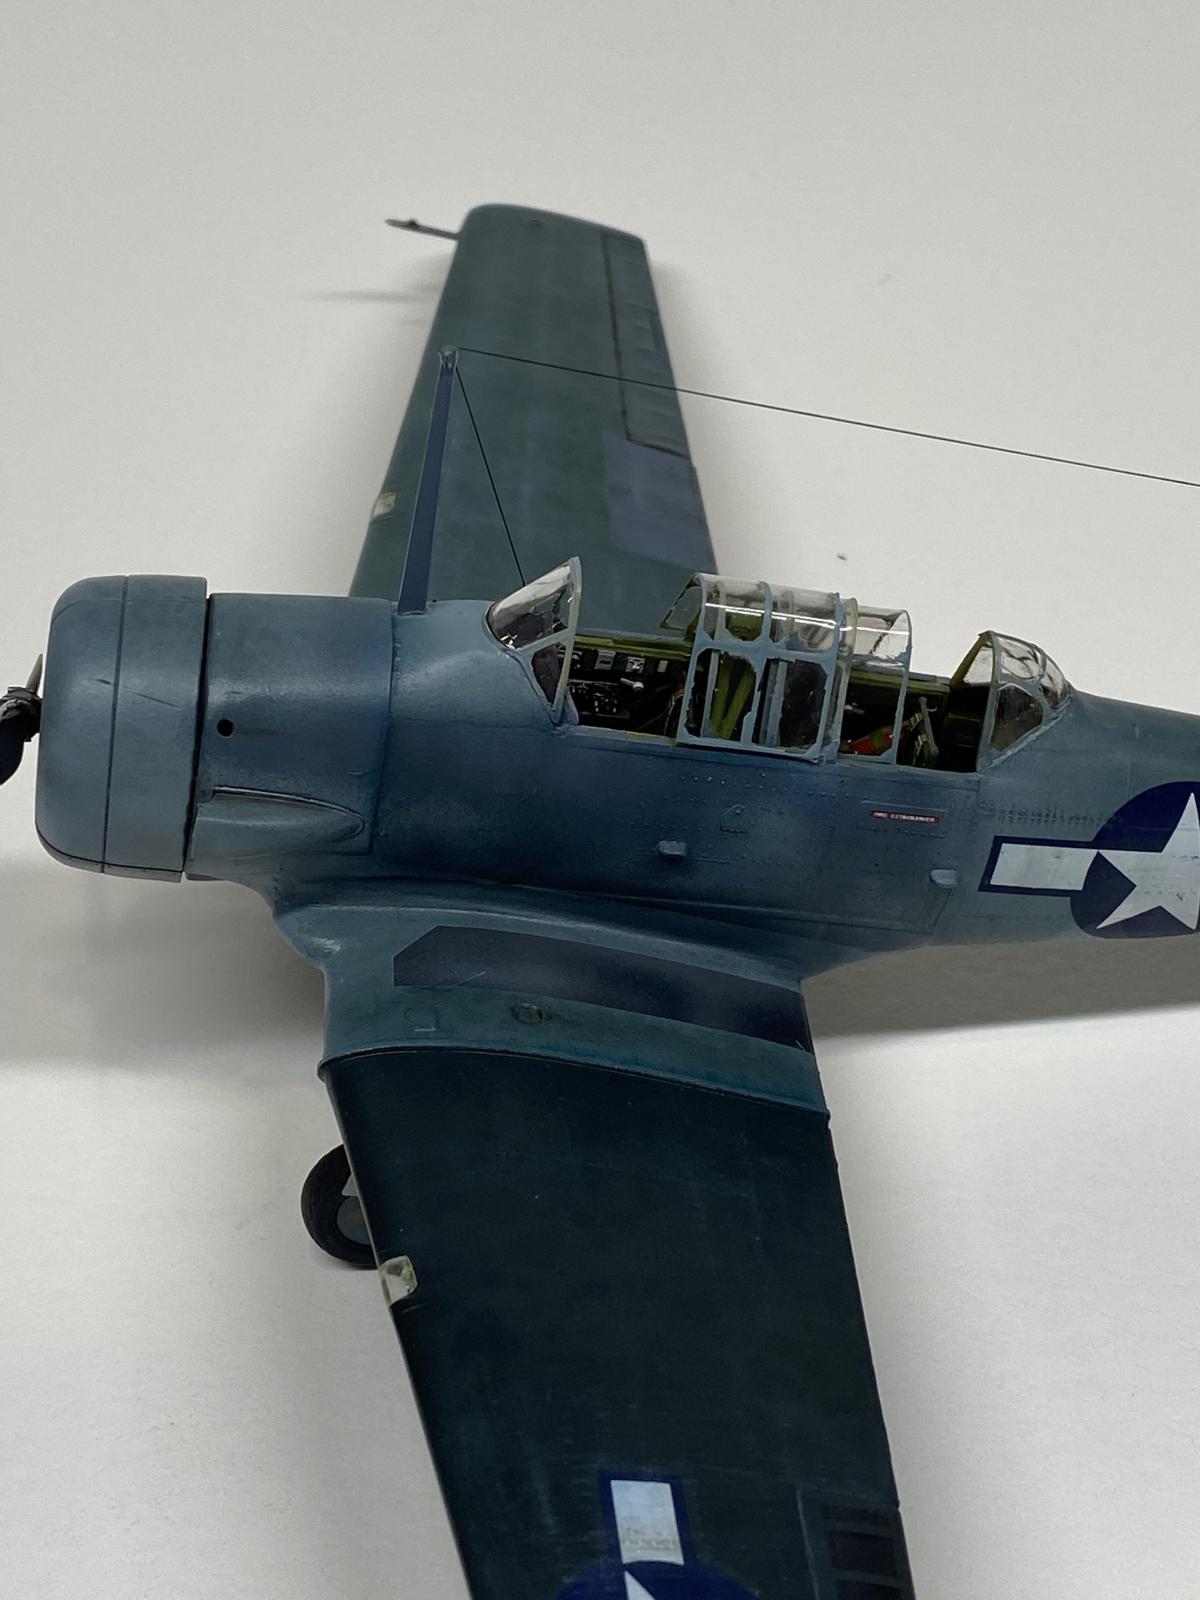
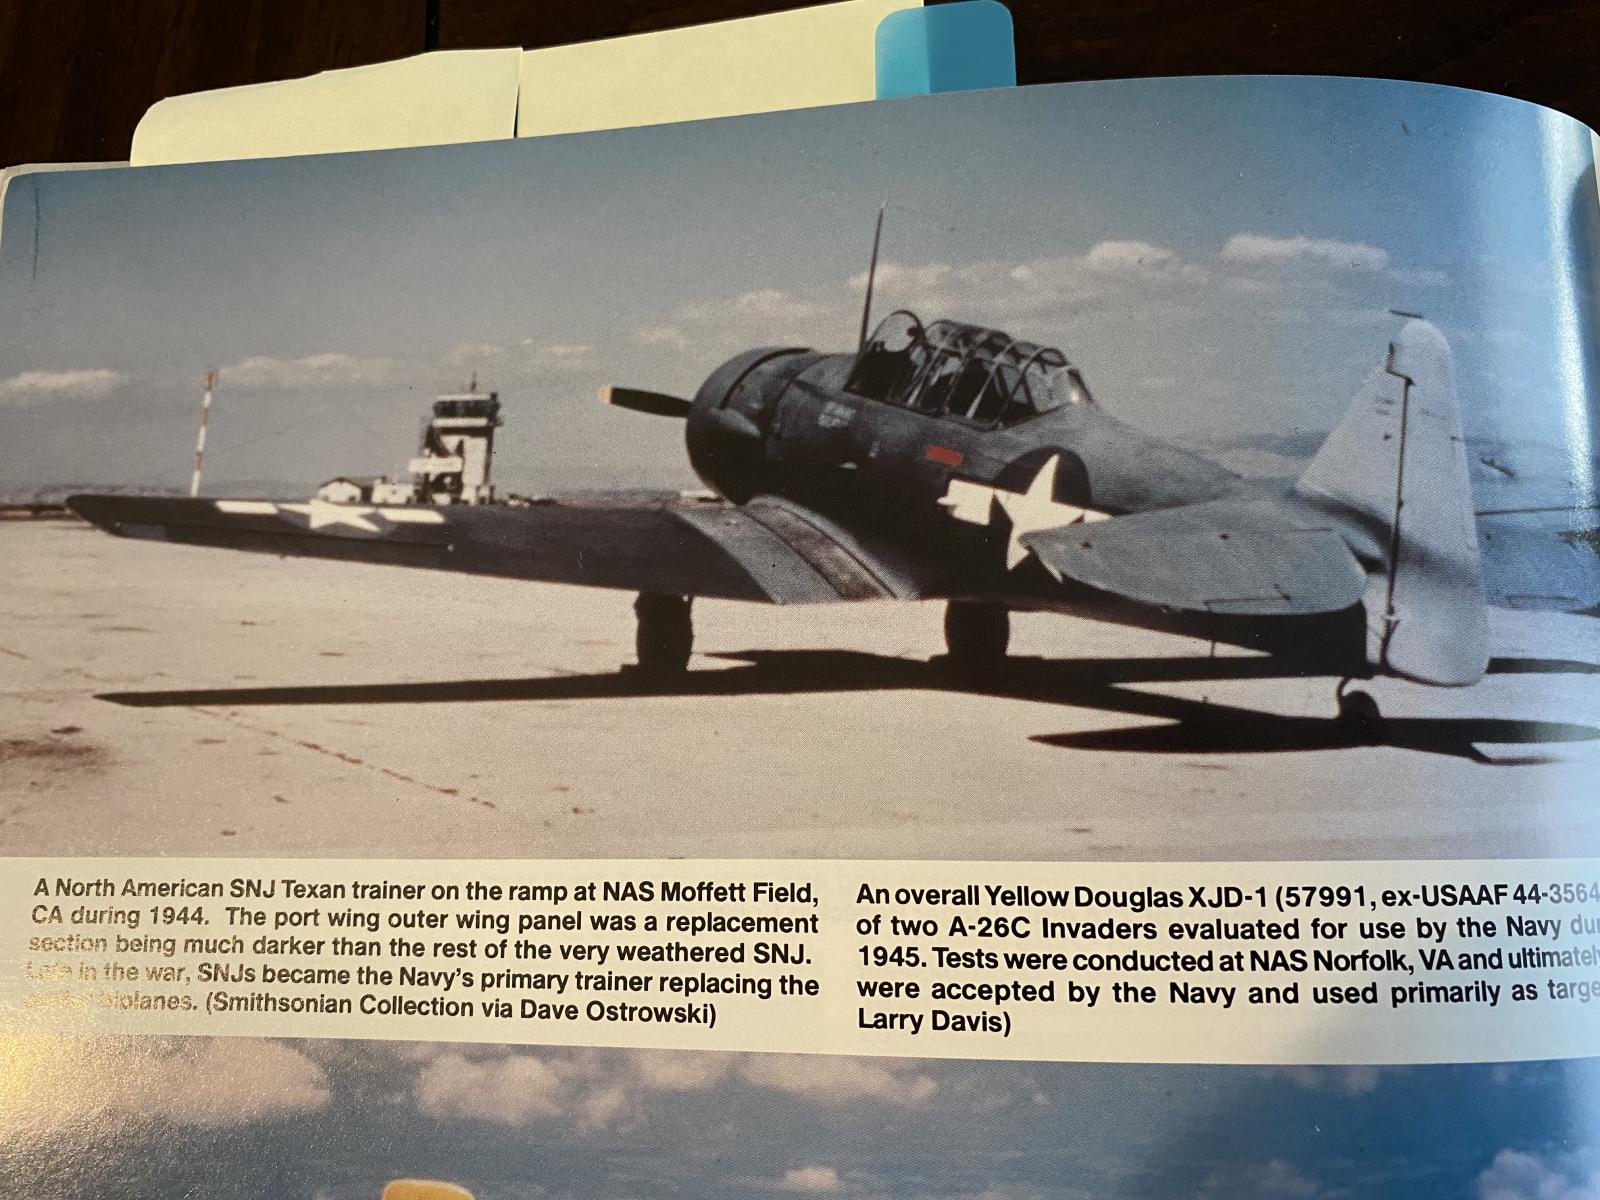
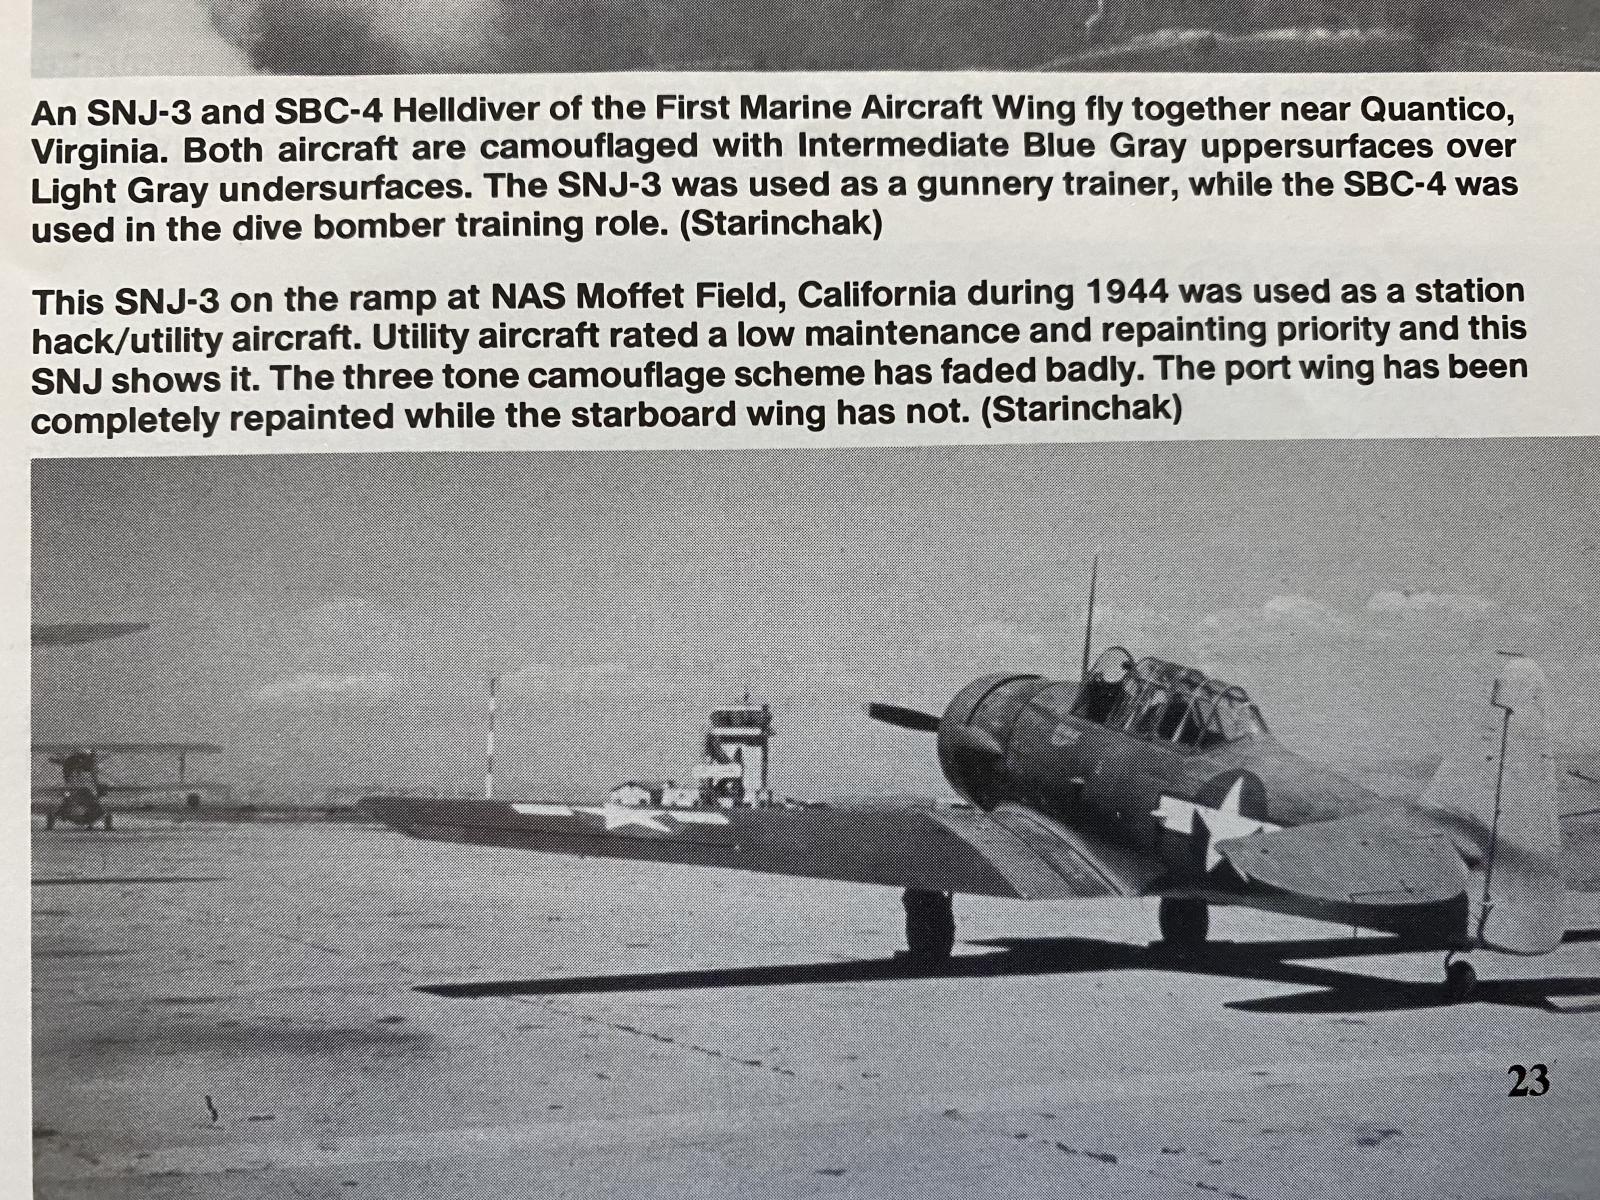
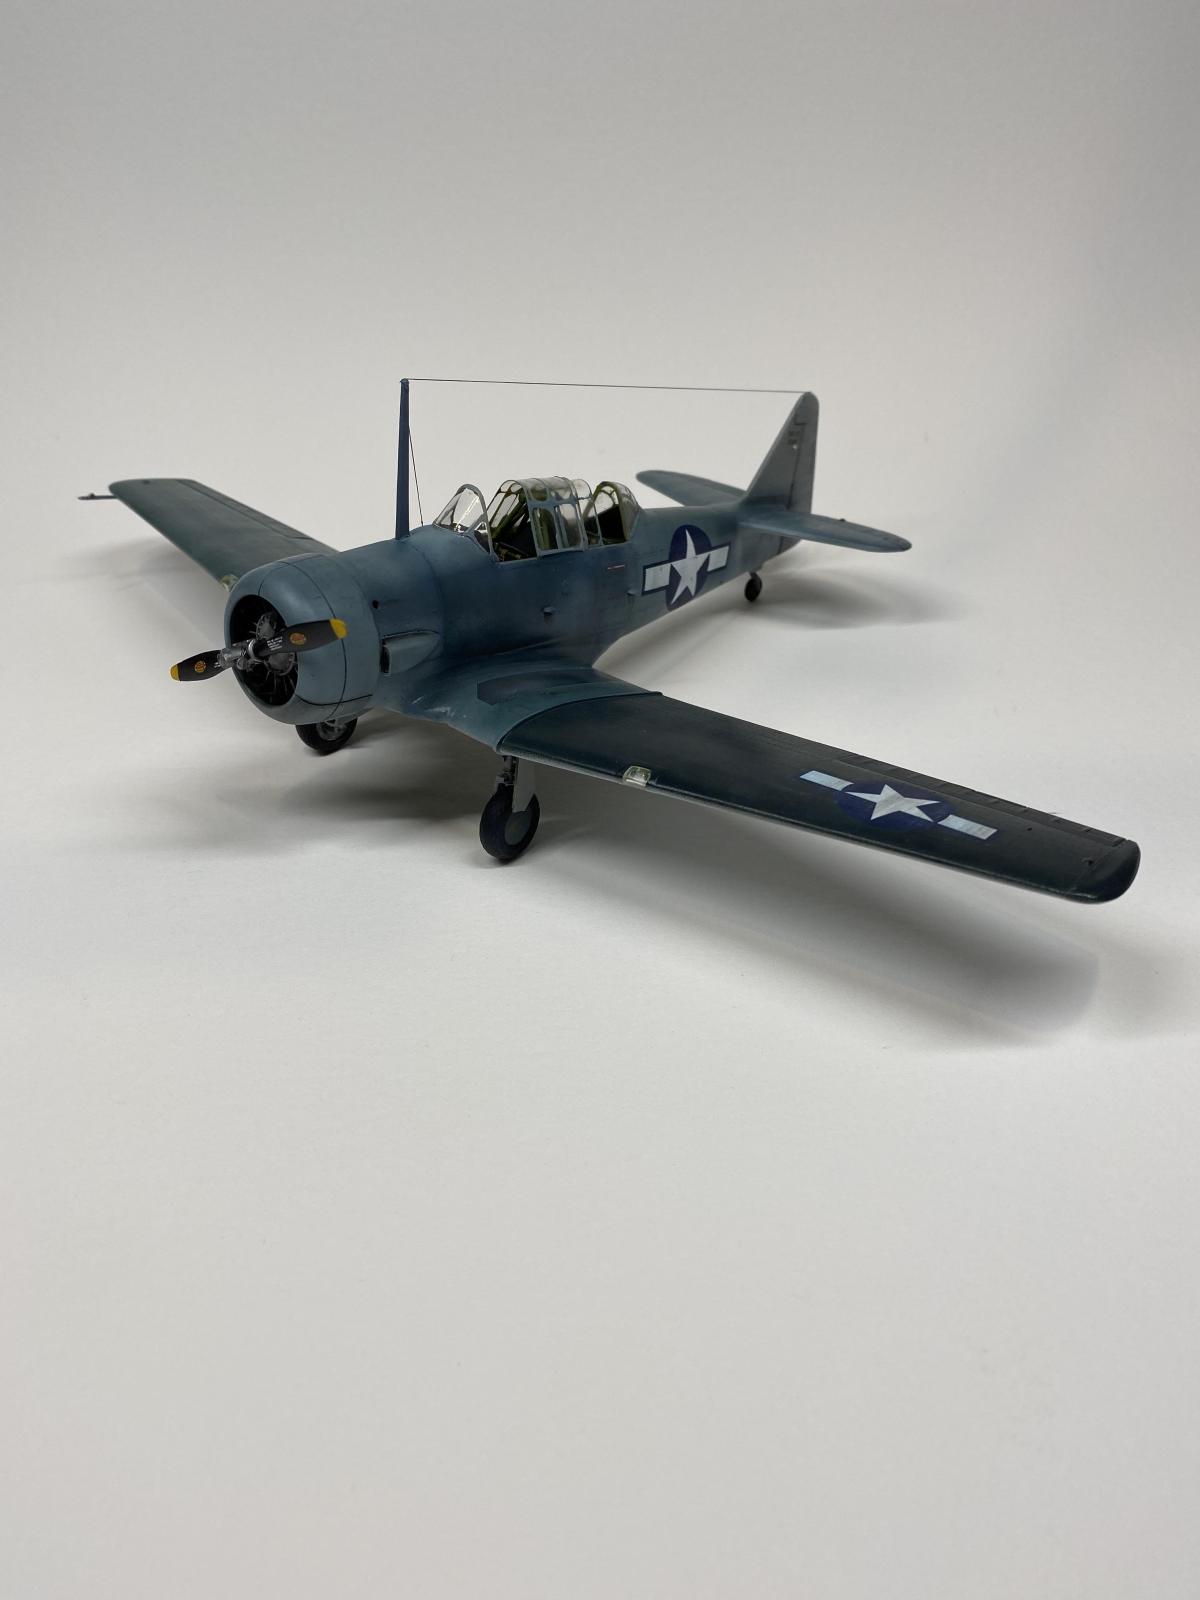
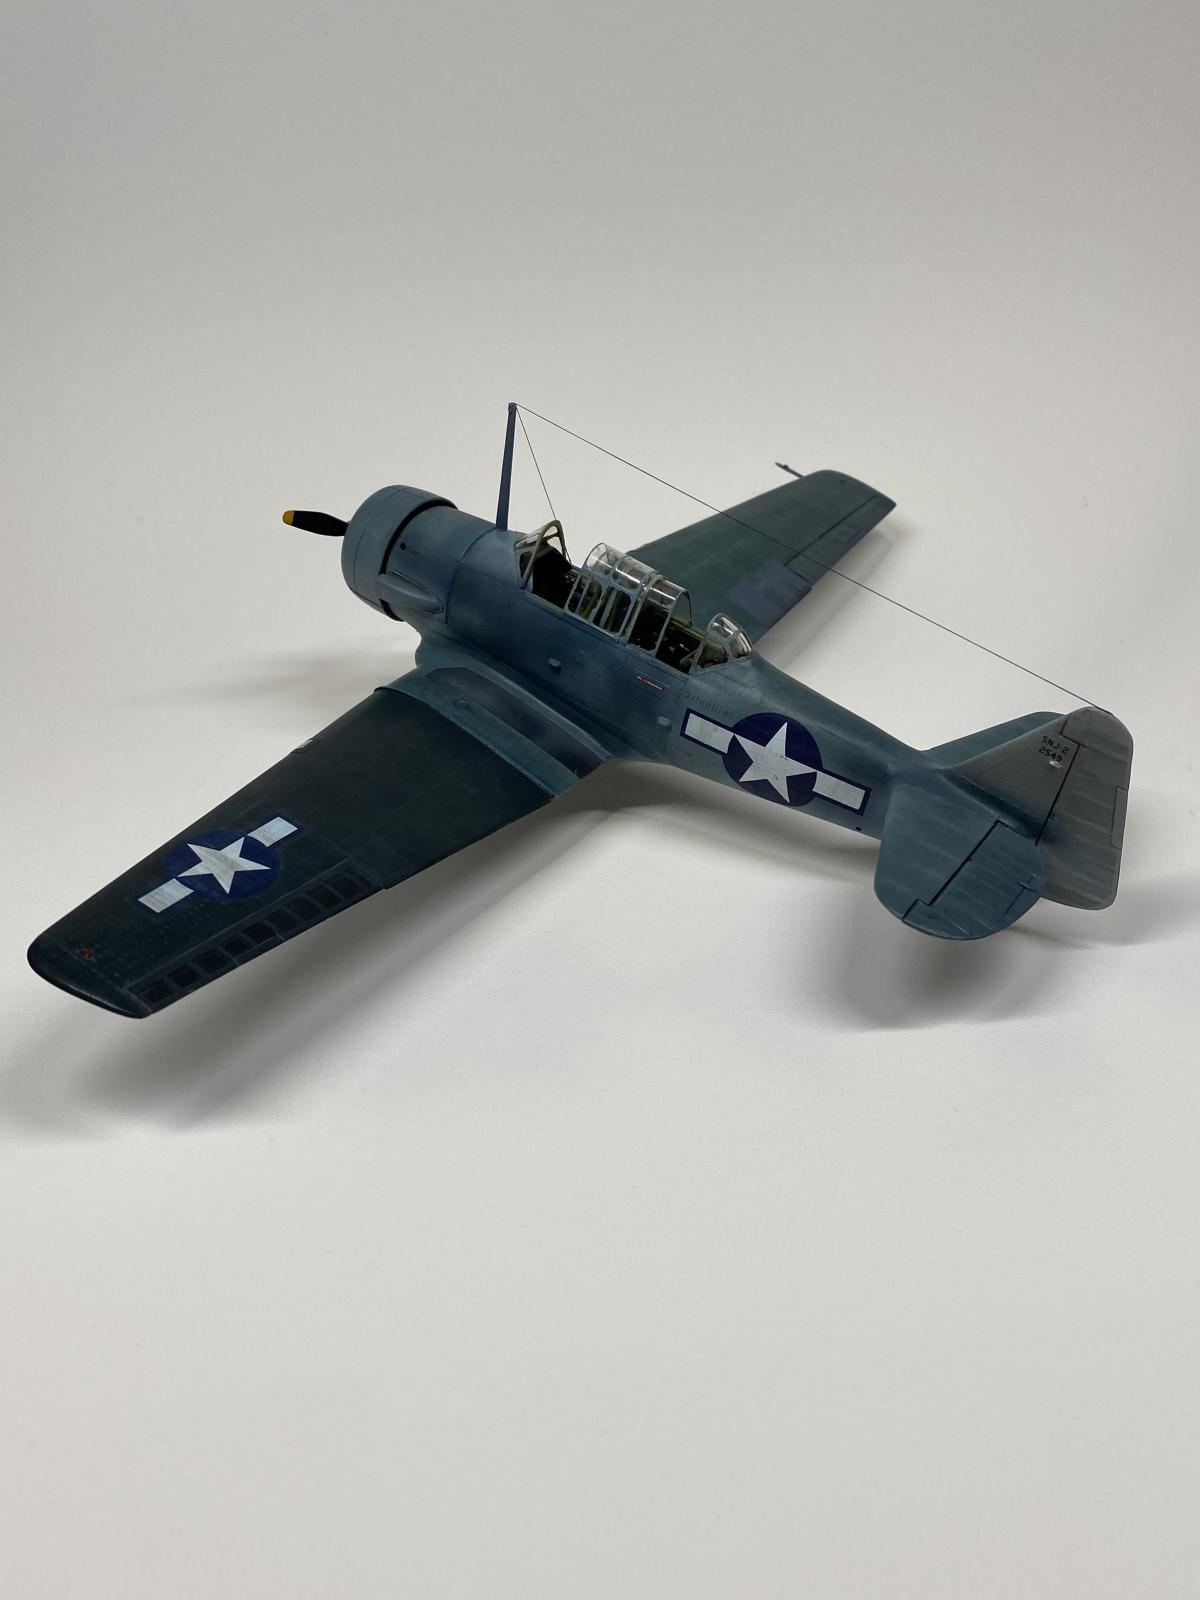
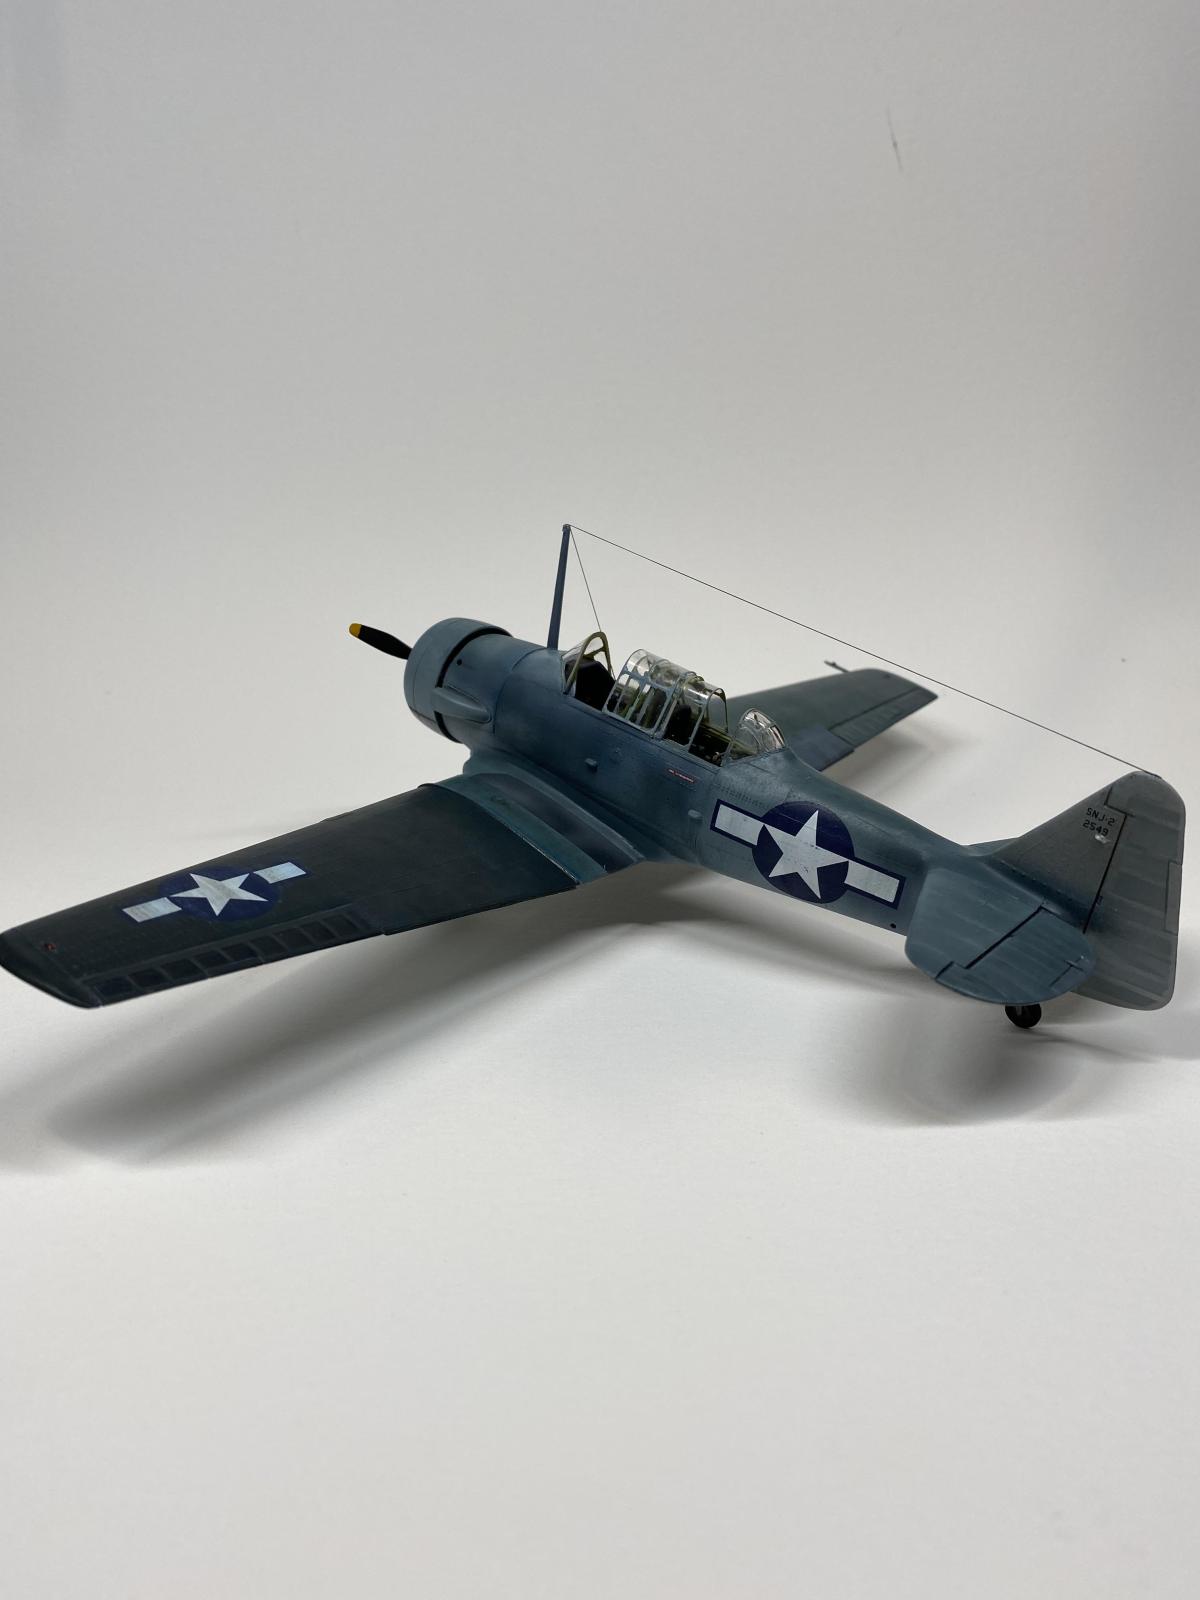
I wanted to do one more model for the Sullivan Memorial Group, and a photo in Golden Wings of a US Navy SNJ-3 caught my eye. It was a very weathered SNJ-3 photographed at NAS Moffett Field in 1944. The camouflage seemed to be a cross between the 2-color and 3-color camouflage. It looked like a good springboard for some new painting and weathering techniques I wanted to try.
Paint Scheme
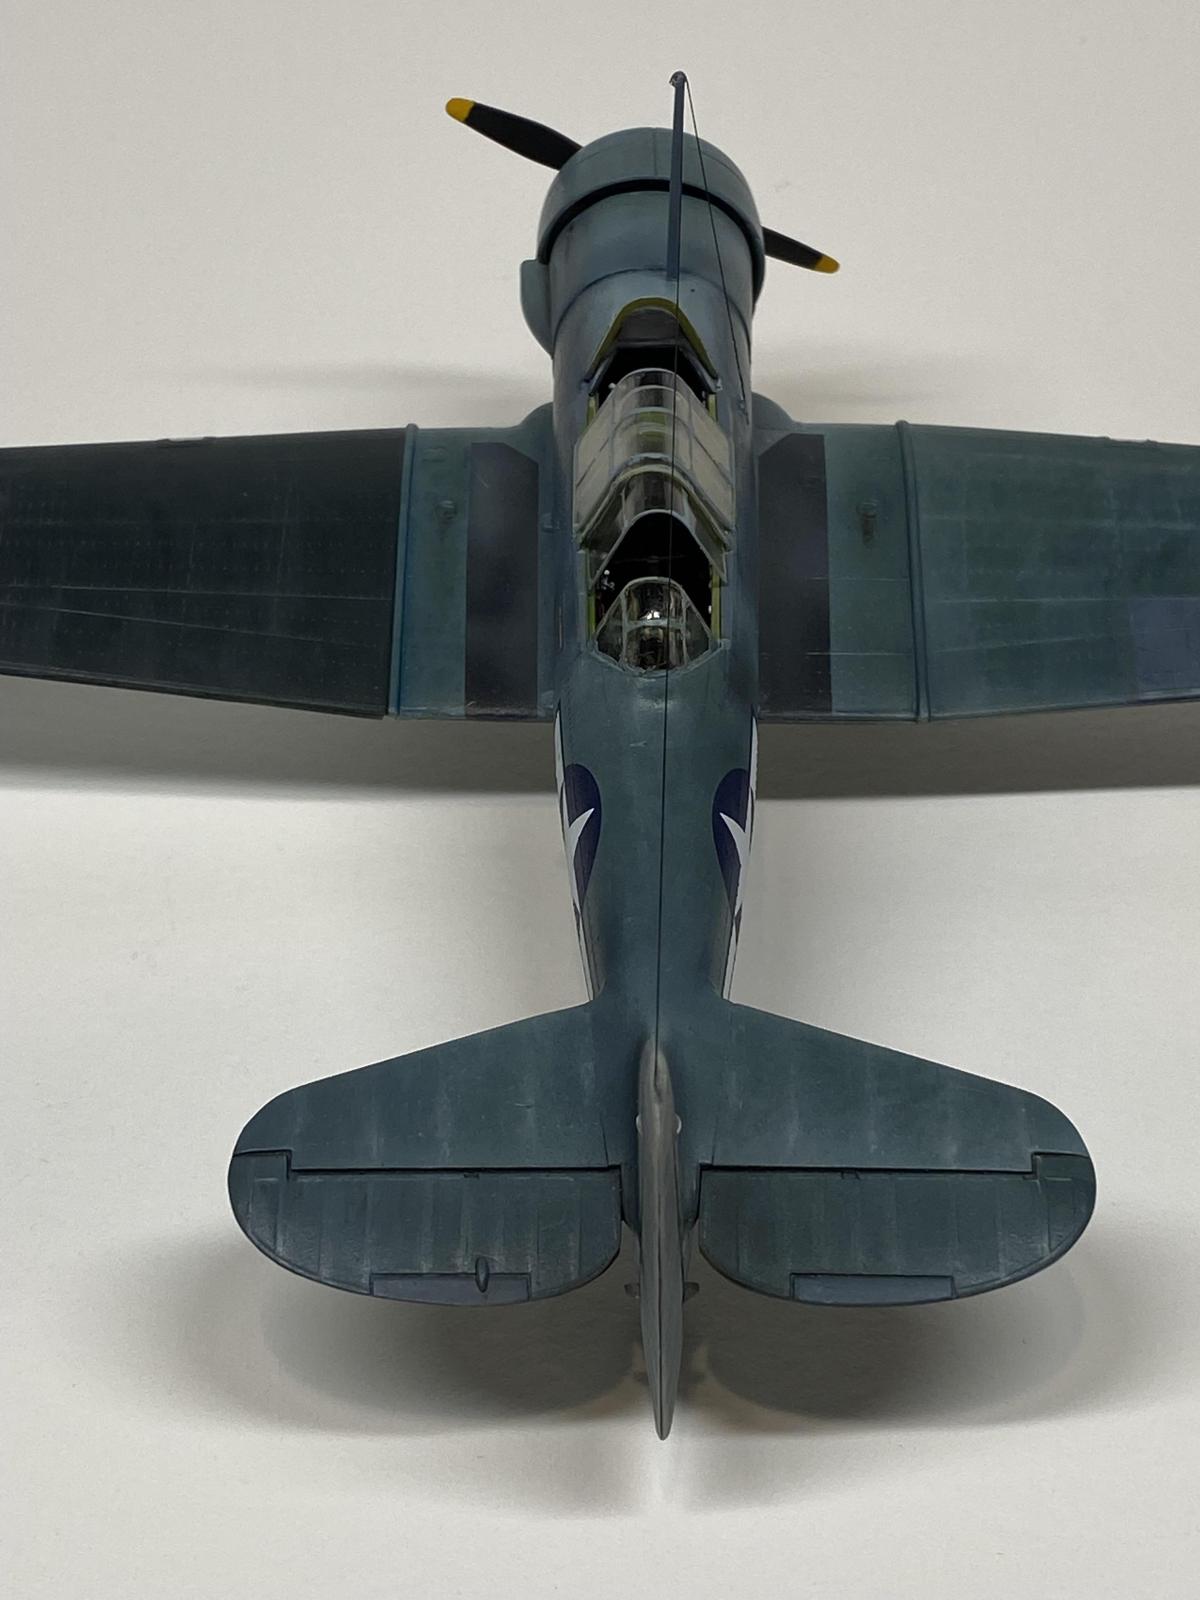
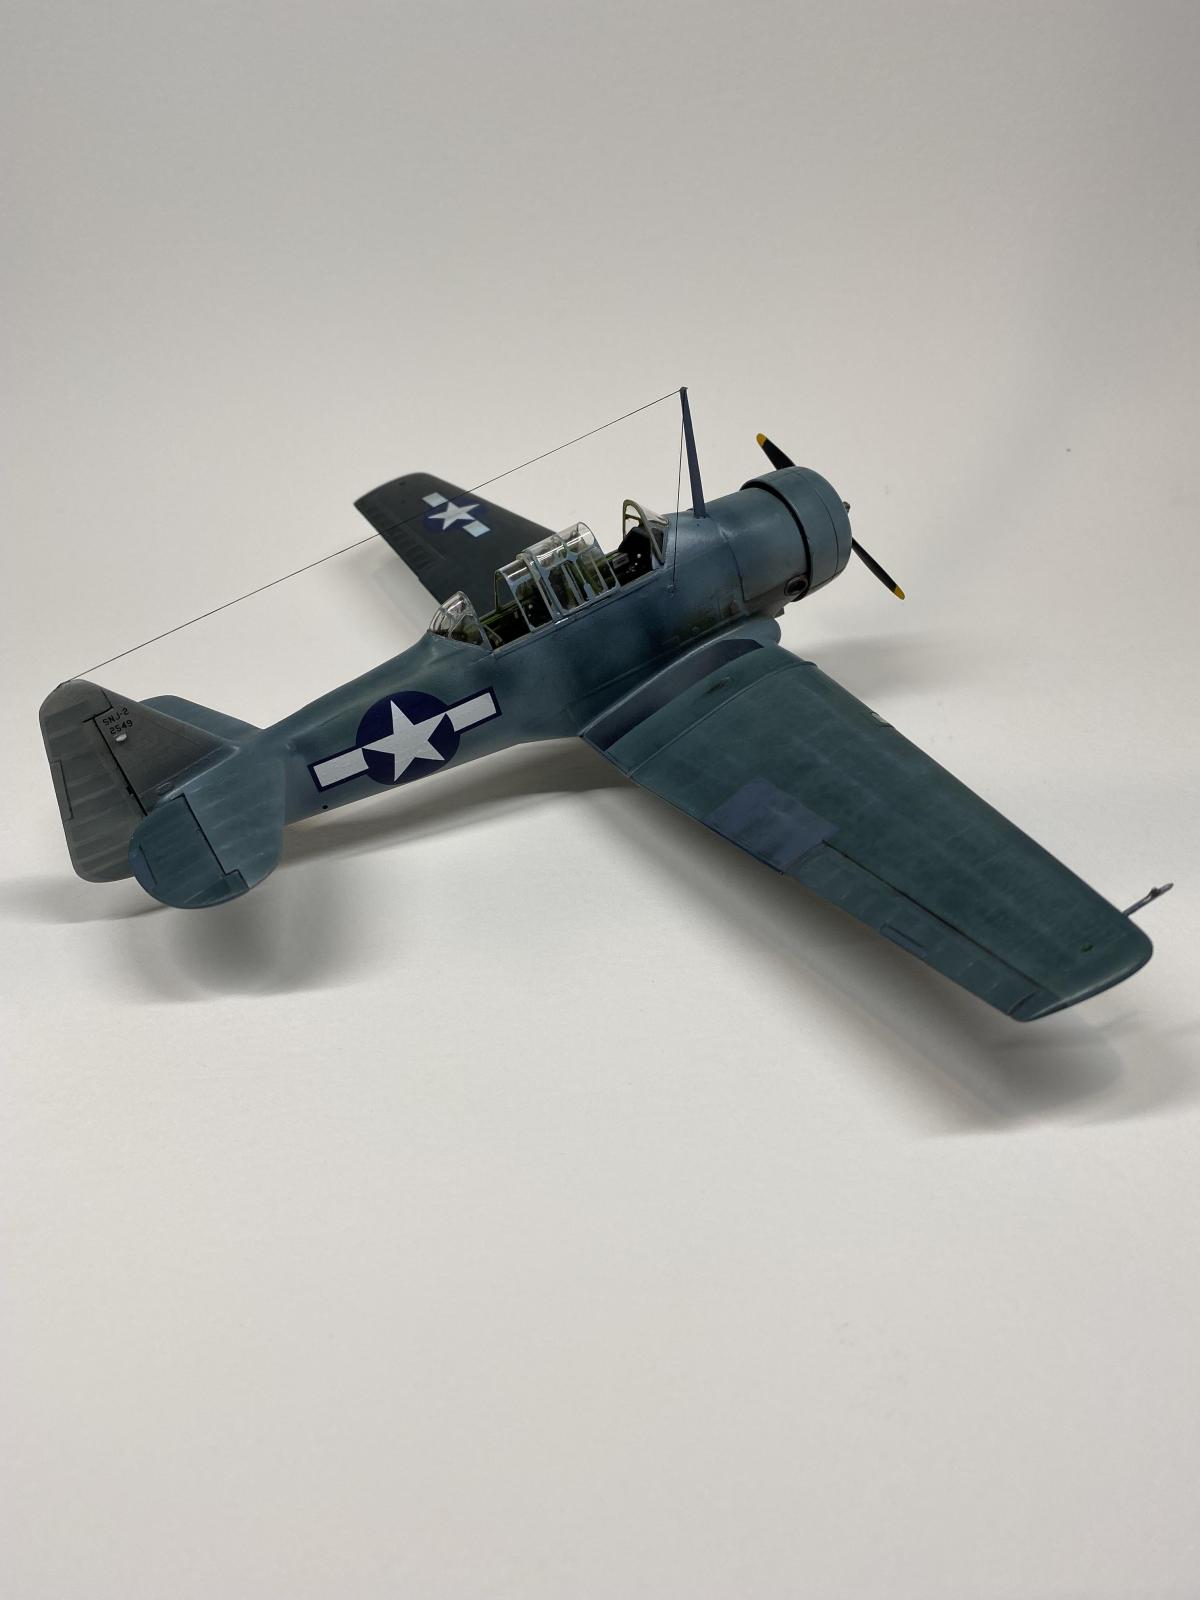
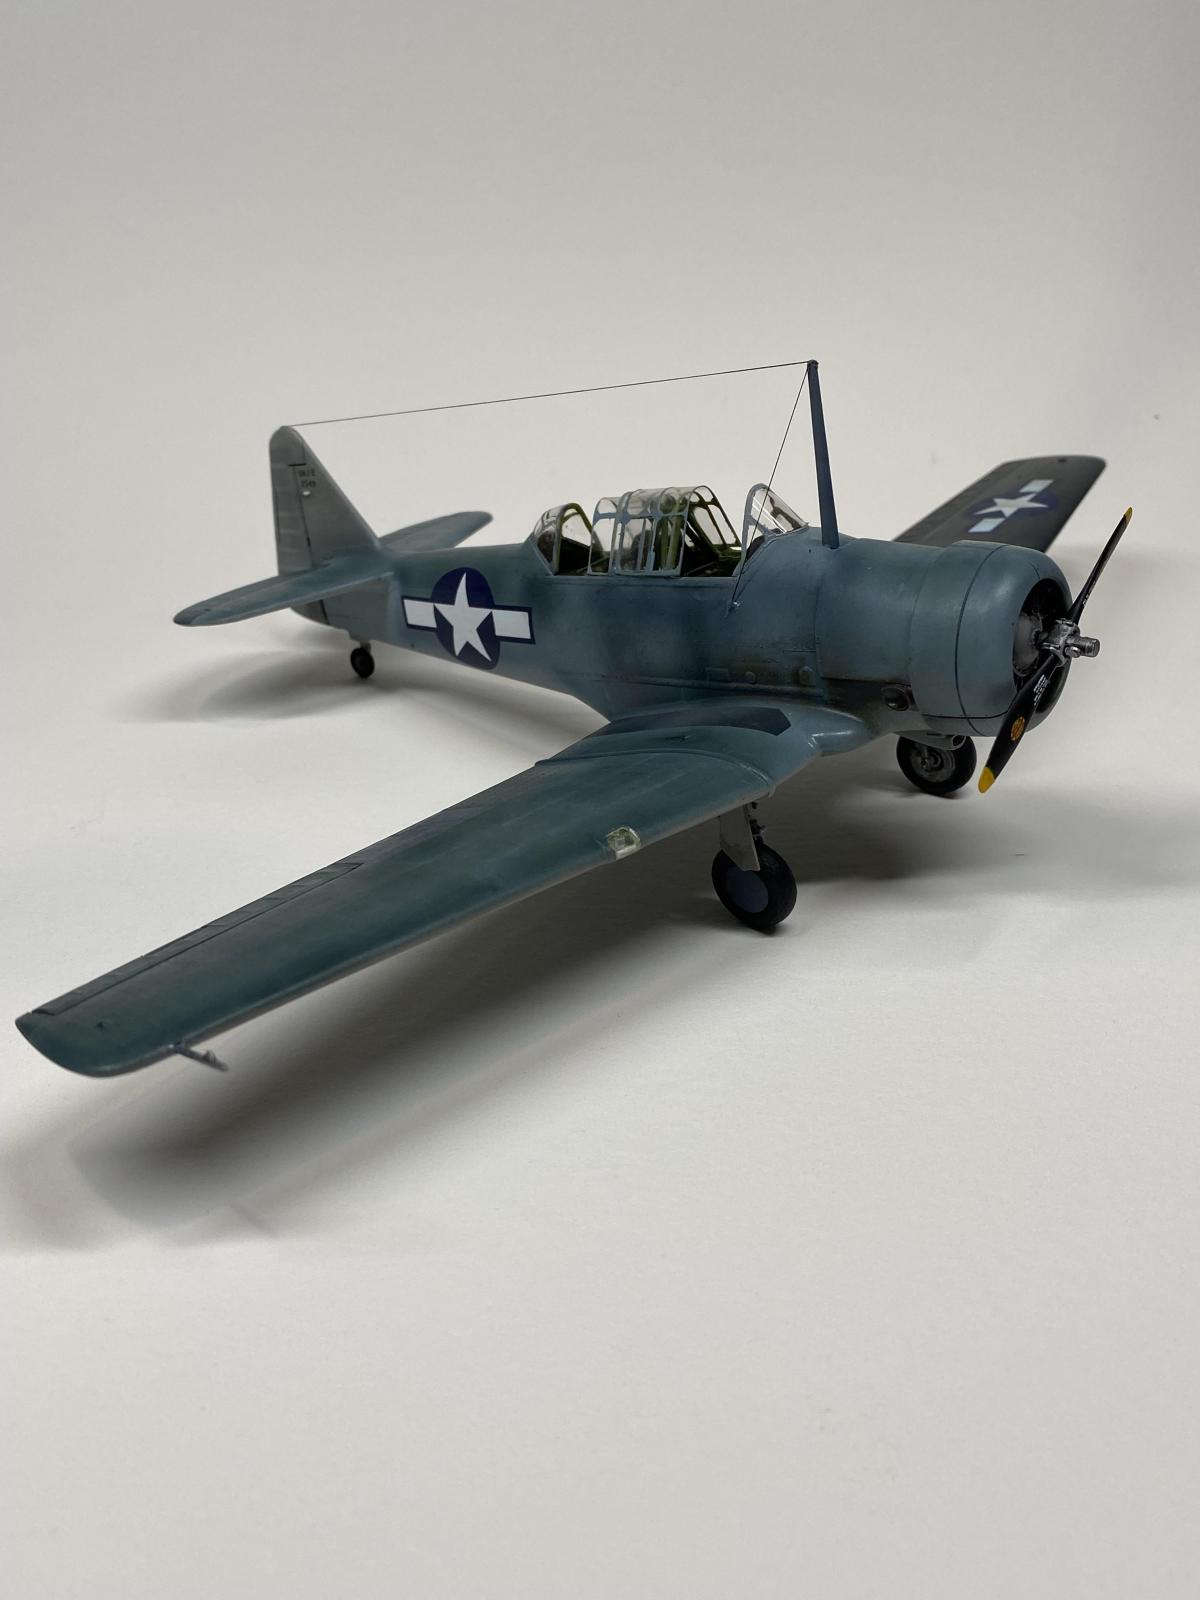
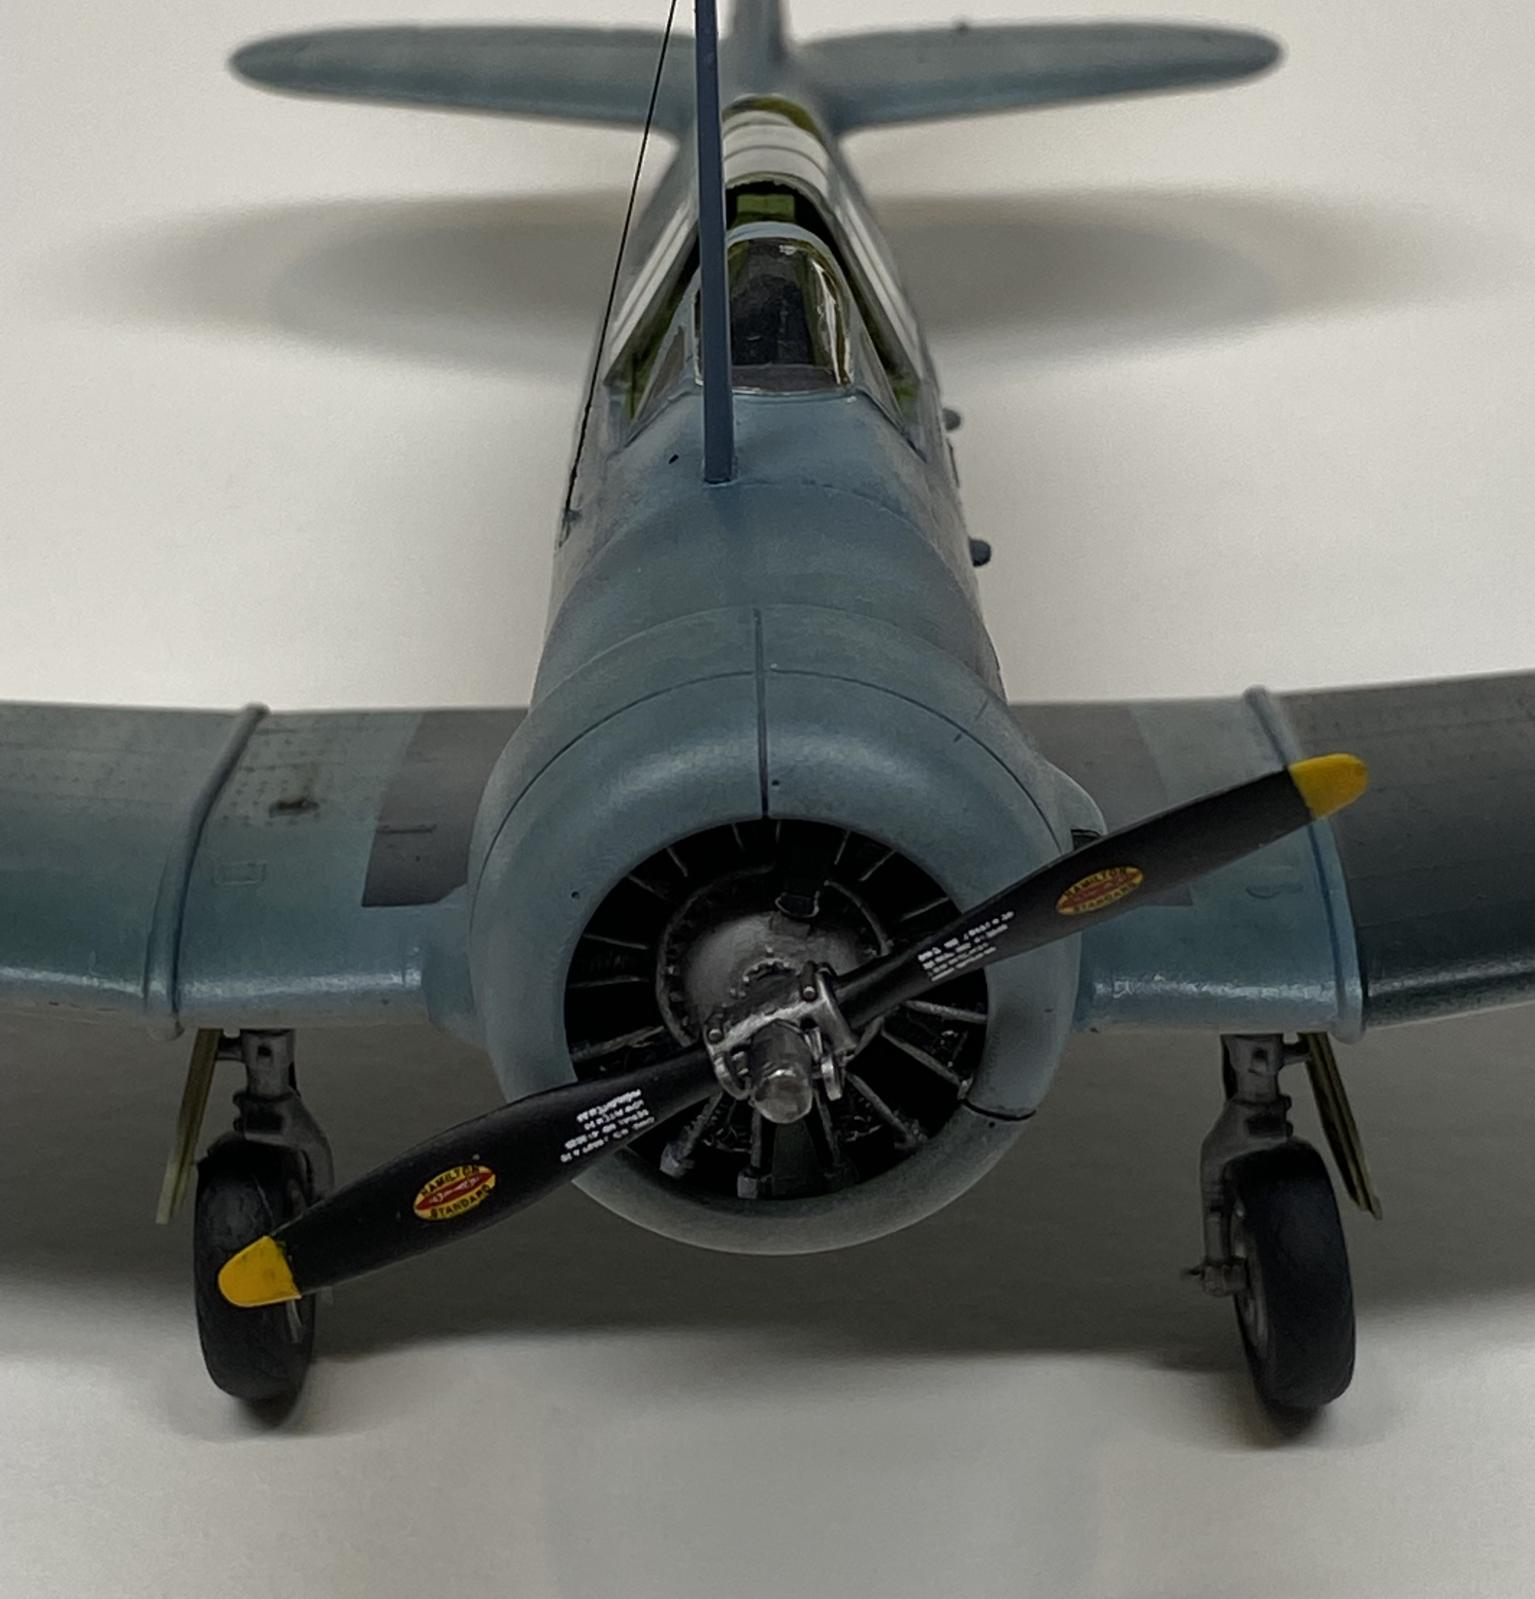
Before I did anything, I wanted to understand the paint scheme for the plane. You can find the photo I used in many books and online, but my two primary sources were Golden Wings by Jim Sullivan and T-6 Texan in Action from Squadron. The plane is identified as a "station hack", which is a plane that is assigned to an airfield rather than a squadron and is generally used for proficiency flying for the staff officers on the base. Since these planes are not assigned to a squadron with dedicated maintenance personnel, their paint and finish would sometimes receive less care and attention than squadron planes. The camouflage on this plane is confusing: The fuselage and the right wing are painted in a very worn Blue/Gray, with Light Gray underneath. The left wing is in a very dark blue color, probably Sea Blue.
None of the sources explain the combination camouflage, but here is what I think happened:
-The SNJ-3 (Navy version of the T-6 Texan) was produced starting in 1940
-The plane may have arrived in overall Light Gray scheme in use at the time
-In 1941, the Navy went to a 2-color camouflage of Blue/Gray over Light Gray, and the plane was painted at that time.
-In 1943, the Navy went to a 3-color camouflage of Sea Blue, Intermediate Blue, and Insignia White
-I think the plane was not repainted in the 3-color camouflage
-At some point after 1943, the left wing was damaged and replaced with a wing that had been painted in the 3-color camouflage, or Sea Blue over Insignia White
-The photo was taken in 1944 at NAS Moffett Field in California, showing the mixed camouflage
The Model
The Kit
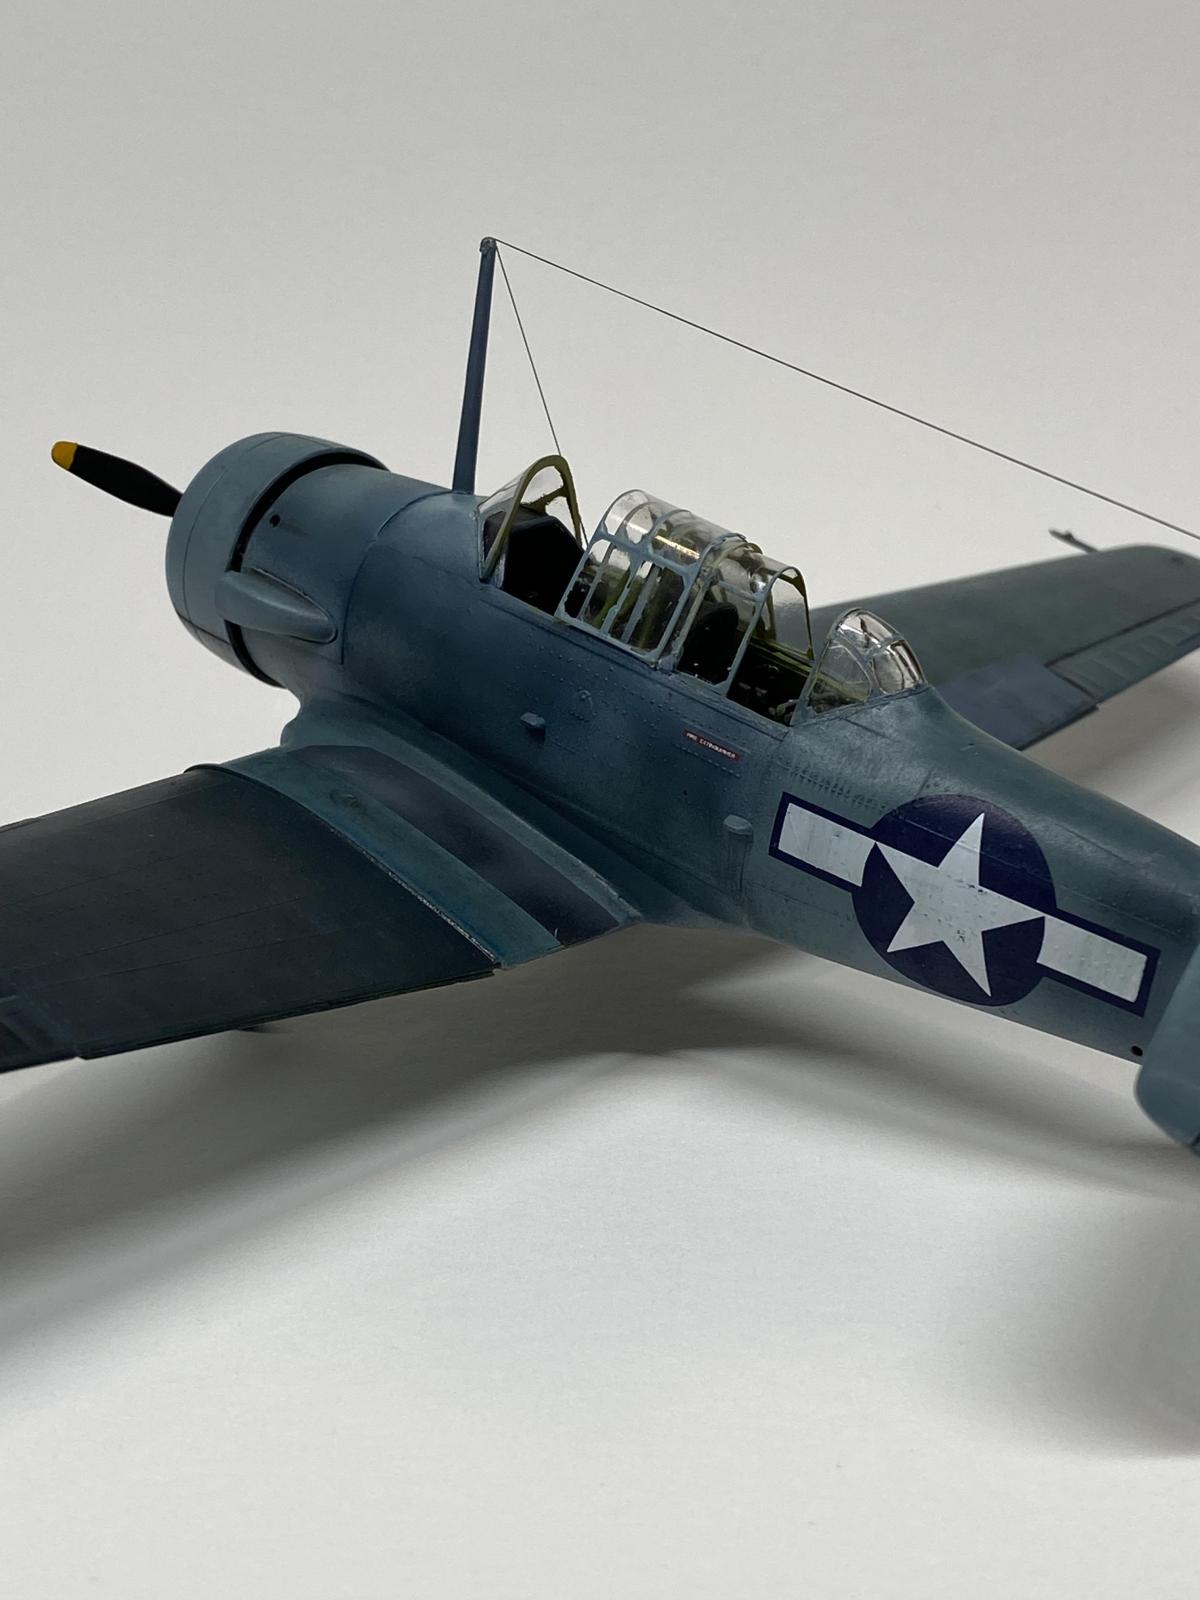
The 1998 Revell release is the one I used. It uses the same molds as the original Monogram release in 1979. The thing that made this release attractive is that it include both the older and newer styles of canopies. The older canopy had more framework. I wanted to try some paint and weathering techniques, so this was the perfect platform.
Aftermarket
-Eduard PE, which was not used.
-Montex mask, which didn't fit at all and was not used.
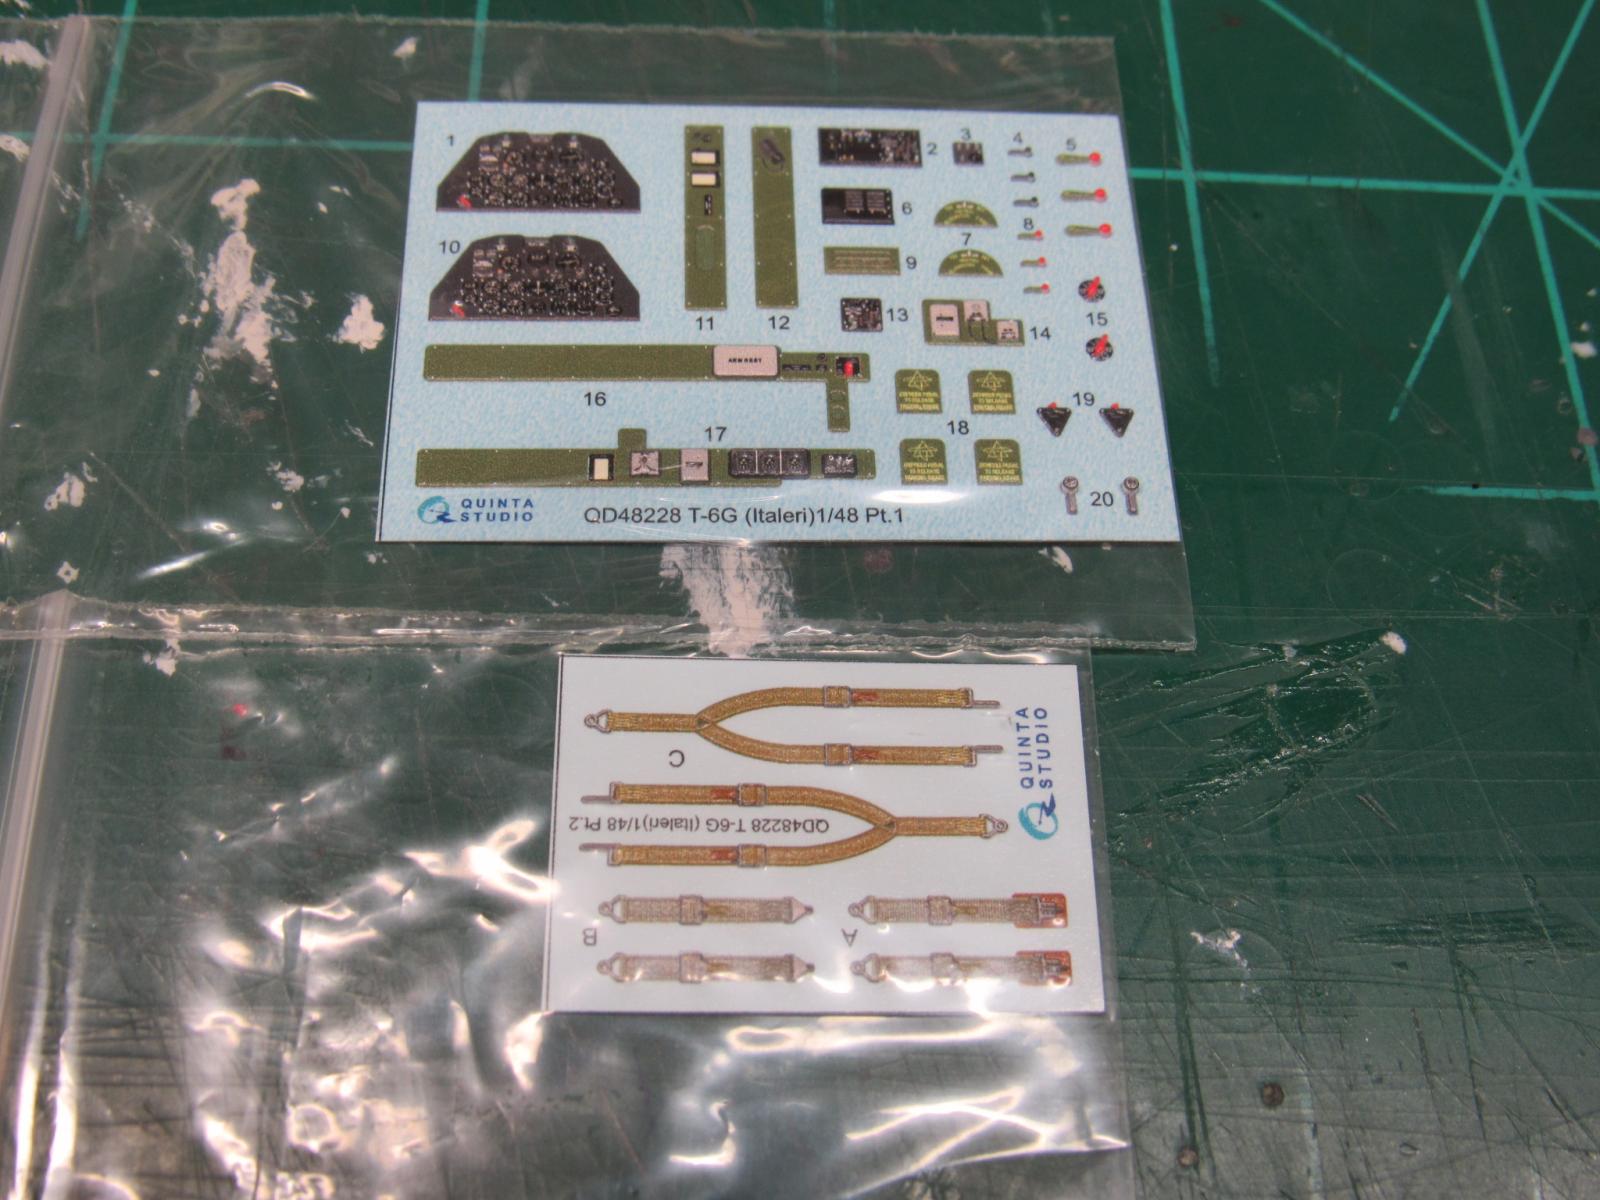
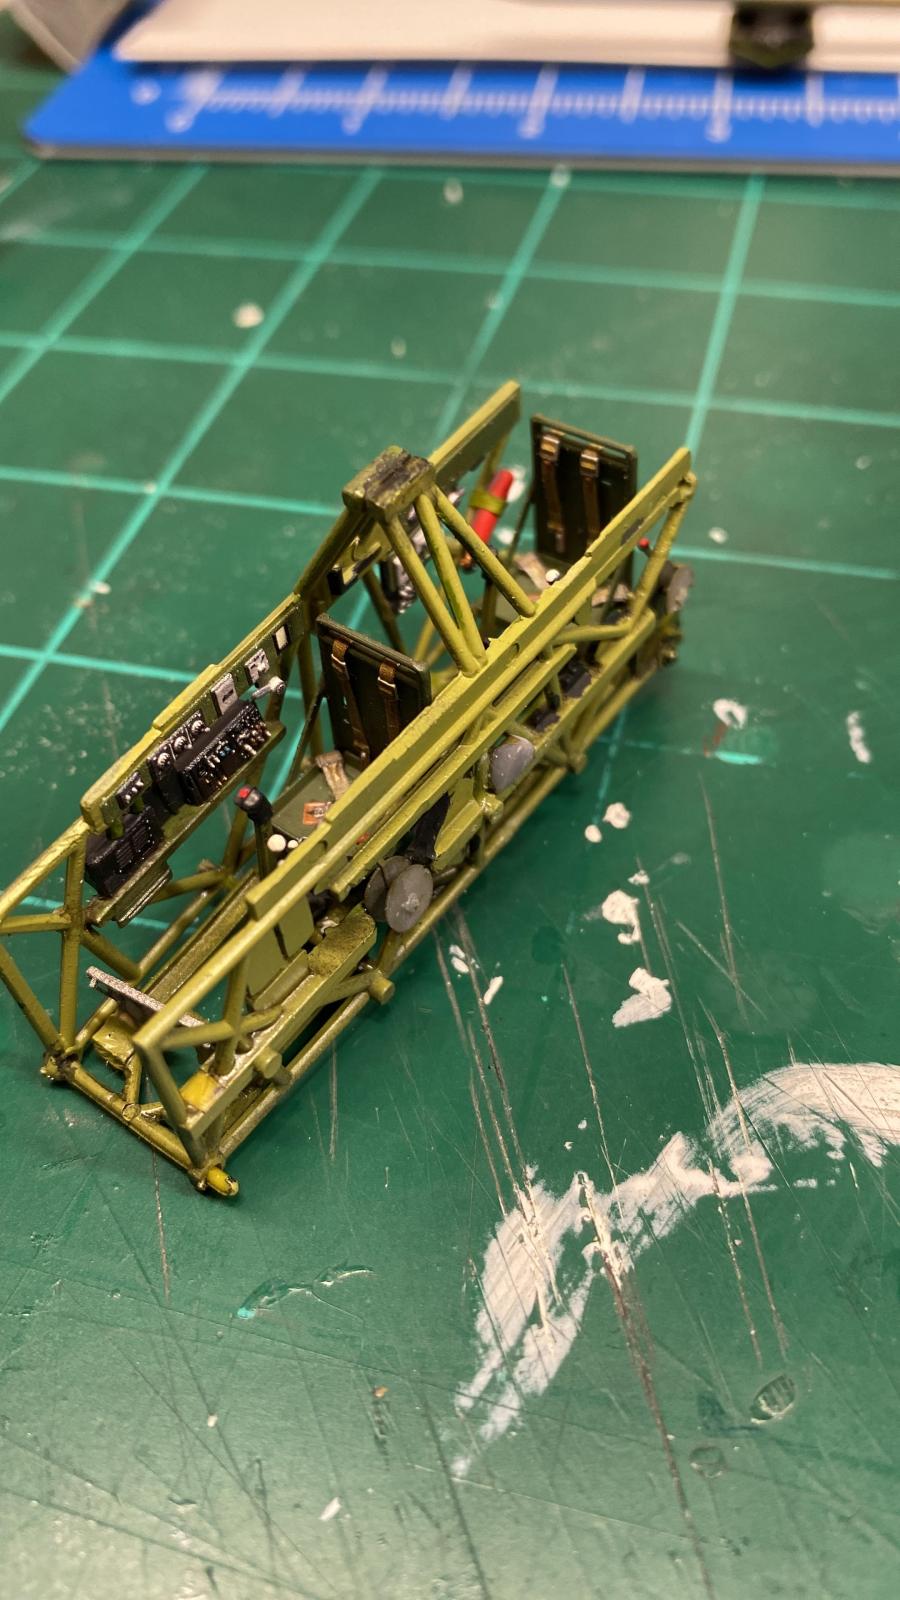
-Quinta Studio interior for the Italeri kit. Nice set, slightly modified to fit.
-Reheat Bezels: T-6G rear instrument panel is wrong for this earlier plane. Rebuilt the rear panel.
-Falcon Models Vacuform Canopy (also available from Squadron). I used the front and rear kit glass, this canopy for the center sections.
-3D printed engine and cowling from Flightline Engineering. Really nice set.
-Decals: From spares and kit decals.
3D Printed
I wanted to try using 3D printed items for the cockpit. I found the files online to print all of the items needed for a T-6 cockpit. These were designed to go into a Quarter Scale radio control plane, so I had to significantly reduce them in size before printing. The problem was that they became extremely fragile when reduced. I could print the seats, but they were too fragile to paint and attach seat belts. After several frustrating days of broken seats, I decided to try and design my own and print them. I designed them using a free online program called Tinkercad. They printed well and are now in the model. I was able to print and use some things from the files I purchased: fire extinguishers, hydraulic reservoir, throttles, rudder pedals, and trim wheels. These were extremely fragile and barely survived the installation.
-
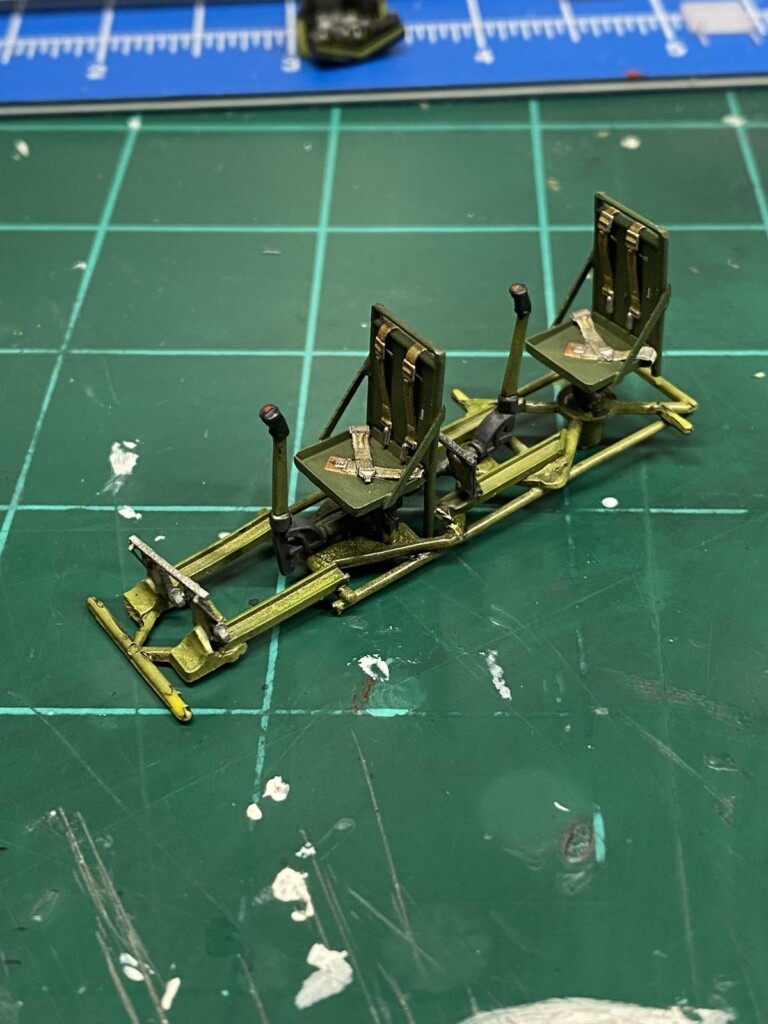
- 1. The floor area was completely reworked from the kit.

-

- 1. Trim wheel
- 2. Extinguisher
Weathering
I started the weathering by using a variety of shades of paint sprayed to show the worn areas. I used Tamiya mixes and AK Real Colors. I then used a variety of artist oils to produce the various areas of worn paint, along with some watercolor pencils.
This was a fun kit and a real learning experience. I enjoyed the build, but I hope to move on to something a little more straight-forward next. If you are interested in a voluminous WIP for this, please visit the Sullivan Group. Cheers everyone.


What a beauty! I too have struggled with some 3D printed parts and breakage. It’s a 50/50 proposition. I usually have 2 printed to get one good one. Thanks for sharing.
Thanks, Matt (@coondog). I am a newby to 3D printing, and I have been climbing the learning curve for a while. The files I got were scaled off plans for the real airplane, but by the time I reduced the size they were just too fragile. The supports for the seats were probably about 0.2mm in diameter. The seat was so thin you could see through them. Most of the seats didn't even survive cutting them off the supports.
Followed this in the WIP. An outstanding result @gblair!
Thanks, Tom (@tcinla). I'm glad you convinced me to use the vac canopies. They look a lot better than the kit canopies. I need to go back and do some touch-up on a couple of the frames, but they came out far better than I thought they would.
Looks great, George! I really like the paint job.
Turned out great, George! It was fun to watch it take shape.
This Texan is indeed a beauty, George @gblair
The chosen scheme is very special and you did a great job on duplicating it to your build.
Also the weathering is very nice.
It was a real pleasure following the progress of this Texan, thanks for sharing your approach.
Thanks, Gary (@gwskat) and John (@j-healy). It was fun to try a bunch of new techniques on it.
Thanks, John (@johnb). Thanks for following along.
Absolutely stunning result, George! What a departure from the original kit! All additions and modifications are second to none. The chosen camo is very interesting and you replicated it perfectly. Your build thread was, as always, a joy to follow and I learned a lot.
A great tribute to Jim.
Congratulations!
Good work, George, a great and worthy addition to the group build.
Thanks, Spiros (@fiveten) and George (@chinesegeorge). Thanks for the kind words, and thanks for following along on the WIP.
Awesome work on this! love the final result. Great weathering and build
Thanks, David (@dbutlr). This was a good platform to experiment with some techniques I haven't tried before.
Amazing, George.
3D printing really changes things, fantastic details.
Thanks, George (@georgeswork). 3D printing is a lot of fun. I am still climbing the learning curve, but it is cool that the seats were simple enough for me to design and print them.
George, @gblair, that is a really well done build. I think you nailed the paint and look of the plane. I have built that old kit before and it is a good kit, but you really gave it a great look.
Nice work with the 3D printing and TinkerCad. I have used TinkerCad it to create pitot tubes, Oxygen tanks, various panels, and even the B-24 Bomb Bay doors. TinkerCad is really basic but does enable you to make good parts down in our scale. I want to learn how to use a more powerful program to create better and more detailed components. I down loaded an interior to the tail turret of a B-24 for a large scale RC plane and used MeshMixer to resize it down to fit inside the 1/48th scale Monogram kit.
3 attached images. Click to enlarge.
Thanks, Walt (@luftwaffe-birdman). I have found reasonably priced files for several RC fighters, including an F4U Corsair and P-51. I haven't bought the files yet, but I have them bookmarked. The files for the T-6 were easy to scale down using the software that came with my printer. The new seats were easy to do in Tinkercad, but they weren't complex. I think things like ejection seats are probably beyond Tinkercad, but I have found several different ejection seats on Yeggi.com. I got a free online program called FreeCAD that is a large step above Tinkercad, but I haven't had a chance to play with it yet. I have also seen the B-24 files and may jump on those soon. I have a Monogram B-24D and B-24 J that is calling my name from the garage. Cheers.
That is a great build! Love the scheme - makes for an unusual Texan. Well done!
I'm impressed!
Amazing work! Great job on the paint scheme.
Thanks, Greg (@gkittinger), Bernard (@lis), and Robert (@roofrat). I appreciate your kind comments. I still have 5 or 6 Texans that I want to do eventually.
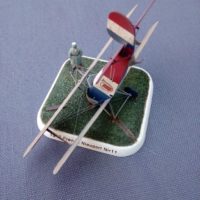
How about one in this scheme?
1 attached image. Click to enlarge.
Wow, what a cool combination of colors, Robert (@roofrat). The extended exhaust makes me think this plane does skywriting, or some kind of aerobatic show where they turn on smoke. The problem with T-6s is that there are so many cool paint schemes for them. Here are a few I like, not to mention the overall yellow trainers that both the Navy and the Air Force had.
4 attached images. Click to enlarge.
They were 'Skytypers' in this pic they were based at Flushing airport in College Point NY.in the late sixties, I posted a few other pics, Under flushing airport, snj. Originally they flew the SNJ-2, you can tell by the rounded rudder, today I believe they have a mix of versions.
Don't know where they are at now but I think they are sponsored by Geico Insurance.
Congrats on making it to the finish line, George @gblair. All your experiments and the paint turned out fabulous! I enjoyed following along.
Thanks for following along, Eric (@eb8010). I appreciate your comments and support.
A beautiful replica of the real plane.
Thanks, John (@jdtruby).
Excellent result, the extras really make it pop! You nailed it.
Thanks, Chas (@chasbunch). I appreciate your comments.
Excellent result!
Thanks, Rob (@robertandy).
@gblair - Fantastic build George. It's great to see you designing your own 3D parts in TinkerCAD. Resin does get very brittle if it's thin and over-cured. With very thin parts, try exposing them for less time. I typically cure bigger stuff for 5 minutes, try just 3 minute cures for the super thin stuff and see if it helps.
Regardless, the project turned out extremely well!
Thanks, Brian (@brithebuilder). The T-6 seat was really basic, so my baby-steps in Tinkercad were enough to make it happen. I tried using cure times as low as 2 minutes, but I think the parts were just too thin. The files I got online were scaled to quarter scale radio control size from actual T-6 plans. I figure the supports for the seats on the actual plane were probably 1" in diameter, so in quarter scale they were 1/4" in diameter. I had to reduce the seat from the files around 95%, so everything got really thin. At first, the seat supports wouldn't survive removing the printing supports, so I moved the printer supports off the seat legs and they survived. The bottom and back of the seat were the next issue. They were so thin that you could actually see through them. I had some spare seat belts, so I tried attaching them to the seat, but either the back or the bottom would fail. I tried reinforcing with superglue, and it still didn't work. It was at this point that I started thinking that designing my own on Tinkercad might be easier, and it was. I know there is software that you can use to adjust and change the files, but I'm not there yet. 3D printing is finally fun. I still have trouble printing large things, which pull off the metal build plate part way through the print. My smaller prints are almost 100% successful. I got some files for some German Afrika Korps soldiers in 1/35 and reduced them to 1/48. These have all printed fine. I think I just haven't quite learned how to adjust the print variables to allow for a heavier print, but I'm getting there. It will be a while till I can successfully print the things that you print, which are all very cool.
George R Blair Jr (@gblair)
Hey George,
Sorry for the late reply. Full scale "life" has once again intervened with our hobby... It's all good though. I was finally able to finish the restoration project of Sandy's Dakota R/T truck. I have some more upcoming projects that will likely keep me with limited bench time for a little while to come.
Wow... This is an incredible looking model ! You have nailed it. This model of yours looks just like the real one did in the original photo. It's really hard to accurately determine exactly what colors were what when looking at a Black and White photo. But here you were very fortunate, as you had a color picture to go from. Having the Black and White version helped too, as this will show you some details that are not too easily seen in color pictures.
Sometimes I will take a color photo, and then convert it to B&W just to see if I am anywhere close.
It was a real pleasure to follow along with your build journal. I am very impressed with your 3D printing abilities. The seats and especially the engine / scratched cockpit look great...as do the canopies. Good job !
Thank you for your continued support with our various groups.
Jim would be proud to see this one built.
I look forward to your next projects. I'm definitely clicking on a few of the various "like" buttons.
Thanks, Louis (@lgardner). I hope everything is going OK. The 2 builds for the group turned out to be very interesting from the research and building perspectives. I am planning to do something I have never done before: I want to build 3 1/72 Lockheed Hudsons at the same time. I have never built more than one model at a time. It turns out all of the releases by the various manufacturers are from the same molds (except for the Airfix version), so its not like building different kits. I hope to get started on them early next week. I have some dental and medical stuff to work through, but I don't think they will interfere with the builds. Take care, Louis.
This is a uniquely painted Texan ! It turned out very nice.
Thanks for the kind words, Jay (@ssgt). I am always looking for something a little different to build, and this certainly fit the bill.