A revolution dressed in corrugated metal: Hugo Junkers ‘tin donkey’ D.1
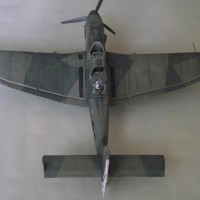
Whichever of the numerous stories associated with Hugo Junkers‘ amazing life and work you take in, you can be sure of one impression: whether as an Aachen professor of thermodynamics, entrepreneur, innovator in aircraft and aircraft engine construction or as a political figure, Hugo Junkers' personality seems to have gone ‘against the grain' of the expected and conventional in a purposeful, creative and sometimes even revolutionary way. The Junkers D.1 shown here in the model should actually be perfectly suited to illustrate this.
It is probably difficult to overestimate how revolutionary an aircraft made entirely of metal must have seemed in those days, when heavier-than-air flying was just over ten years old. The leading experts were convinced that one criterion in particular would remain important in order to increase flight performance: the construction had to weigh as little as possible and be able to hold a maximum amount of ‘load-bearing surface' in the airflow. Lightweight constructions made of wood and lines, whose fragile structures had to be braced together with sprawling struts and wire, have dominated the scene ever since. However, the resulting lift and structural lightness came at the cost of an aerodynamically absurdly large frontal area.
Corrugated sheet metal
Hugo Junkers, Professor of Thermodynamics at the University of Aachen since the mid-1890s and owner of a gas furnace factory, had his own ideas on this subject. As early as 1910, he applied for a patent for a ‘thick wing profile' - made of metal. Initially ridiculed and not taken seriously by the leading voices, he persistently began to develop the idea of an all-metal aeroplane and make it a reality. In his opinion, noticeable increases in performance could only be achieved through the aerodynamically refined shape of a monoplane, which would have to be made of metal for reasons of strength. In order to be able to use this heavy material efficiently, he adapted corrugated sheet metal technology for aircraft construction. The first experiments with self-fabricated corrugated sheet metal were carried out in Junker's bath furnace factory using sheet steel, but later the lighter duralumin was used. From then on, corrugated sheet metal was to become a trademark of Junkers aircraft construction.
The Junkers D.1
The beginning of the world war brought dynamism to Junkers aircraft development - but soon also a state-ordered ‘forced marriage' with Fokker, which could only be dissolved after the defeat in 1918. The J1 was presented in 1915, convincingly confirming the concept of the metal aeroplane. The development stages of the J2 and J3 designs led to the J4, an armoured two-seater combat aircraft. Under the military designation Junkers J.1, this was to be the first Junkers all-metal machine to be produced in series and used in combat from 1917. While the J4 was a heavily armoured all-metal aircraft, but still a biplane in terms of design, the concept of the subsequent J7 was to have only one wing in order to offer the manoeuvrability and speed of a fighter aircraft.
Presented for the first time in March 1918 at the Idflieg comparison flight in Adlershof, the design was impressive despite all reservations about metal aeroplanes. After further comparison flights in May and June, the J7 and a two-seater variant, the Junkers J8, were finally ordered into series production under the military designations Junkers D.1 and Junkers CL.I respectively.
Around 40 aircraft were produced by Junkers-Fokker (‘JFa') up to the end of the war. The sources document their delivery to the airborne units in the West, but whether the Junkers D.1 was actually used in combat there remains questionable
However, the aircraft was still able to demonstrate its potential in the battles in the Baltic following the armistice. Many of the photographs showing the Junkers D.1 were taken in the Baltic theatre of operations - but not the photographs that prove the existence of the D.1 shown here in the model.
The original aircraft: Junkers D.1 5188/18 ‘11'
The aircraft shown here is a Junkers D.1 as photographed in October 1918. The only marking apart from the crosses on the wings and fuselage is the number ‘11' on both sides of the fuselage tail, so that the exact identity and further fate of the aircraft must unfortunately remain unknown. The so-called ‘tiger stripes' on the wings of this unpainted aircraft are interesting: these show the seams where the individual corrugated metal profile strips have been joined together to form a complete wing by means of slight differences in brightness.
The engine of the aircraft is not clear from the surviving photographic material. It could therefore be either the Daimler Benz D.IIIa with 180 hp or the 200 hp DB.IIIaü. Both horsepower ratings mentioned accelerated the D.1 to around 180 km/h; other sources also speak of up to 240 km/h, which would have been a peak value at the time. The weight of an all-metal aeroplane is of course particularly interesting: here you are in for a surprise! With a wingspan of 9 metres and a length of 6.70 metres, the Junkers D.1 had a maximum take-off weight of 835 kilograms. For comparison: a Fokker D.VII weighed 910kg loaded and reached a top speed of just under 190 km/h.
About the kit and the building process
The attractive natural metal finish of this machine was one reason why I built this machine as a model, but another circumstance also helped: unpleasant experiences with decals from Roden made me look for alternative markings. I soon found what I was looking for on the Wingnut Wings homepage: the building instructions for all their models can still be found here. The Junkers D.1 has a lot of interesting material and documentation for this marking.
Even though I don't trust the decals from Roden, I really appreciate the kit moulds from this manufacturer. In fact, there is much to praise here too: the accuracy of fit of the parts and their precise moulding - particularly important when depicting corrugated sheet metal - are just as pleasing as the thoroughly appropriate level of detail. Nevertheless, inspired by the building instructions for its big sister in 1:32, I made some improvements to the interior. The impression can be improved with just a few correctly placed lengths of steel wire, another useful and actually indispensable addition for an open cockpit are the seat belts, here as etched parts from Eduard. A striking improvement over the original kit parts is the replacement of the two Spandau MGs with two resin examples from Gaspatch. The belted cartridges on the (here obviously loaded) machine guns also come from the Gaspatch set.
Last but not least, the dreaded Roden decals were used after all - at least some of them: to be honest, I wanted to see if I could save myself the trouble of masking off the six beam crosses. To my astonishment, everything worked right away, which is all the more surprising as sliding decals that have to fit into the hollows of ‘corrugated metal' are actually very challenging.
The pleasantly speedy and enjoyable construction of this interesting aeroplane was of particular interest to me because of the challenges of the corrugated sheet metal. There's a very specific reason for this: I wanted to tackle two of Mikro Mir's new Junkers F.13s as my next project - and some experience with the challenging presentation of corrugated dural would be useful!
Whether the practice with the Junkers D.1 actually prepared me for the big Junkers F.13 will be another story soon to follow.


Well done Junkers. I like Roden kits, but not the decals. Sometimes they work and other times... I can pour on the Solvaset (a hot decal solution) and they still don't fully stick.
Fascinating aircraft, story, build and finish. All good.
Museum-level work, truly. Amzing bird, sotry, kit, and especially your execution!
Great job, Roland
Beautiful work on this! Looks fantastic.
An excellent result, Roland @rosachsenhofer
Definitely a master class build.
Great article and excellent build, Roland @rosachsenhofer . I really like the way the plane looks, it doesn't look like the kit was too bad...but definitely not Tamiya. The results though are fantastic and shown well with your photography.
Nice work, Roland. I enjoyed that kit too, but used spare decals.
A great looking model Roland, well done.
Excellent build and superb article, Roland!
Beautiful, I like it very much. Also very interesting information.
Let me thank you all for the motivating and encouraging feedback! It's a huge encouragement and also inspiringly interesting; I'm delighted that you like the result!