Tamiya F4U-2,1/48. The First Navy Nightfighter.
This article is part of a series:
What inspires you to choose a kit or a scheme? For this model it was a post on this very forum that is a large reason.
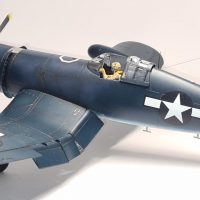
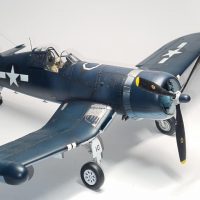
My long term goal is to build a Corsair of every variant in 1/48, starting from the simple F4U-1 by Tamiya and ending in a scratchbuilt XF4U prototype when I have the skills developed. The F4U-2 is the last of the Tamiya Corsairs I had to check off my list. I started by looking at schemes and came across a very interesting colour profile where the nightfighter received matt black painted sides, I felt this would make a unique looking Corsair so immediately purchased the kit (which seems to be getting harder to find, and more expensive since Covid). Whilst the kit arrived I got to work on one of my favourite parts of modelling, research, in which I quickly learnt that the colour profile was inaccurate and wrong, but then I came across the brilliant article on this forum titled 'A Corsair for Bob' by David Hansen as well as the articles on Tailhook Topics about the F4U-2, both of which providing a plethora of useful information about the aircraft and it's history, as well as the unique paint scheme sported by this F4U-2 '10'.
Well, that settled it. A unique scheme, a huge wealth of information for a niche subject, time to get to work I thought.
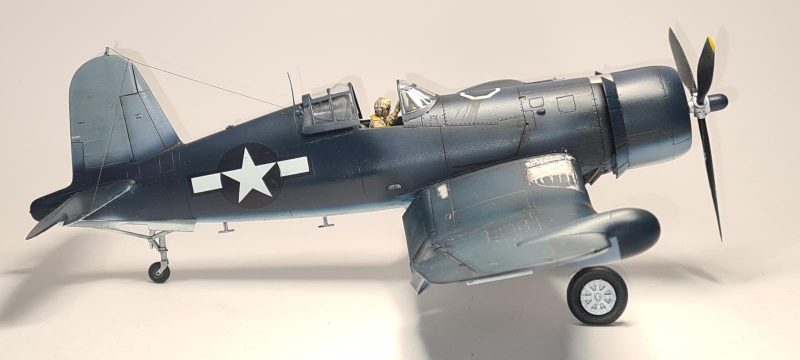
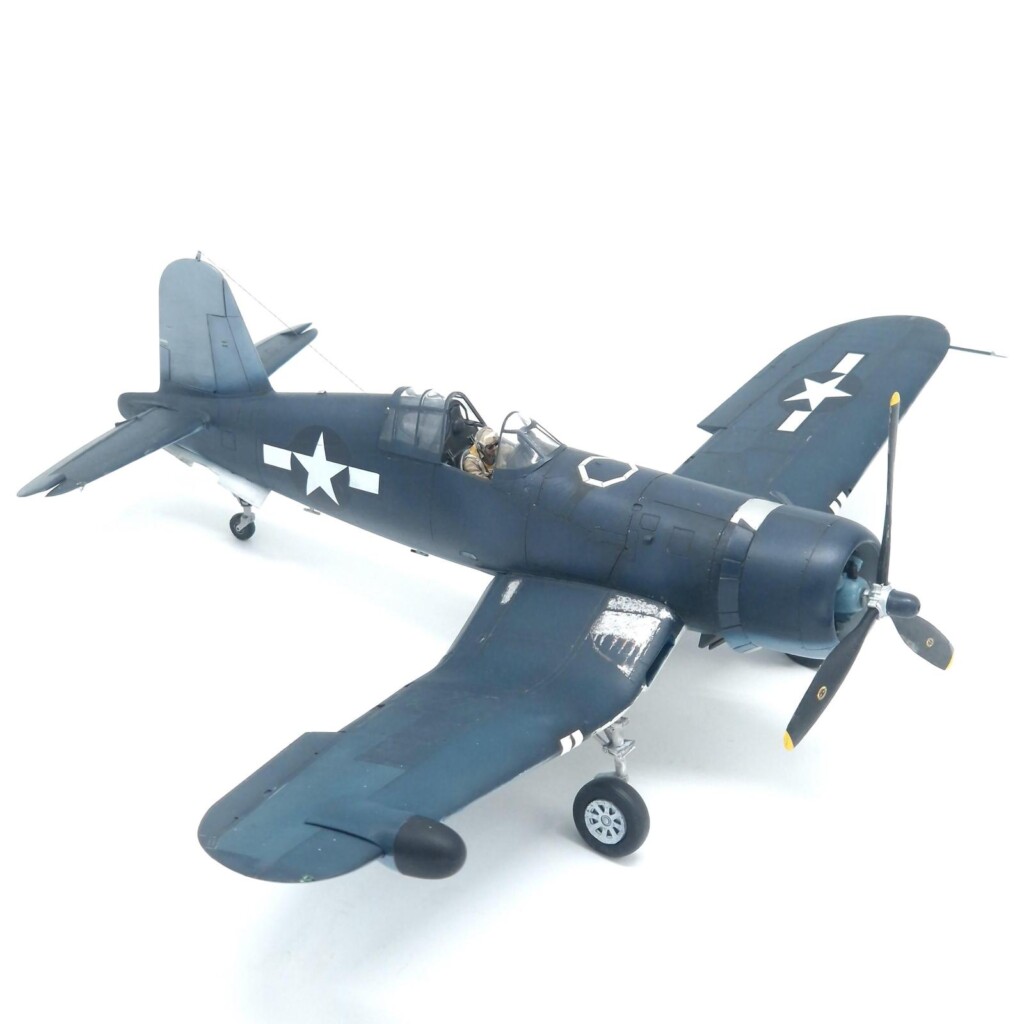
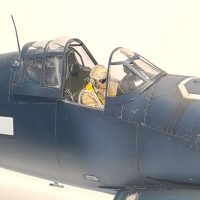
As stated previously there really isn't anything more to add about Tamiya's Corsairs that I haven't already. This one received little aftermarket, just the elevators from Aires quickboost and the rest of the set went towards my Corsair Mk.II (note: remember to check the stash, as I already had one of these sets unopened. Doh, I guess it makes an excuse to build another one), it also received a pilot from PJ Models. These days I'm finding that resin pilots are becoming rarer and rarer to find which worries me as I like to normally build my models in flight, the reason I went for the resin pilot is that the Tamiya pilot looks very 'goofy' to put it lightly, somewhere between having too much to drink and having been involved in too many crashes. You may ask 'why does a night pilot have sunglasses?', well someone suggested to me that he is wearing sunglasses to keep his eyes adjusted to the dark during a sunset takeoff which works absolutely fine for me.
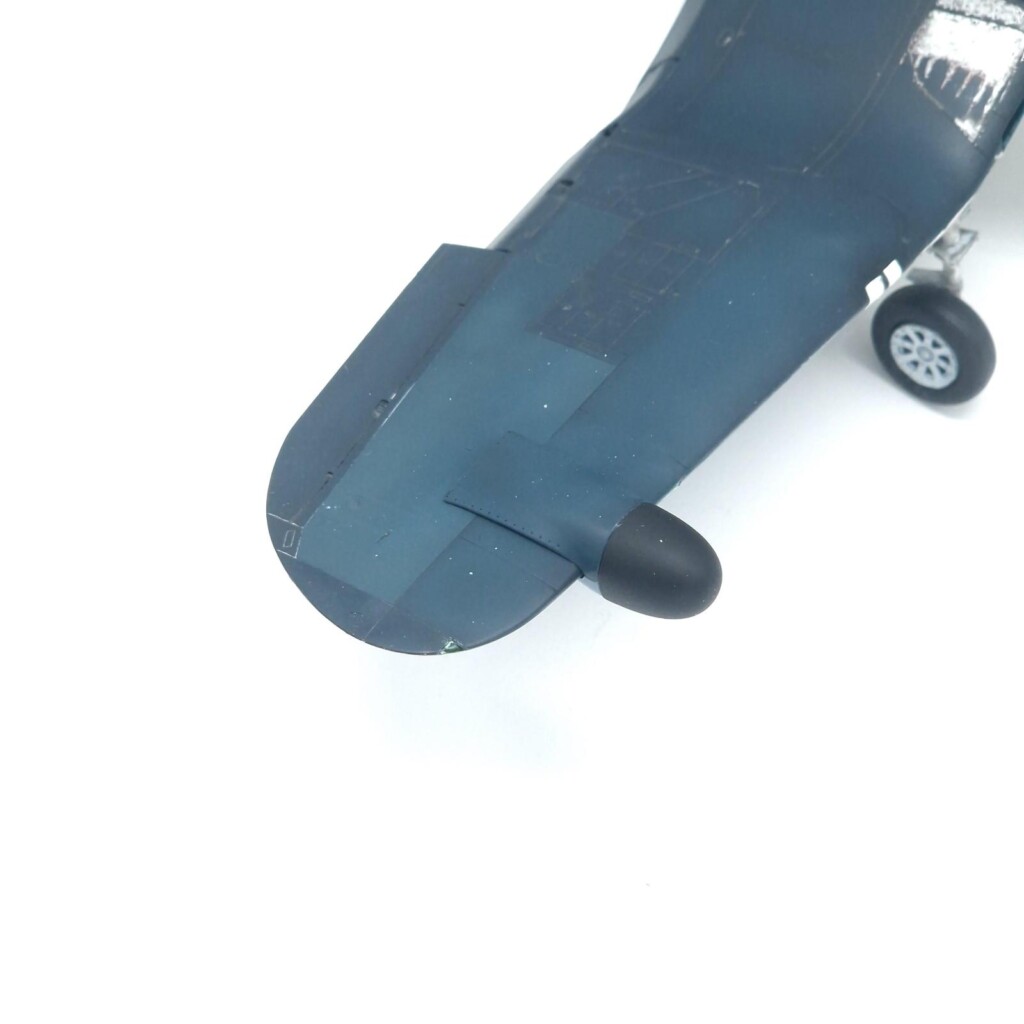
Painting this was a blast, I used MRP paints for the first time and bought a simple set of 4 paints. First up was Insignia White ANA601, I didn't like this at all, MRP comes pre-thinned and I found this to be slightly too thinned for my liking and the coverage was poor, so I substituted this for a most XF-1 mix which flowed better. For the light blue I MRPs Intermediate Blue ANA608 which sprayed wonderfully, I freehand painted the blue as the reference photos show in which it is extended lower down the fuselage than normal, and then I sprayed it high up the fuselage to a normal location for a Corsair. Next up was ANA607 Non-Specular Sea Blue which got sprayed on the fuselage like a standard tri-colour scheme would have. Now, fun fact for you all, the US Tri-colour scheme introduced in 1943 is actually technically 4 paints as there is two Sea Blues, one of which is Non-Specular ANA607 (matt) the other is a Semi-gloss ANA623. It's hard to see but is visible in particularly clean photos where there is a difference in colour of the two paints, whilst they were intended to be the same shade this naturally happened due to a difference chemical composition as well as the difference in light reflection. Also to make things more confusing the paint for ANA623 changed in 1947 to produce a more brighter and stronger paint that is seen on the Korean War birds largely because the WWII version wasn't as strong as expected. Back to WWII you'll notice that the semi-gloss paint was used on the wings, with the non-specular being used on the fuselage and sometimes the leading edge of the wing.
With this in mind I did two things, firstly I sprayed the wings in ANA623, I then went about and weathered the entire plane with tonal variations (more on that later). After the plane got a little bit more sunbleached than before, I followed up by painting the uniquely darkened down sides with ANA623 and made sure to NOT give this any tonal variation in order to make the appearance of nice, clean, freshly applied paint. This came out surprisingly well and shows how darker the freshly applied paint is compared to older paint and why that original author of the colour profile thought the sides to be black, thank you to David Hansen and the folks at TailhookTopics once again for solving this problem and proving it to be fresh sea blue paint, not black.
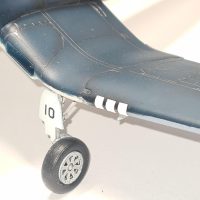
Aside from that I didn't bother doing much else, a few chips here and there were made into the X-11 base coat with a knife to show metal paint. The upper cowling panel was sprayed with AK Extreme Metal Aluminum to make it nice and shiny, and then decals straight from the Tamiya kit (plus some borrowed ones from their F4U-1D for the fuel tank) we're applied with the black 10 on the wheel doors being made from some other numbers included in the kit. Aboard USS Intrepid these 4 Corsairs of VF(N)-101 sported their squadron patch on their fuselage, but this was apparently removed when they moved aboard USS Enterprise.
Now I mentioned about tonal variation, prior to this I did what I thought was an okay job by doing a base shade, a lighter tone in the middle of most panels, and even lighter tone on a couple of panels, and then a dark tone on the panel lines. But what I did was do it subtle so it looked like it would make sense. Well with this particular Corsair I did everything to the extreme so much so it looked awful, but then I toned it back with the base colour over the top which in my opinion made a better looking tone for these older paint panels. On top of this, the model received an MRP semi-matt coat, but the specific areas on the side painted in ANA623 also got resprayed with MRP semi-gloss to give it a more shiny and darker effect.
With this done, my 5th Tamiya Corsair was done, and my 7th Corsair overall. On my trio build of the Corsair Mk.II, F4U-2, and F4U-4 this was the last one to complete, largely because the MRP paints whilst being incredibly good stink so much more than any other paint I've used. I'm in the UK, and for a good week we had some random snow and I really wasn't feeling like opening every window of the house to clear out the smell during snow.
Thanks again to David Hansen and the posts on Tailhook Topics which were incredibly helpful, but also intrumental in making me paint this interesting scheme rather than the one included in the kit. I'd also like thank all of you lovely folks on this forum for the great amount of support and kind words on my last post, it definitely means a lot. It's a good reminder to all of you that any of your posts may one day inspire another builder to work hard on their own creation.
Ammendment, 2024
Greetings from the future! In case anyone sees this from in their travels of finding F4U-2 tidbits online or are thinking of making an F4U-2 for themselves, I'd like to just point out that Magic Factory have now released an F4U-2 in 1/48. The kit is very nice, but most importantly for the F4U-2 in particular it comes with a correctly modeled radome as the Tamiya kit's radar system is more akin to what we see on the post-war F4U-5N. Along with that, the kit comes with decals for this scheme painted here though I would ecourage you to double check your interpretation of source images as the sizes of the markings are too large and the squadron insignia is incorrect depicting the VF-101 marking from 1952 onwards. I've gone ahead and ripped off the Tamiya part and fitted the Magic Factory one.
Regardless, due to the simple fact of that radome I would highly recommend the Magic Factory offering for anyone considering an F4U-2 build. At the moment is part of a dual-combo set but the price per model works out the same as these Tamiya kits and two Corsairs are always better than one, but if you are interested I do have a build thread of the Magic Factory kit and may have an article out on them if you are reading this. Best of luck in your modelling affairs either way!
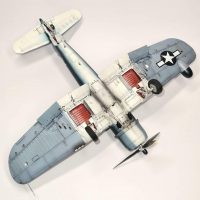
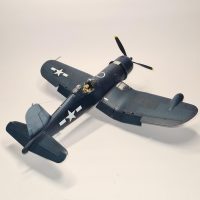
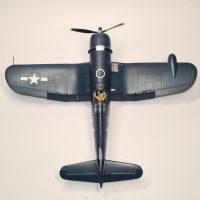
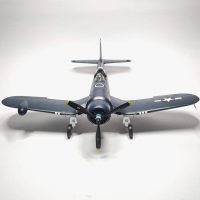
Actually, the VF(N)-101 Corsairs were on Enterprise, not Intrepid, but that's not a problem. You've done really nice work here and I'm very interested to find out about the fresh Sea Blue mistaken for black, which makes very good sense. Thanks much!
As far as the XF4U-1 is concerned, you don't have to scratchbuild. Mike West has a very nice resin XF4U available over at Lone Star Models - you just have to catch him open for business, but if you go there, you'll find that information.
https://lonestarmodels.com/store/
Thank you very much for that link for the XF4U-1, I've seen a conversion for an XF4U-3 by Reith Creations for that Tamiya kit that I'm planning on buying soon, I'll add that -1 conversion to the shopping list.
E: I checked out Lonestar models and see that he makes an F2G conversion for Tamiya, I may have to pick that up too as it may actually go together easier than the Special Hobby kit.
As far as I'm aware VF(N)-101 were aboard USS Intrepid during February 1944, but were transferred over to Enterprise when the Intrepid was hit by a torpedo on 17/18th of Feb. I could be wrong, also the second image I used is of an F4U-2 and every website I've seen credits it to being taken aboard Intrepid, but I wouldn't personally be able to tell any difference between the two ships from such a picture if there even is any slight distinguishing features.
I just checked and yes, it's even in my book that Chick and the boys did move from Intrepid to Enterprise. You're also right about your pilot and his sunglasses, since they were more "dusk and dawn" fighters than "night" fighters.
You also have to do an F4U-1C!
It's on the to do list to do a 1C! Though it's a little more interesting as there isn't any conversions, but how hard can it be to make 4 cannon bumps from scratch?
When I next make a group of Corsairs I'm thinking I'll make an F4U-1C and an RNZAF -1A, and either an XF4U-3 or F4U-1A 'Sally'.
Nice work, Harvey. Corsairs and Spitfires are my favorite fighters and I have a decent collection of each. The -2 is one of my missing links. I’ll be referring to your article when I finally do one. Well done!
Thank you! Definitely check out David Hansen/Tailhook topic posts if you haven't already! I'm currently building Eduard's Spitfire Mk.I from their limited edition set so I'll likely have a post about them in a month-ish.
David Hansen does good work, and so do you. You're not gonna bore me with Corsairs. I turn my TV on once a week, for Black Sheep Squadron.
I really like reading what you write about each project, the history and the process.
Maybe that Tamiya pilot would make a good Pappy Boyington.
Your figure positioning and painting is very good.
Great stuff Harvey, keep 'em coming.
Thank you for the kind words! I took a quick detour from modelling and focused on some miniature painting projects a few months ago and it's definitely helped develop some transferable skills for painting pilots as well as being more comfortable with a good old hairy stick, something which I definitely lost some ability to use when jumping over to airbrushing.
I'll post my F4U-4 soon which had a Tamiya Corsair pilot put in it, you'll see he has a strange expression to him to say the least. I've painted 3 or 4 of them pilots now and I can't find a way to make them not look like a madman due to their open mouth grin.. Perhaps that's a sign that I should learn to sculp milliput/green stuff so I can make some figures myself.
There's one thing: I bet that short little pilot would have his seat at maximum elevation.
I suspect what's at issue is the Tamiya seat is empty and doesn't include the parachute pack as a seat cushion. Not sure if Tamiya included that in their Corsair pilot figure or not. I've seen a publicity/ propaganda photo taken of Boyington in a Birdcage Corsdair and i'm pretry sure he was not sitting on his seat cushion. He looked laughably unable to see over the dash, much less over the nose of the plane.
Very nice as well, Harvey.
Like mentioned by John Krukowski, Corsaurs will never bore us.
I did a very old Revell one two years ago but I'm definitely in search for a new one.
Thank you! Honestly you can't go wrong with a Tamiya one even if it is a little bit older than some of the other Corsairs on the market.
Well done, Harvey! This is an amazing model and an equally amazing article!
And, please, bring more Corsairs on!
Thank you! I've got a few more of them to post so I'll definitely get round to taking some more photos.
Nicely done Harvey, that's a really good looking bent wing bird. Interesting article on your subject as well. I like it a lot.
Very well done Harvey, my compliments to you on your fine Corsair build.
Thank you very much!
Very nice work, Harvey.
Nice to see the research of others is being put to good use in helping to dispell the myths and misconceptions about the F4U-2 especially in respect to the paint scheme. The -2 is very much a "Missing Link" in the Corsair history, along with the Brewster F3A series and the XF4U-3.
I know Bob Brunson would have loved it.
Thank you for the kind words and thank you hugely for the amount of effort you spent on your own Corsair and especially the research put into it, it was extremely helpful on this build and I definitely think if you were to have kept it to yourself I wouldn't have done this particular scheme as there really isn't a lot of information out there beyond your content.
I've been thinking of doing an F3A, but not sure what to go for as they didn't have the most glamorous schemes due to that slight issue of the wings falling off.
Lovely work, and great research to really flesh out the project! Learned a lot from it. Beautiful model.
Thank you very much!
Terrific work, Harvey, a well researched variation on this classic kit, definitely liked. By the way, do you remember the Corsair that Ford made? It would make an interesting addition to your collection.
I'm afraid I haven't heard of it, but I'll look into it!