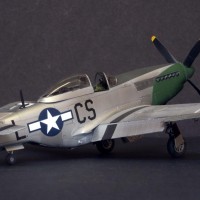
Tamiya 1:48 P-51D-10-NA
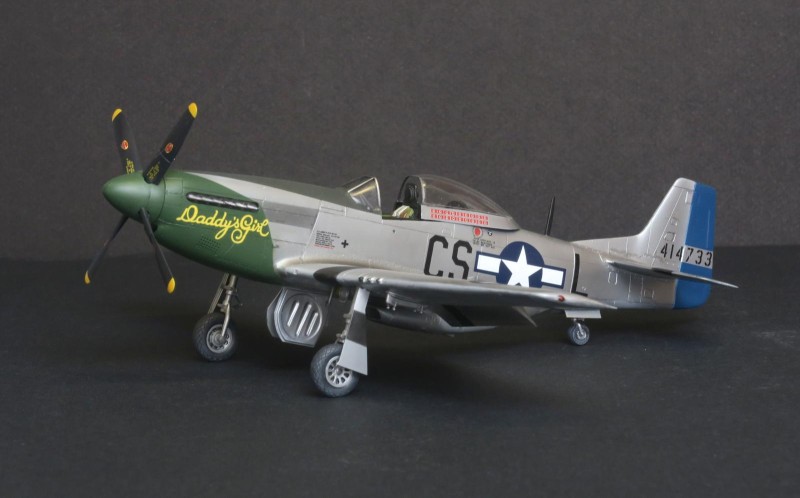
I've been hoarding this kit since the time it was probably the best 1:48 Mustang. Now we have modern new kits like Airfix and Eduard, so I figured I'd better build it before it becomes irrelevant. I had also picked up a couple of Aeromaster's sheets from their series Green Nose Mustangs of East Wretham and so wanted to do one of them. I actually ended up using a single-plane sheet from Fundekals for Ray Westmore's "Daddy's Girl" of 370th FS, 359th FG based at East Wretham, UK in late 1944. I went with this particular plane because I liked the combination of the green nose and blue tail (not offered on any of the Aeromaster sheets), and I was able to find several period photos that helped with some detail decisions. I did use Aeromaster decals for the national insignia.
The Tamiya P-51D is generally a pleasant build with not too many vices. I added a few aftermarket items: a True Details resin cockpit, and Quickboost resin flaps and exhausts. Photos confirmed that the plane had unshrouded exhaust stacks when they were taken. I also substituted prop blades from Ultracast for the kit items. They're shaped better, but they were a pain to align evenly.
About the only real issue with the kit is the clear sliding canopy: It's a separate piece from the lower frame, and it's virtually impossible to cut it from its sprue without leaving a very visible blemish that goes all the way through the plastic and therefore can't be eradicated. Believe me, I tried — twice — without success. My solution was to use a Squadron vacuform canopy and cut the clear section away from the frame. It took a couple of attempts, but I think the end result looks a lot better.
This was the first P-51 model for which I puttied and smoothed the wing panel lines. I used Bondo, followed by Mr. Surfacer 500, smoothed out with sandpaper and Micro Mesh polishing cloths.
I decided not to mount drop tanks because the parked plane in one of the photos didn't have them either. However, I did pirate the sway braces from a derelict Hasegawa kit to dress up the pylons a bit.
On to the painting phase. All the metallic areas are various shades of Alclad II: RAF High Speed Silver for the puttied/smoothed wing areas; Duraluminum for the ailerons, flaps, stabilizers and most of the fuselage; White Aluminum for the fabric elevators and unpainted bits of the rudder. For the darker panels in the fuselage (e.g. around the exhausts and above the turbocharger outlet) I applied light, misted coats of Burnt Metal Carbon until I achieved the degree of discoloration I wanted. I also did some post-shading around the machine gun panels on the upper wings to dirty them a bit.
There are a couple of period color photos of 359th FG planes, so I was able to get a rough idea of the green and blue. For the green I started with Mr. Color Euro Green 34092 and added a little Medium Green 34102. For the blue I started with some Pactra Royal Blue mixed with their Insignia Blue (Pactra's got to be the longest lived paint I've ever encountered) and added a bit of Model Master Non-Specular Sea Blue. The color photos showed a very dark OD for the anti-glare panel, so I used Model Master ANA 613 darkened with a dab of black.
I applied the decals directly to the Alclad finish (no gloss coat). The Fundekals went down just great, but I had some trouble getting the port upper wing insignia to lie down over the raised fairing. I first went with Aeromaster printed by Cartograf, but the marking broke before it stretched sufficiently, so I removed it and used a decal "printed in Mexico," with better results. Once decals were done I treated the panel lines with Tamiya black Panel Line Accent Color. I also applied a light coat of Mr. Color GX Clear Flat to the wings to bring down the sheen of the High Speed Silver. I was worried it would spoil the metallic effect, but it came out quite okay.
Cheers, Pip
An amazing job, Pip! Well researched and documented.
Yes, the newer quarter scale Mustangs are superb, but there's really nothing too wrong with the Tamiya Mustangs, let alone the fact that they build well.
Thanks for sharing your build details.
Love it. The green nose is a rarity for model builders
great painting!
A very nice result, Pip @seawinder
The green nose and blue tale are indeed a beautiful and not often seen combination.
Thanks for sharing the research information.
Very nice! I don't think I've seen that scheme before, the two prominent colors that are so different. Very cool.
Well done indeed! ?
The word "Best" is subjective and the modeler fills in the gaps when it comes to making a good looking kit .
In the processing of building some folks gifts and talents can make kits go south. Maybe, the qualifier should be "prevents" the modeler from making mistakes or the modeler will spend less time building, leaving more time for painting. Some of the current crop of Mustang models, given the quality are pretty close in helping the modeler achieve that goal of making a Mustang. In the end its the skill of the modeler.
Pip,
You have done the Tamiya kit proud with some strong work in the painting dept and the vacuform canopy is more accurate in scale thickness. The end result is a skilled build of a classic. How's that for adjectives.
Two thumbs up.
Wow! Thank you all so much for taking the time to comment. Your words are truly appreciated.
Pip
Hello PIp, I just saw your most recent Mustang build and wanted to add my voice of appreciation for that very fine P-51D. Well done and certainly adds another outstanding model to your collection.
Thanks so much, Jim! As always, your comments are treasured. Pip
Good looking pony Pip, well done.
Thank you very much, Tom!
Nice job Pip, great paint scheme and a great looking Mustang!
Thank you very much, Bob!
Super nice Mustang model! Great work Pip! ?
Thank you very much, Gary!