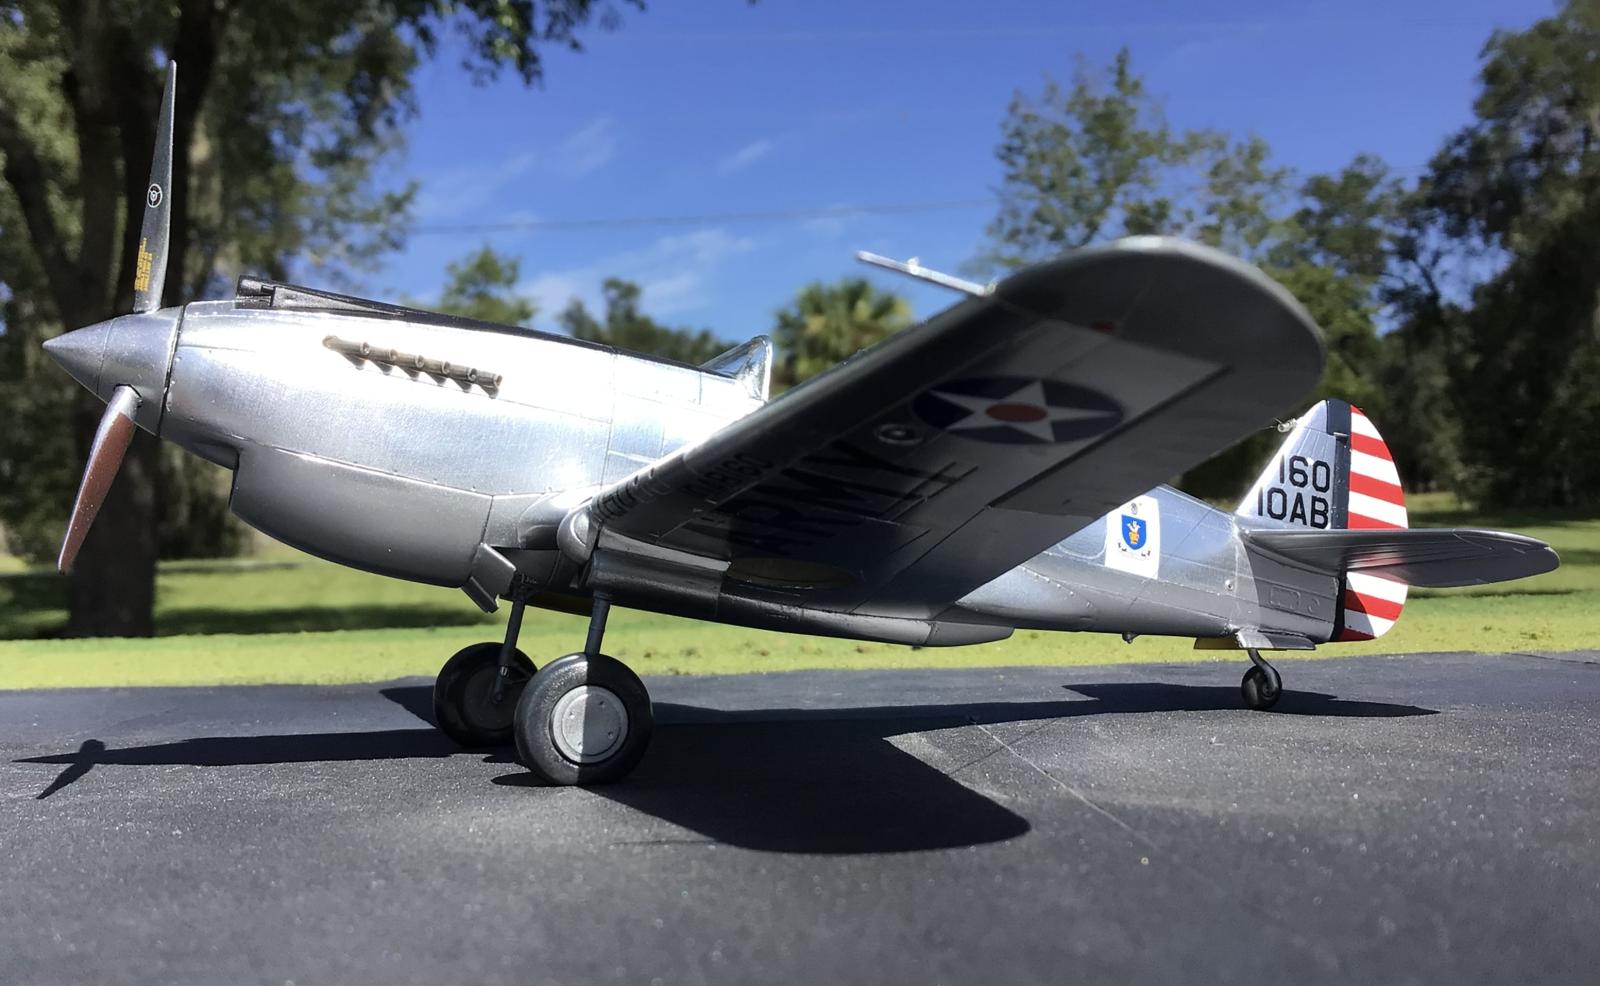
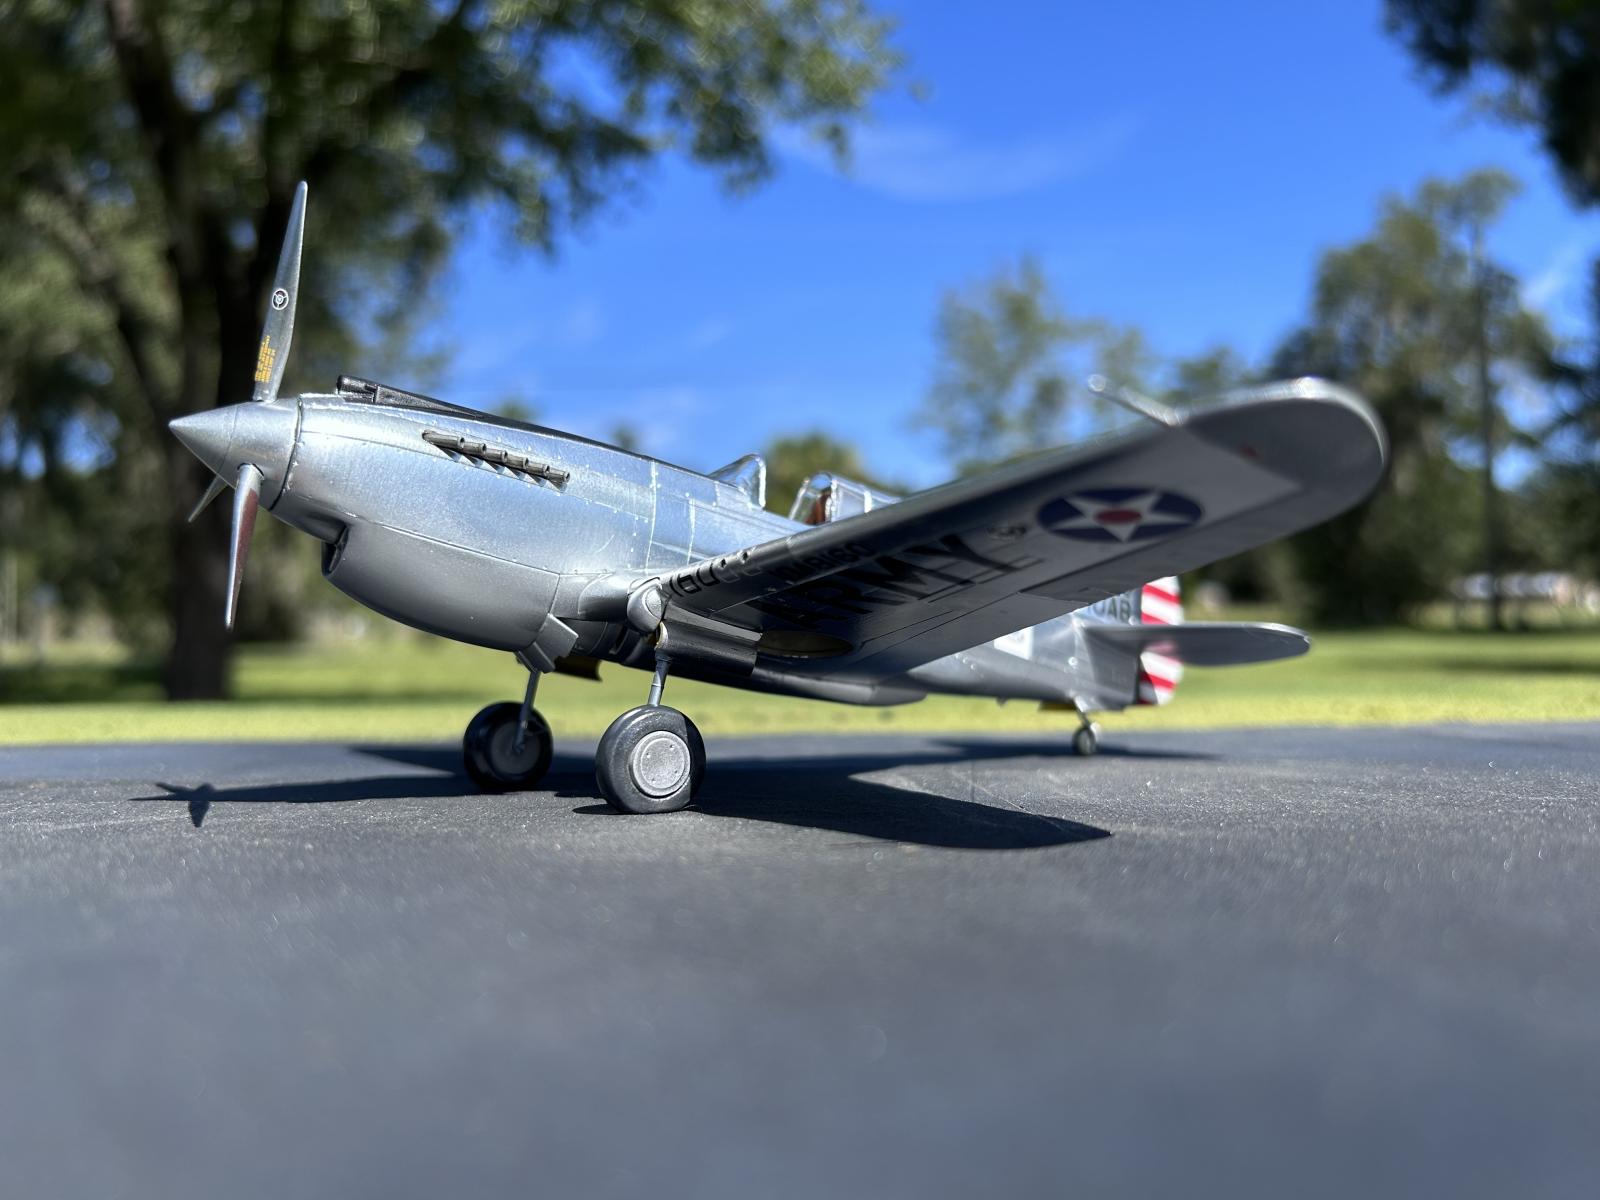
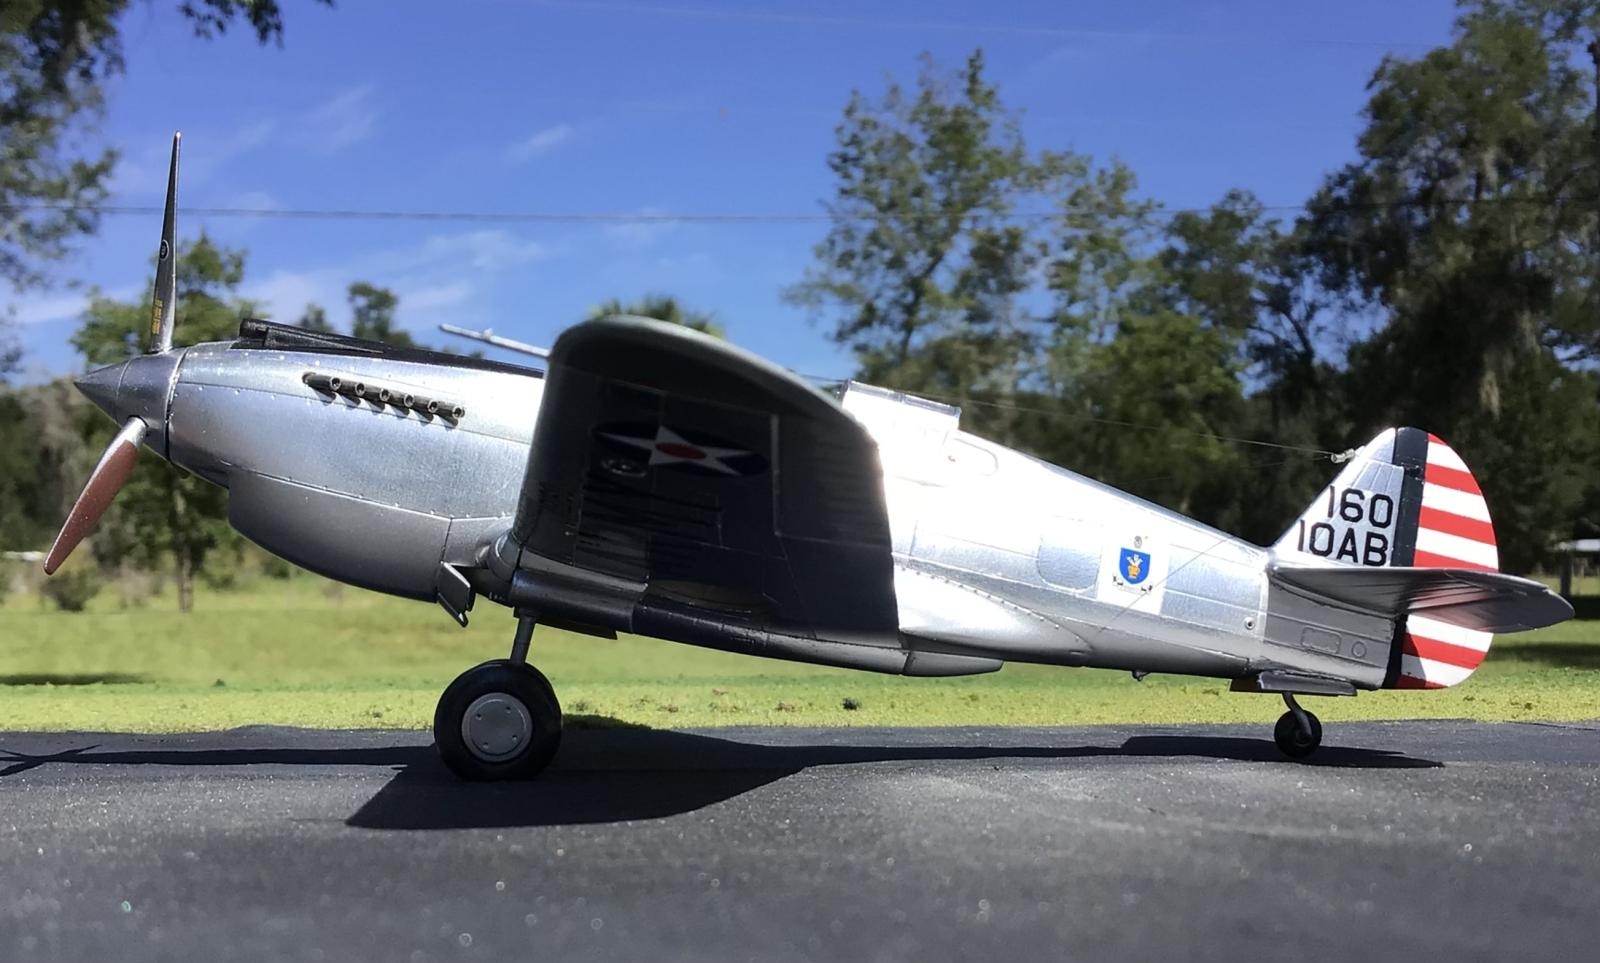
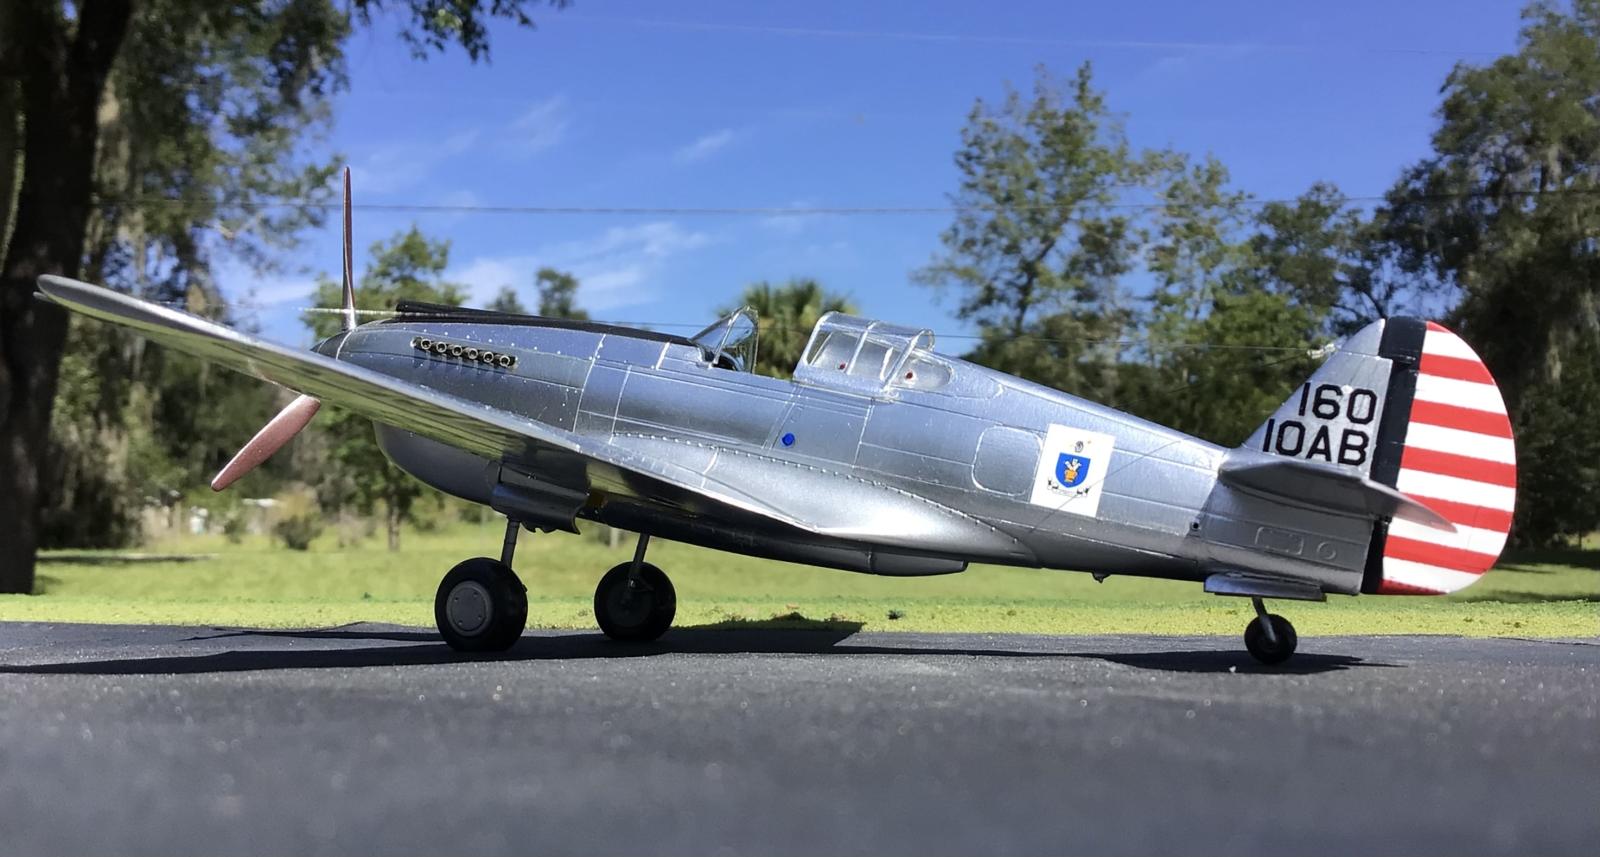
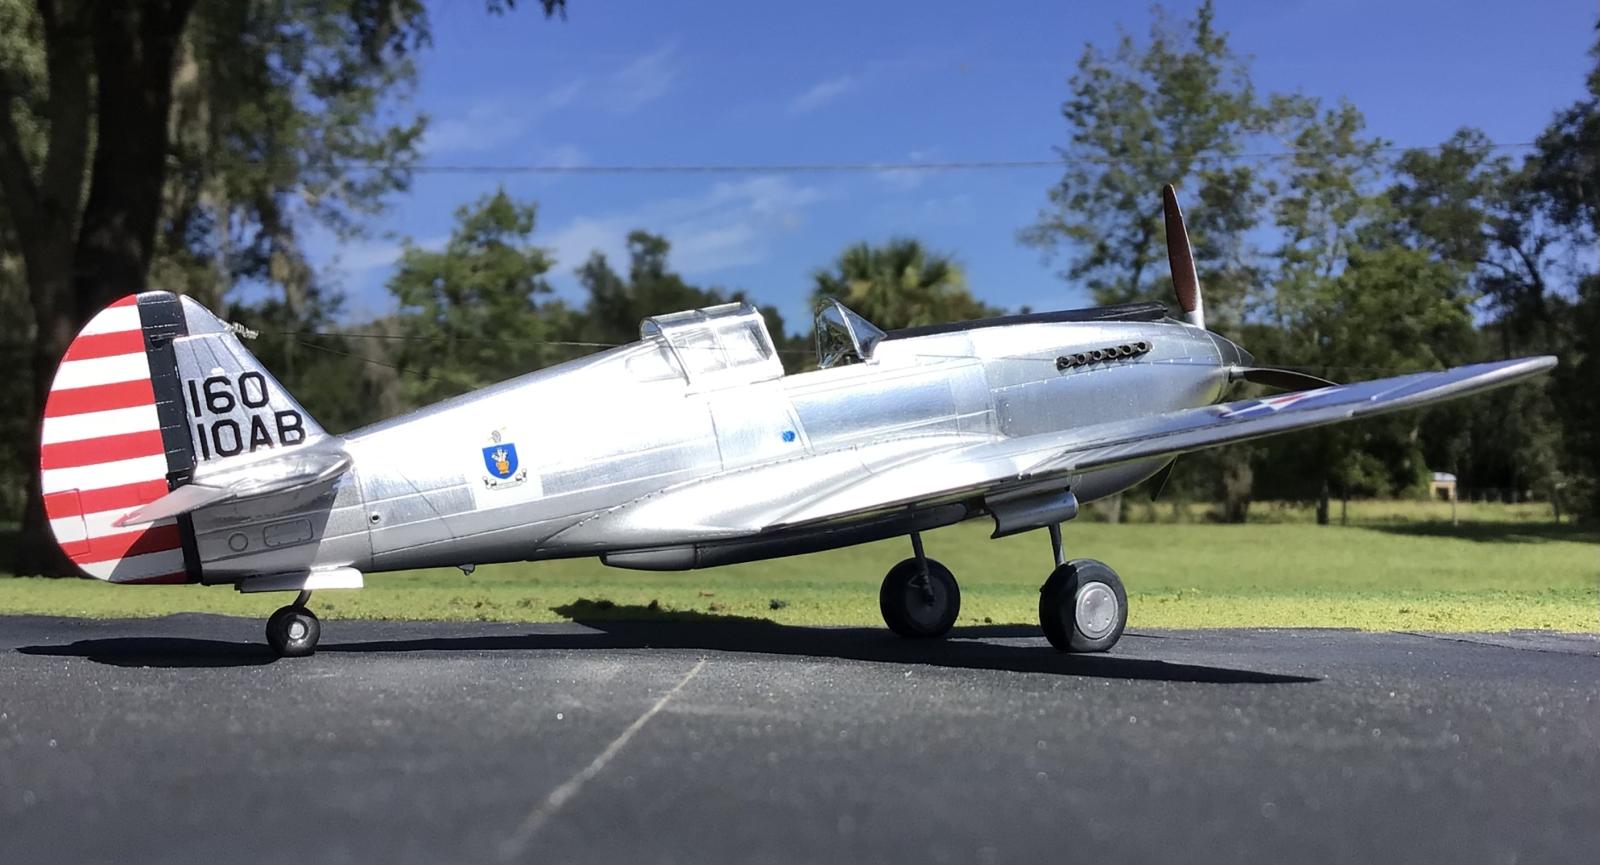
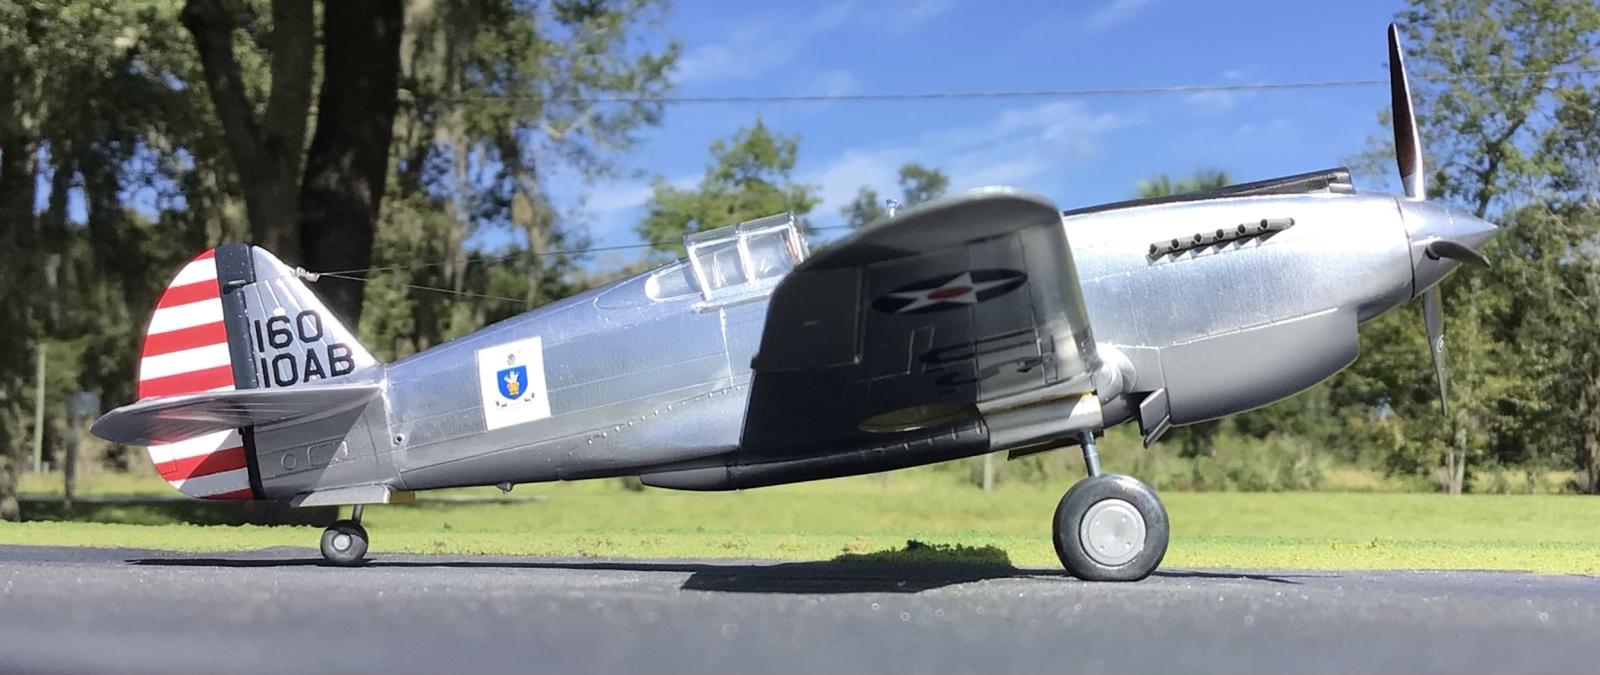
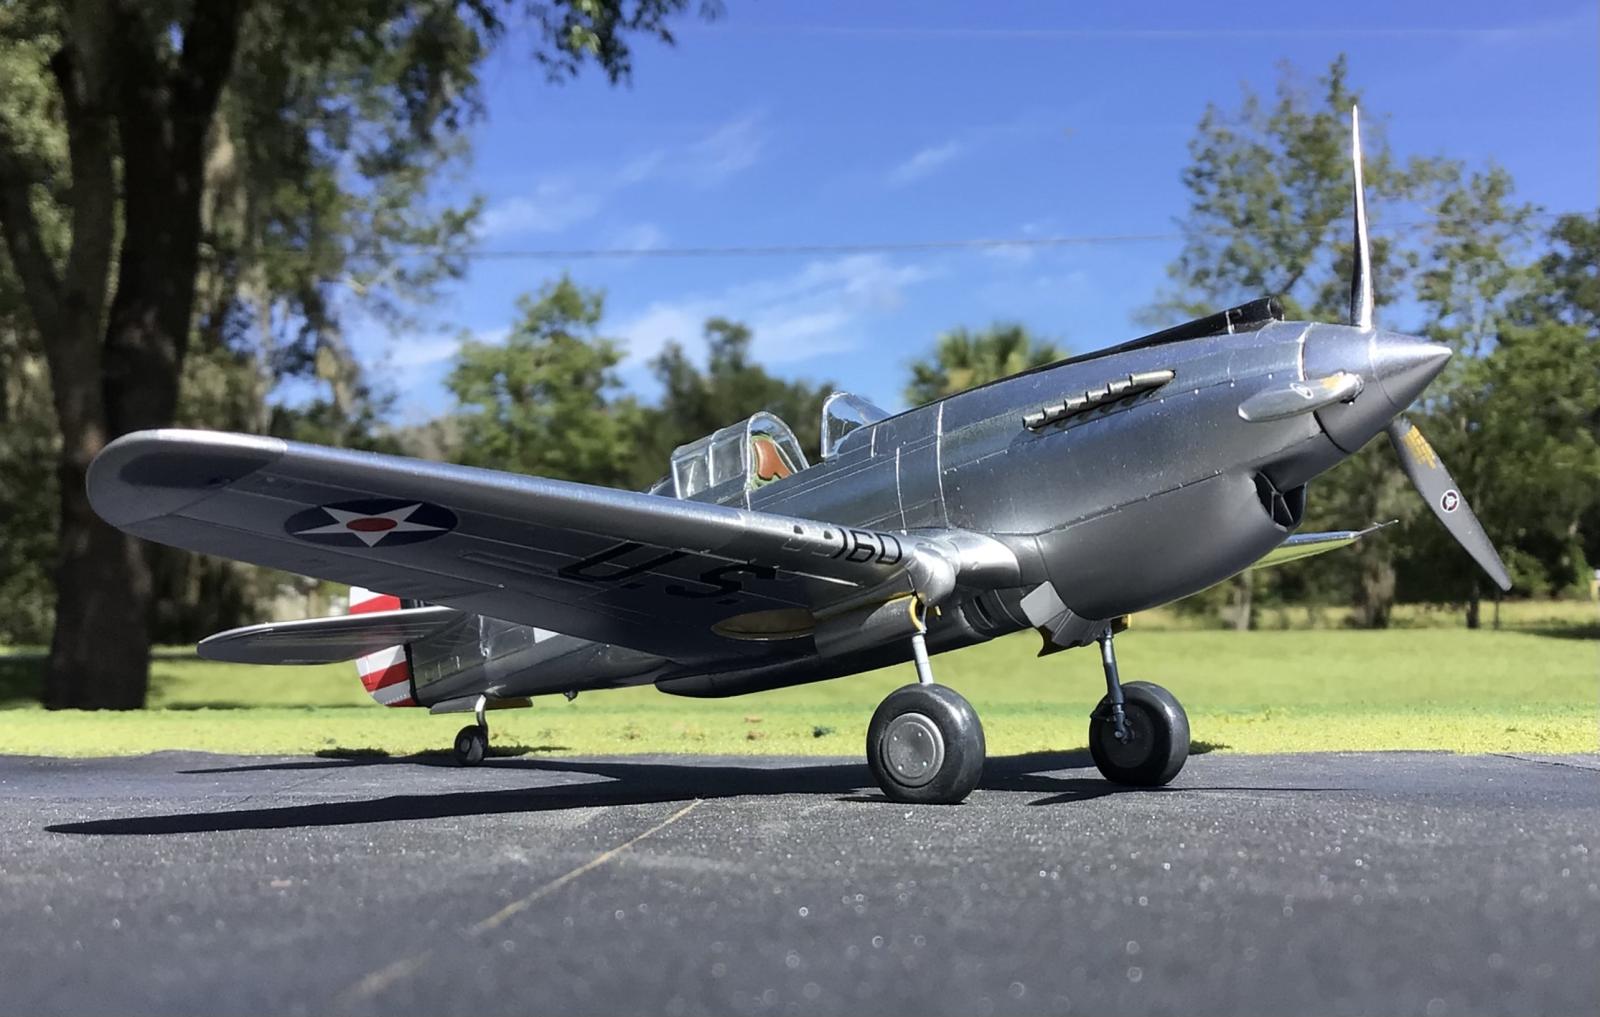
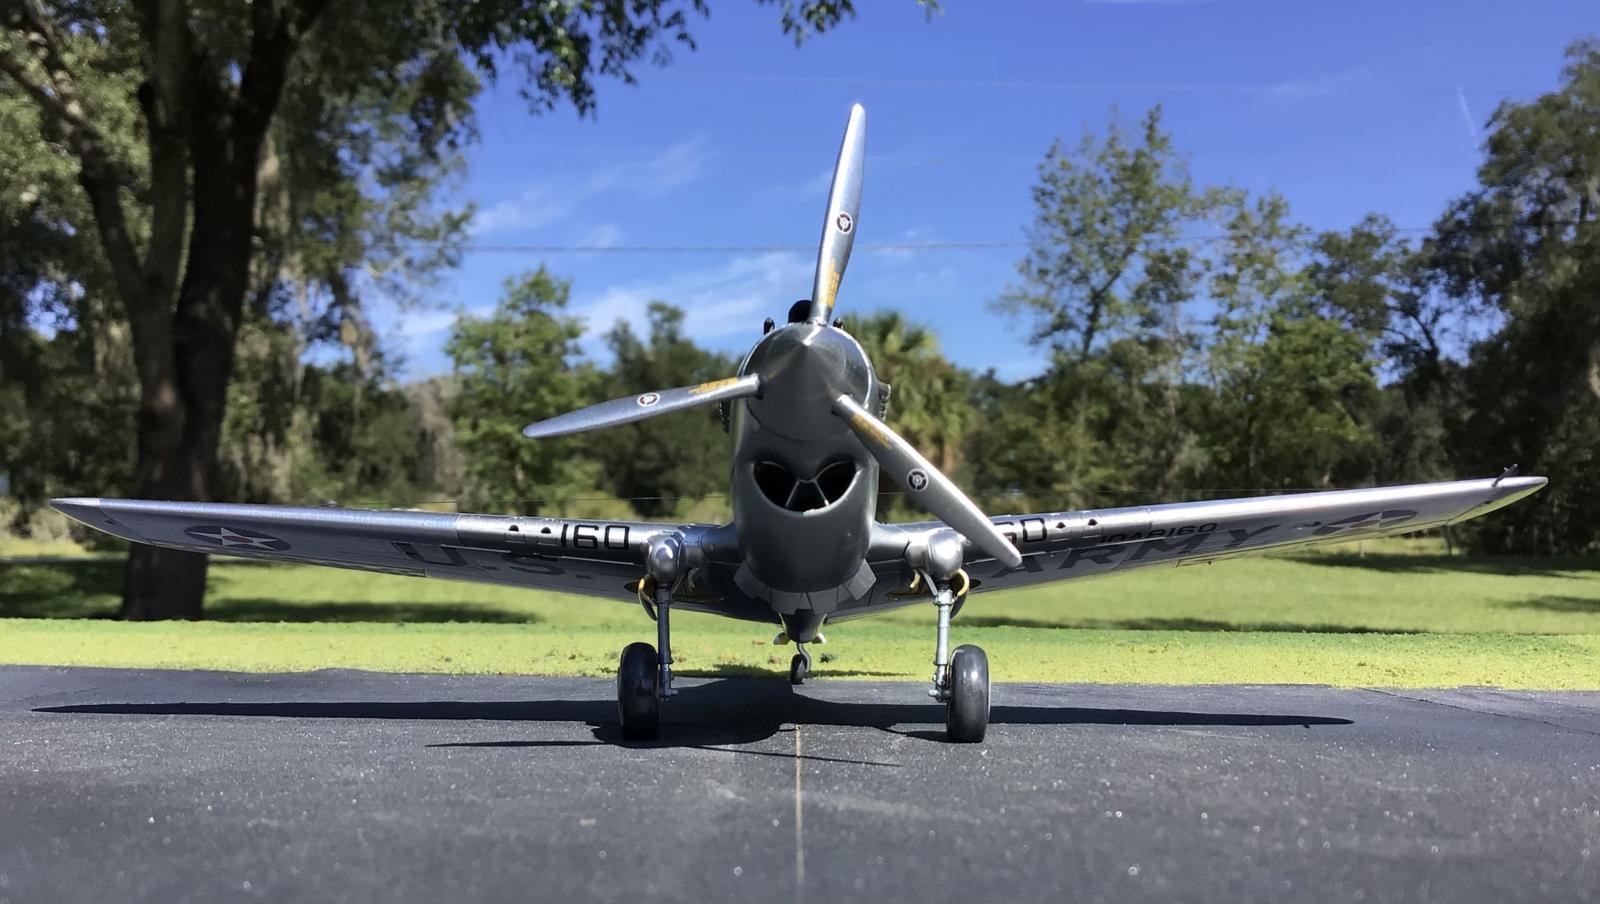
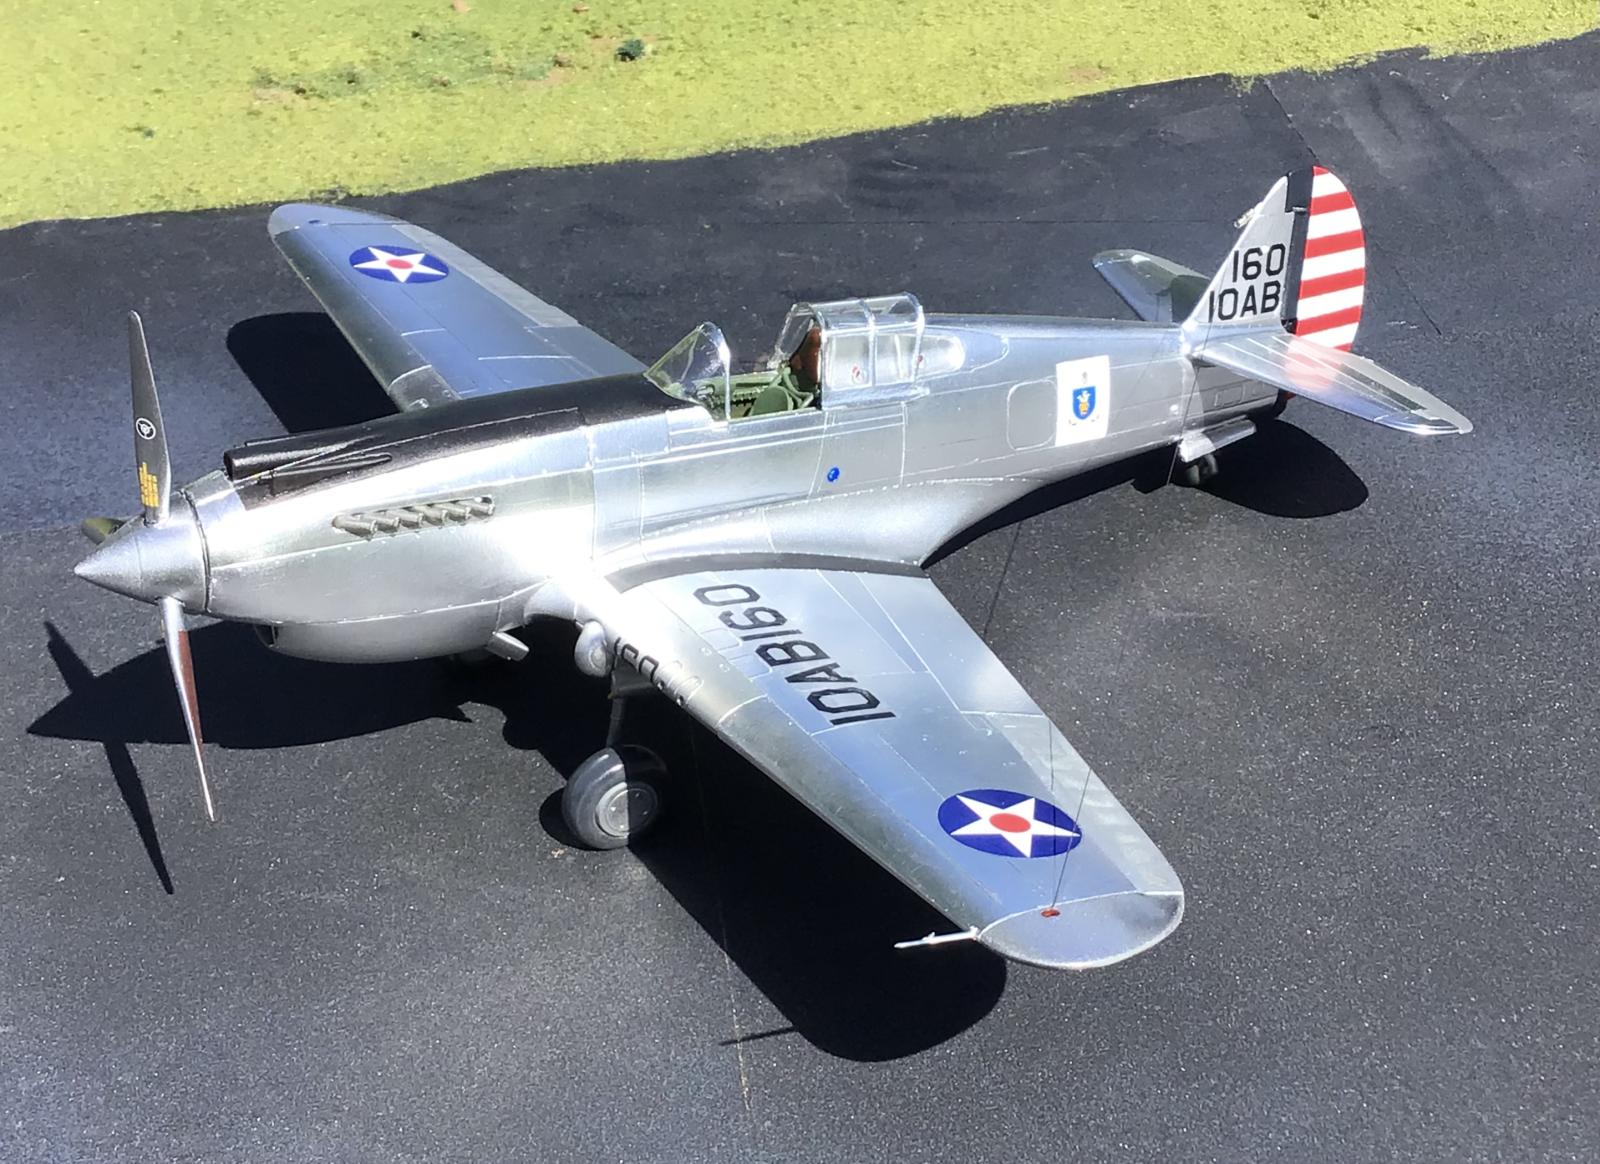
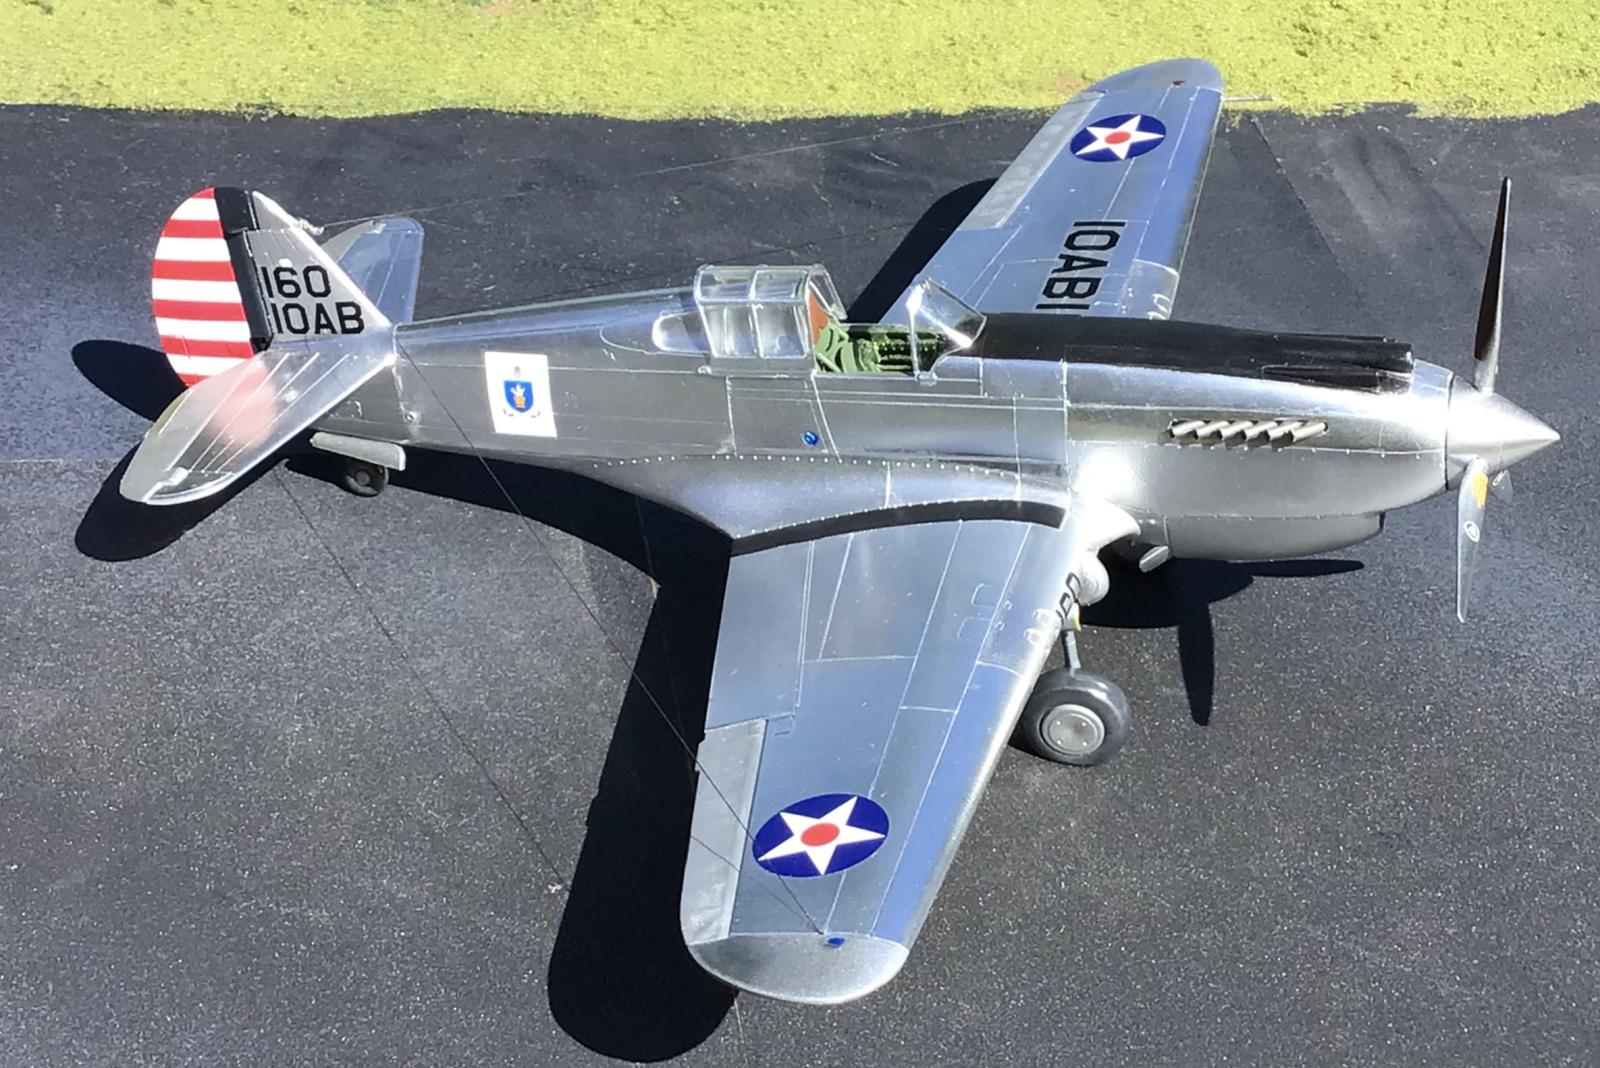
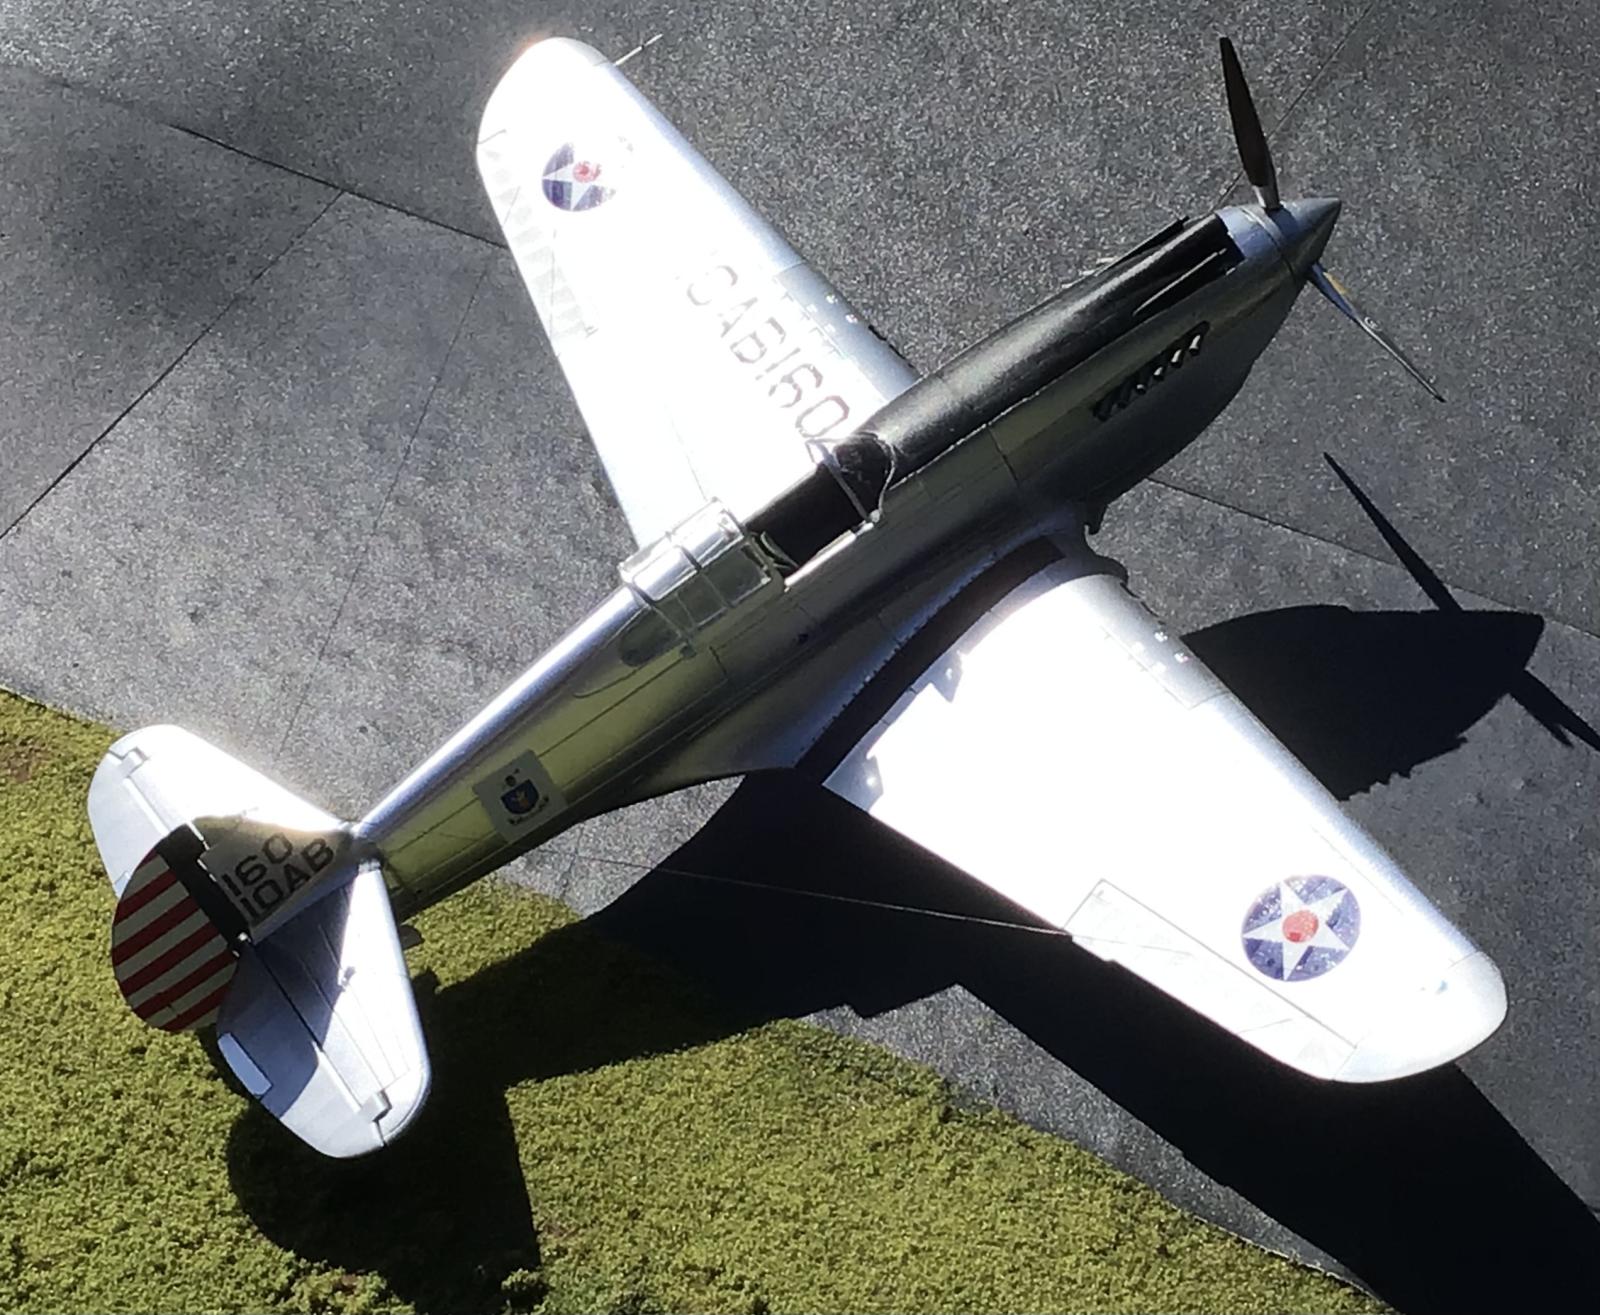
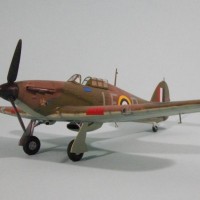
Airfix 1/48 scale Curtiss P-40, 10th Air Base Squadron, Chanute Field, Illinois
This is a build that I had started a while ago. My very first model I built was the old 1/32 scale Revell P-40E "Flying Tigers" model. I was 8 years old. I was captivated by the box art, showing a P-40 diving through a formation of Japanese bombers... and I was hooked. So I am partial to anything P-40.
I currently have some P-51D Mustangs underway, as a mutual build with Pedro Rocha, and I wanted to brush up on my bare metal skills. @holzhamer Pedro L. Rocha
Thank you for starting the build journal for these Mustangs.
So it was the perfect opportunity to finish this one up.
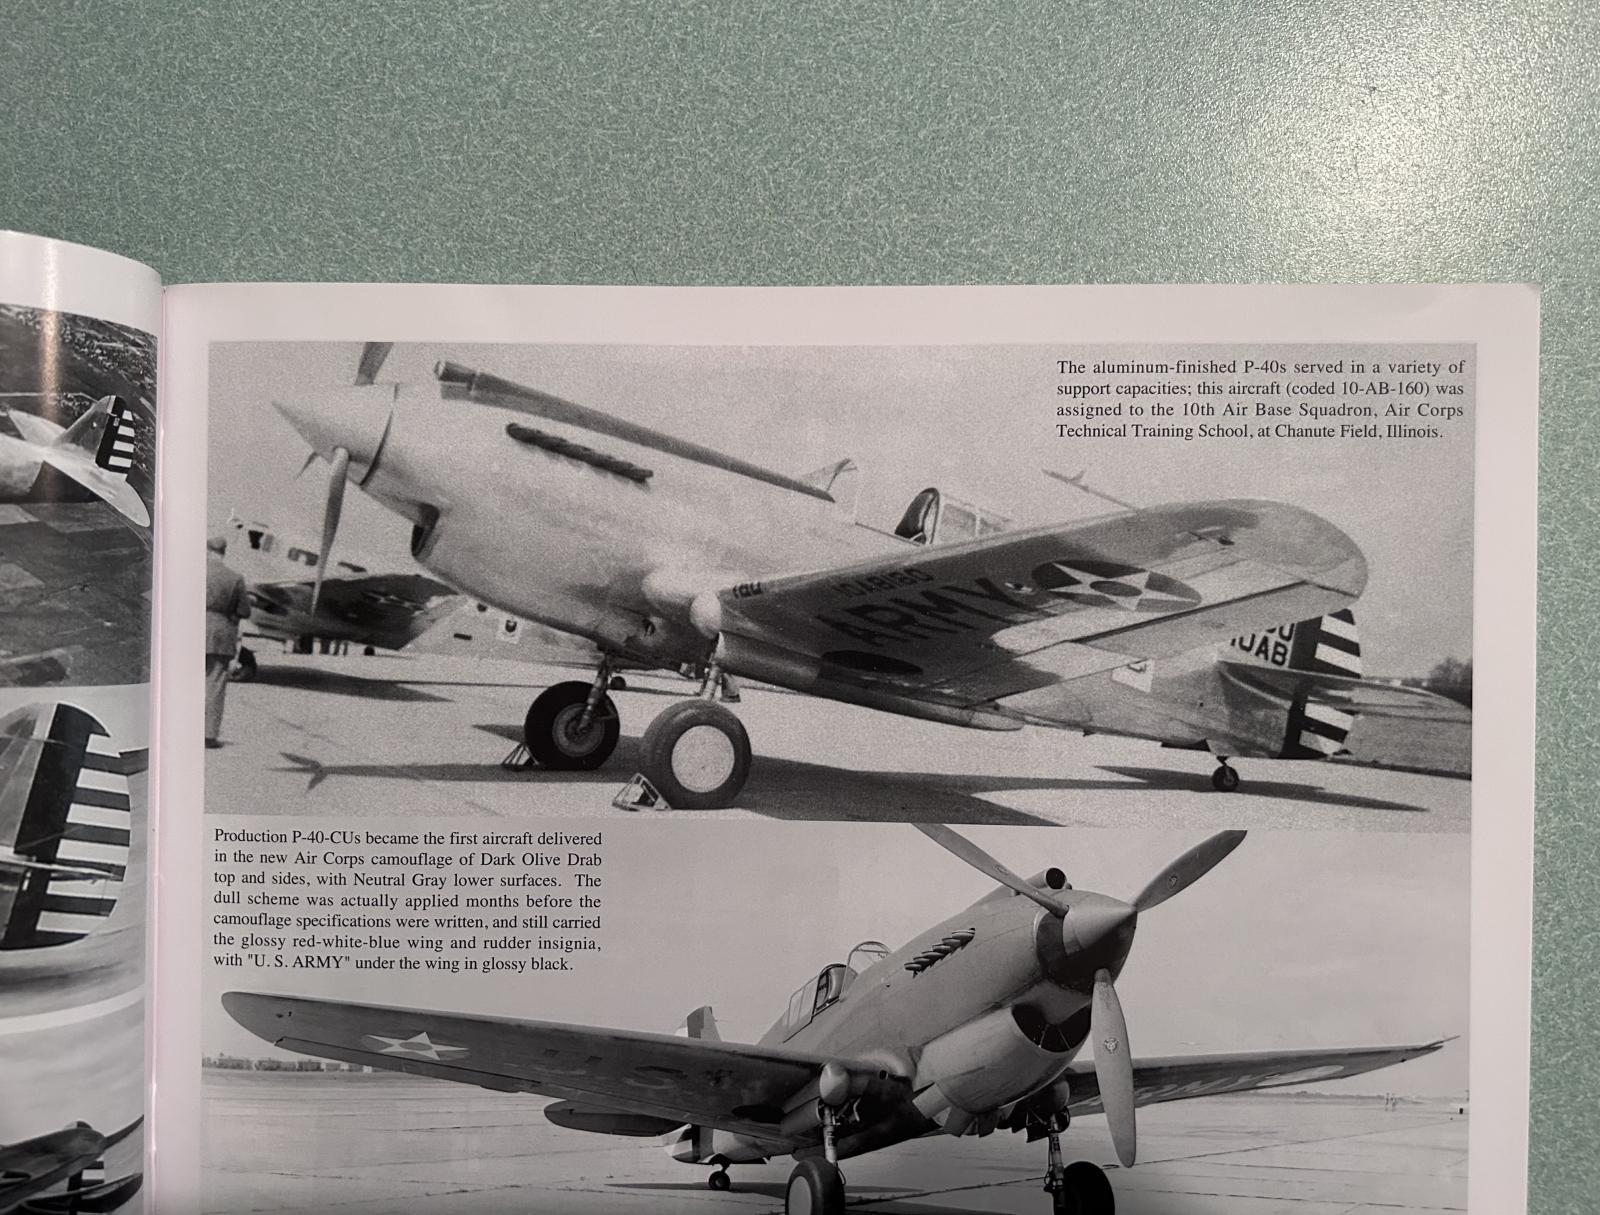
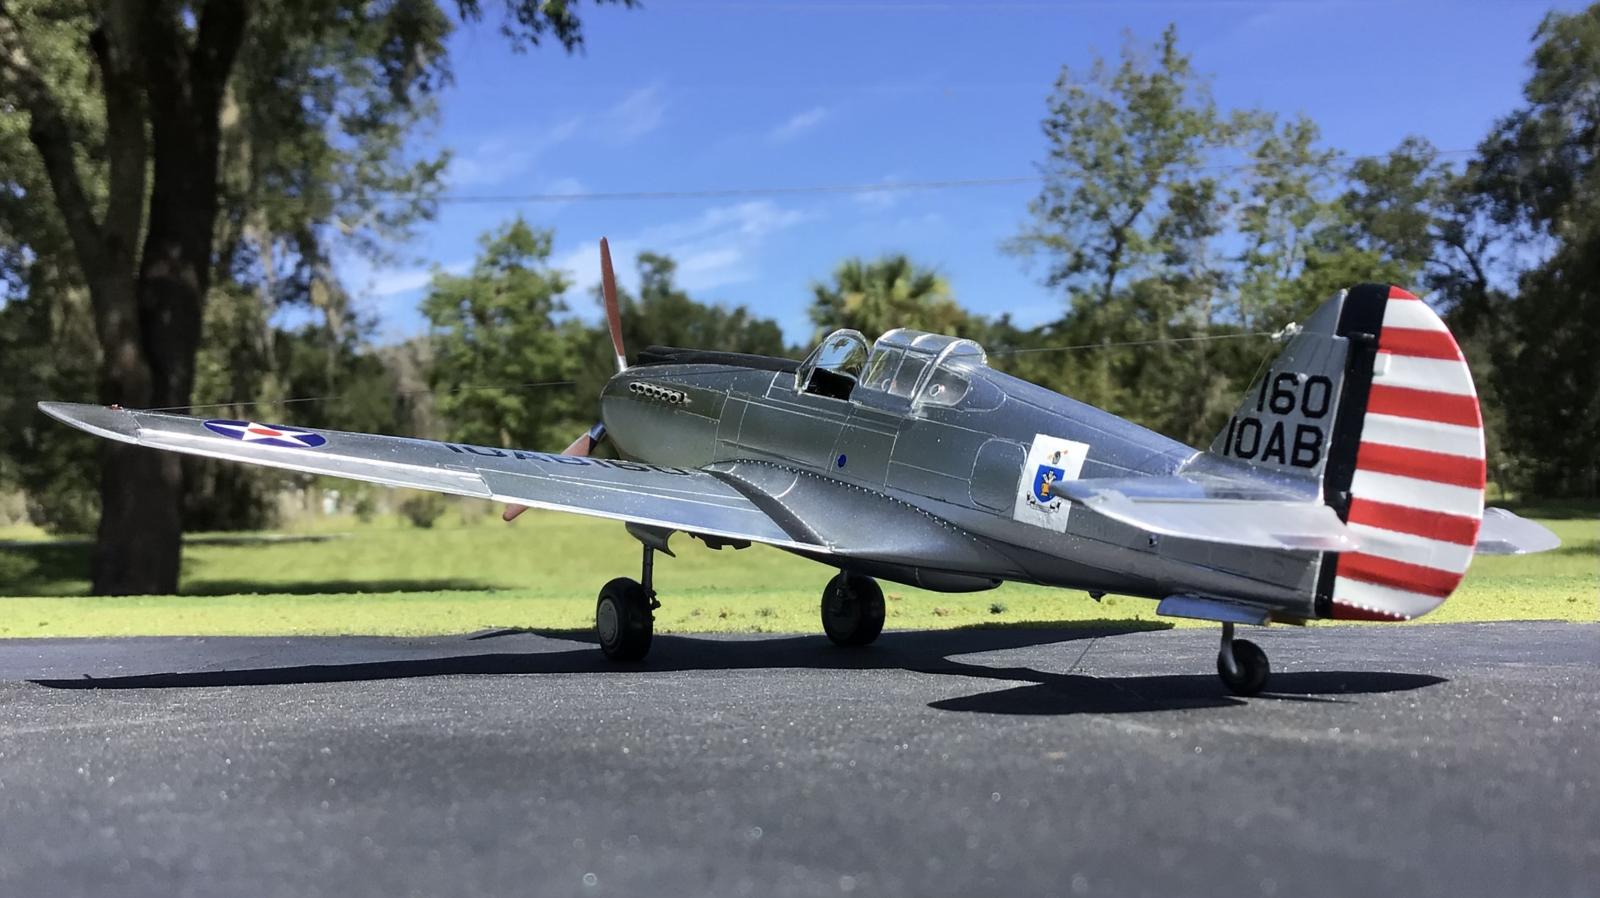
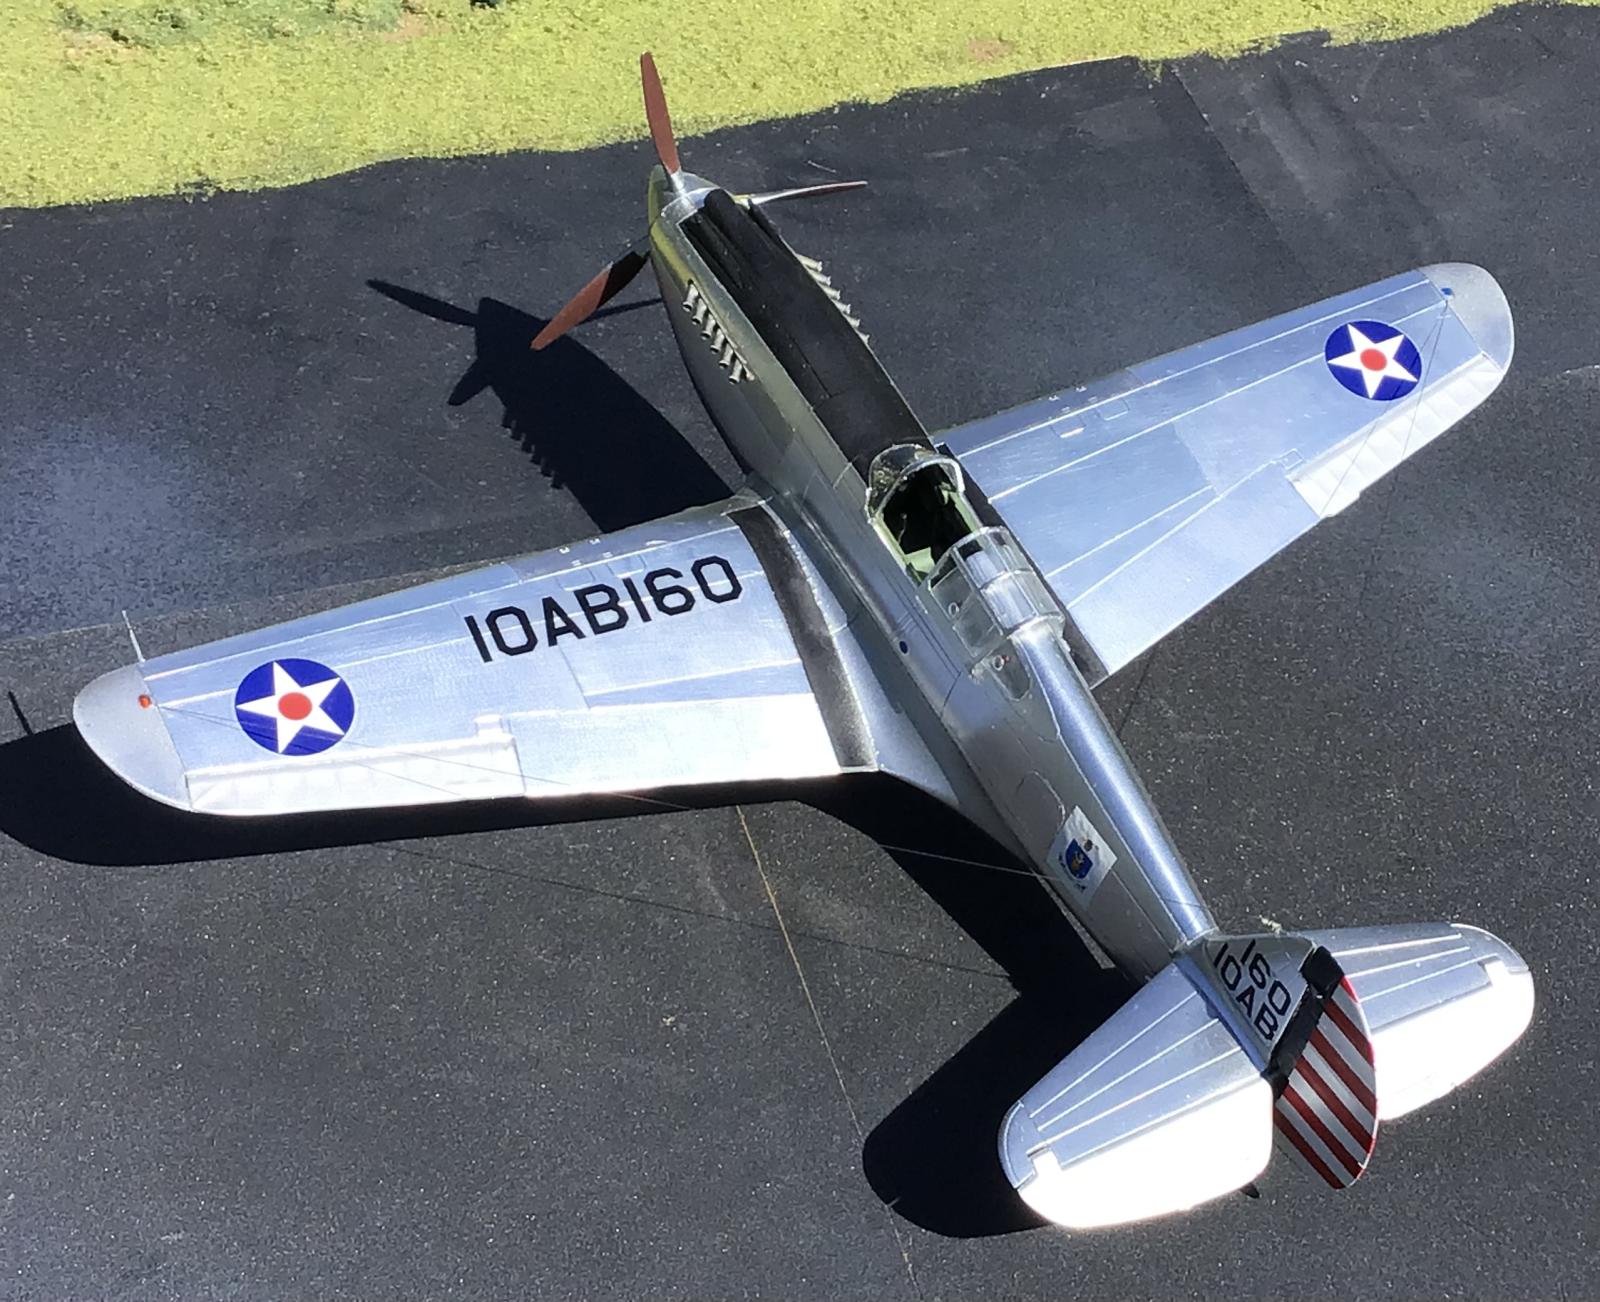
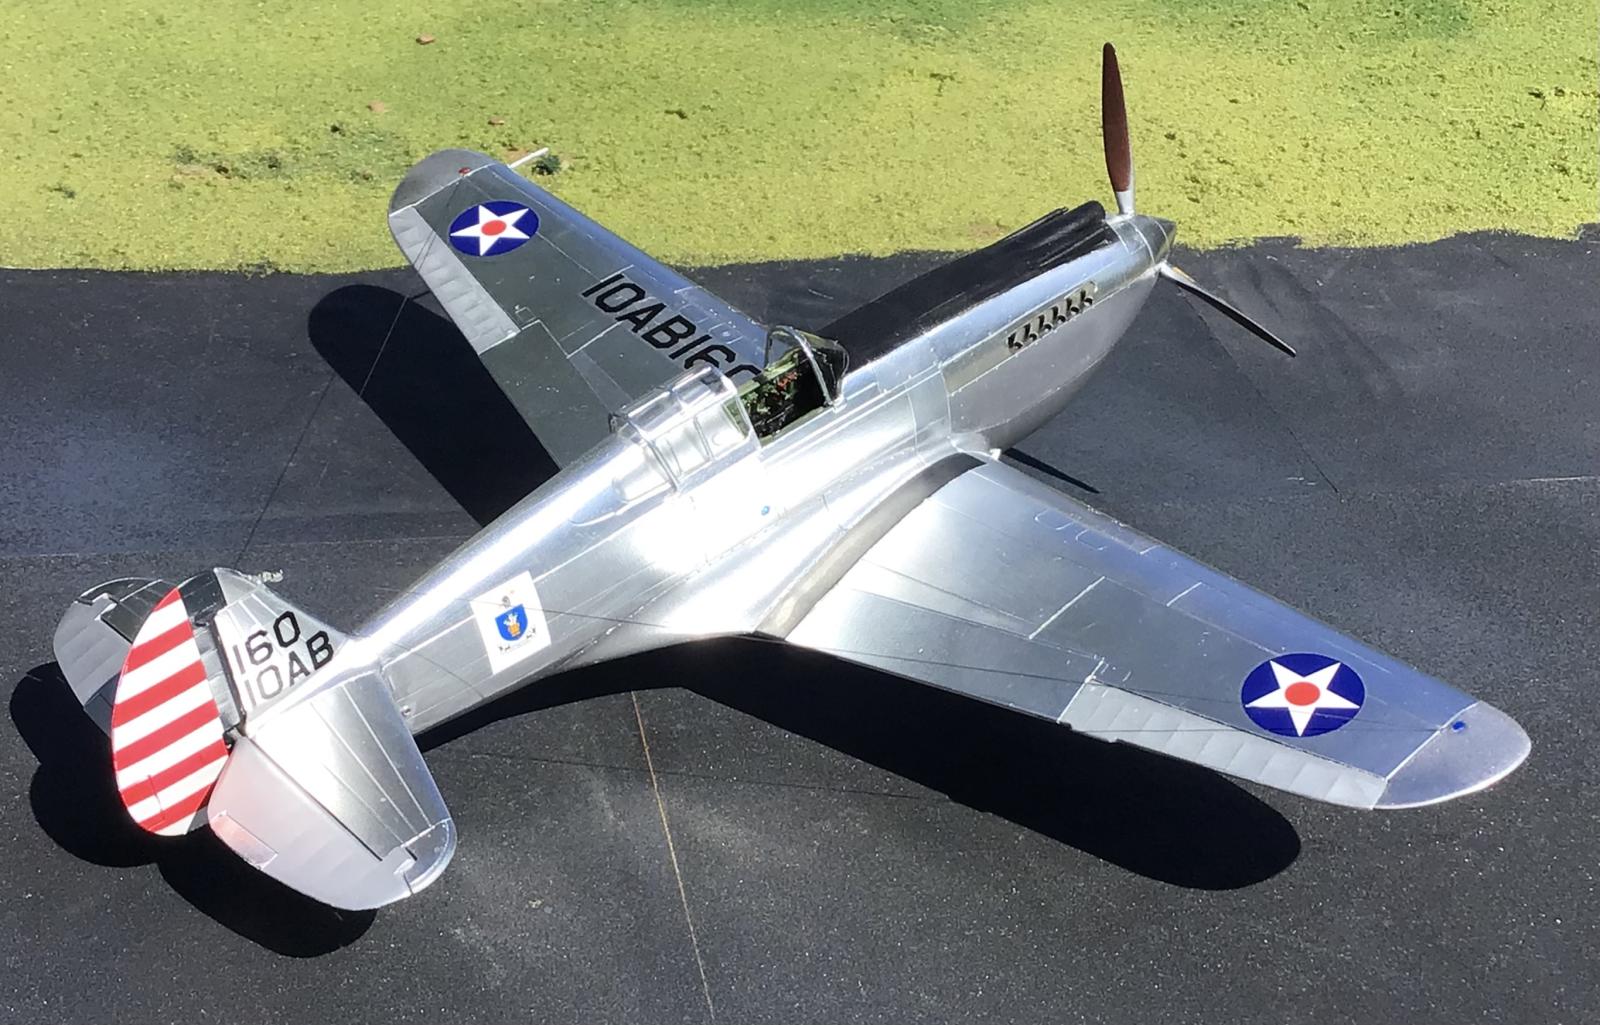
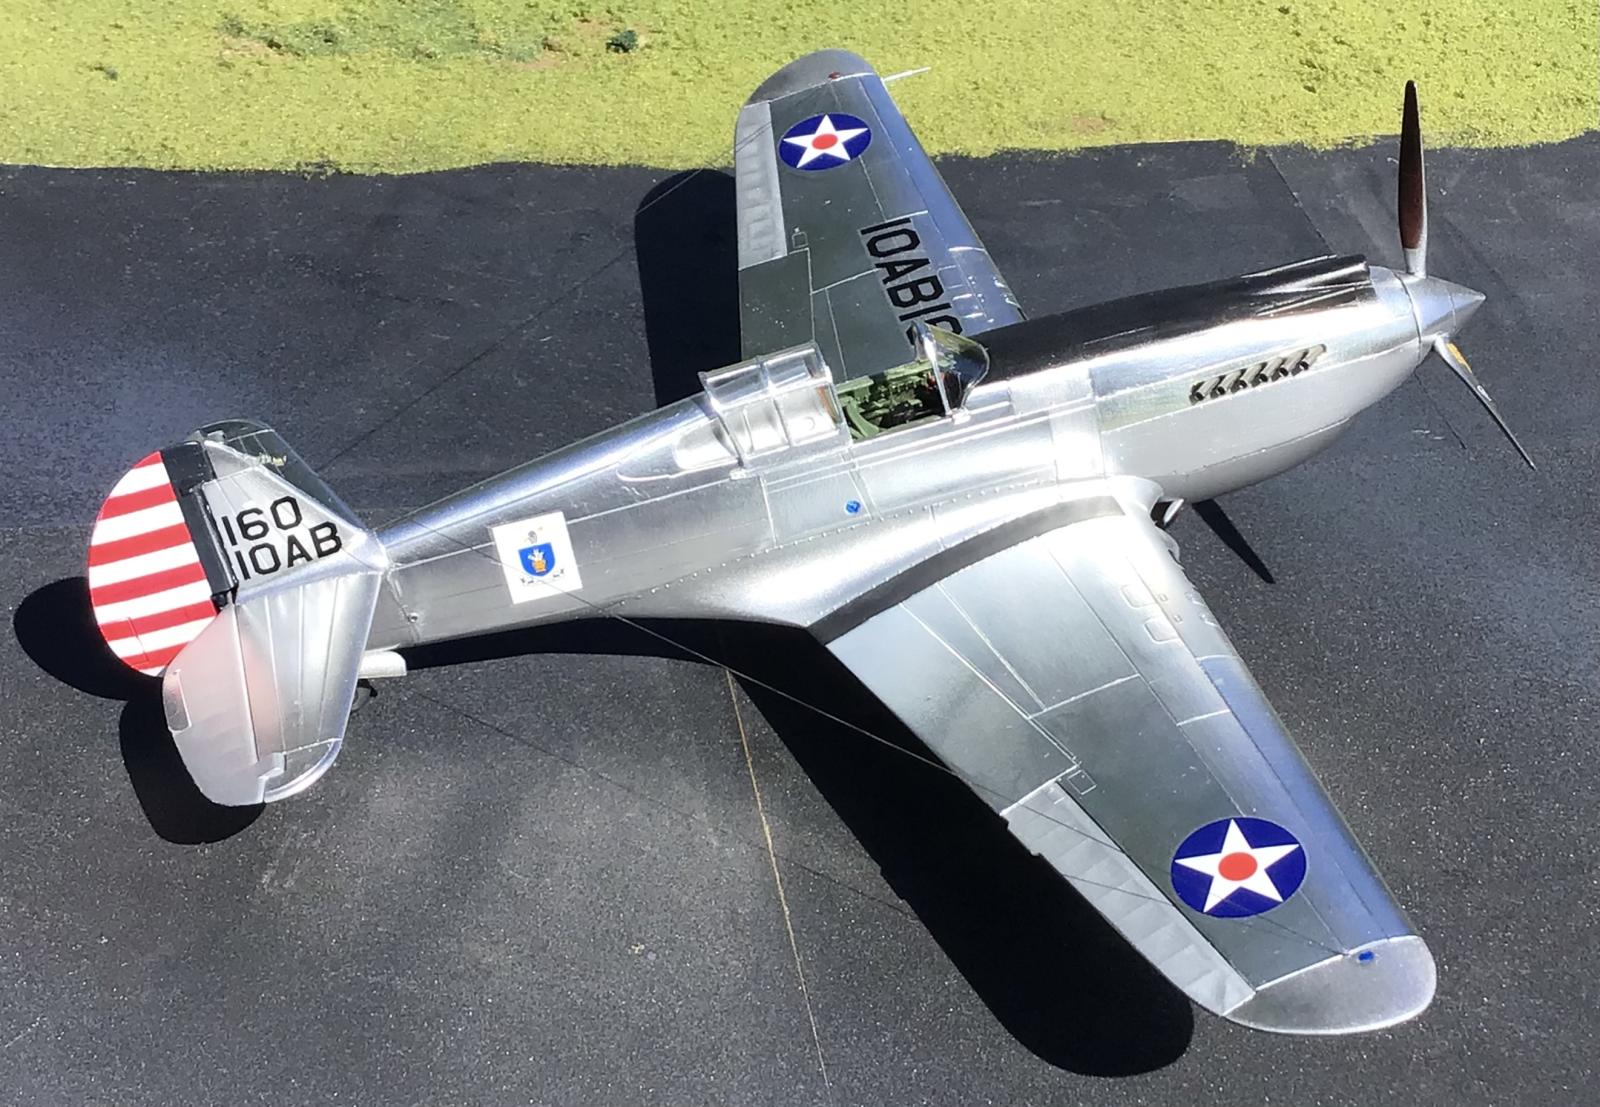
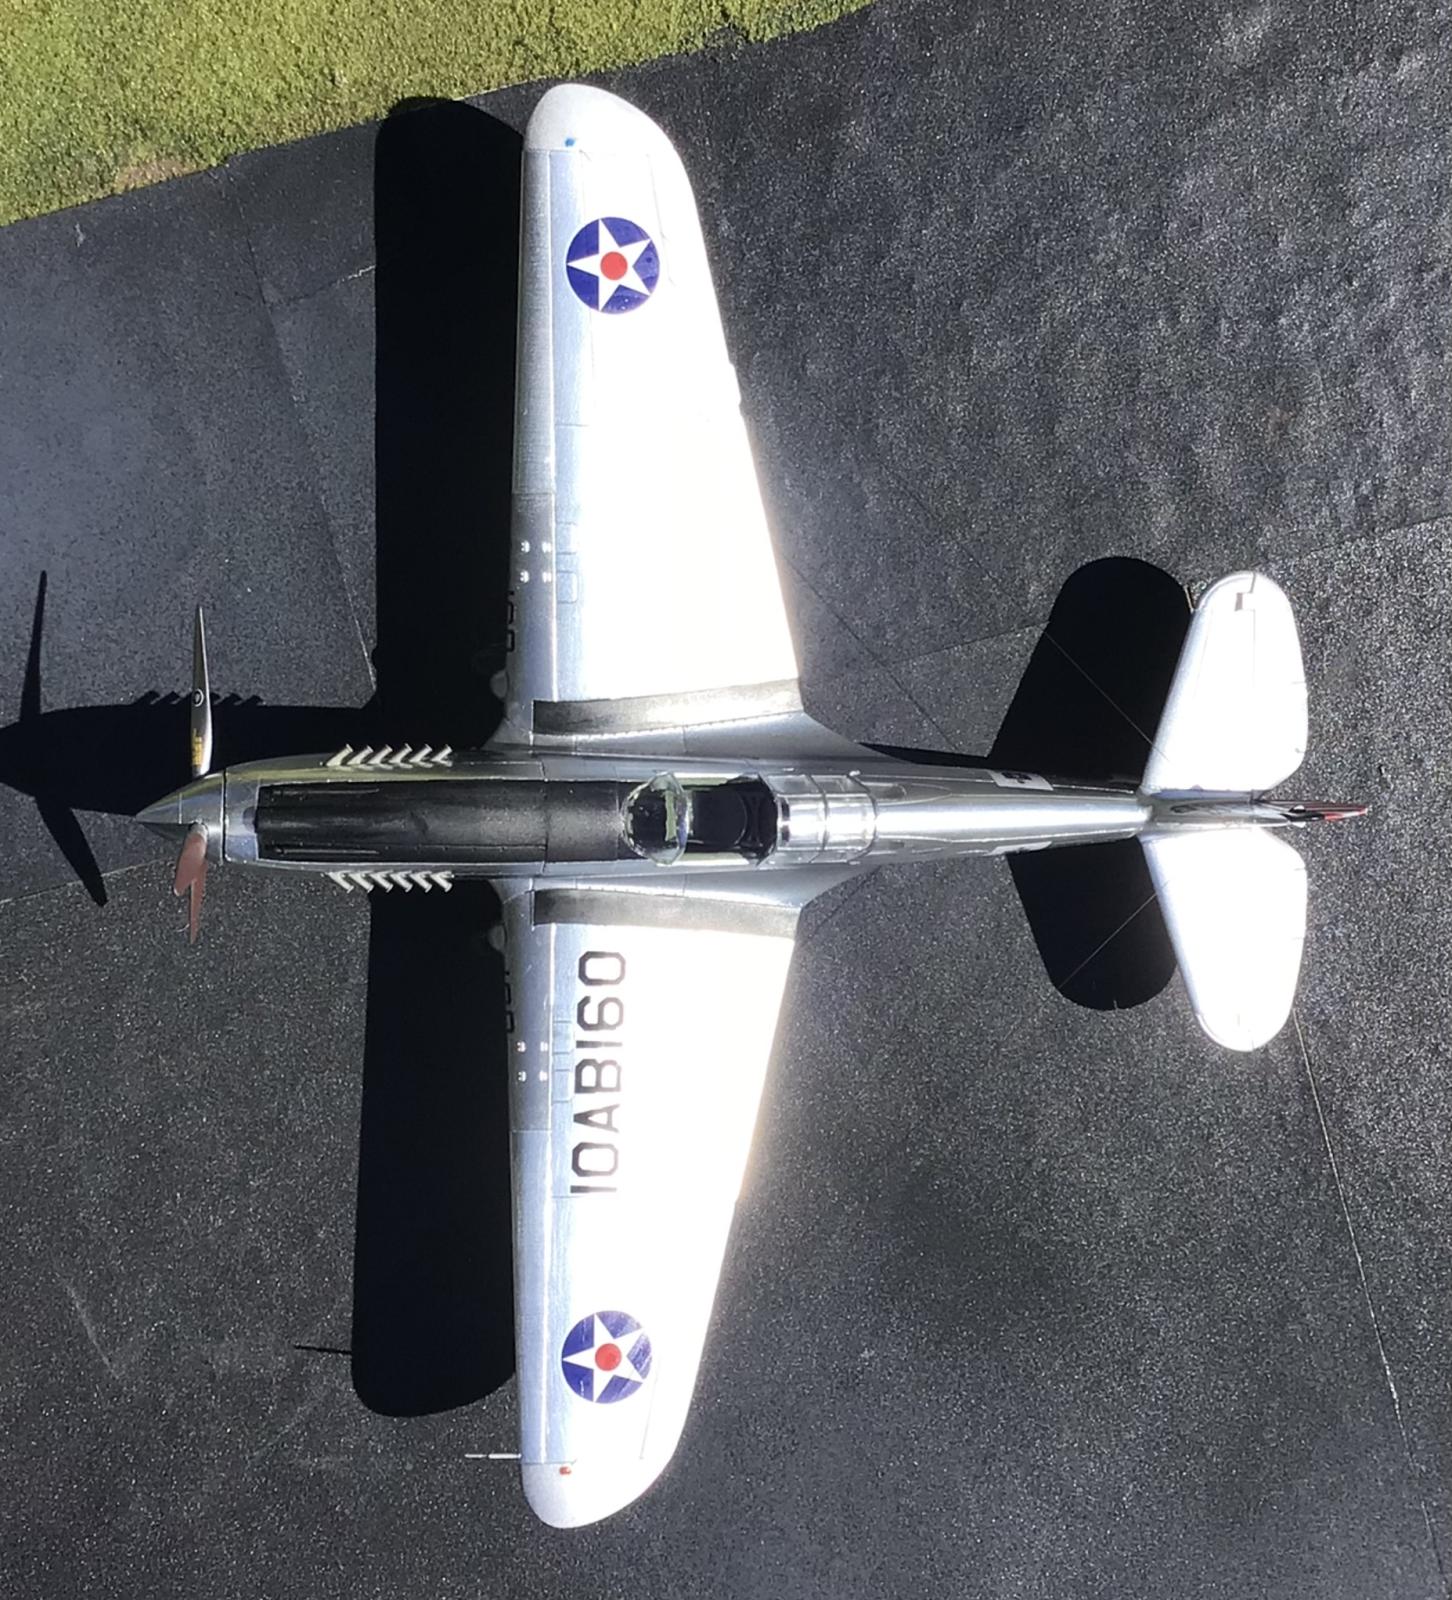
I tried to duplicate the original photo I saw in Dana Bell's excellent book on these early P-40's.
-
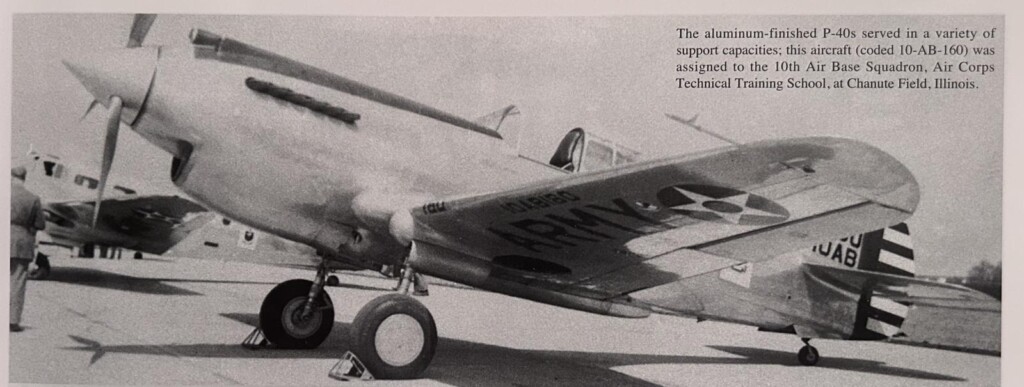
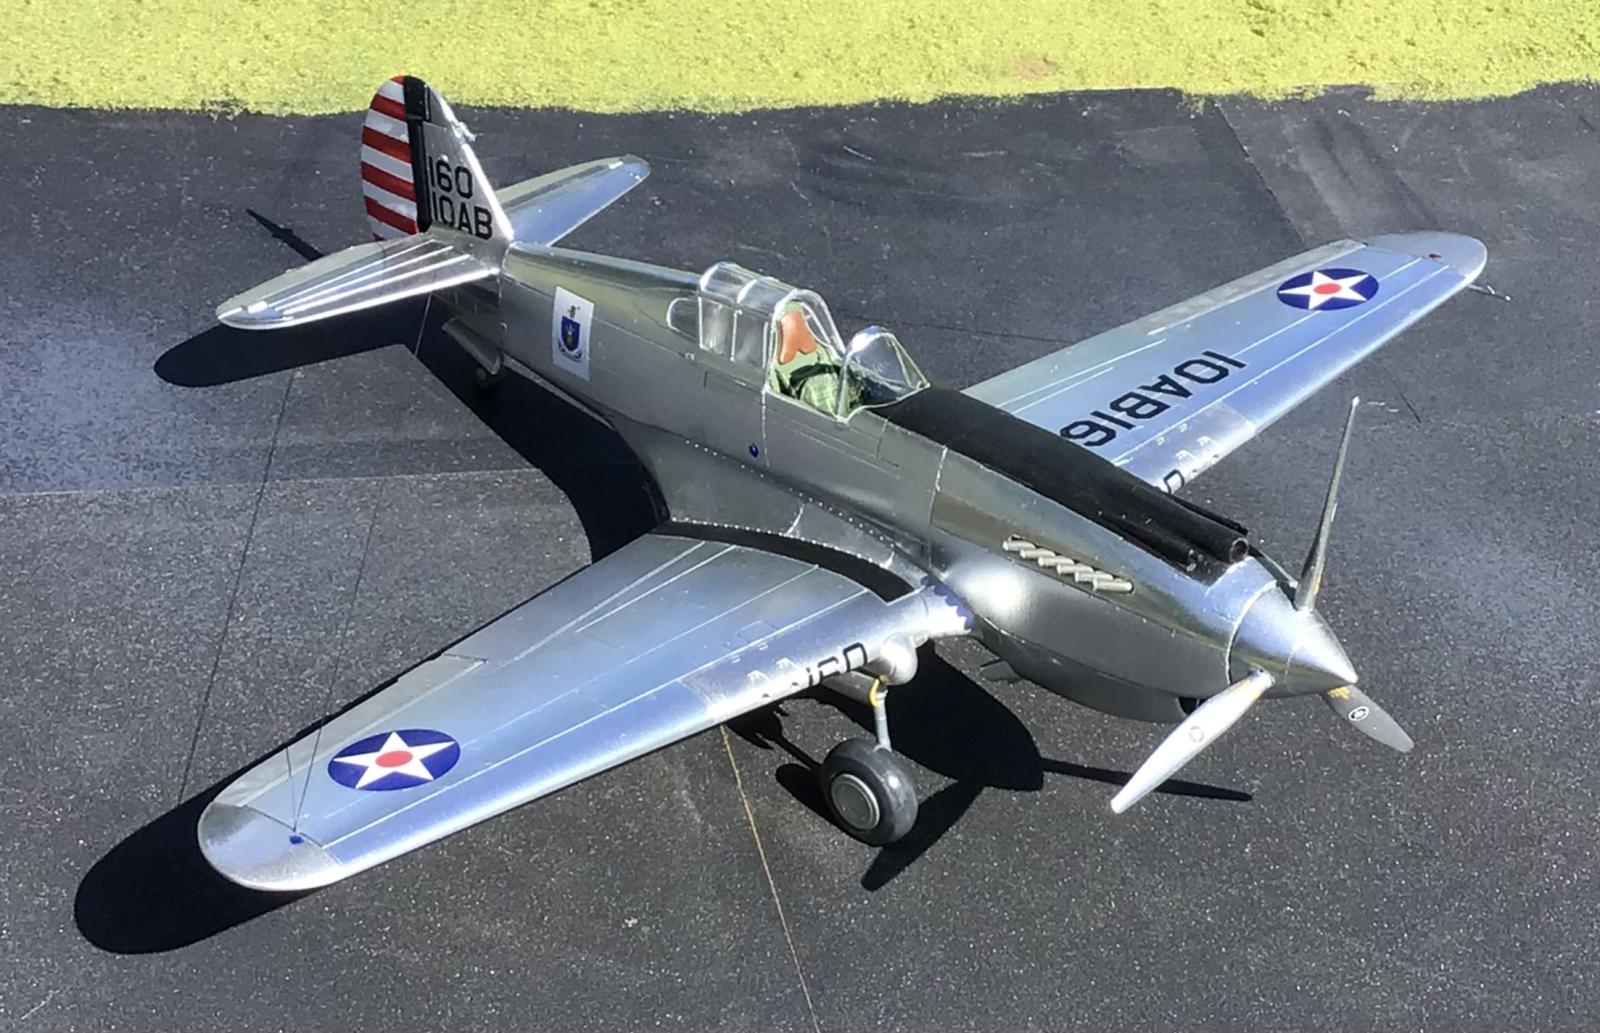
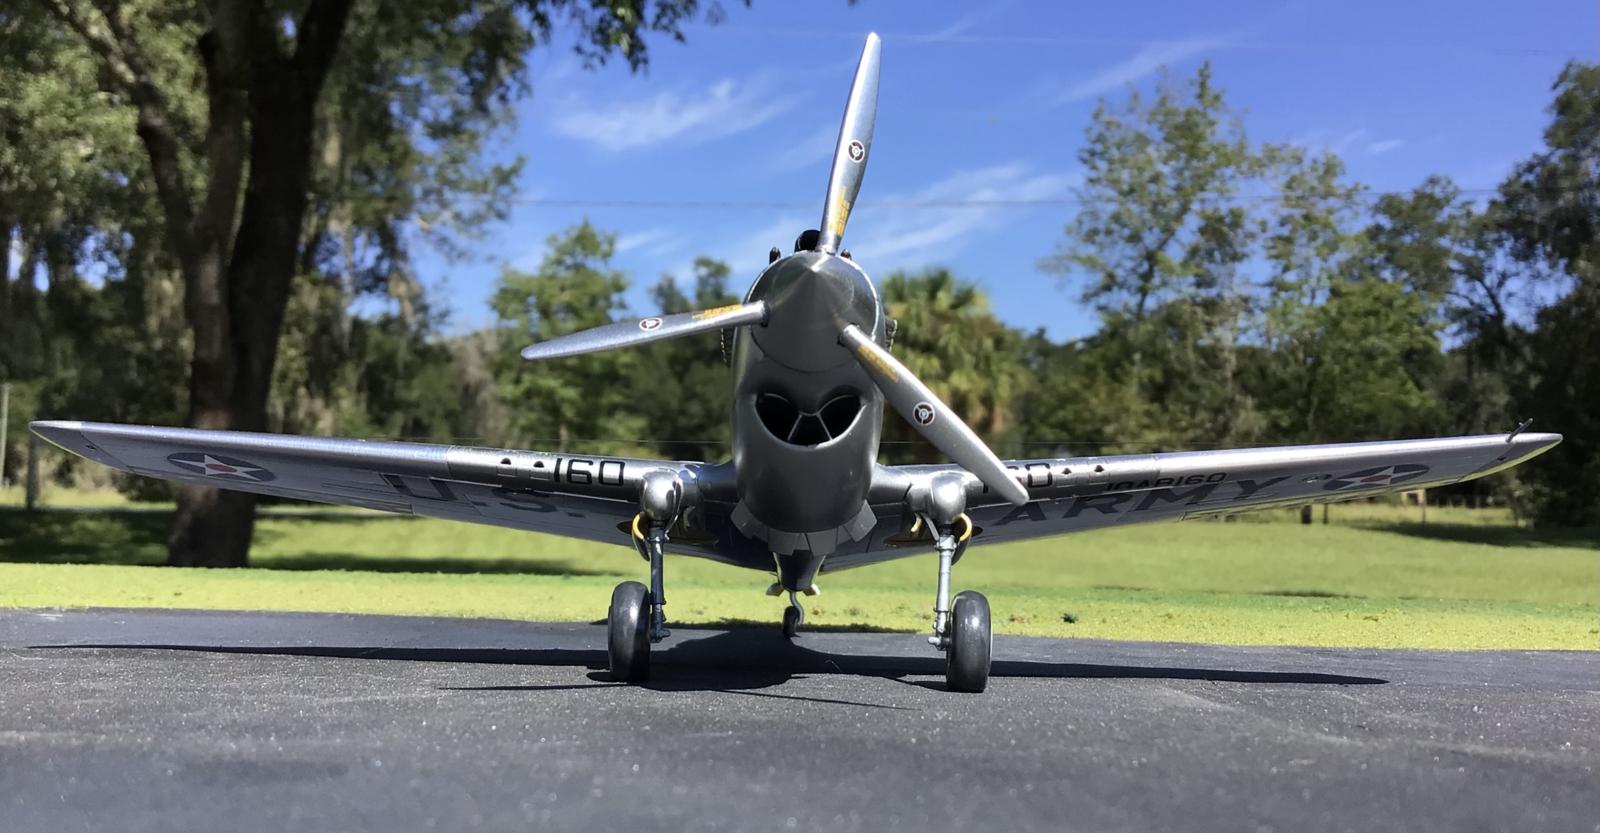
- 1. Notice the landing light
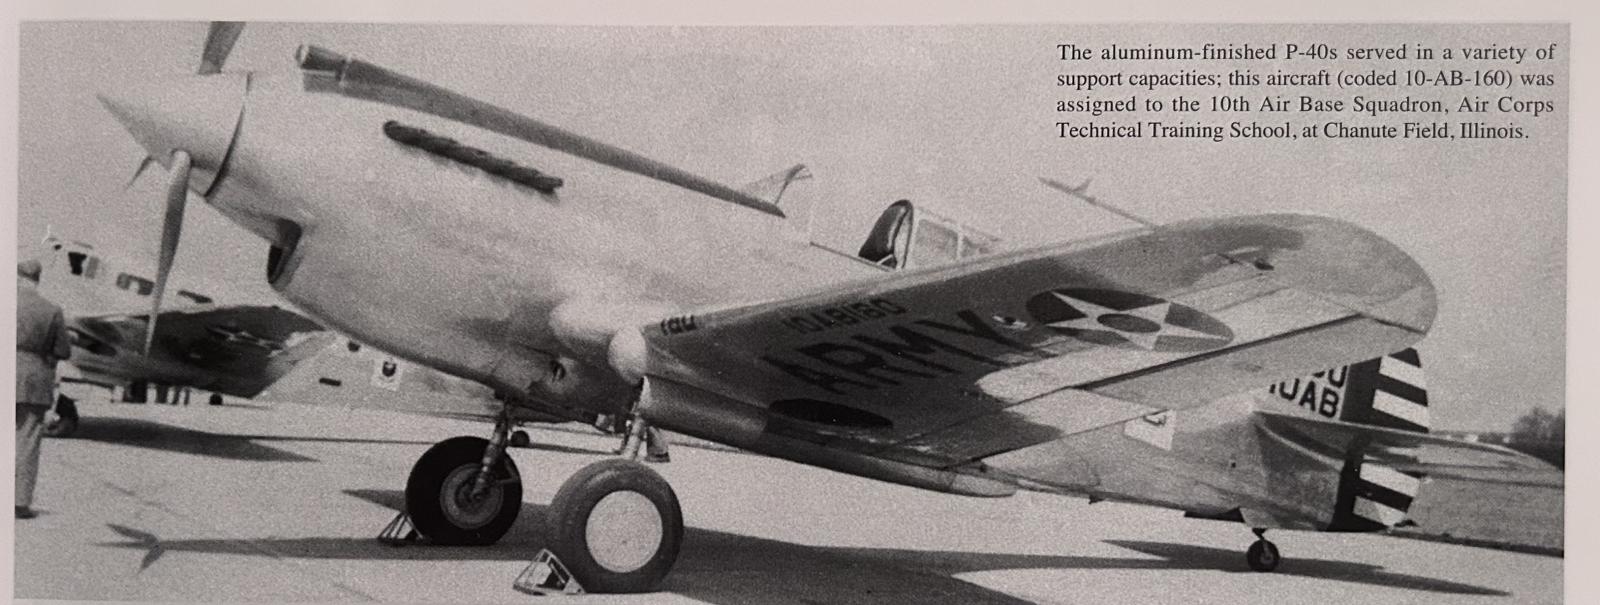
So I posed my model as close as I could to match the original.
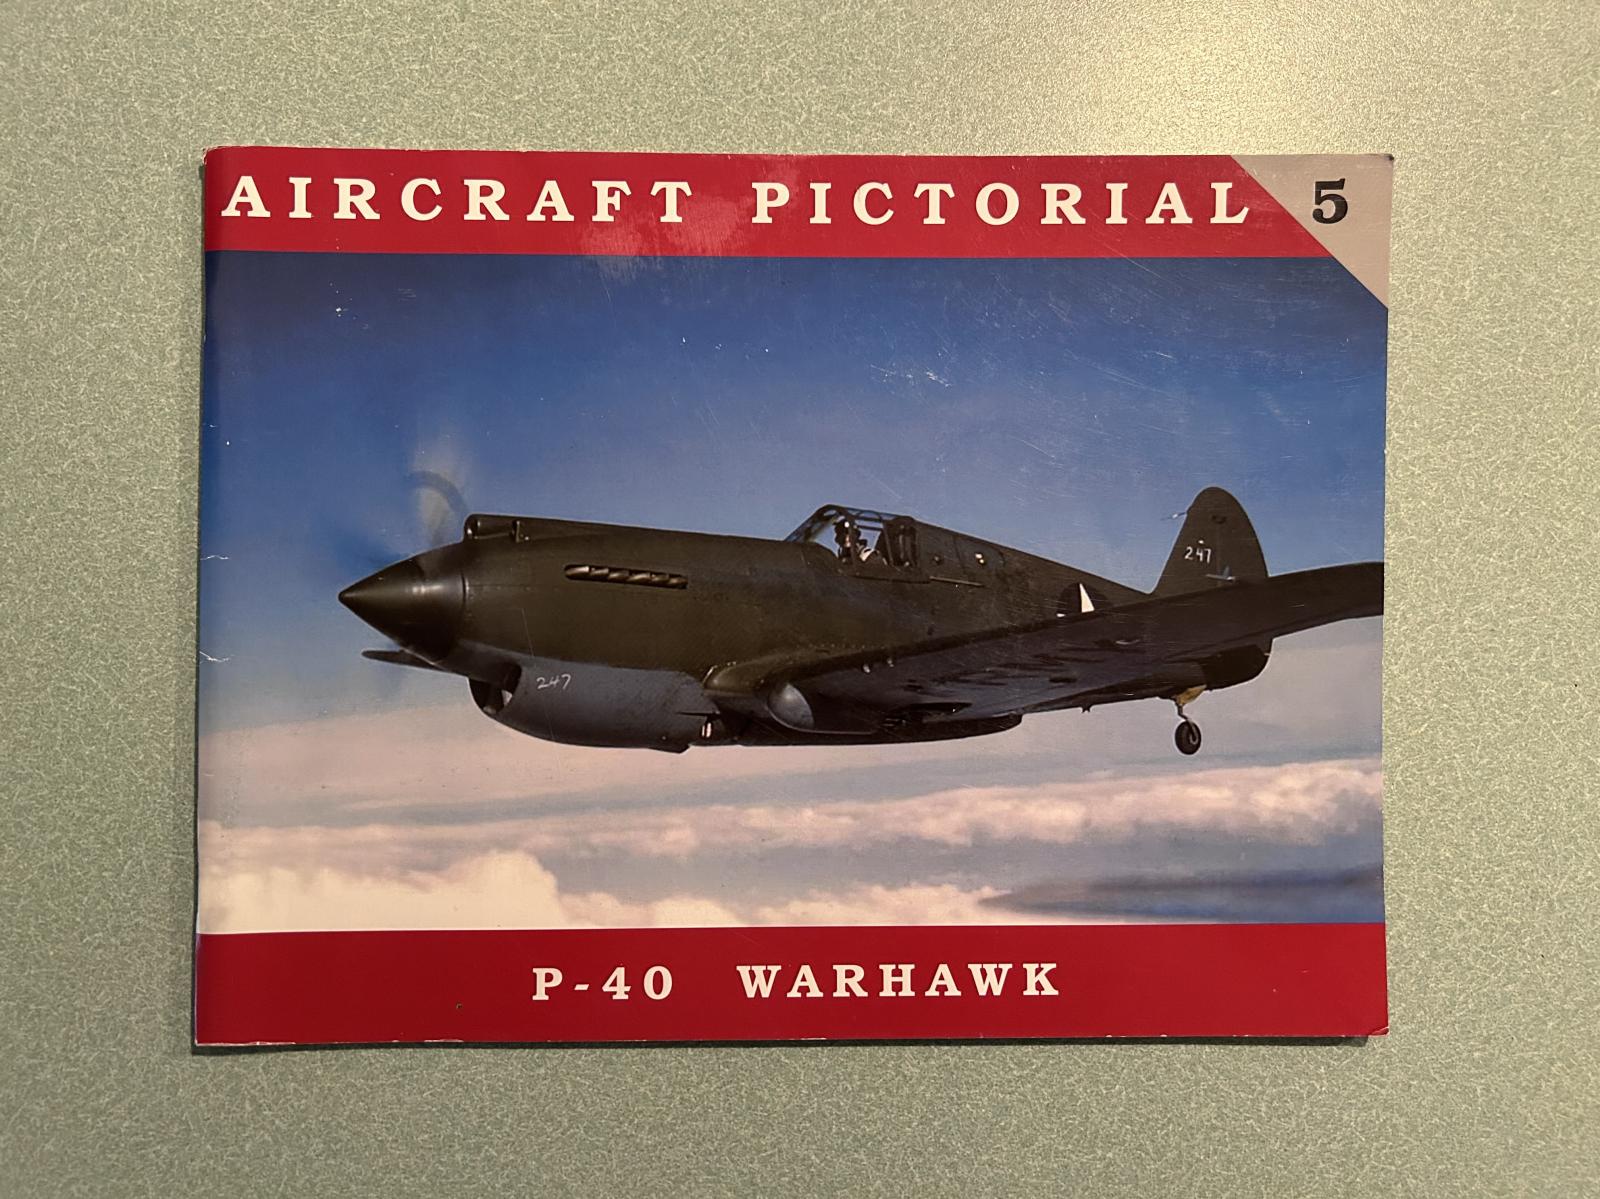
This is the book I'm talking about. I highly recommend it if you like the P-40.
I know there were some that have bashed this kit about the so called "Nun's Hat" area, but it looks like a P-40 to me. I have seen a real life P-40 up close and personal on many occasions.
I can tell you from personal experience, this kit is as close as anyone has come to getting it right. The ancient Monogram kit is good too in this aspect, but it lacks the details that Airfix has right from the box.
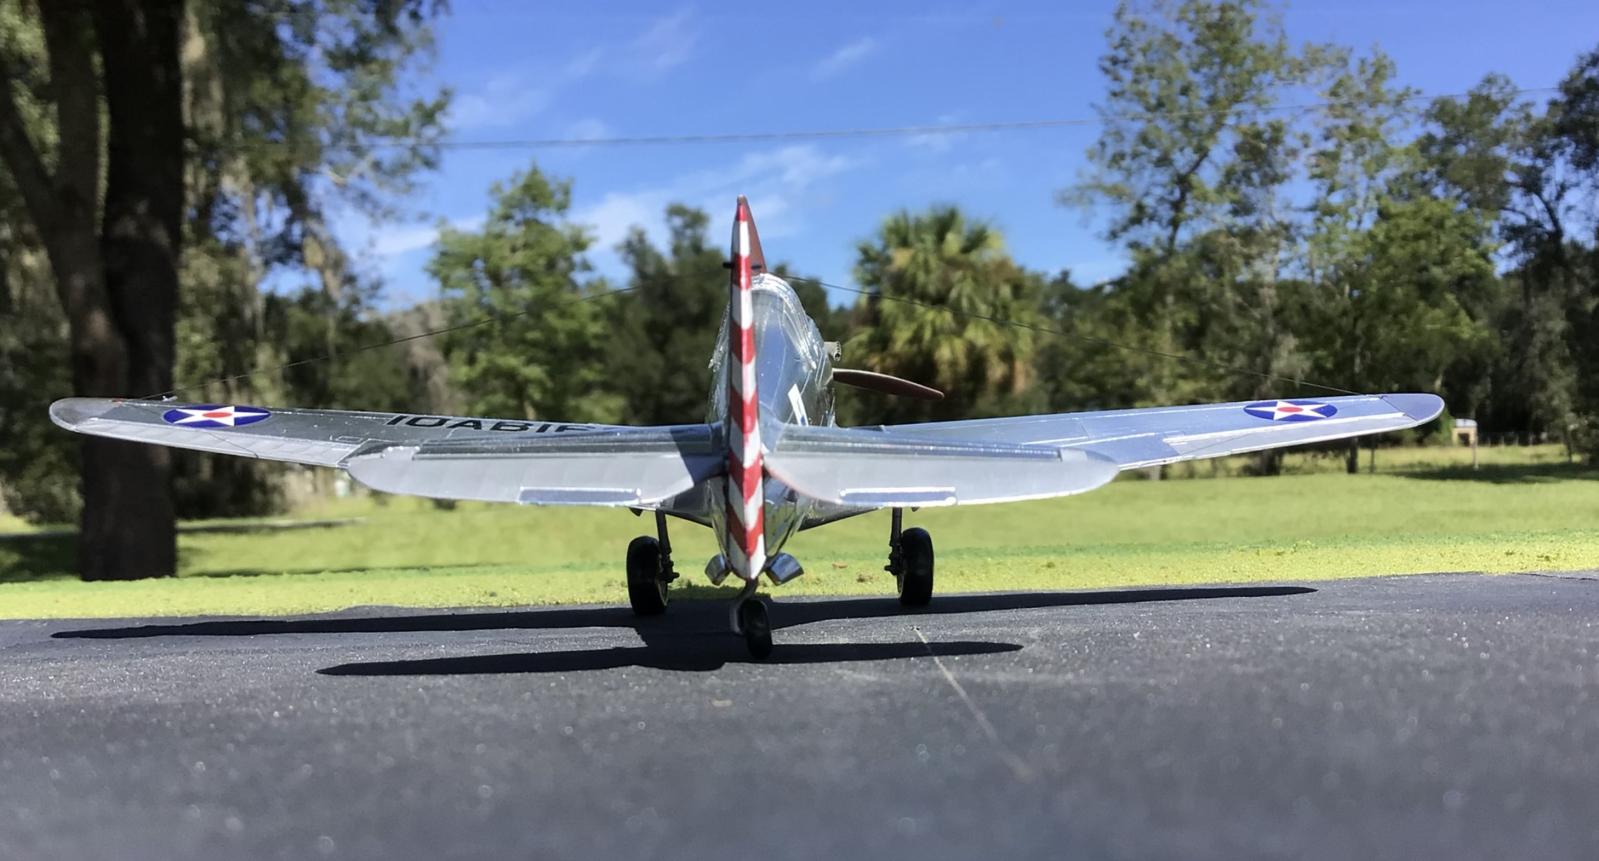
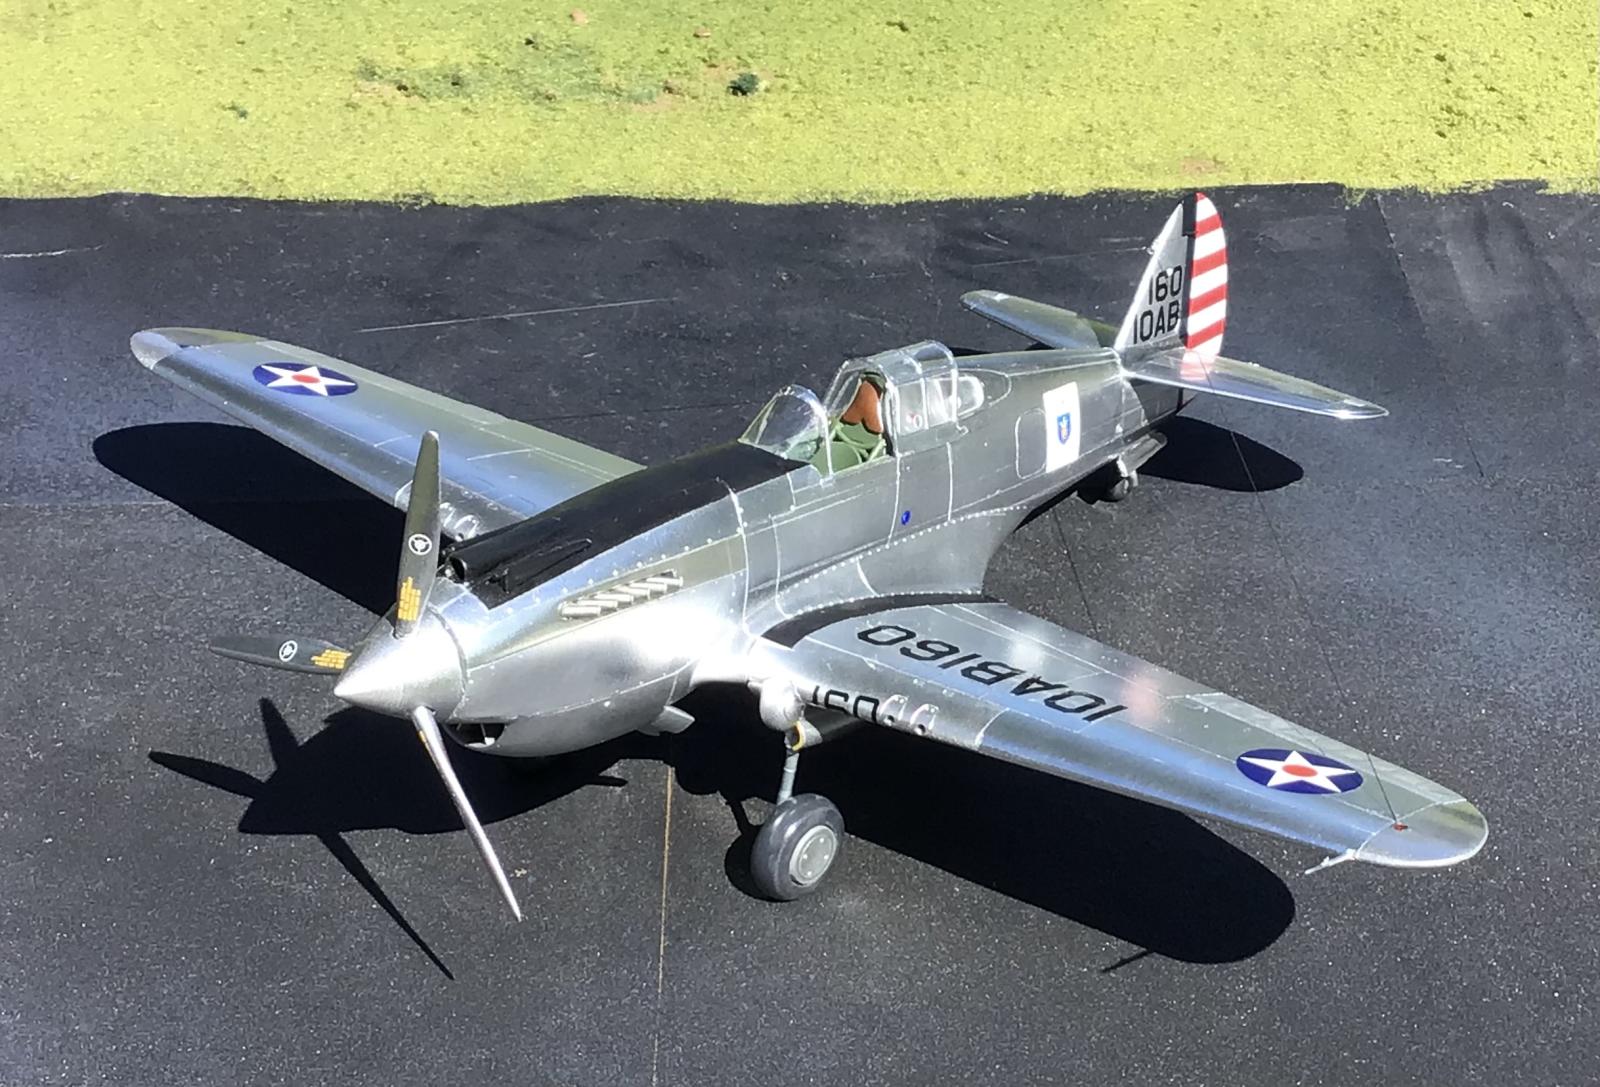
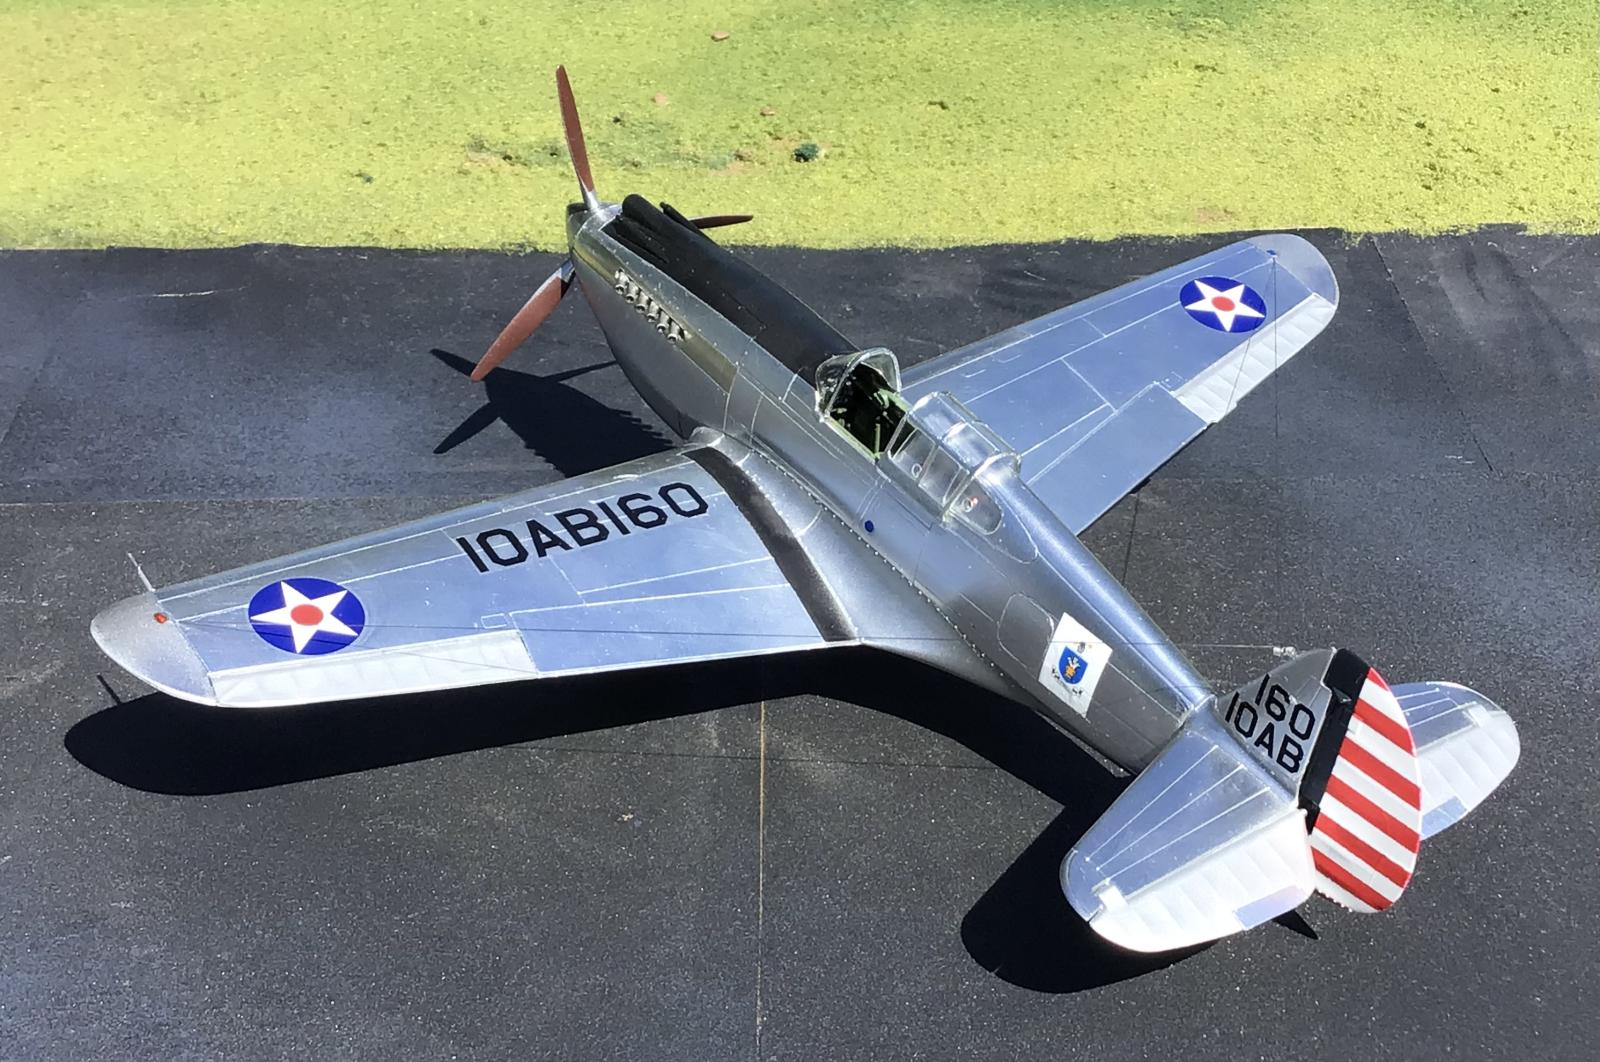
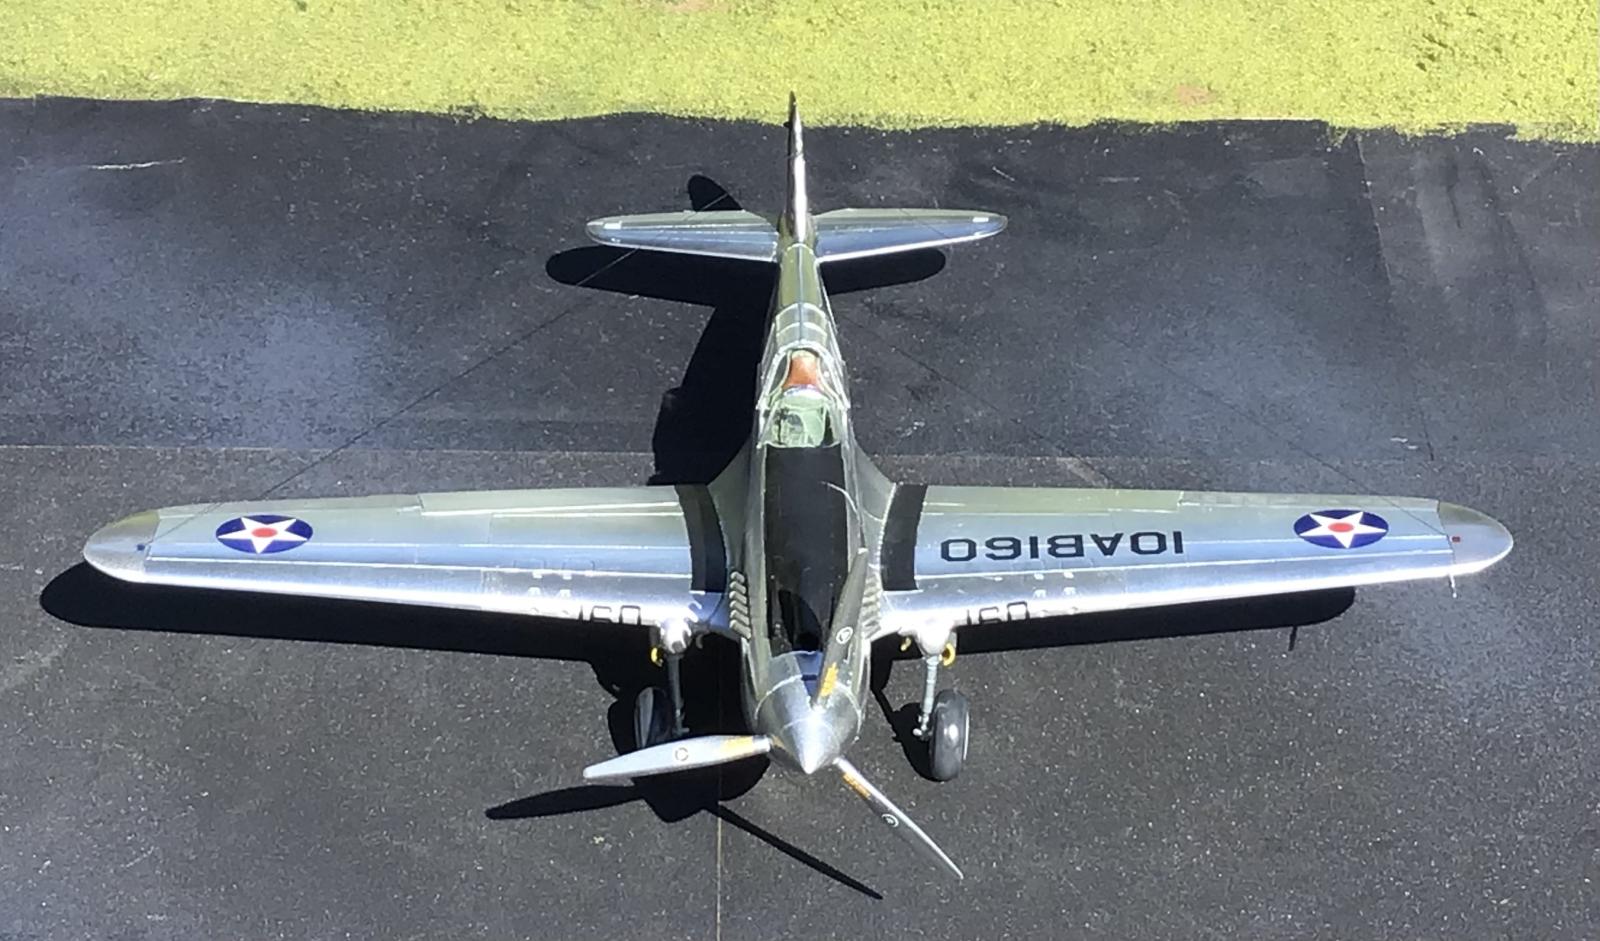
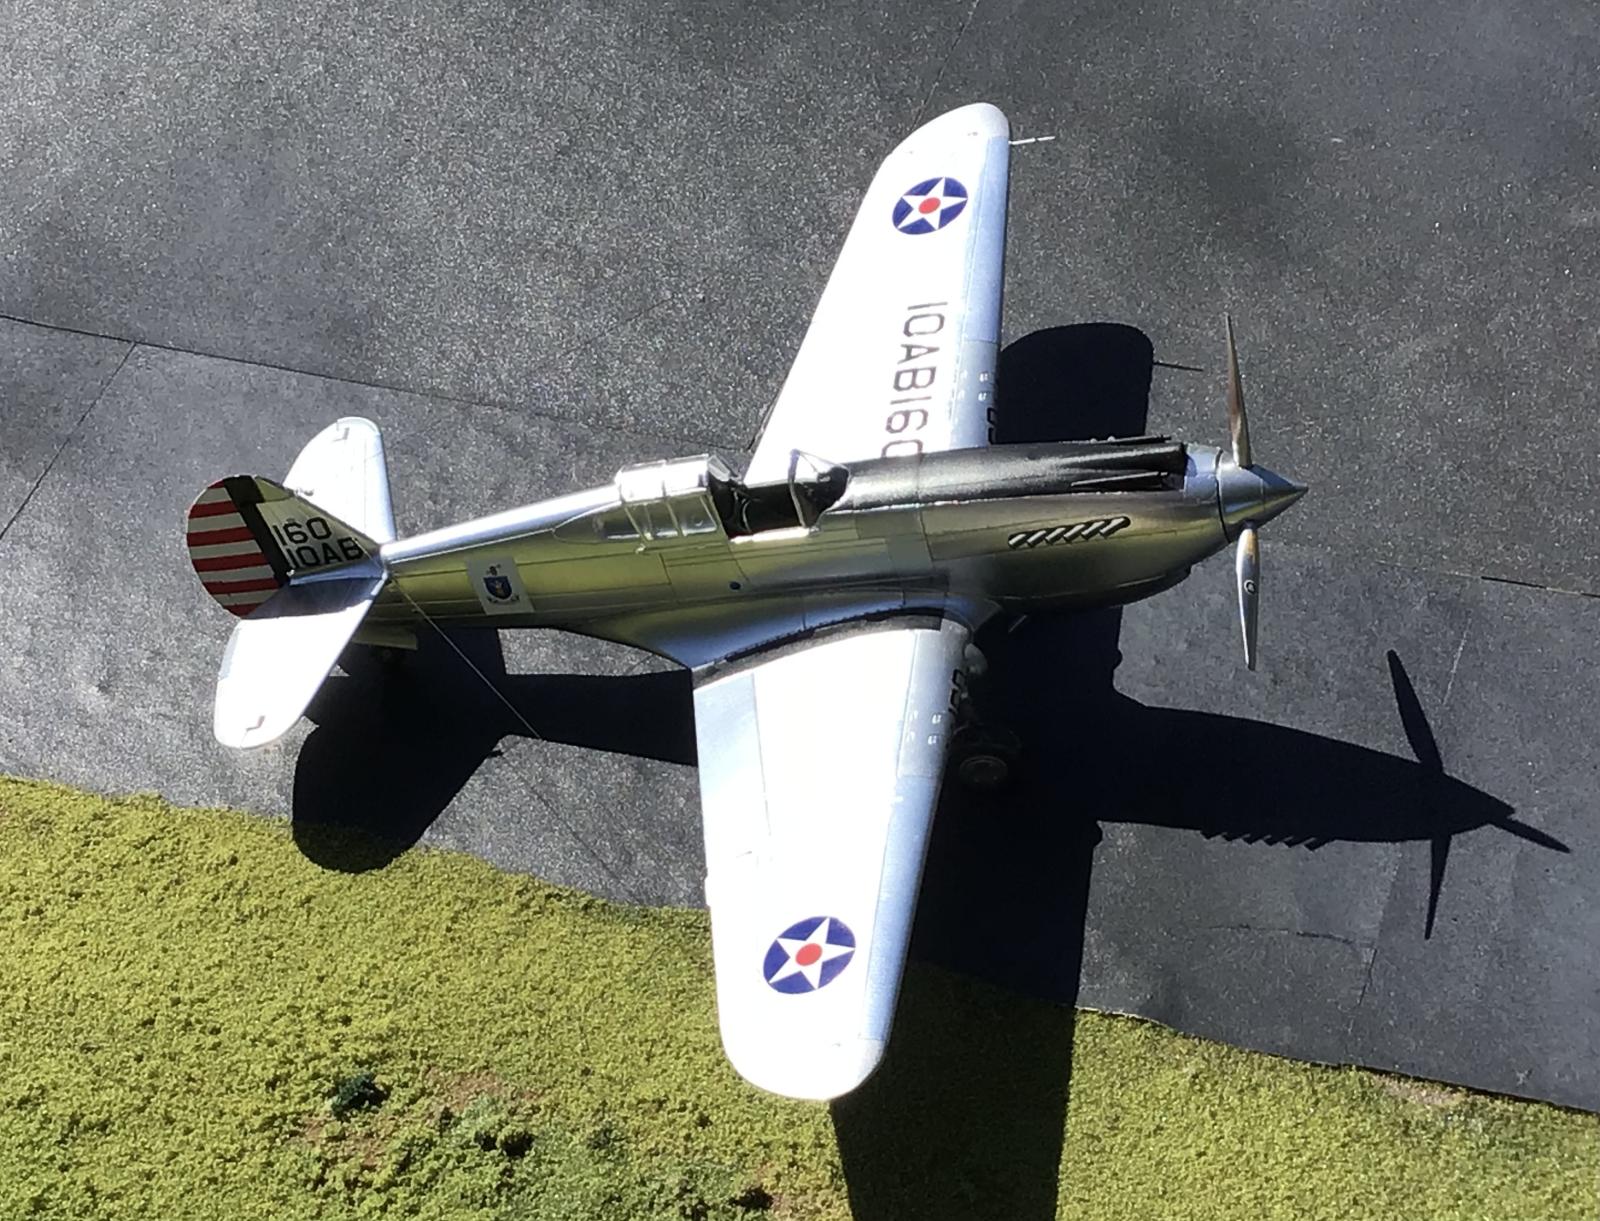
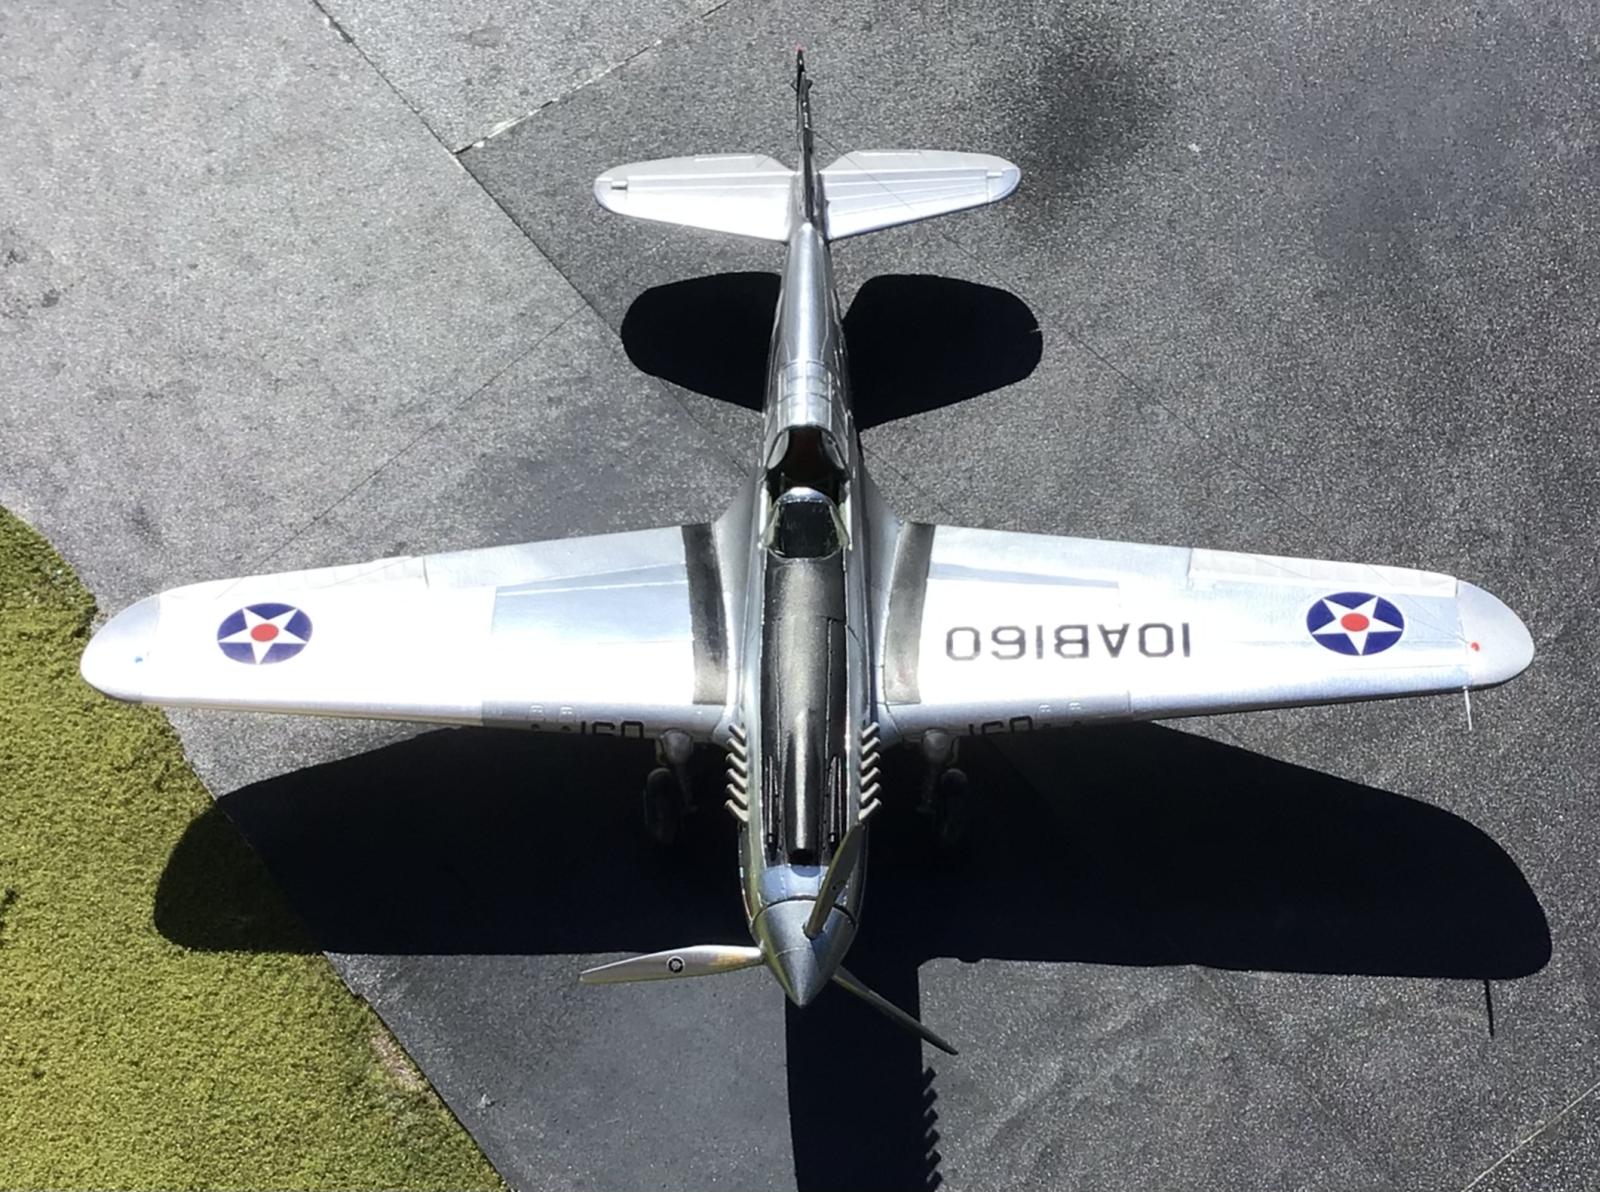
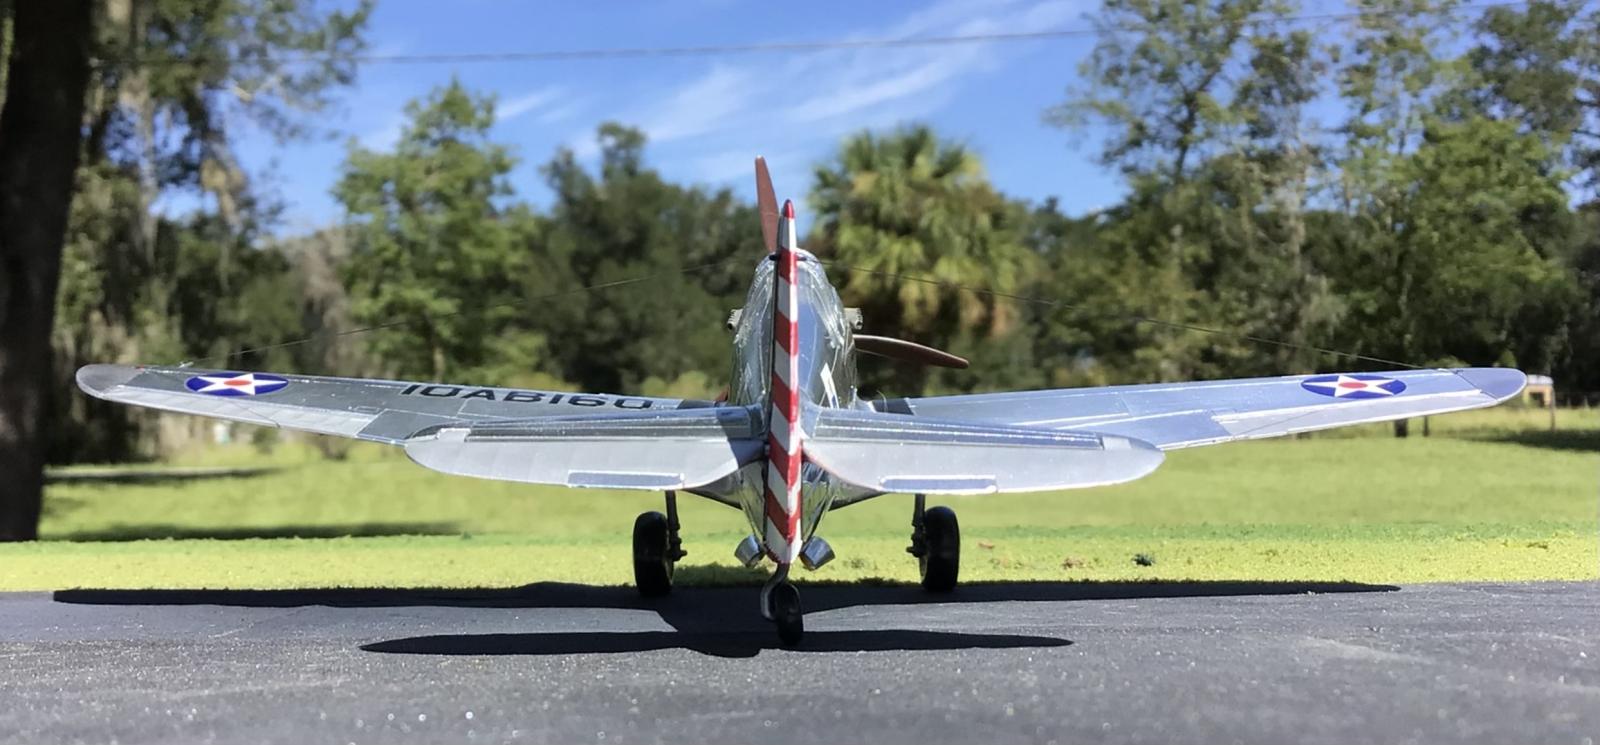
The elevators were posed in a droop. You see a lot of P-40's like this in photos. I also used some EZ Line, and one of my home build springs for the radio antennae tensioner, mounted on the vertical fin.
This one took a little bit of filler under the nose seam, and a little tiny bit along the fuselage spine just behind the cockpit. Some filler was also required on the propeller spinner. I cut the propeller blades off in order to make it easier to sand and get right. I used LQS filler and glued the propeller blades back on again afterwards.
This could have been due to my building techniques and not a fault of the kit.
There are a few things to watch out for during construction. First off is the wheel to tire fit. It is very snug. The inside of the tire should be opened up just a little. If not, you could have a hard time installing the tire onto the wheel.
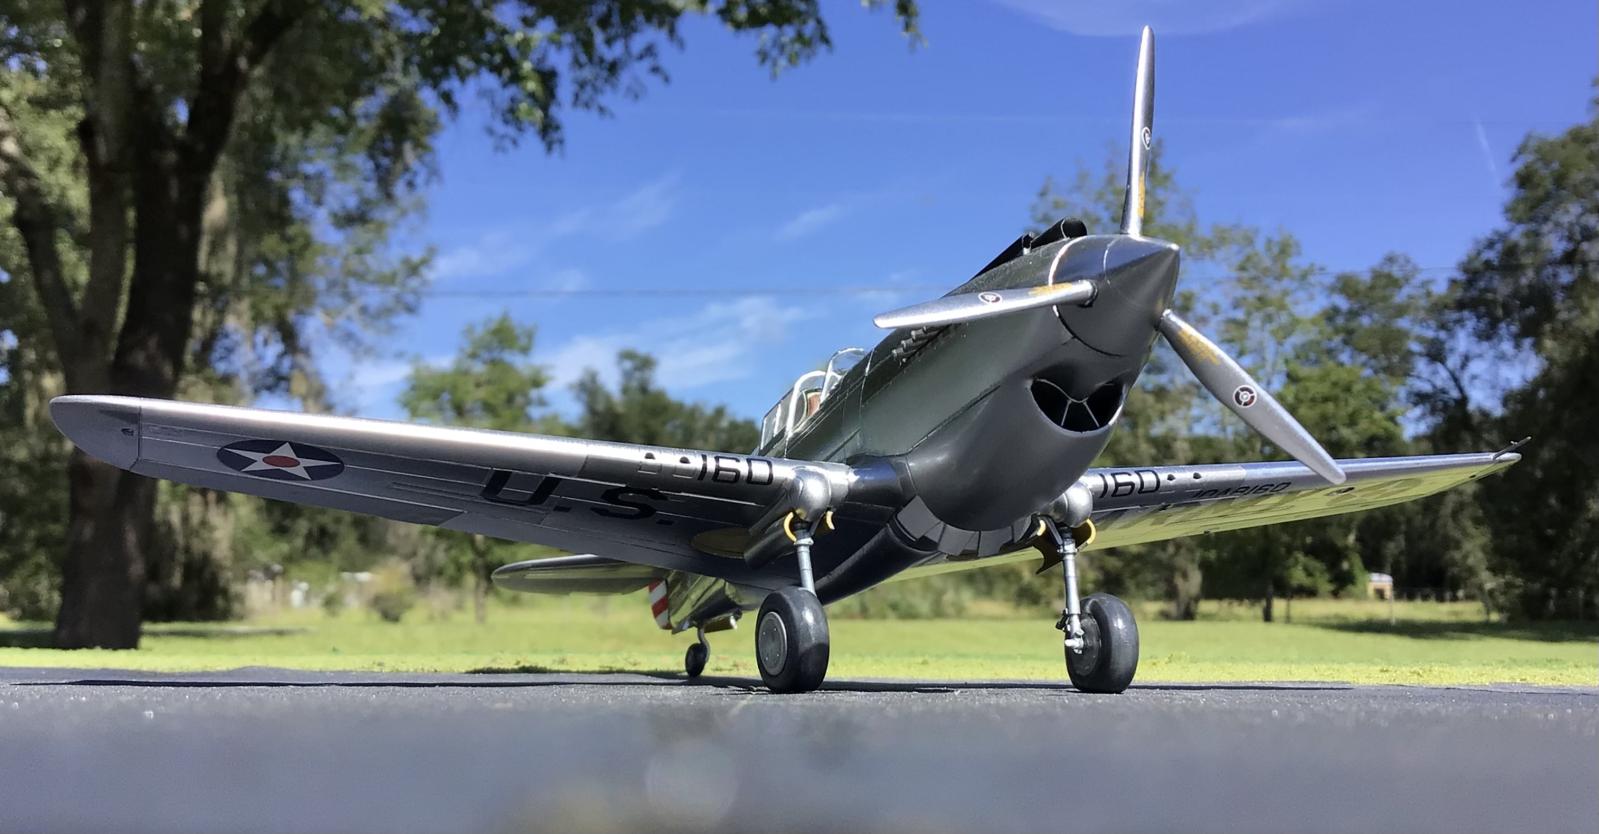
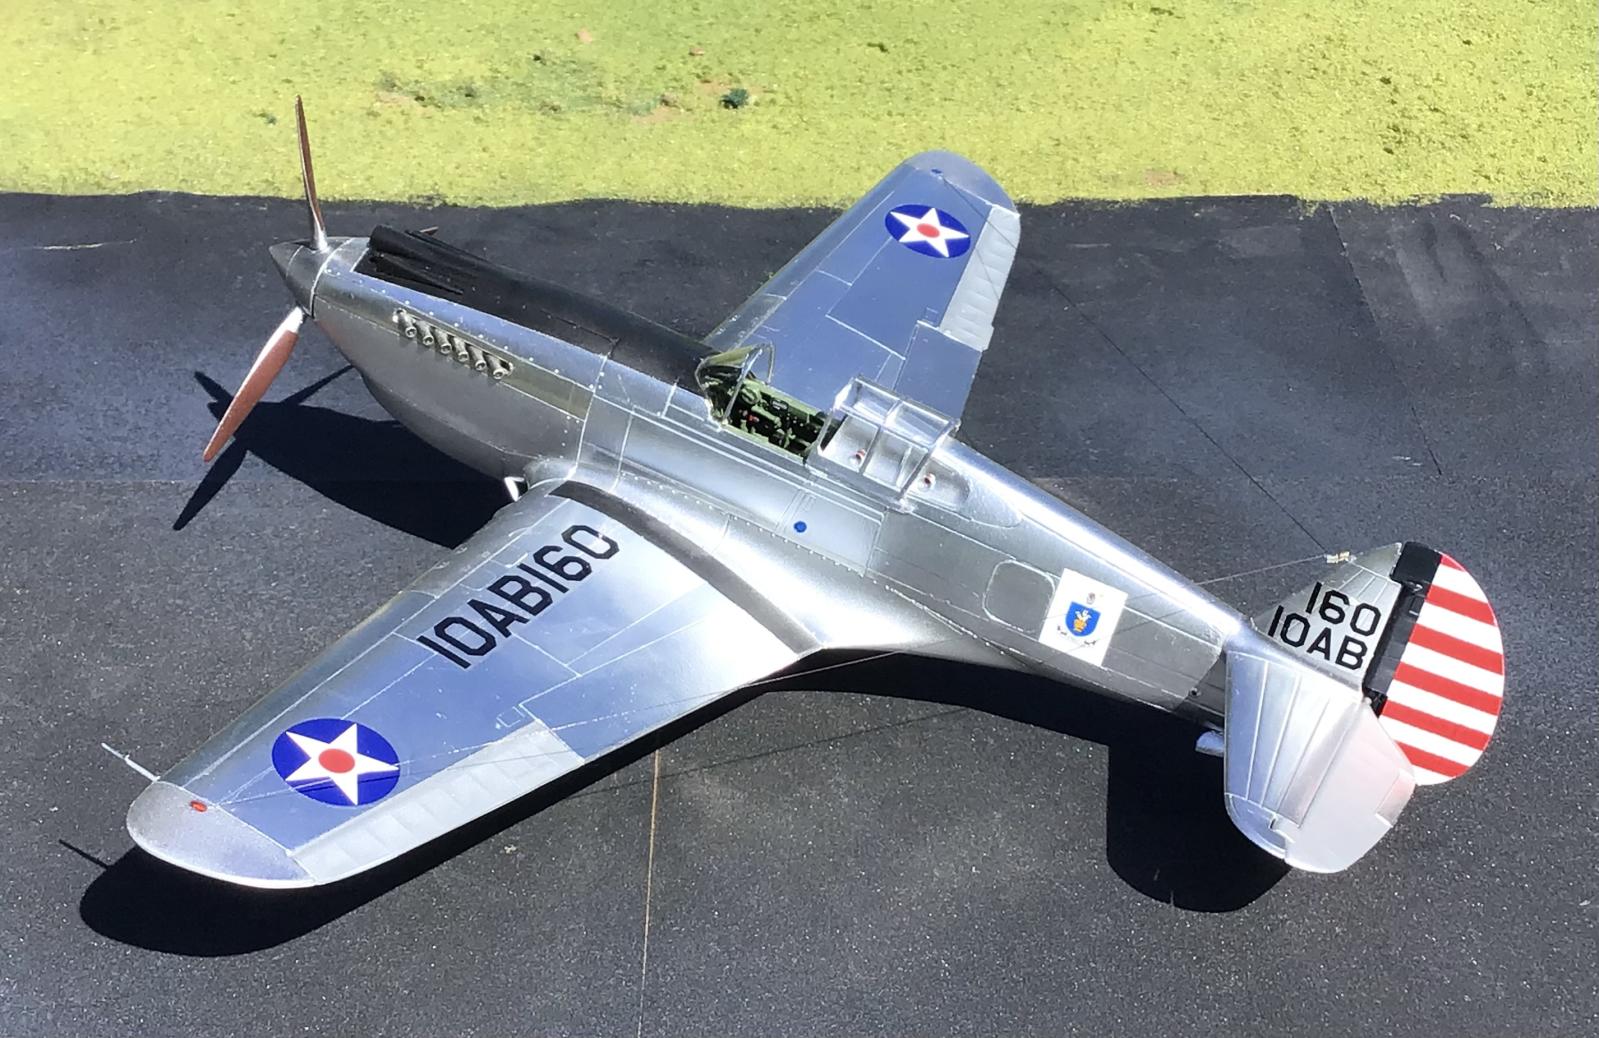
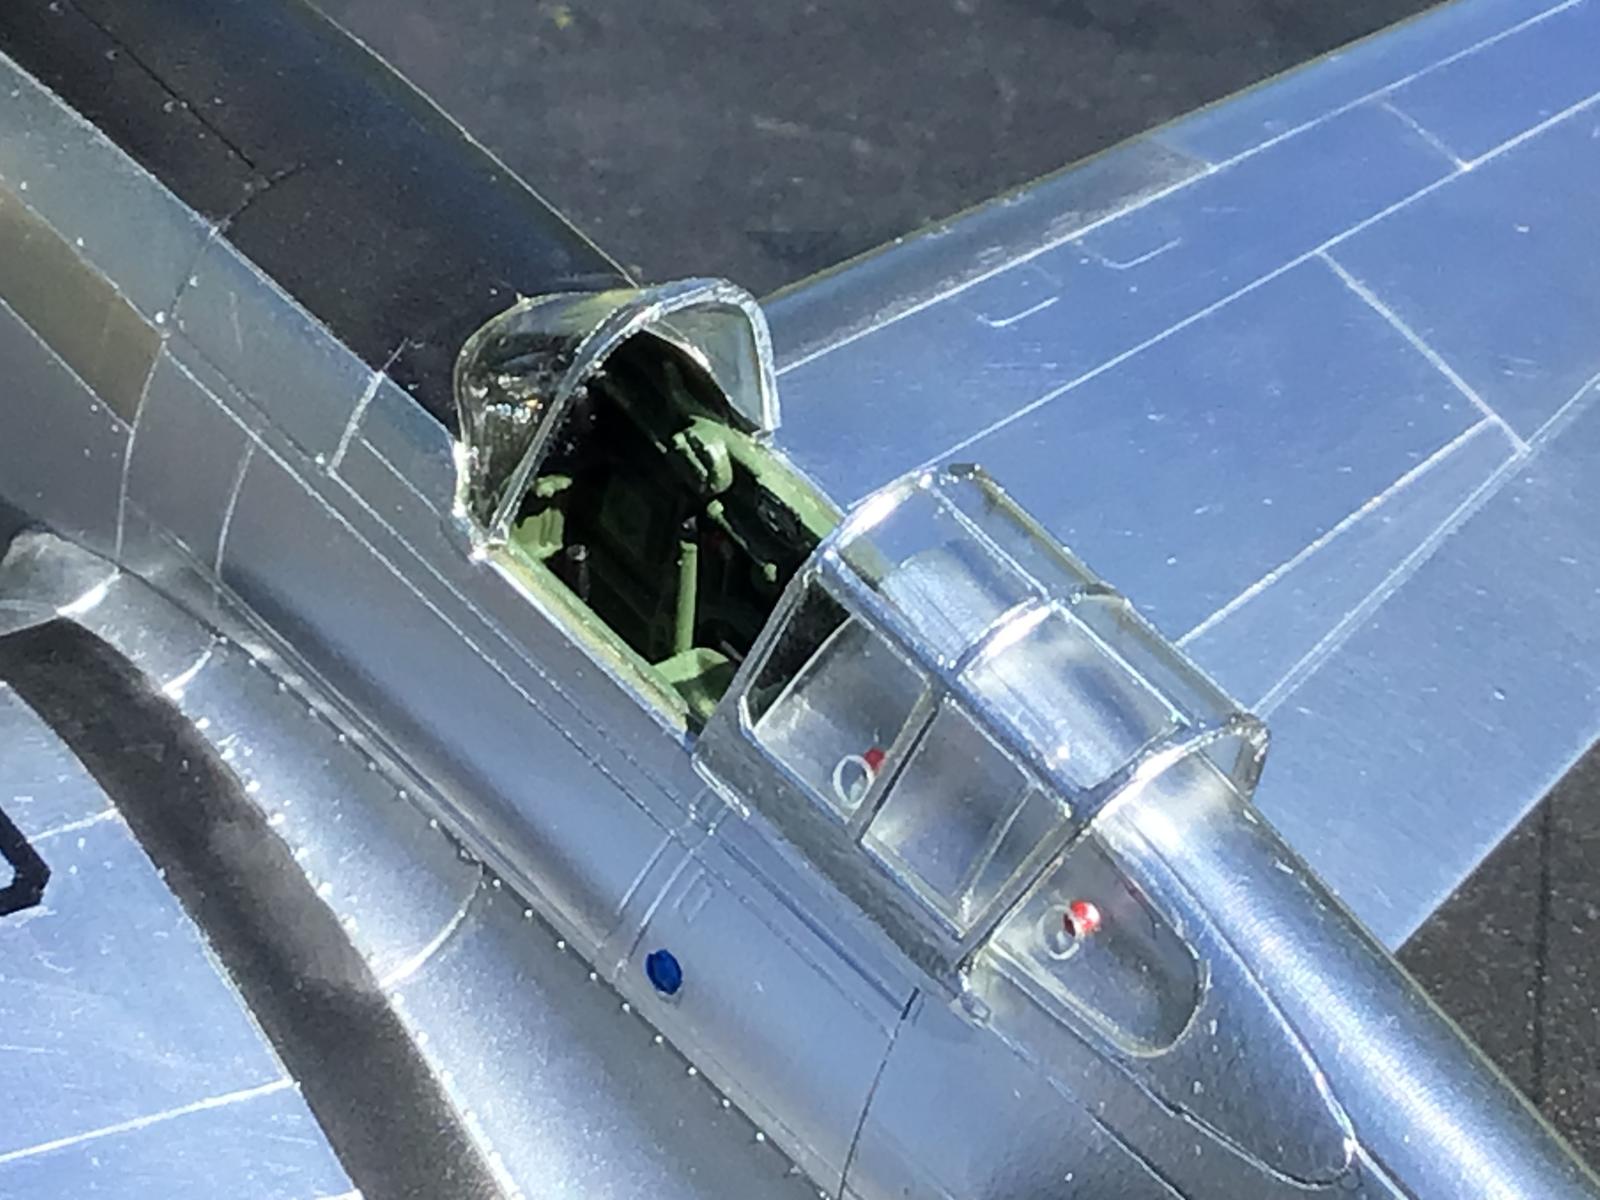
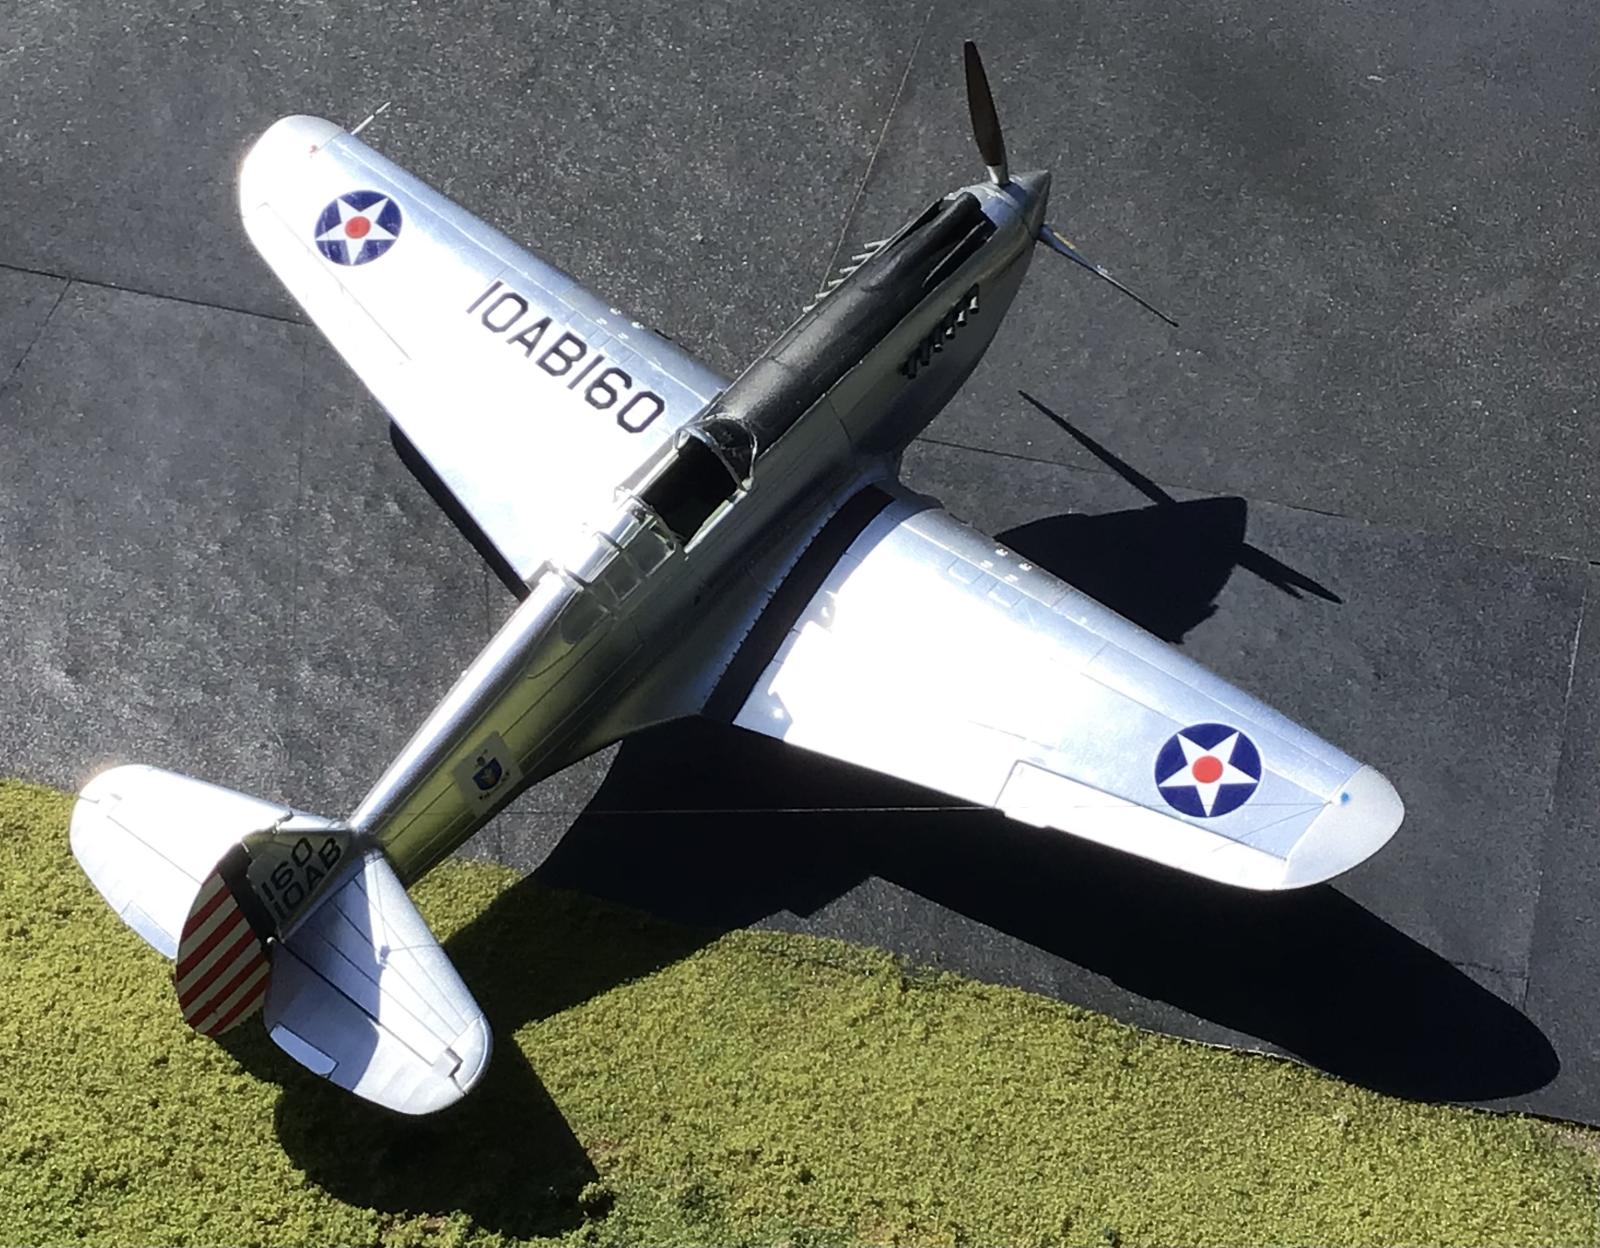
Secondly, there is a clear landing light on the clear parts tree. There is also a hole molded into the lower wing on the Port side. It has to be opened up in order to install the light.
This is a feature found on these early P-40's. I don't know why they didn't mention this on the instructions.
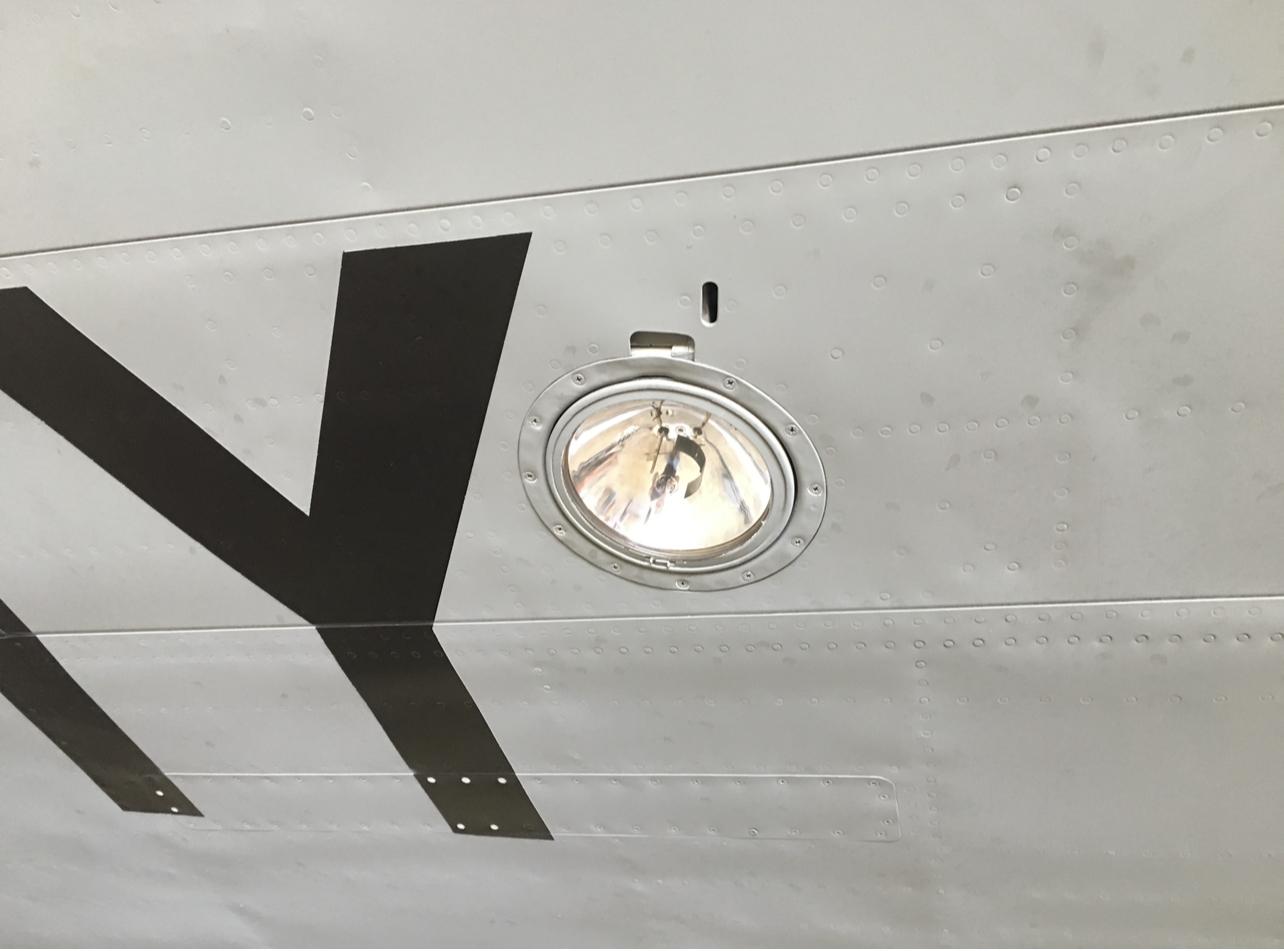
I personally took this picture of the landing light on the early P-40. You can also see it in the original Black and White photo in Dana Bell's book.
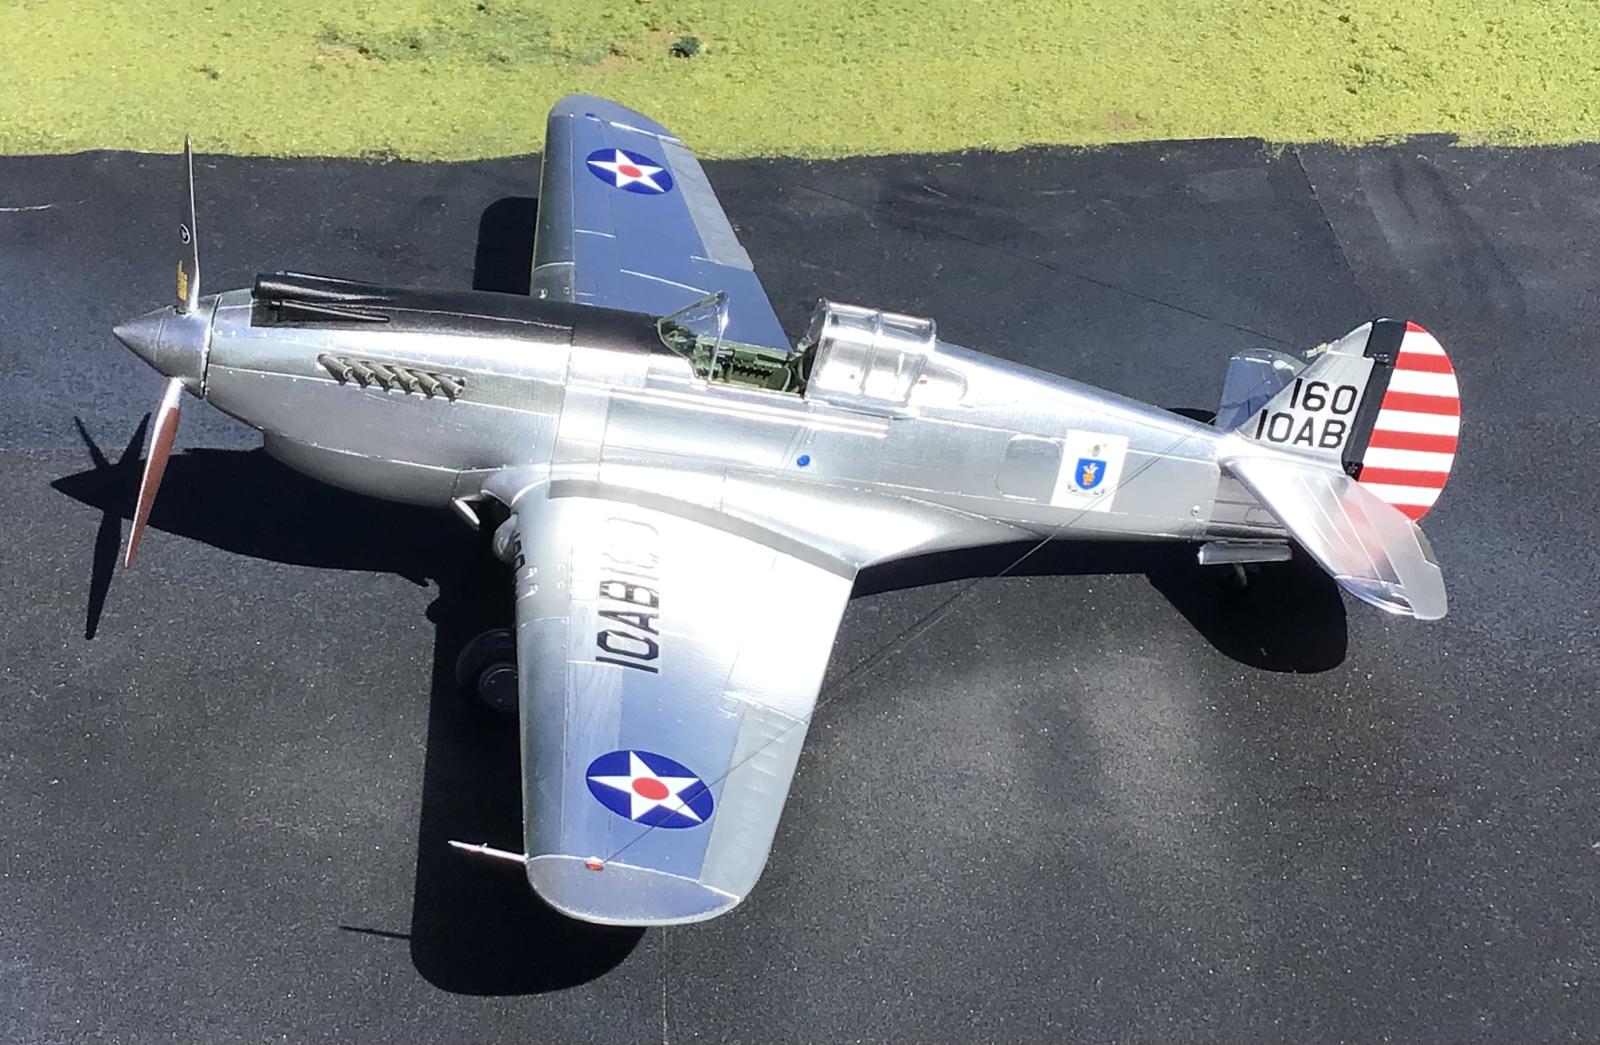
Finally, the trim tab on the rudder is only present on one side. You have to scribe in the trim tab on the other side. This took me all of 30 seconds to do, and I took my time...
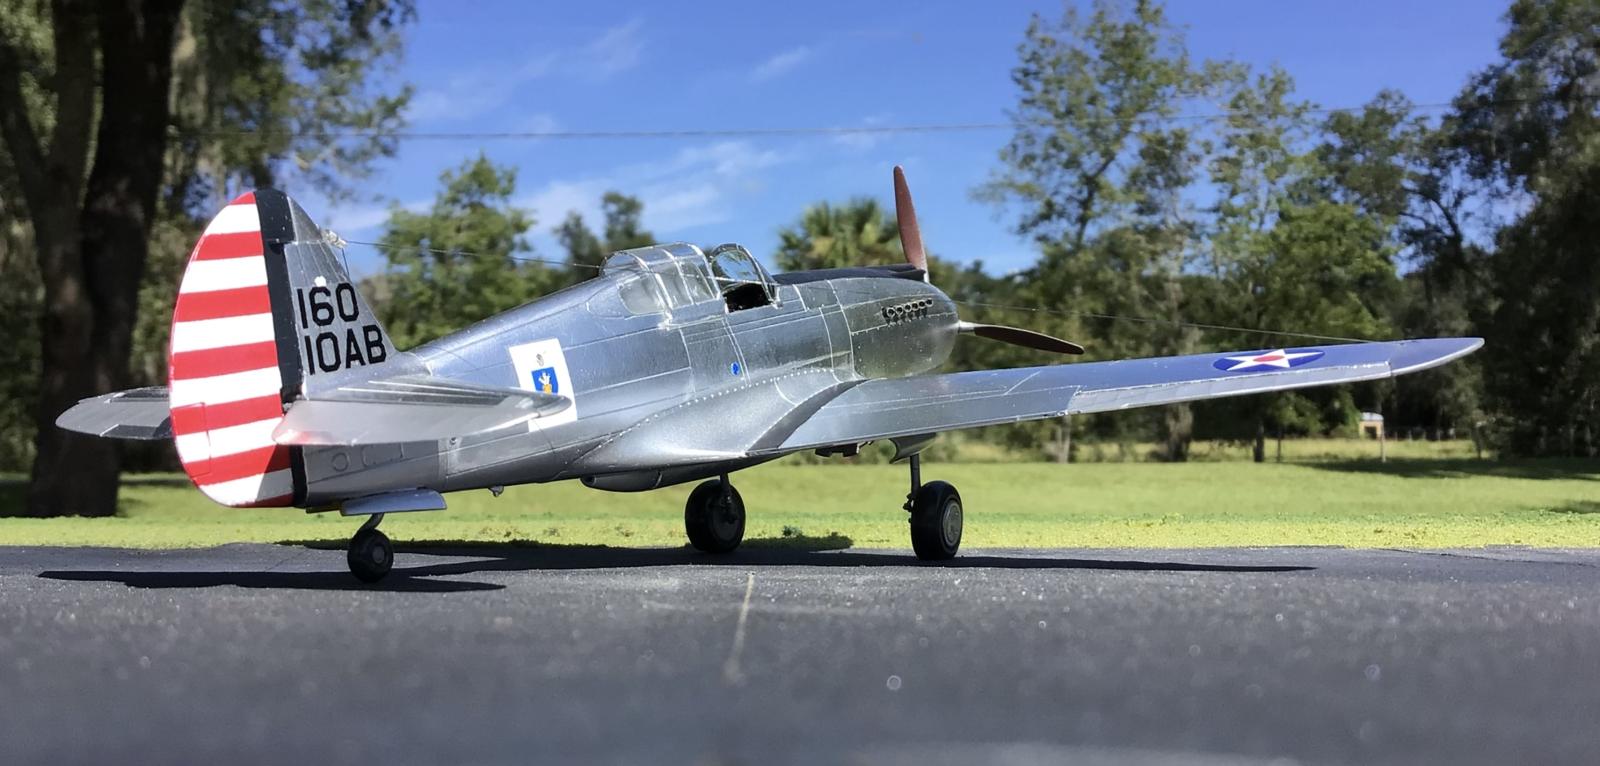
This kit was a fun one to build. I gave me no troubles at all other than what I mentioned above. On the back side of the propellers during this era, the blades were painted in a color called Maroon 18. You will see the color I think it is closest to. The Japanese used a similar color on their propellers. This was used to cut down the glare.
Since it was going to be done in a bare metal foil finish, I needed to get the seams spot on.
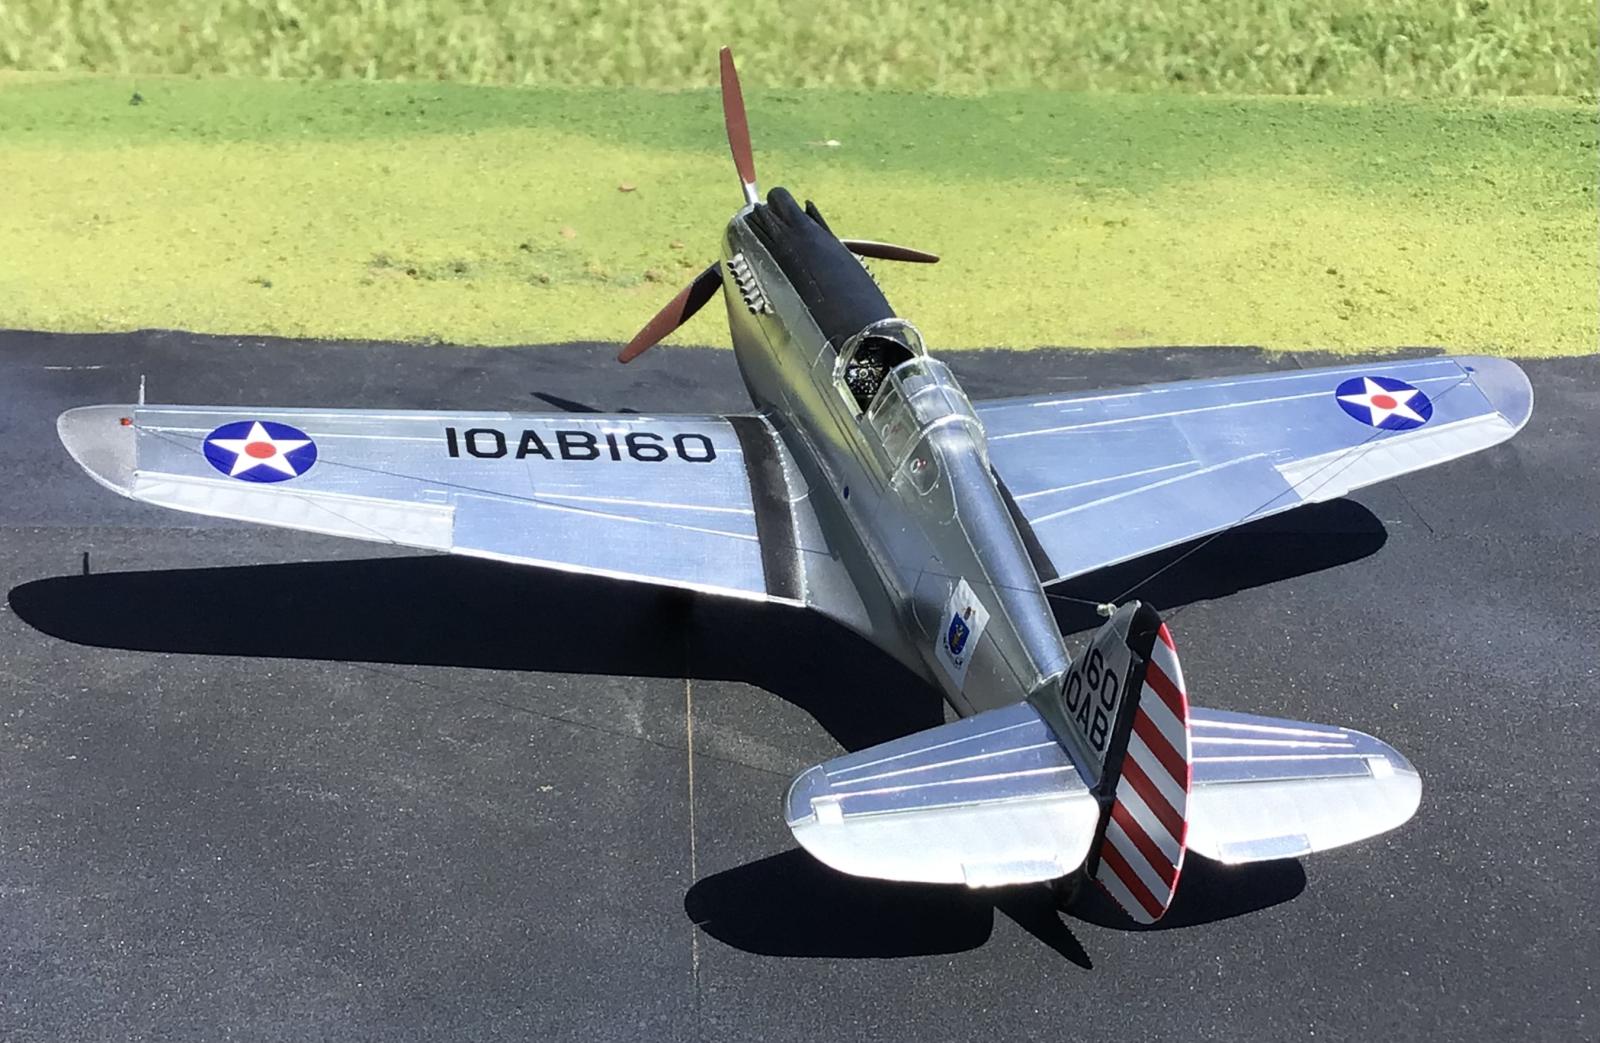
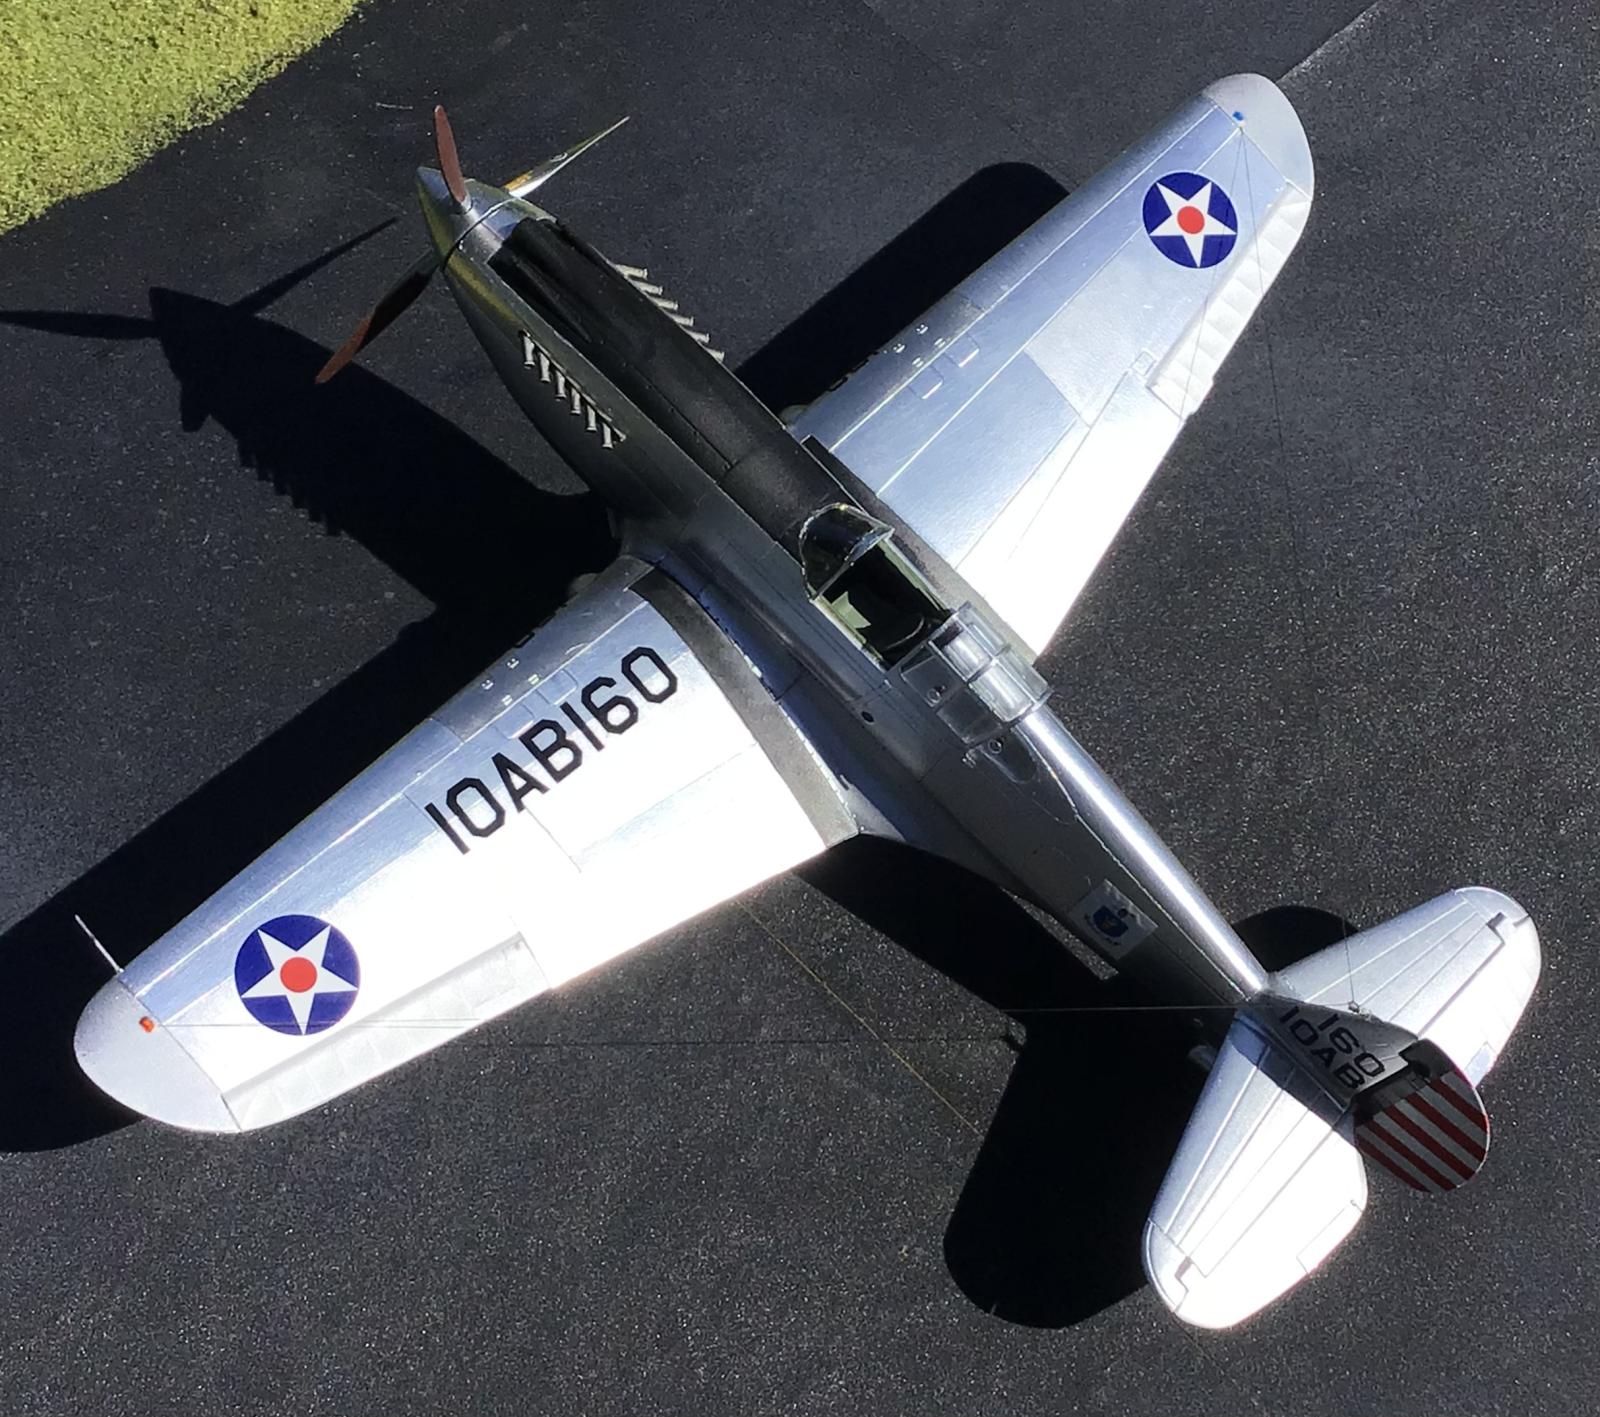
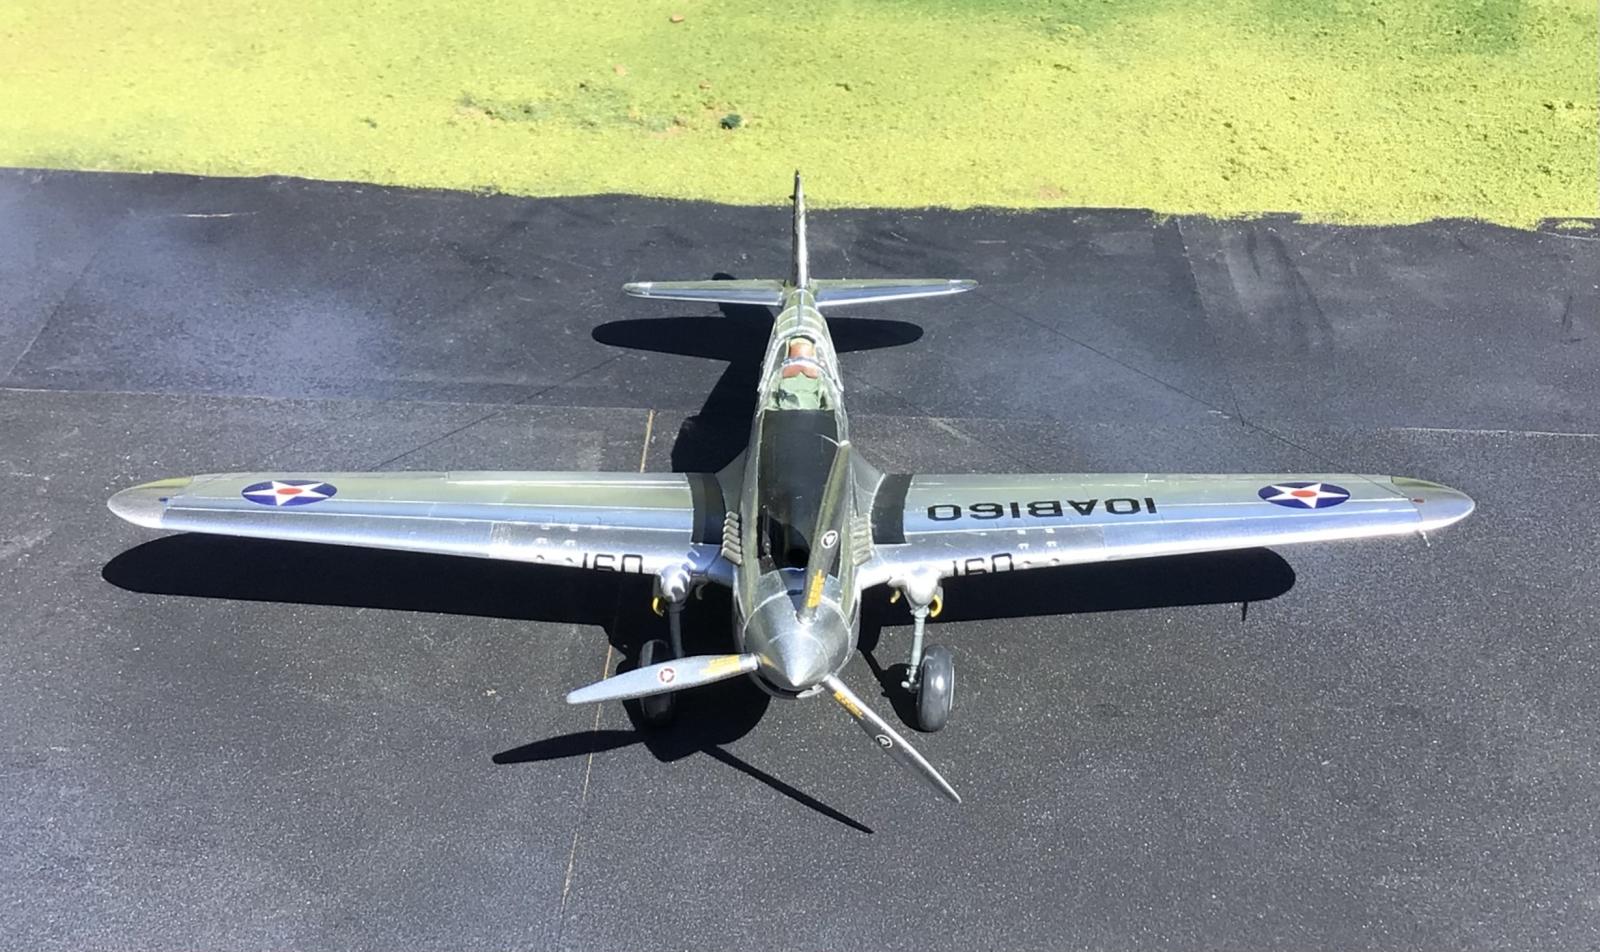
These early P-40's look the best to me. The first 3 of them were delivered to the US Army like this, in bare polished metal.
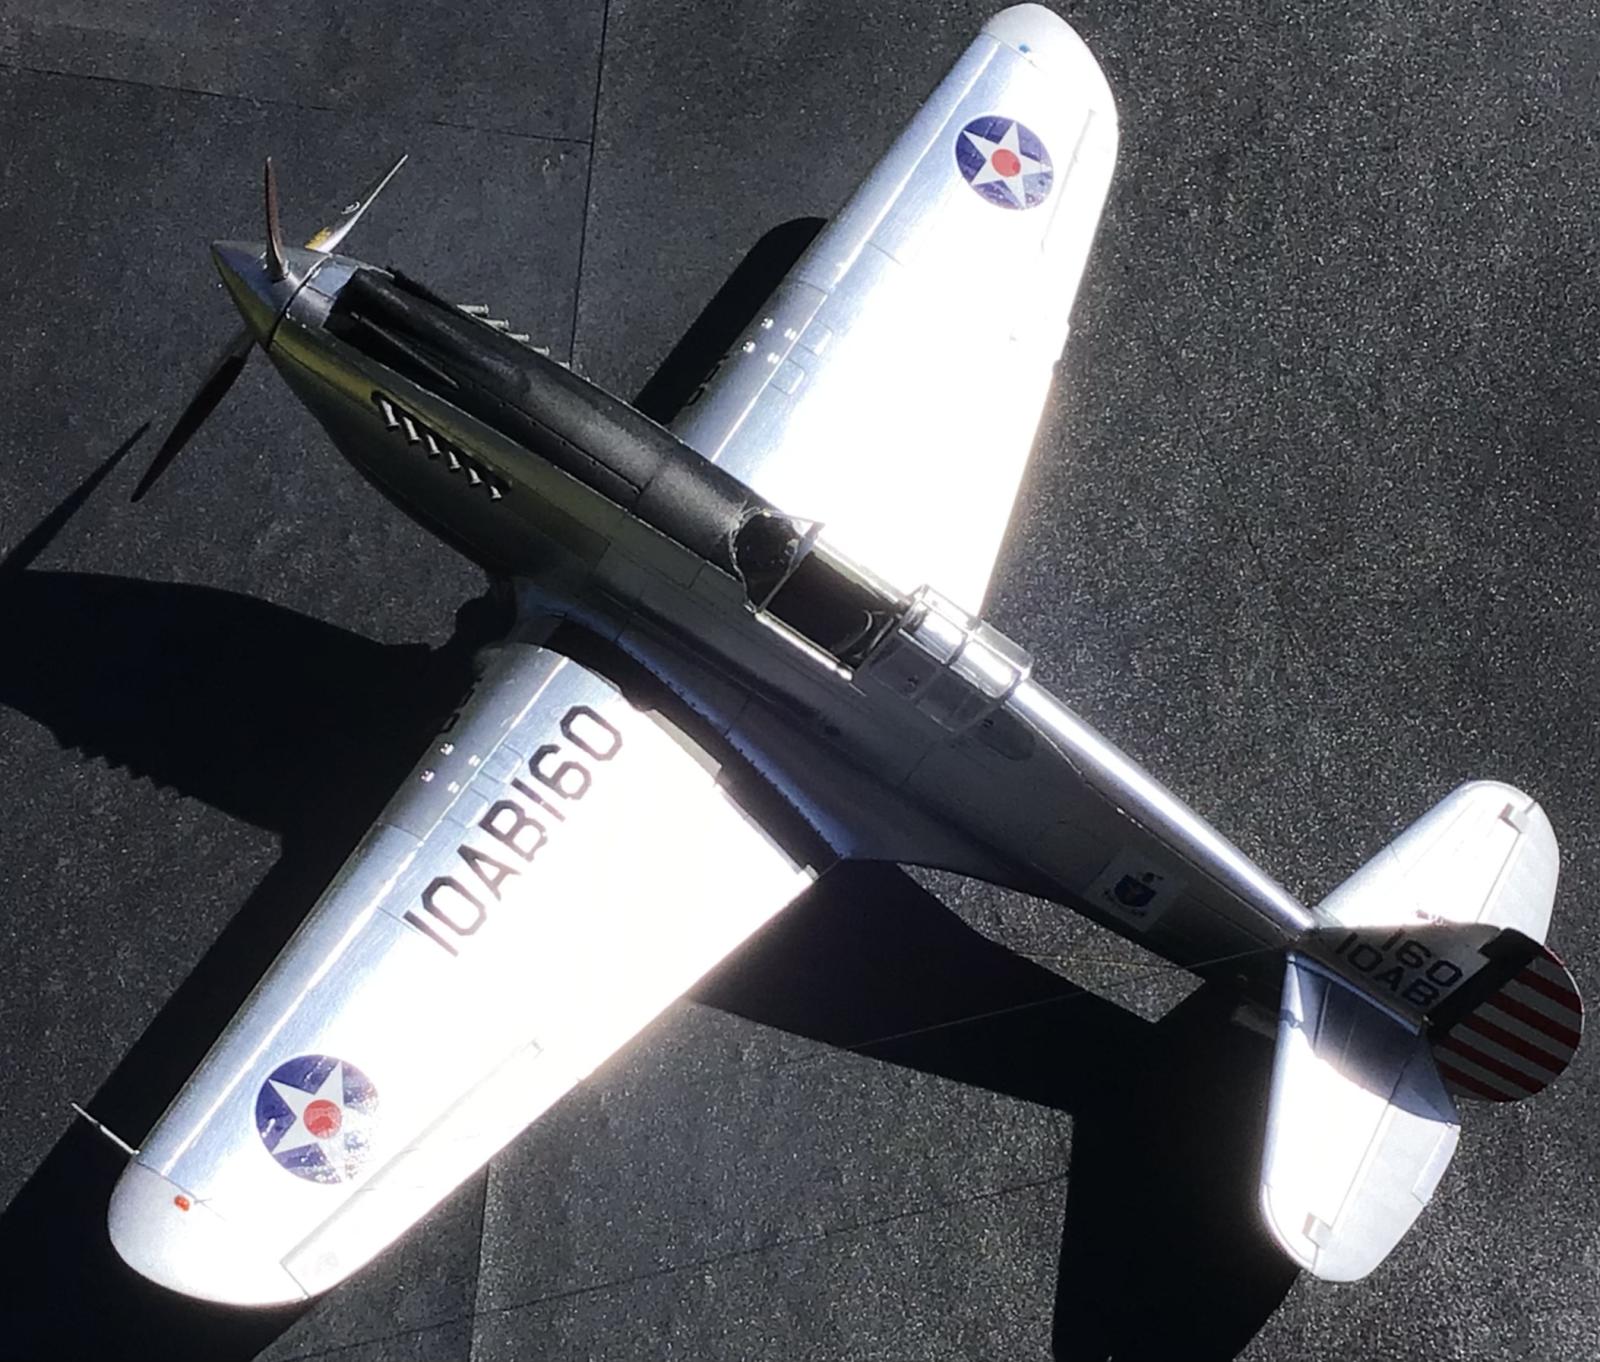
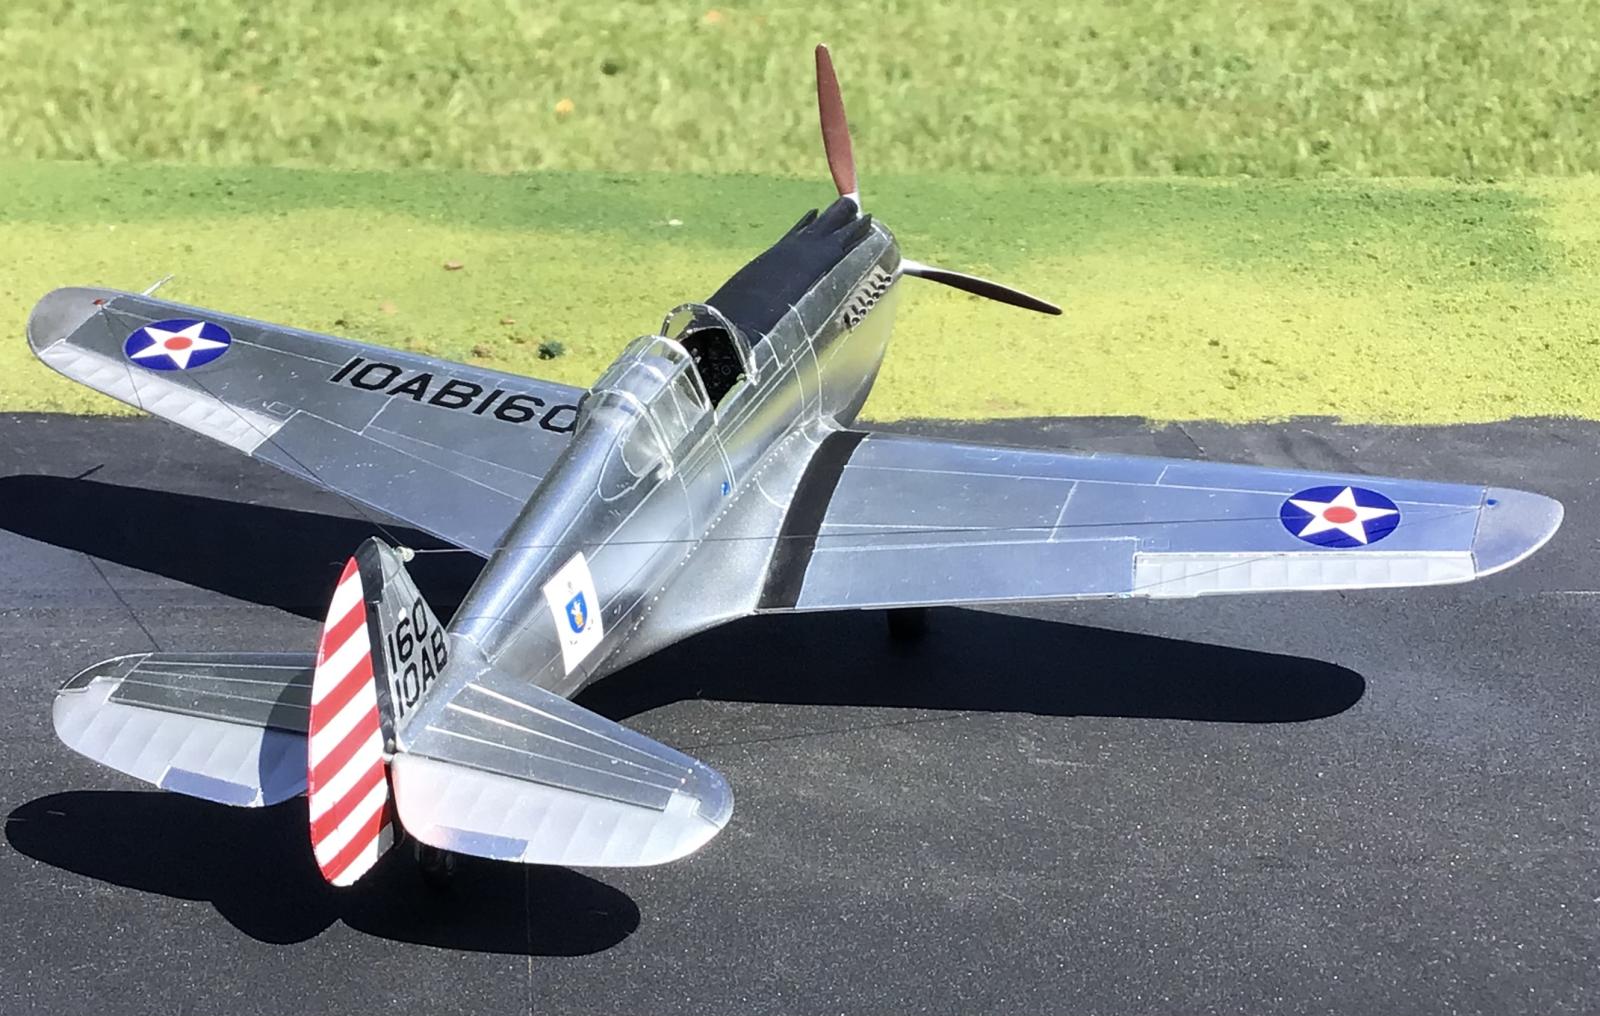
Serial numbers 39-156, through 39-158 were delivered in a polished metal scheme with Pre War markings.
I also installed a set of aftermarket resin exhausts on this one. I think these were from Brengun, and they were for a Late Mark Spitfire ! They dropped right in... I used them because they didn't fit the Spitfire kit I bought them for... Go figure.
The remaining P-40 aircraft were delivered to the Army, camouflaged in OD Green over Neutral Gray. There are a bunch of color pictures of pre / early War P-40's out there. One can find them if you search for them. They are excellent for showing the Curtiss aircraft factory at Buffalo, New York. These were taken for a "LIFE" magazine article, and they are very informative to look at.

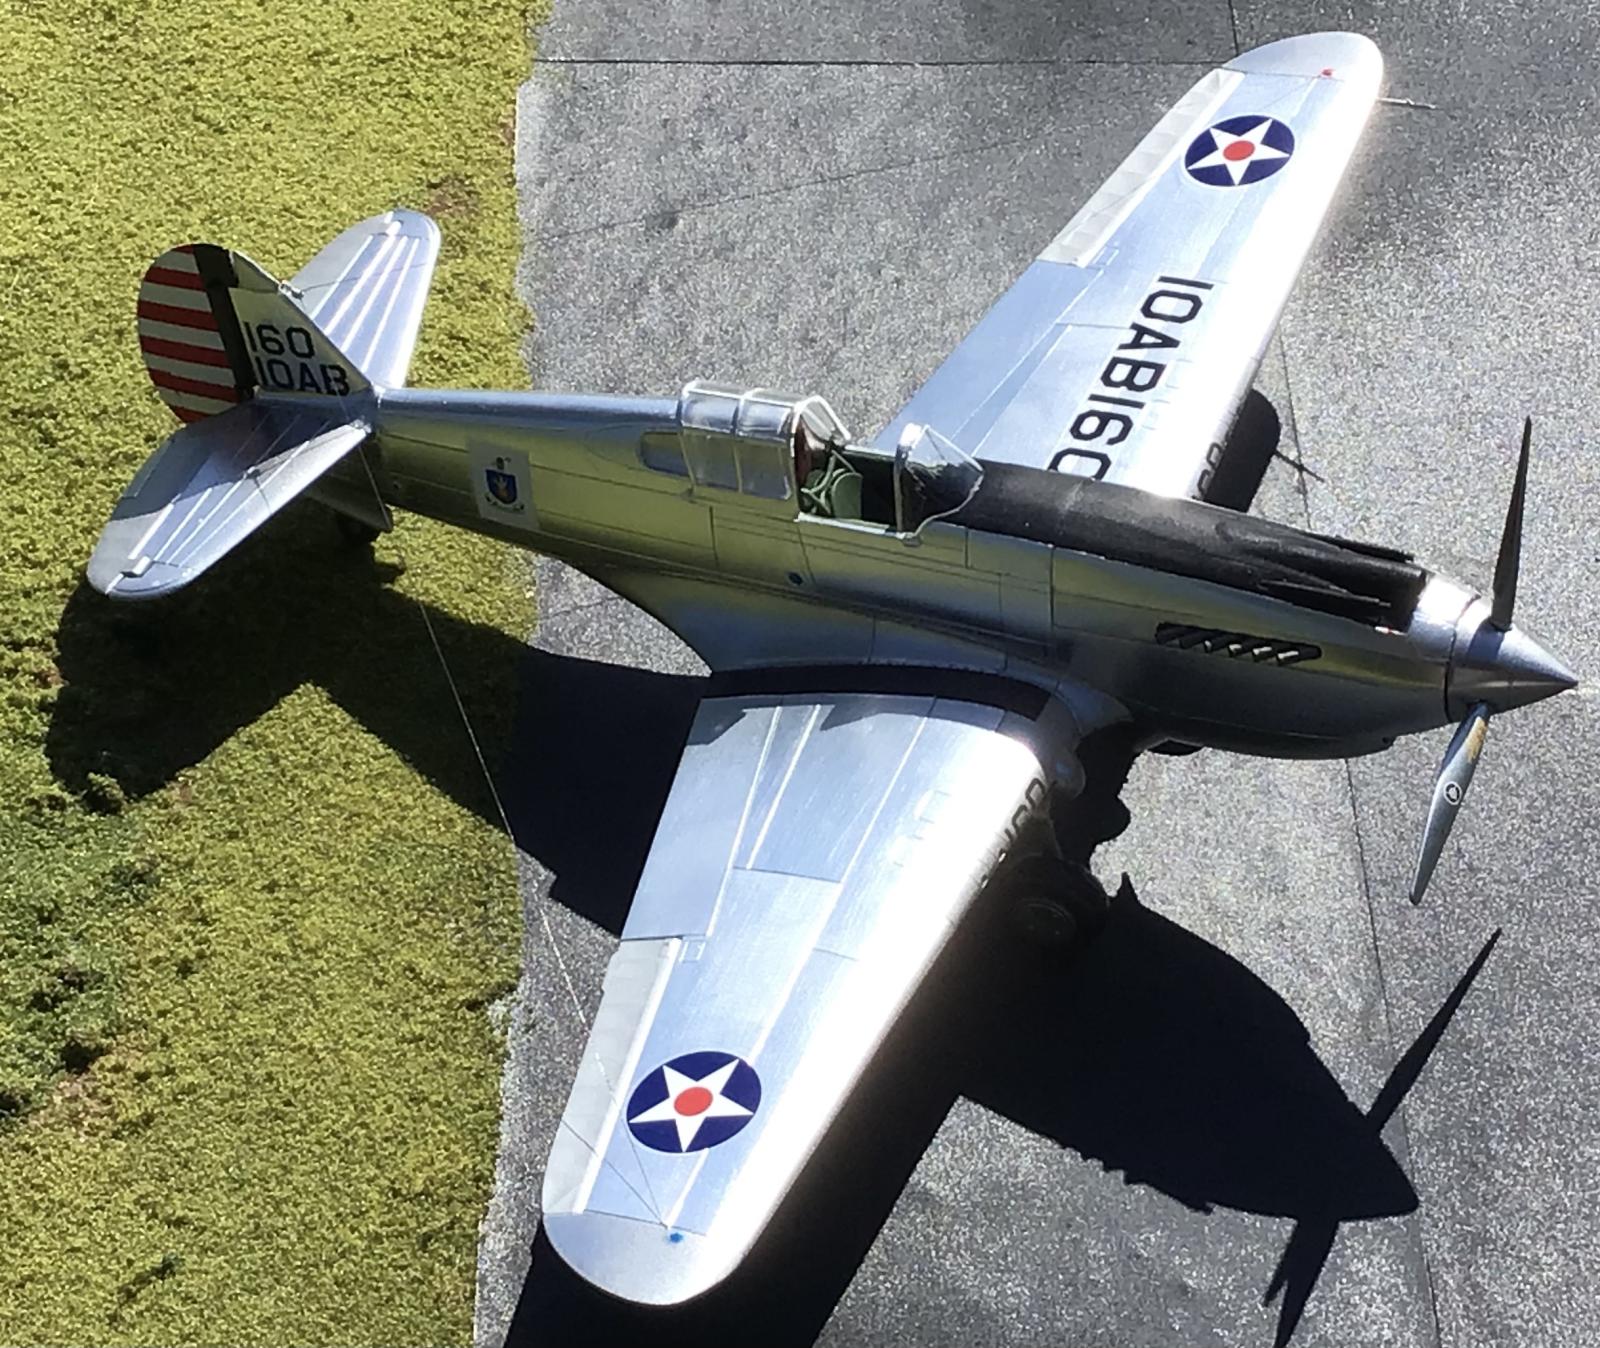
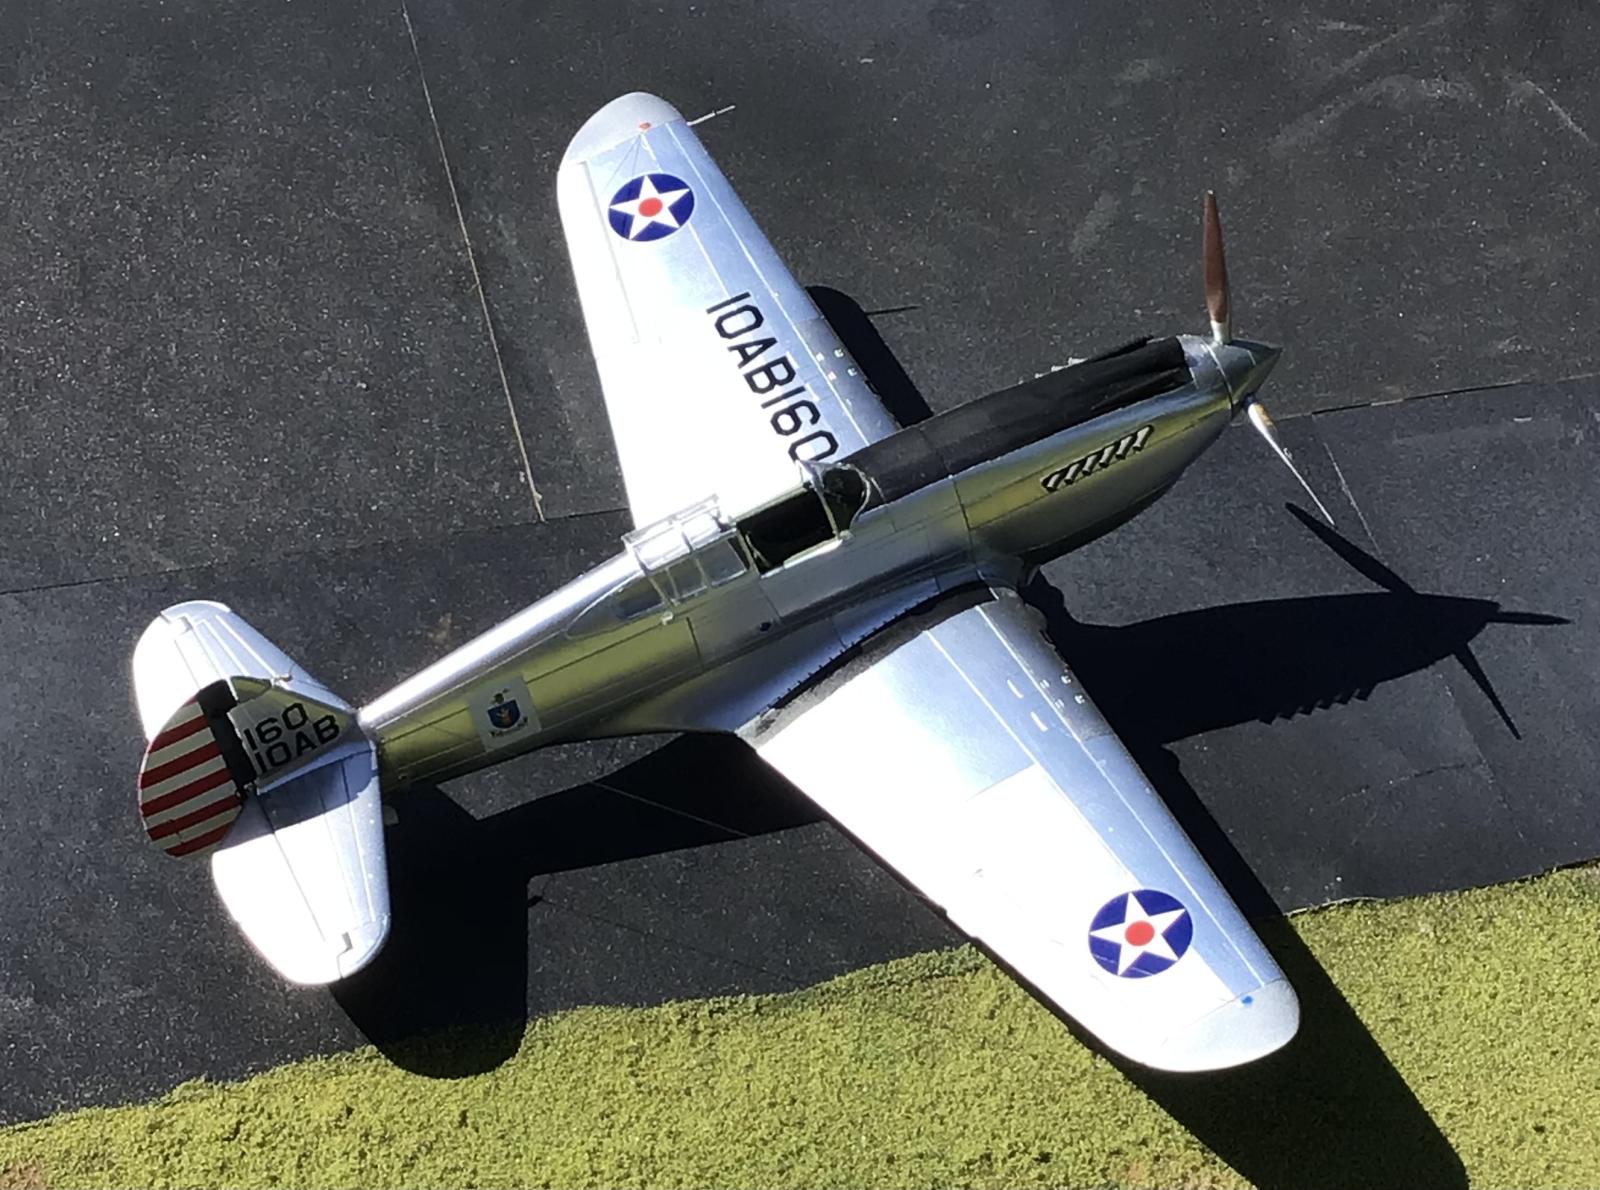
I built this model with intentions of using this decal set from Iliad Designs. They worked very well, but the wing US Stars were a little too big. I base this comment on the various photos I have found showing the size of the US Insignias on these early bare metal planes. The insignia's size was increased later on when they were painted in OD Green and Gray.
So I had to scrounge the spares for what I eventually used. The US Stars provided might actually work well on some other early or pre war P-40's.
I used Bare Metal Foil to cover the majority of this model. I used several shades. The majority of the airframe is covered using Matt Aluminum color. For the compound curved areas, I used a refill dispenser of Molotow Chrome, and sprayed it onto the model using my air brush. I picked up this tip from Josh Patterson here on Imodeler.
Josh Patterson Thanks Josh !
The fabric covered controls were painted using an Aluminum paint. I also painted the rudder stripes, instead of using the Illiad decals for this.
These decals have a mistake with them. They provided two stripe decals for the same side of the rudder... That's a big oops on their part. However, the carrier film is excellent, and was not too noticeable on the first time around...
Remember when I mentioned the landing light not being mentioned on the instruction sheet earlier ? I realized this error when I started taking the pictures. I hadn't installed the light originally, and I had completely decaled the plane and it was covered with foil. So I took a big gamble and decided to install the light now.
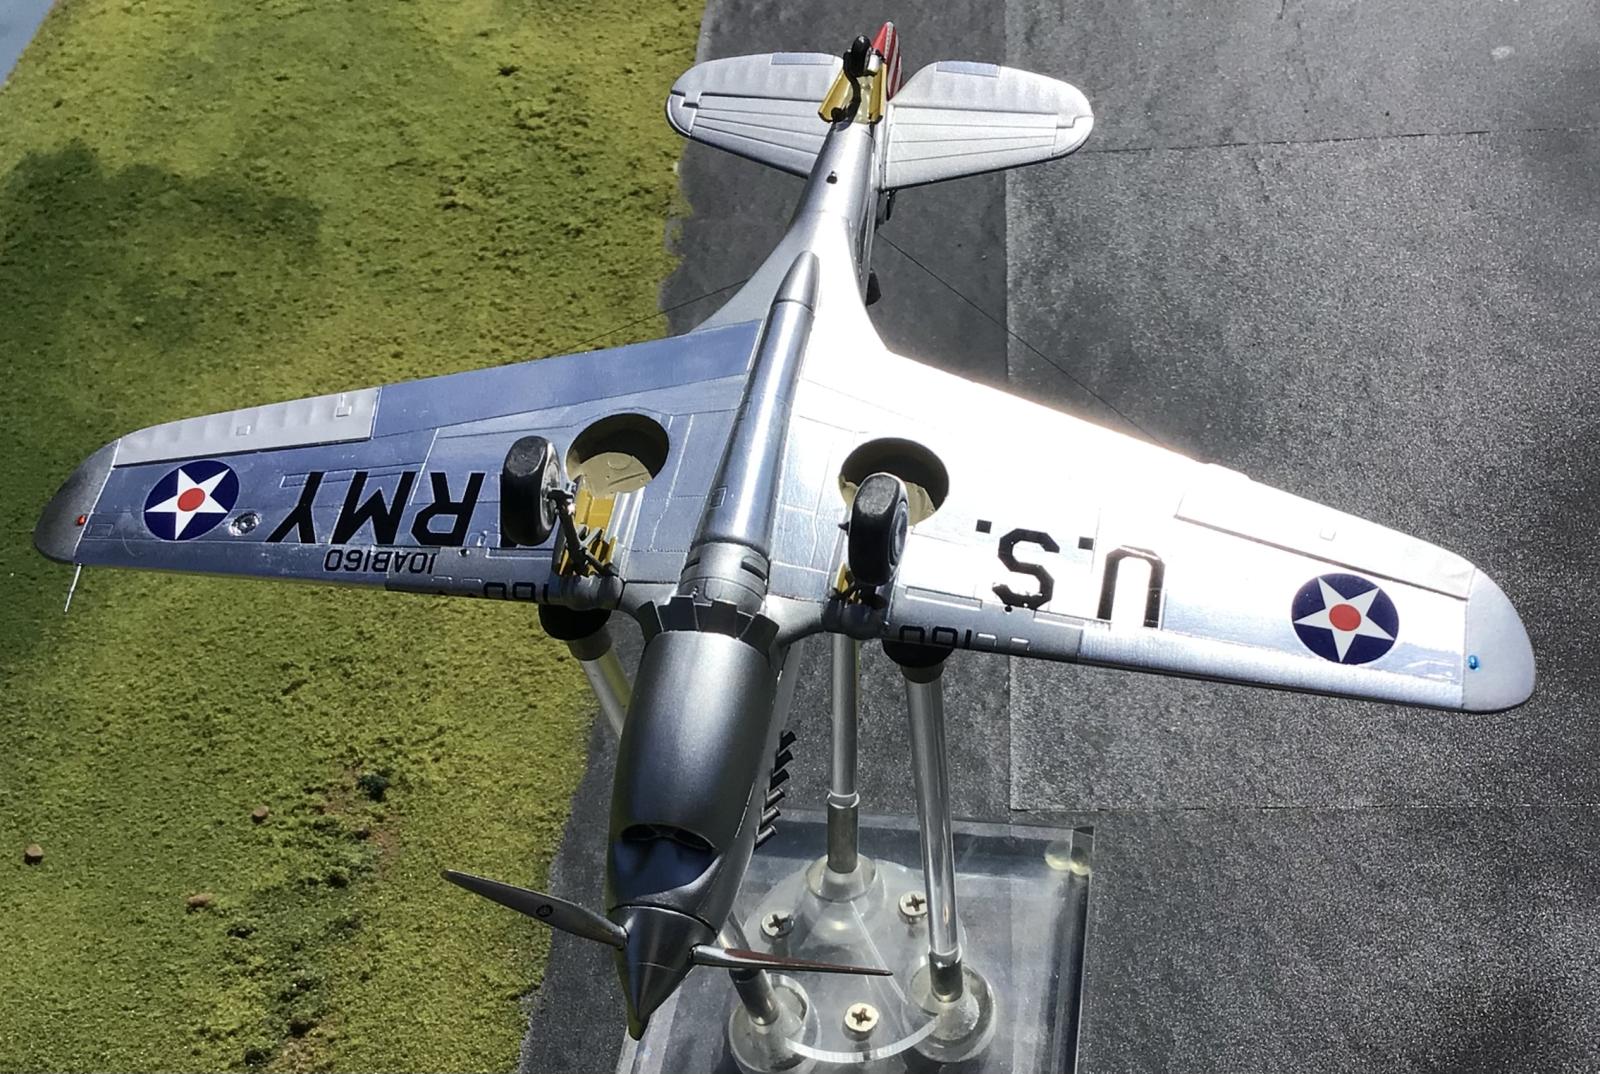
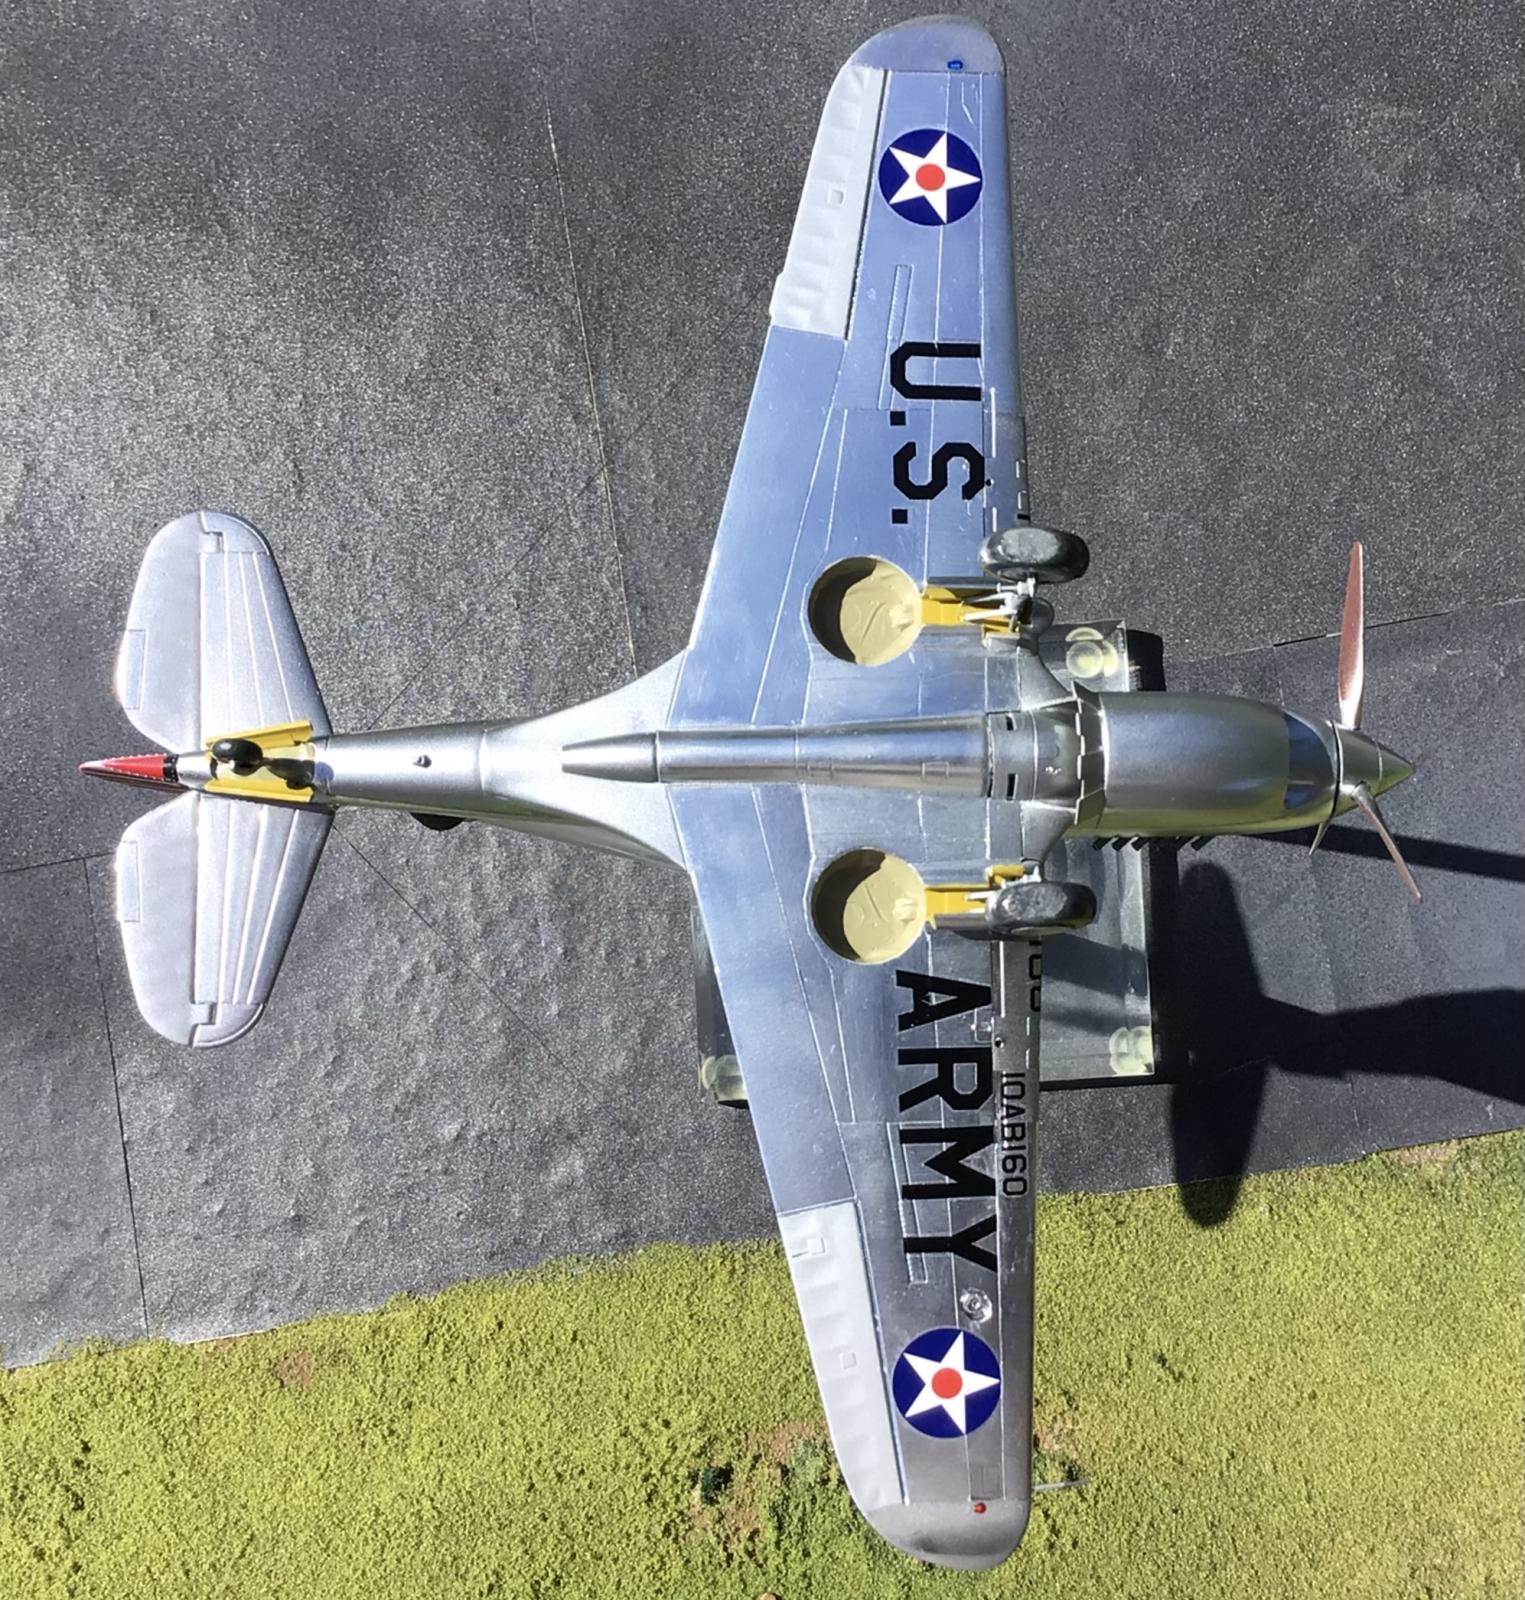
I'm glad I did. But I had to use tape to remove the "U.S. ARMY" letters and insignia from the wings. I was lucky and only had to replace one small section of foil. I used a #24 drill bit to carefully drill the landing light hole out.
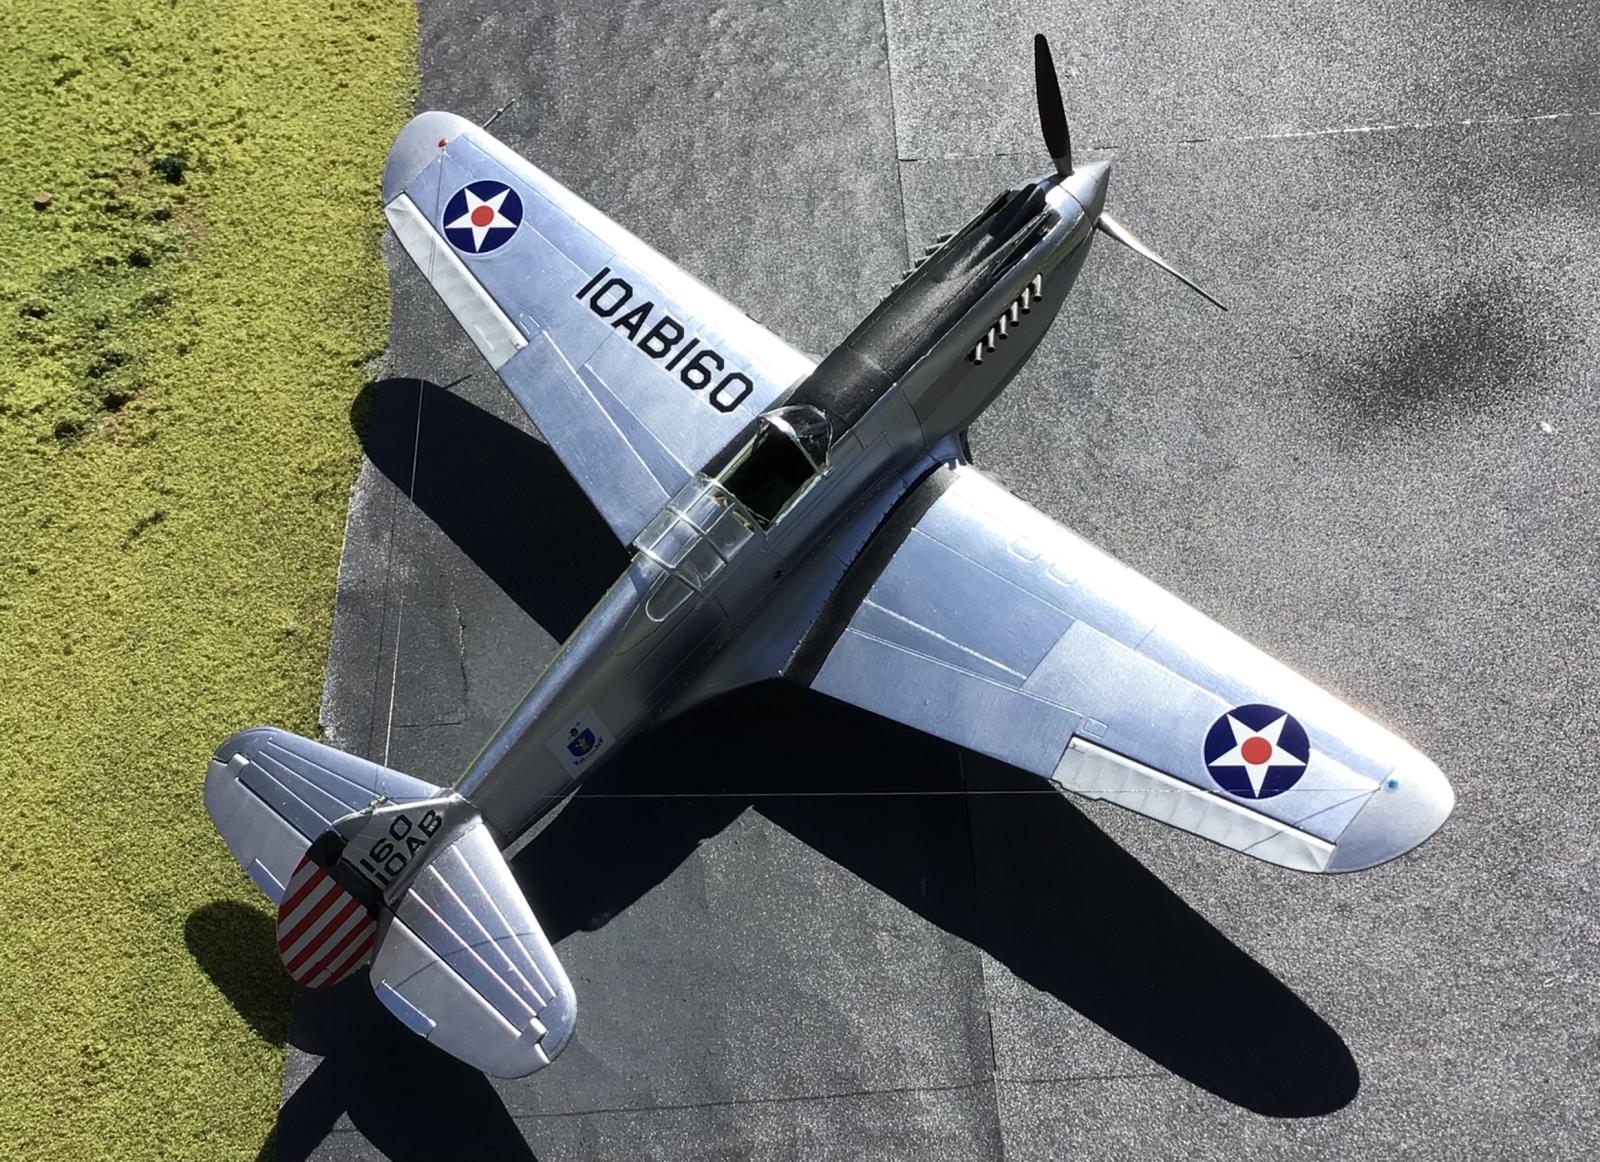
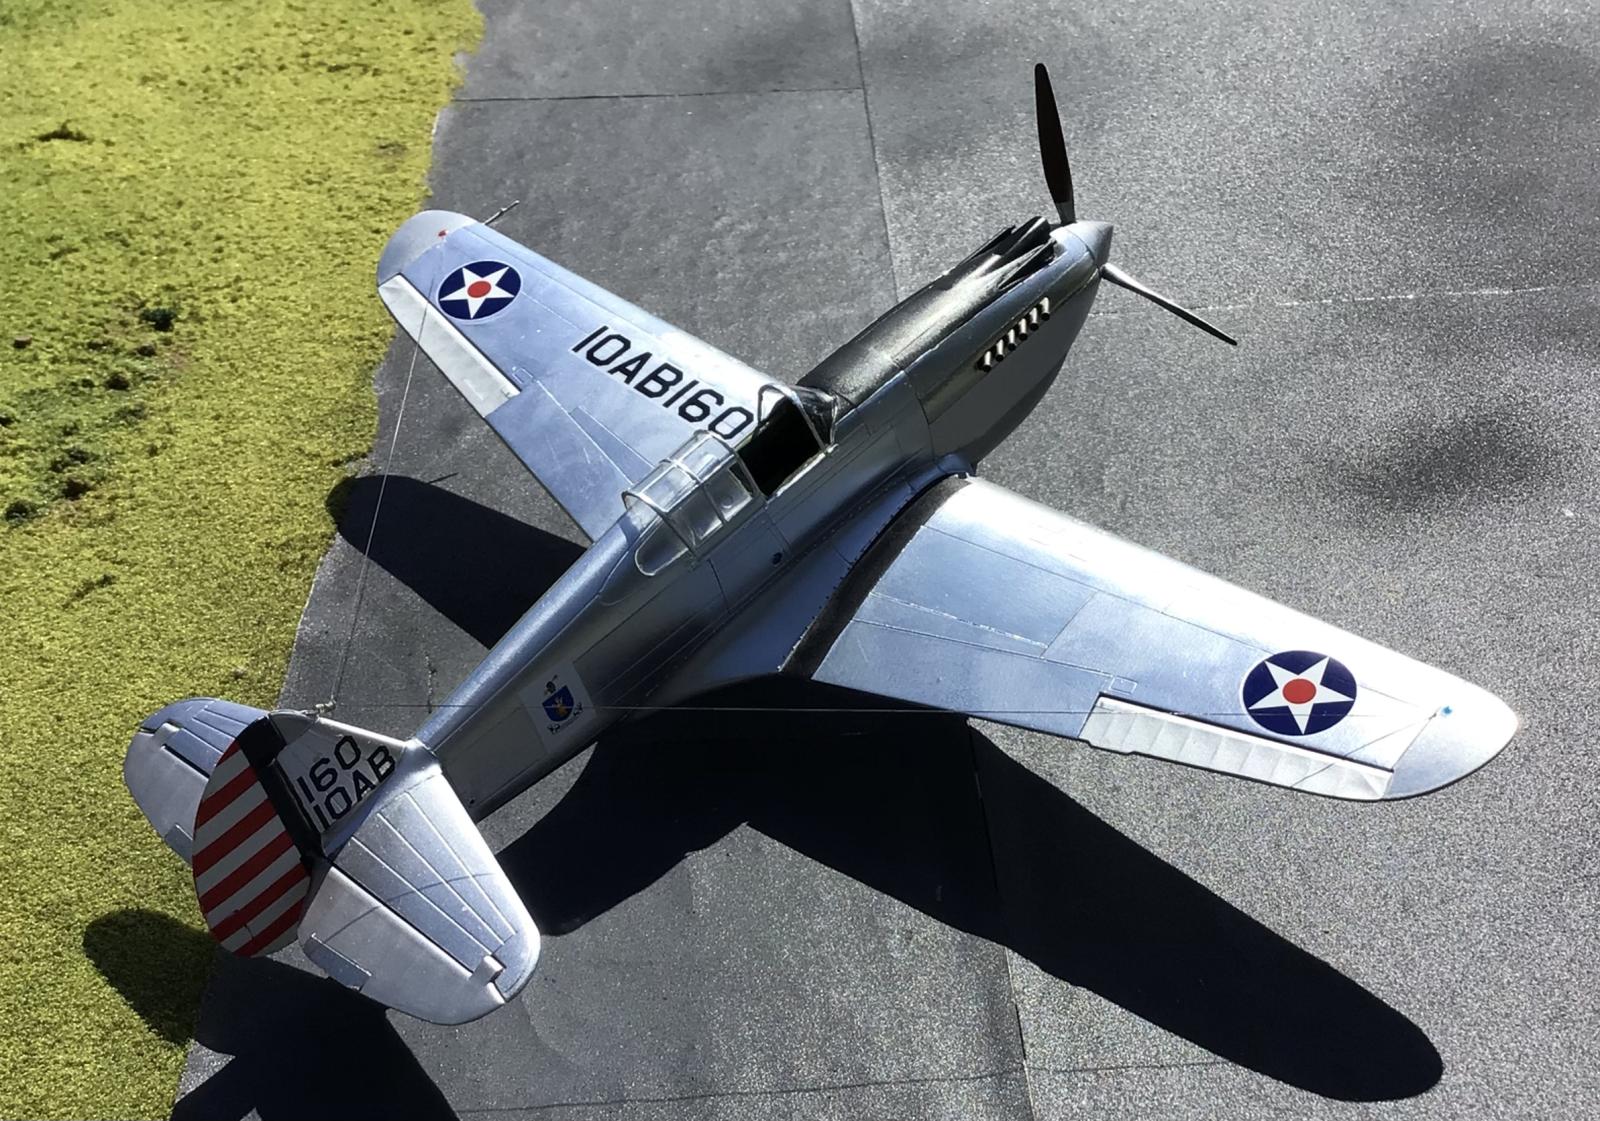
I used some decals I had from another P-40 set to replace the "U.S. ARMY" letters in Black. These polished aluminum planes had black letters. Only later when they were painted in camouflage did these letters become a Dark Blue, but occasionally they were still painted using Black too. The US Star insignias with the Red centers came from the decal stash.
They are the correct size, but I think the Blue is a little bit too light. I'm not changing it again... It's close enough for me.
As always, comments are encouraged. Thanks for looking !
Hi Louis, let me be the first to congratulate you on this perfectly finished early P-40, you’ve got the NMF off to a tee.
George Williams (@chinesegeorge)
Thank you George. I sincerely appreciate your compliments.
🙂
You do great work with the foil. I haven't brought myself to attempt it yet. This is a great-looking P-40!
Greg Kittinger (@gkittinger)
Thank you Greg ! It's nice to hear from you buddy. Foil isn't too hard to use. I apply it with a little down pressure using my fingers. In some tight places I use a cotton Q-Tip bud. Then if you are not happy with it, you can simply pull it up and reposition it again. You can do this several times, and as long as you don't crease the foil you will be OK. It's easy to use once you get used to it. Give it a try sometime. I think you will like it.
Louis, your Curtiss is a testimony of your skill using Bare Metal Foil! It’s as shiny as the real deal, really amazing. I can’t spot any blemish no matter how hard I seek.
A beautiful and unique model of the very early P-40 aircraft is what you present us here. You could donate it to a museum for sure 😉
Thumbs up my friend! @lgardner
Pedro L. Rocha (@holzhamer)
This is the nicest compliment anyone could get. Thank you. I do sincerely appreciate this. I hope the P-51 Mustangs will be like this too. I'll reply back to your PM soon. I'm limited for time right now. Take care and stay safe.
Awesome job my friend, @lgardner. Great looking build, along with some P-40 history.
Robert Paschall (@beauslx)
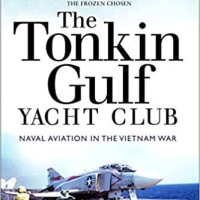
Thanks ! I try to give a little history lesson in each of my posts. I sincerely appreciate your compliments. This is a plane that I have been wanting to build for a long time now. At least 5 years, possibly even more. I accidentally stumbled across a photo of an early NMF P-40 and was going to somehow cobble together decals for it. It was not the exact same plane as this one, as it lacked the Flat Black anti glare paint ahead of the cockpit. I think it had the numbers MD and 11 on it. Then Iliad released this decal set, Dana Bell came out with the P-40 book, and I knew it would happen. Thanks again.
Can one say, Perfect! If not, damn close. Well done, Louis.
@lgardner
gary sausmikat (@gwskat)
Thanks Gary ! It's pretty close to being the perfect build, but so far I don't think I have ever done one of those ... close but no cigar. If the US wing insignias were just a little bit Darker Blue then I might agree with ya. Perfection is the nemesis of good enough. 😉
Thanks again buddy. It's good to hear from you.
Wow that is an amazing finish and model! The NMF is almost flawless which is the way it should be. The outdoor shots really make it look real.
I'm happy with the Airfix P-40 (it's not perfect) but it isn't a fussy fiddly build and has decent details.
Beautifully done, and I love the photography.
That is beautiful
Beautiful result, Louis! I forgot the light on the last one I built too.
That's an amazing finish using Bare Metal Foil. I always struggle with that stuff.
Amazing, another example of your high build standards, Louis @lgardner
Your skills with the foil are excellent, the result looks as if it is a real metal aircraft.
Thanks for the building approach on this kit.
Amazing.🫳🎤
An absolute gem, Louis! Researched and built in the best possible way, this is a really excellent P-40! NMF rocks!
Congratulations my friend!
Nothing less but pefection Louis. A great canvas of work in this nifty P-40. Gaining experience for more bigger ambitious projects down the pipe. Like a B-24, an F-86, B-47 perhaps, the sky is the limit. Though myself foil has never been in my sights to ever attempt and most likely won't but you have it down to an art my friend. If there was a model of the year award, as we used to have a model of the month, this is a winner hands down, and there are a lot of excellent models here. As we all know. Thanks for sharing.
Fantastic! I'm impressed!
What a stunning beauty, Louis @lgardner! I love the Airfix kit and your build with the metal foil together with the scheme you chose is very beautiful. Great work!
Great finish , i have tried to use foil but never succeeded, your plane looks excellent. Very informative article as well.
Great article, great model, Louis @lgardner! 🏆
That is a really beautiful build Louis, @lgardner. I just picked up this kit and your build really makes building it tempting. I looks like it is a really nice kit. Your silver really turned out good. I have never seen one in silver and I think you nailed it.
@lgardner - Fantastic work Louis! The metallics are flawless.
Astonishing, Louis. Like most of the comments before, it’s impossible not to gaze in wonder at the work you have done with the aluminium foil. A skill set that most of us simply wouldn’t attempt. You have pulled it off without a wrinkle. And the decals sit perfectly, too.
Next you’ve blended the parts the aluminium might struggle to get round with the Molotow chrome marker paint. And again done it to an exceptional standard!
It’s just a wonderful model, Louis. Congratulations. It should be in a museum!
Great build and narrative Louis, fantastic 👍
Hats 🎩 off to you
You really knocked this build out of the park, Louis @lgardner. It looks superb. I use BareMetal foil for car window frames etc. but have been too timid to do an entire plane with it. You make it look so easy. How ‘bout you give us a lesson on how you make those antenna springs? What’s your secret?
@lgardner - really nice work on this using the bare metal foil and a superb result. One of the best looking early P-40s anyone has shown here.
Excellent build my friend! and it's not a Hellcat lol. Really nice! I've done vacuform and resin but I don't think that I could ever attempt foil.
1 attached image. Click to enlarge.
That's a real stunner! My hat's off to you for the great bare metal finish and the research that you put into this project. Just beautiful!
Excellent- very impressive with the NMF using foil. You've set the bar very high with this one!
Wow… that’s really nice !
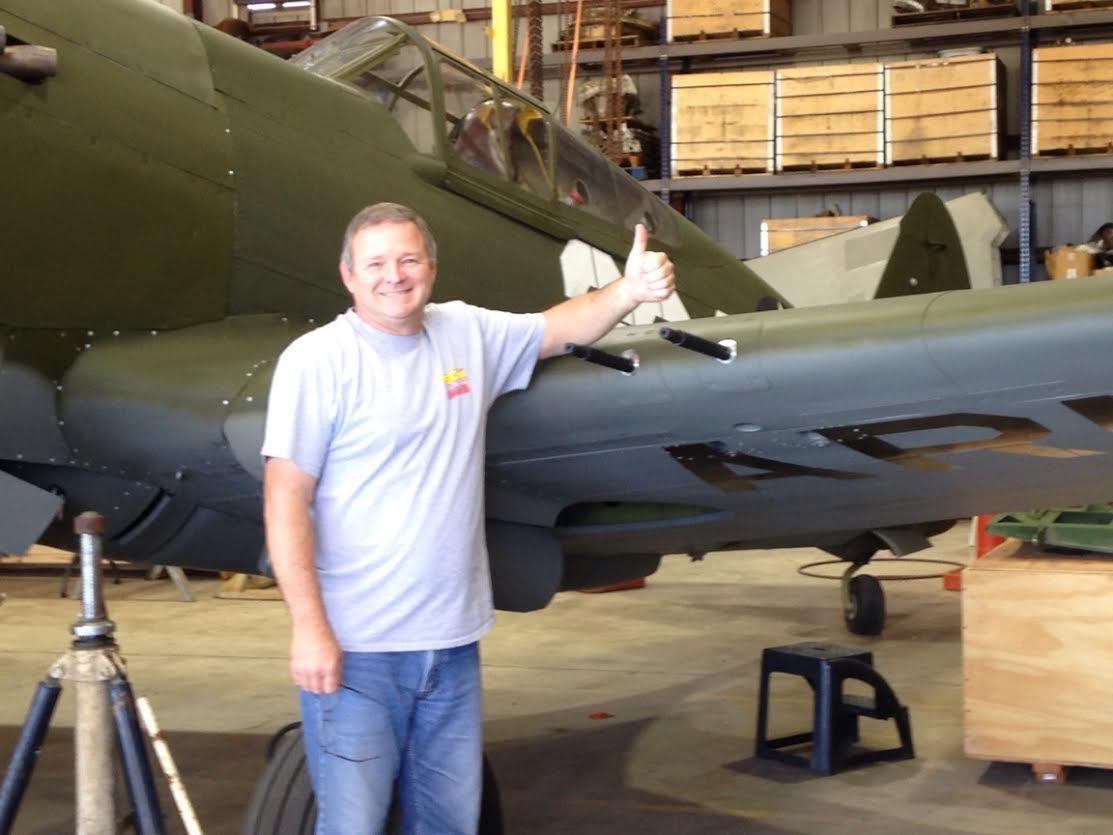
For me what makes this build great Lou is your selfie with the smile with the thumbs up. At the core of every good modeler lives the kid inside. The spirit of adventure ,discovery and the happiness of success. All of that gets carried into a build. Which is easily seen on the Airfix kit. Two thumbs up.
I am a huge P-40 nut, I love 'em! Your build here is just beautiful! I also have plans to build this exact aircraft. I have this kit in my stash and a few fo the old Monogram kits too. If i can do halh as nice a job building one ill be extremely happy.
I know they weren't the best fighter of the war, we would have been screwed without it. The P-40, I feel has always gotten a bad rap, it fid everything that was demanded of and then some, and with a competent pilot, it could and did hold its own against better fighters.
If yoir interested check out my Monogram P-40 on my page. Thanks for the inspiration.