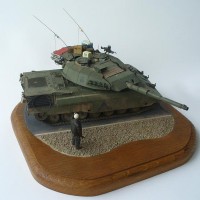
P-51B in Slovak National Uprising (1/48 Tamiya P-51B)
First, a little background.
In the spring of 1944, the Czech Government in exile in London and various resistance groups began to believe that the German occupation forces had been sufficiently depleted by the war on the Eastern Front that there might be an opportunity to successfully revolt. Preparations began in March 1944, consisting of gathering soldiers, airmen, weapons, and ammunition. Resistance groups intensified attacks on the German garrison forces in Central Slovakia. In August, 1944, Soviet forces were only 40 miles from the border of Slovakia, and the resistance decided it was time to strike. Units of the Slovakian Army and Air Force rose against the Germans and began attacks on 29 Aug 1944. Sadly, there was a lot of distrust between the various resistance groups and the Slovakian leadership, and the attacks quickly faltered. Although the Uprising failed, an intense level of Slovakian resistance continued until the end of the war in 1945.
So, how did US airplanes end up taking part in this Uprising? It seems that on 7 October 1944, 6 USAAF aircraft (2 B-17s of the 483 BG escorted by 4 P-51Bs) flew into Tri-Duby Airfield in Slovakia. The bombers carried supplies for the resistance, as well as 3 OSS teams. They departed with 18 allied pilots that had been shot down in Slovakia, as well as 5 French partisans.
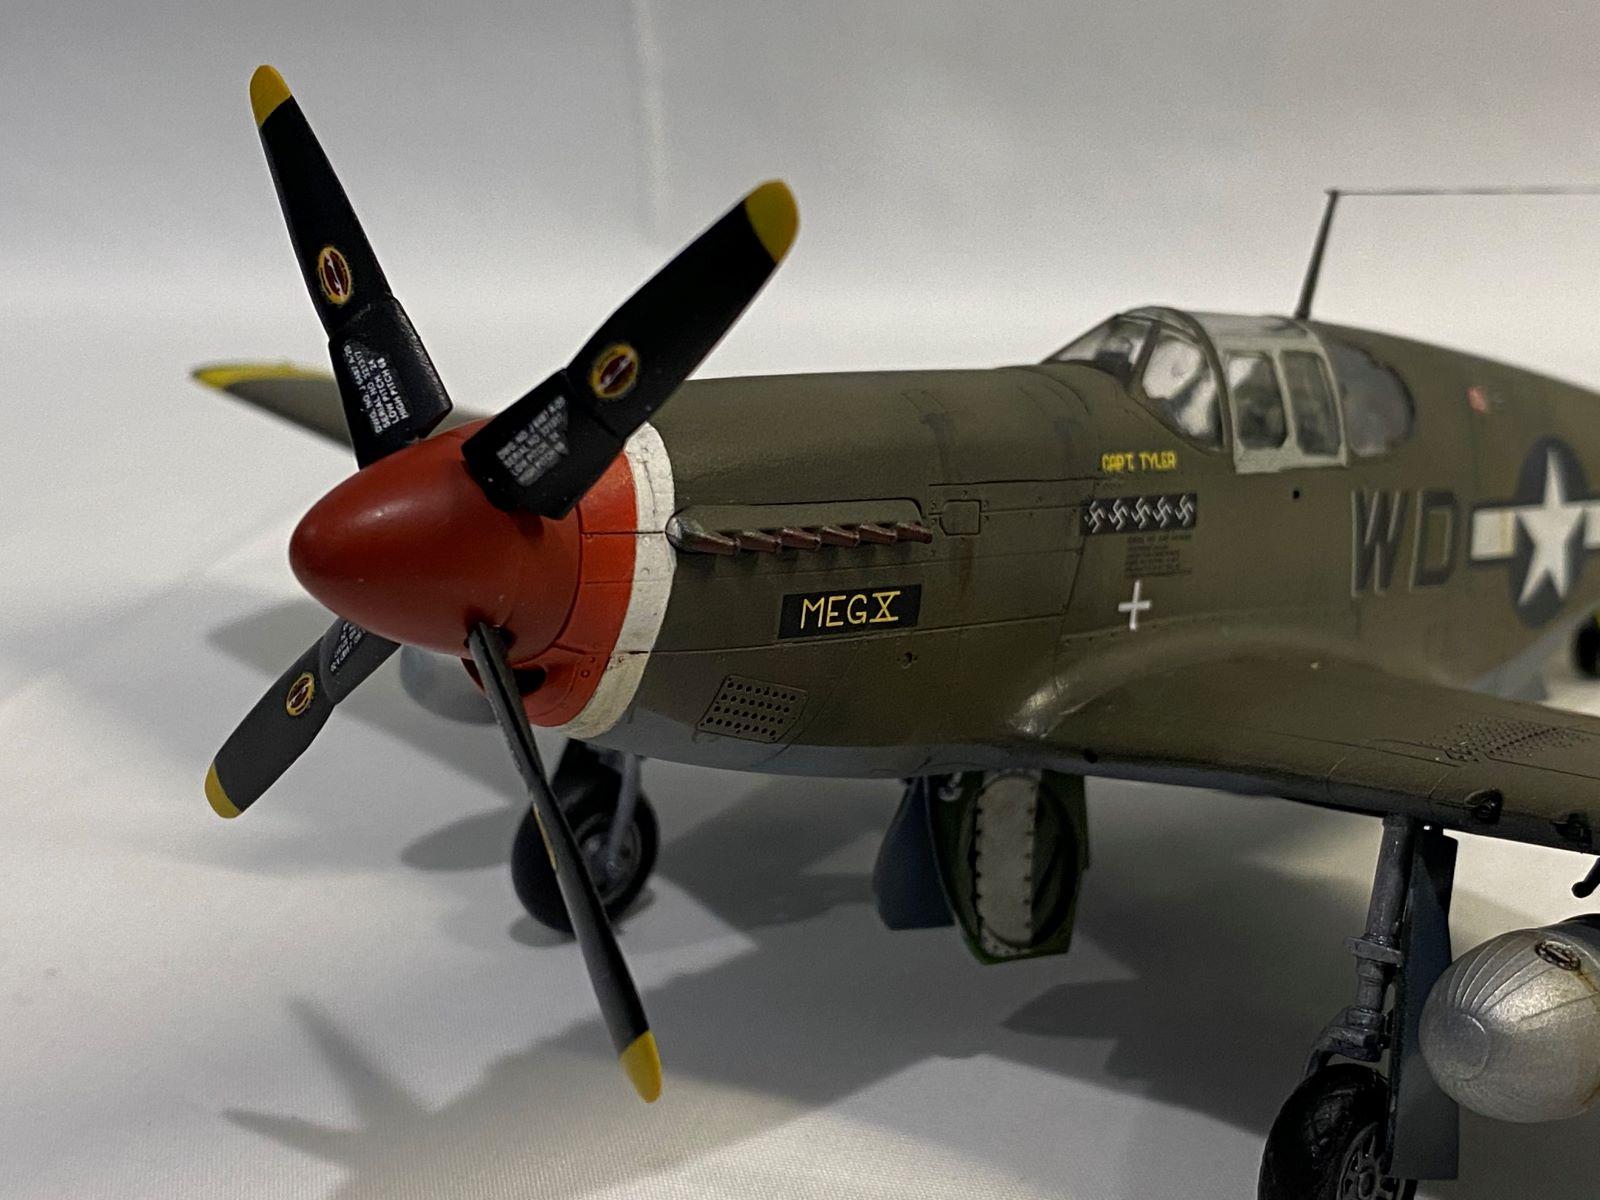
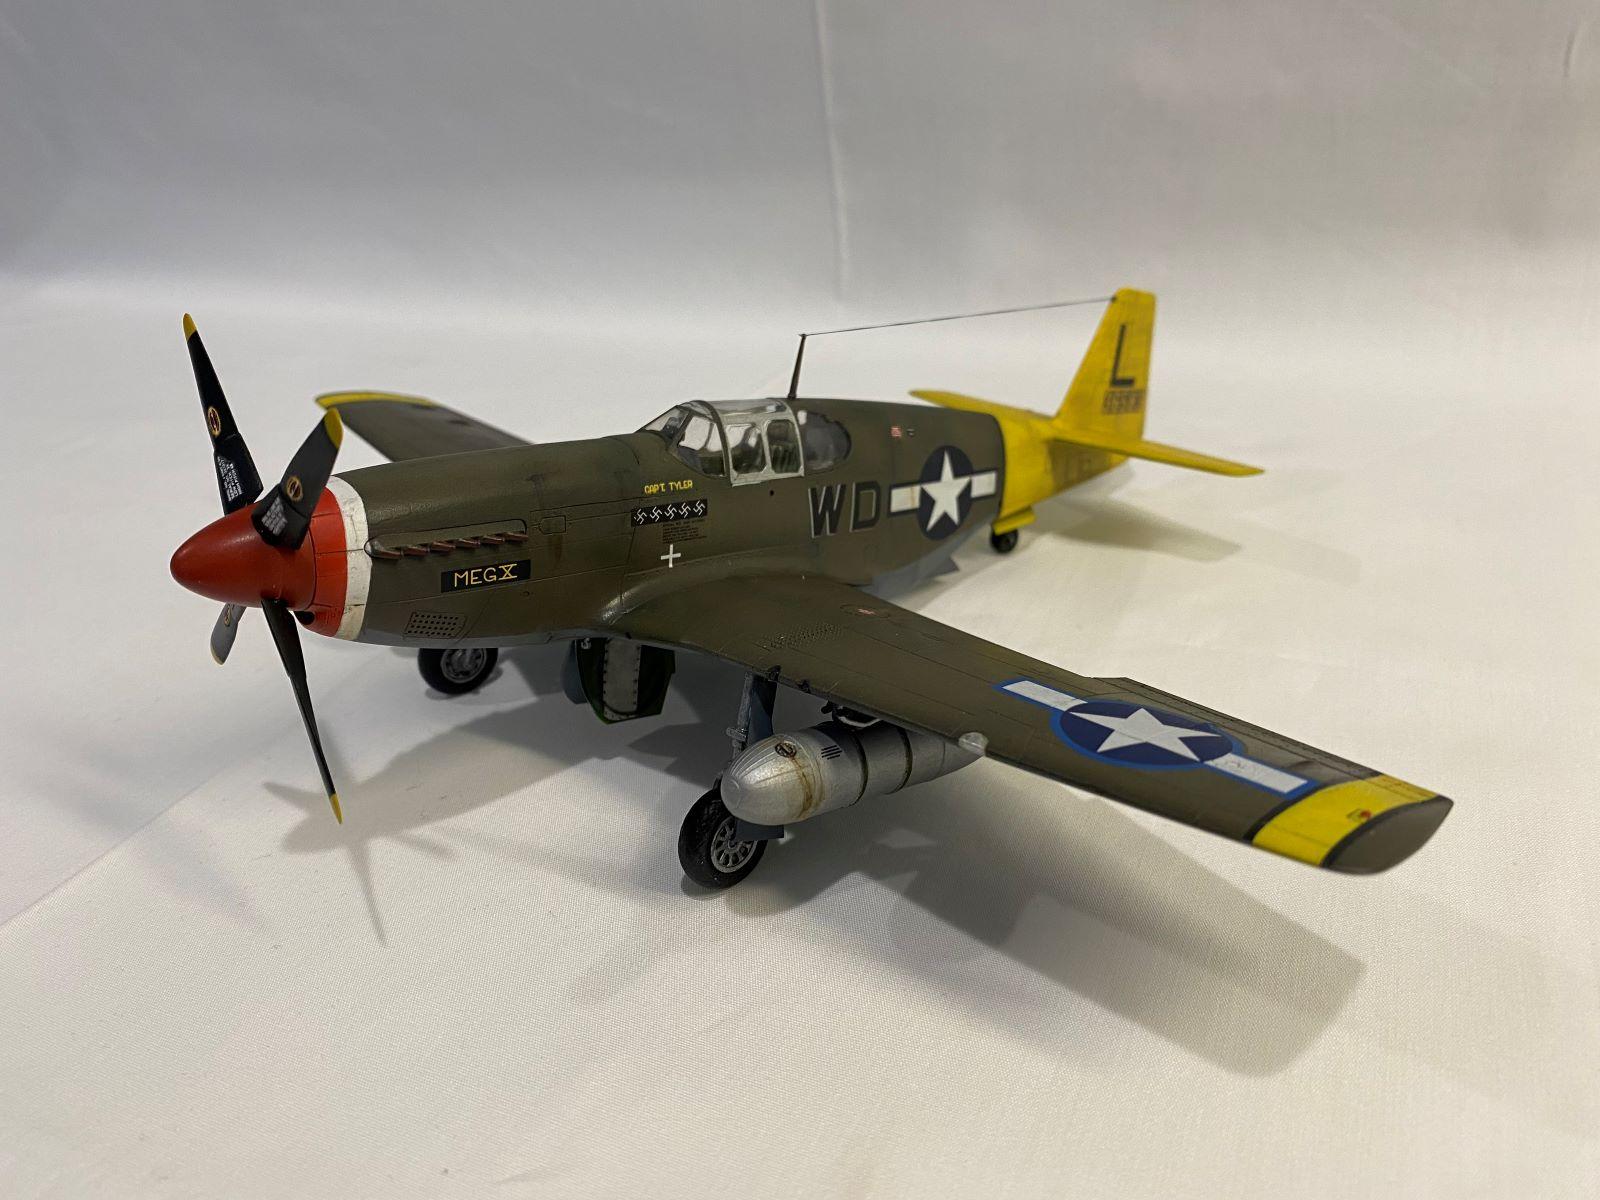
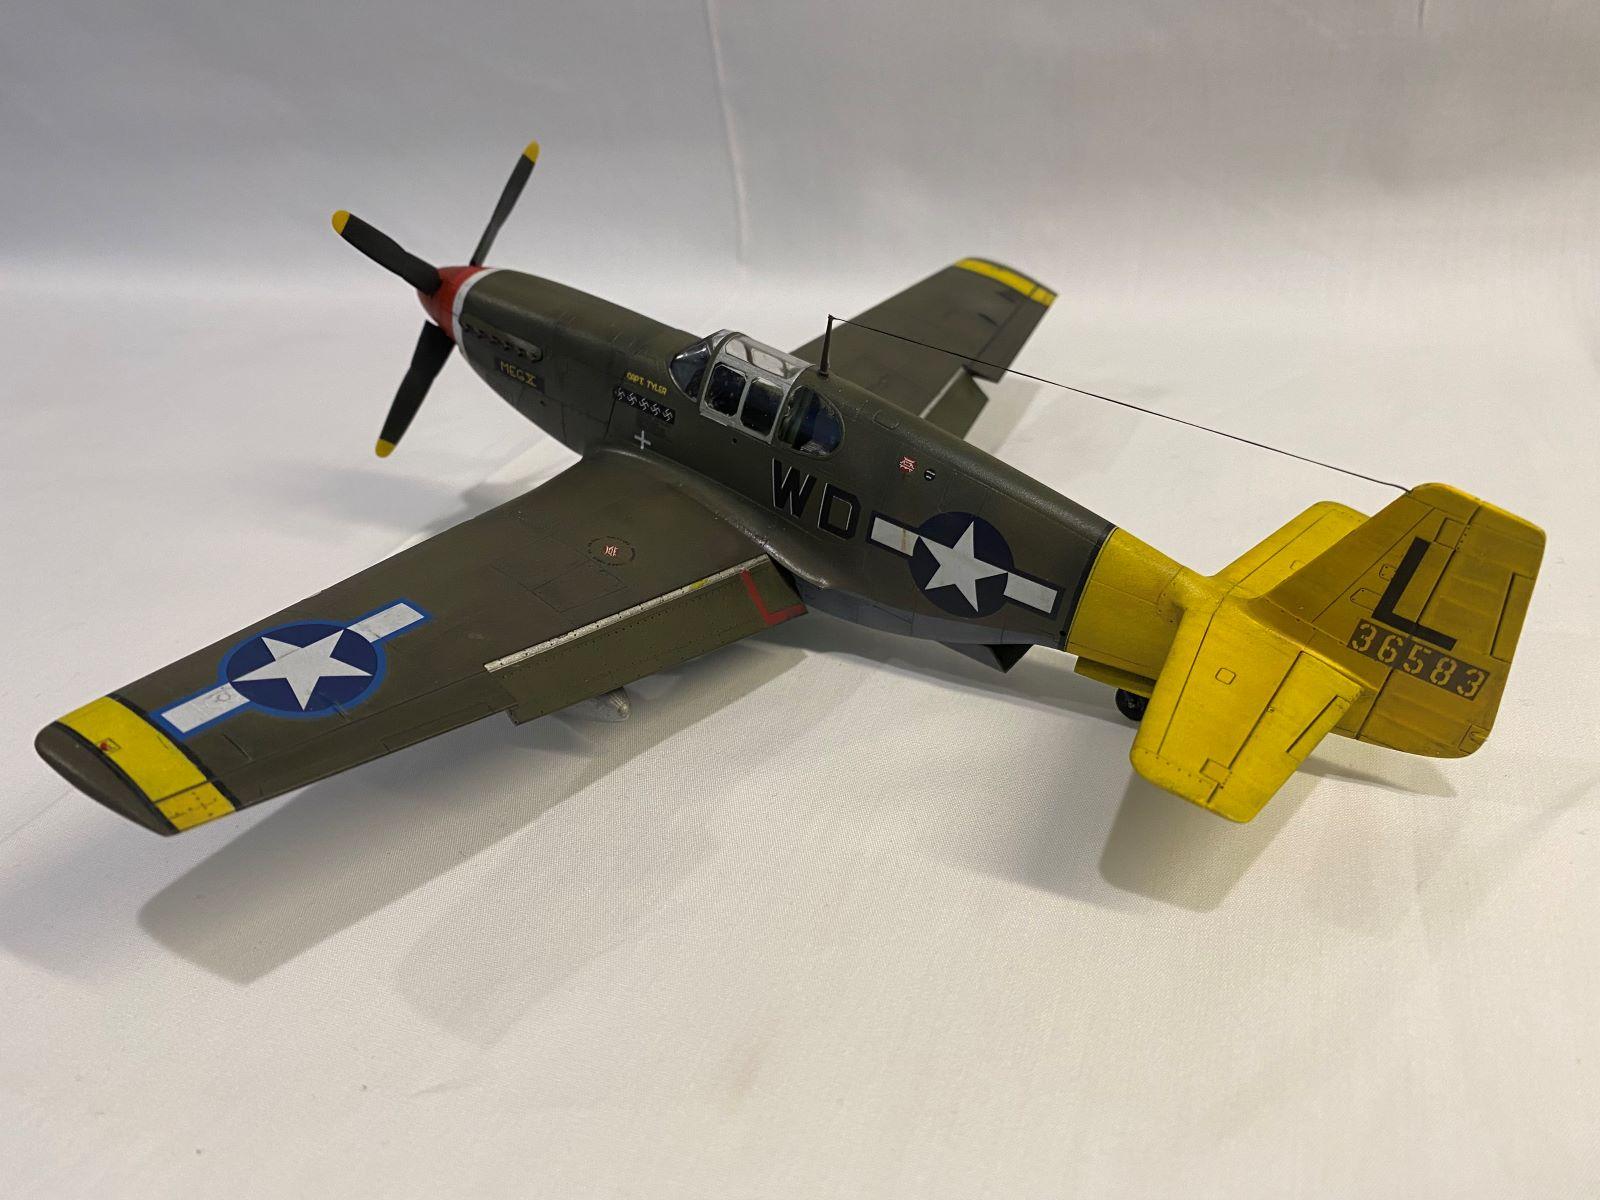
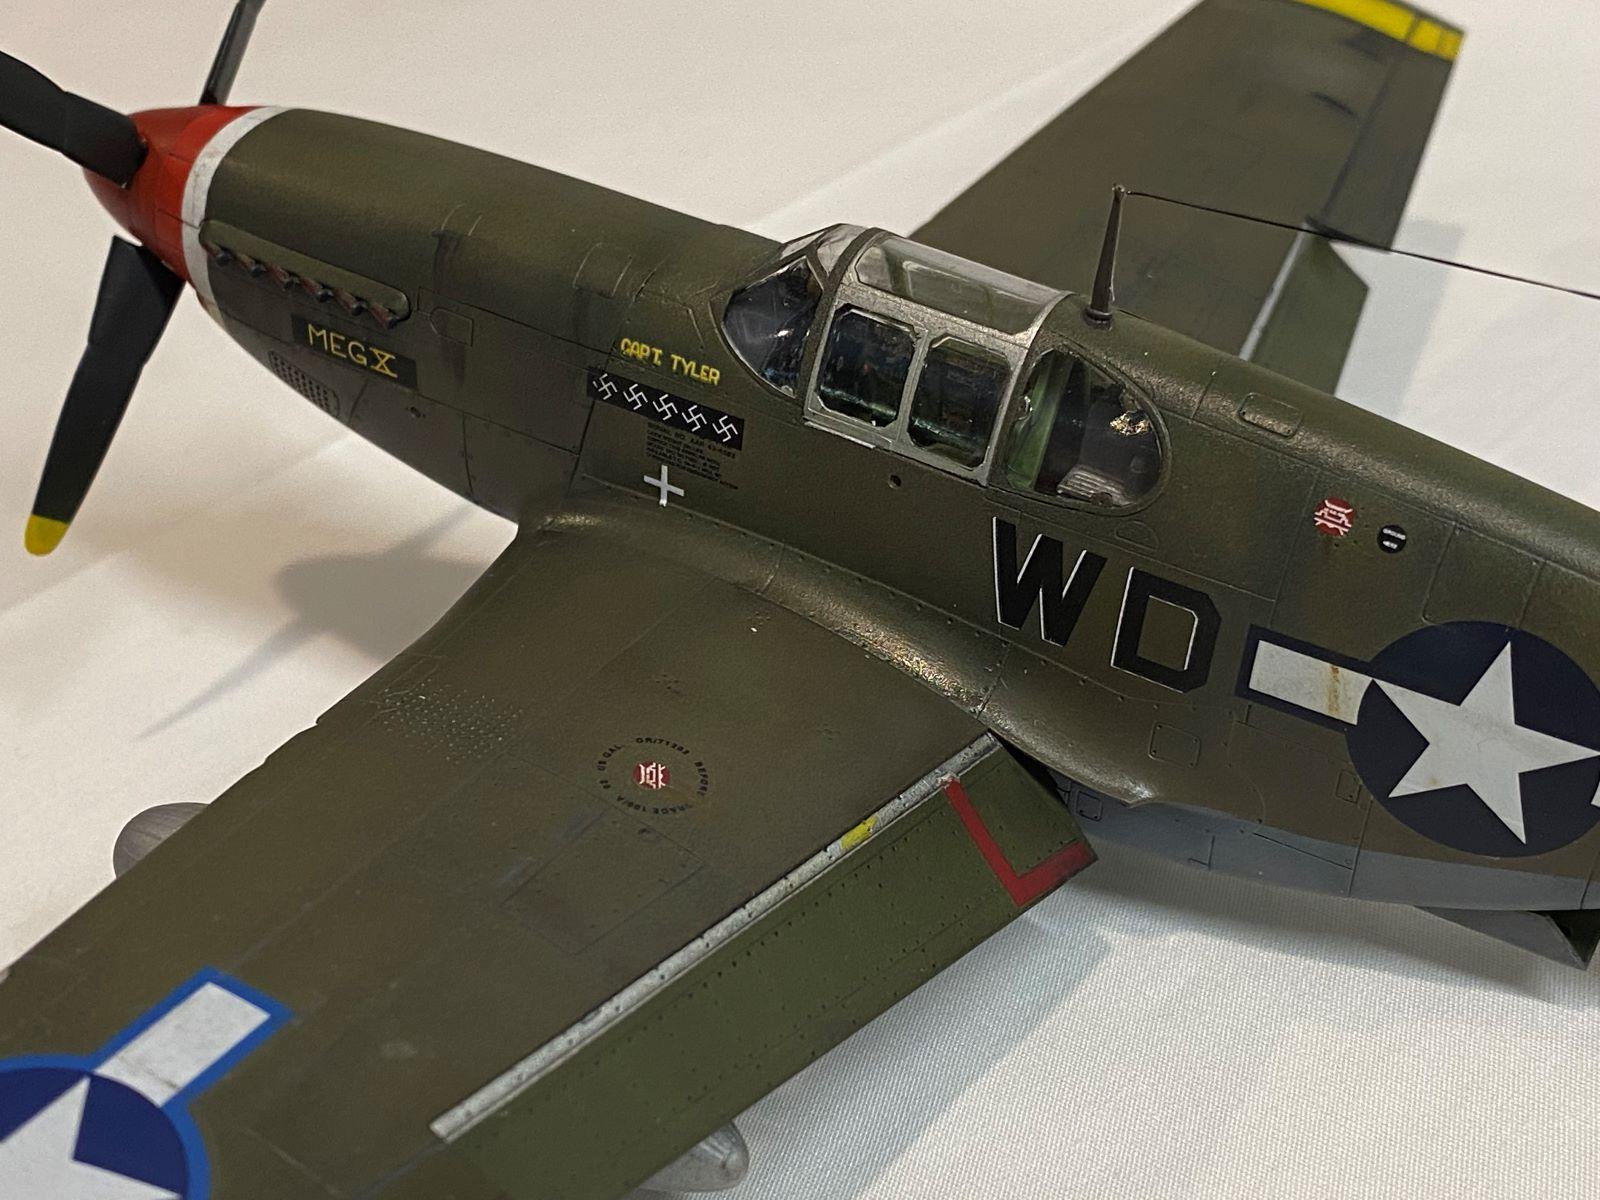
One of the escorting P-51Bs was 43-6583 of the 4 FS/52 FG, flown by 2Lt Ethan Allen Smith. The Mustang was nicknamed "Meg X". Records indicate that Smith made a forced landing upon arrival at Tri-Duby which destroyed the aircraft. Lt Smith was hurt in the landing and was taken to Zvolen Hospital in Slovakia (obviously in the hands of the resistance). Smith was returned to his squadron after two weeks in the hospital, and he eventually returned to active duty.
-
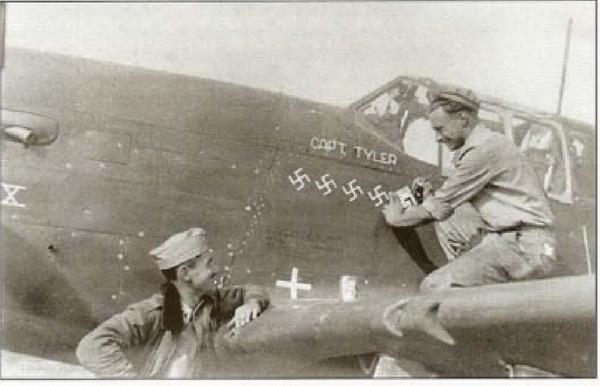
- 1. This is the only photo I could find of "Meg X". You can just see the end of the name here.
The Build:
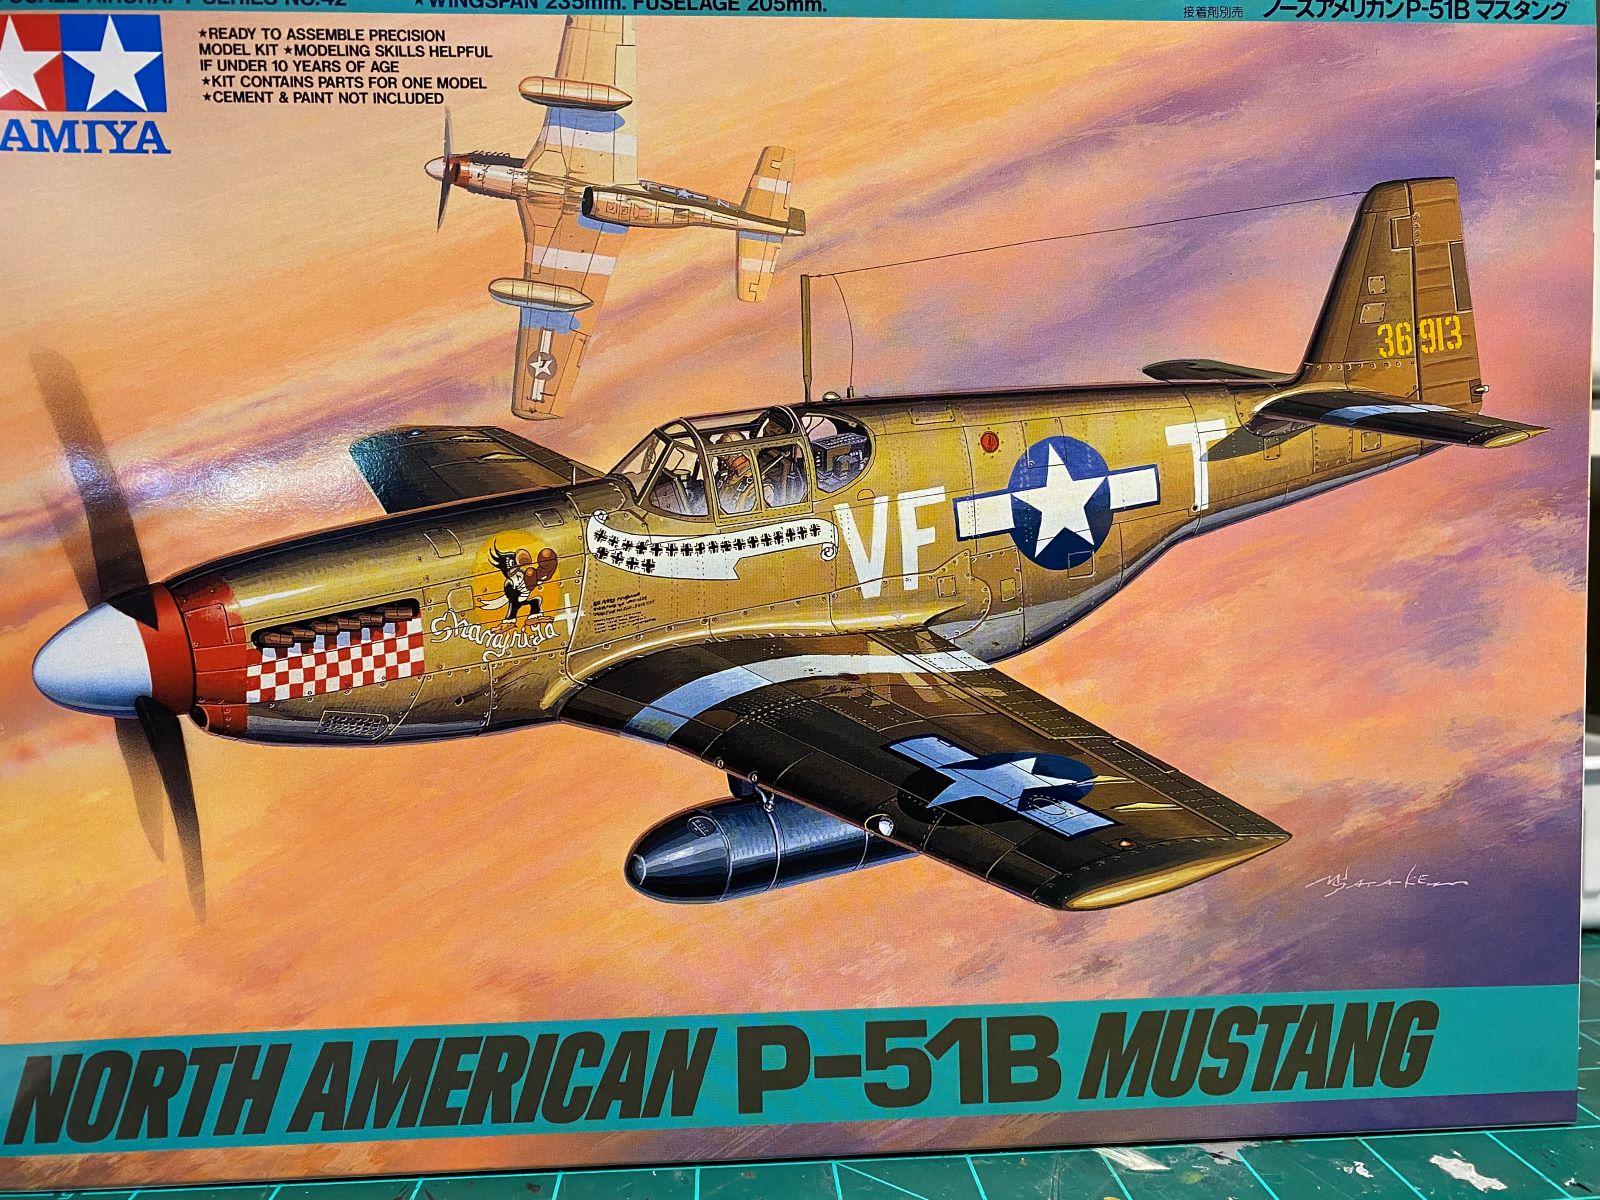
My mother's parents were from Prague and came to West Texas before WW2 broke out. Lucky me! So when I saw these DK Decals for the Slovakian National Uprising, it was a no-brainer to build one of the planes. I had a 1/48 Tamiya P-51B, as well as an Eduard interior set, and the decals, so the plan was put into motion. Spiros (@fiveten) and John (@johnb) had just started a team build on a pair of P-51s, and they graciously asked if I would like to join their group build. So, off we went.
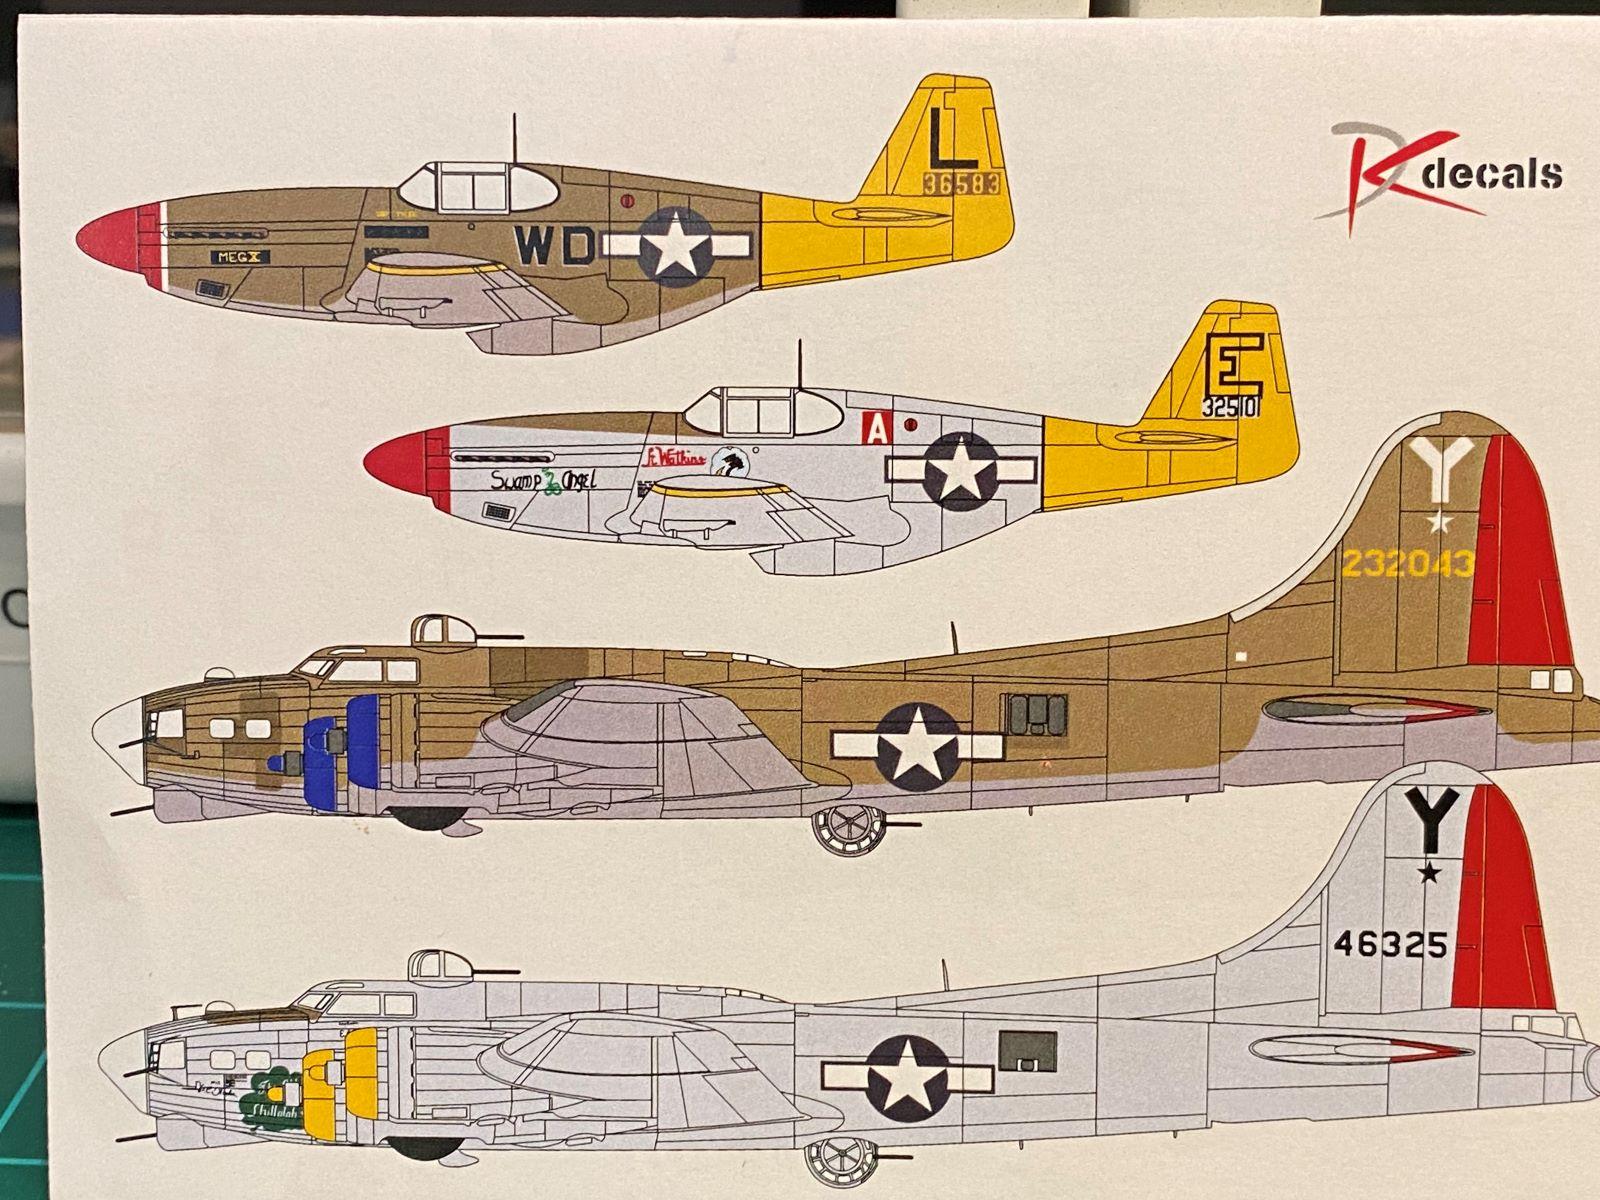
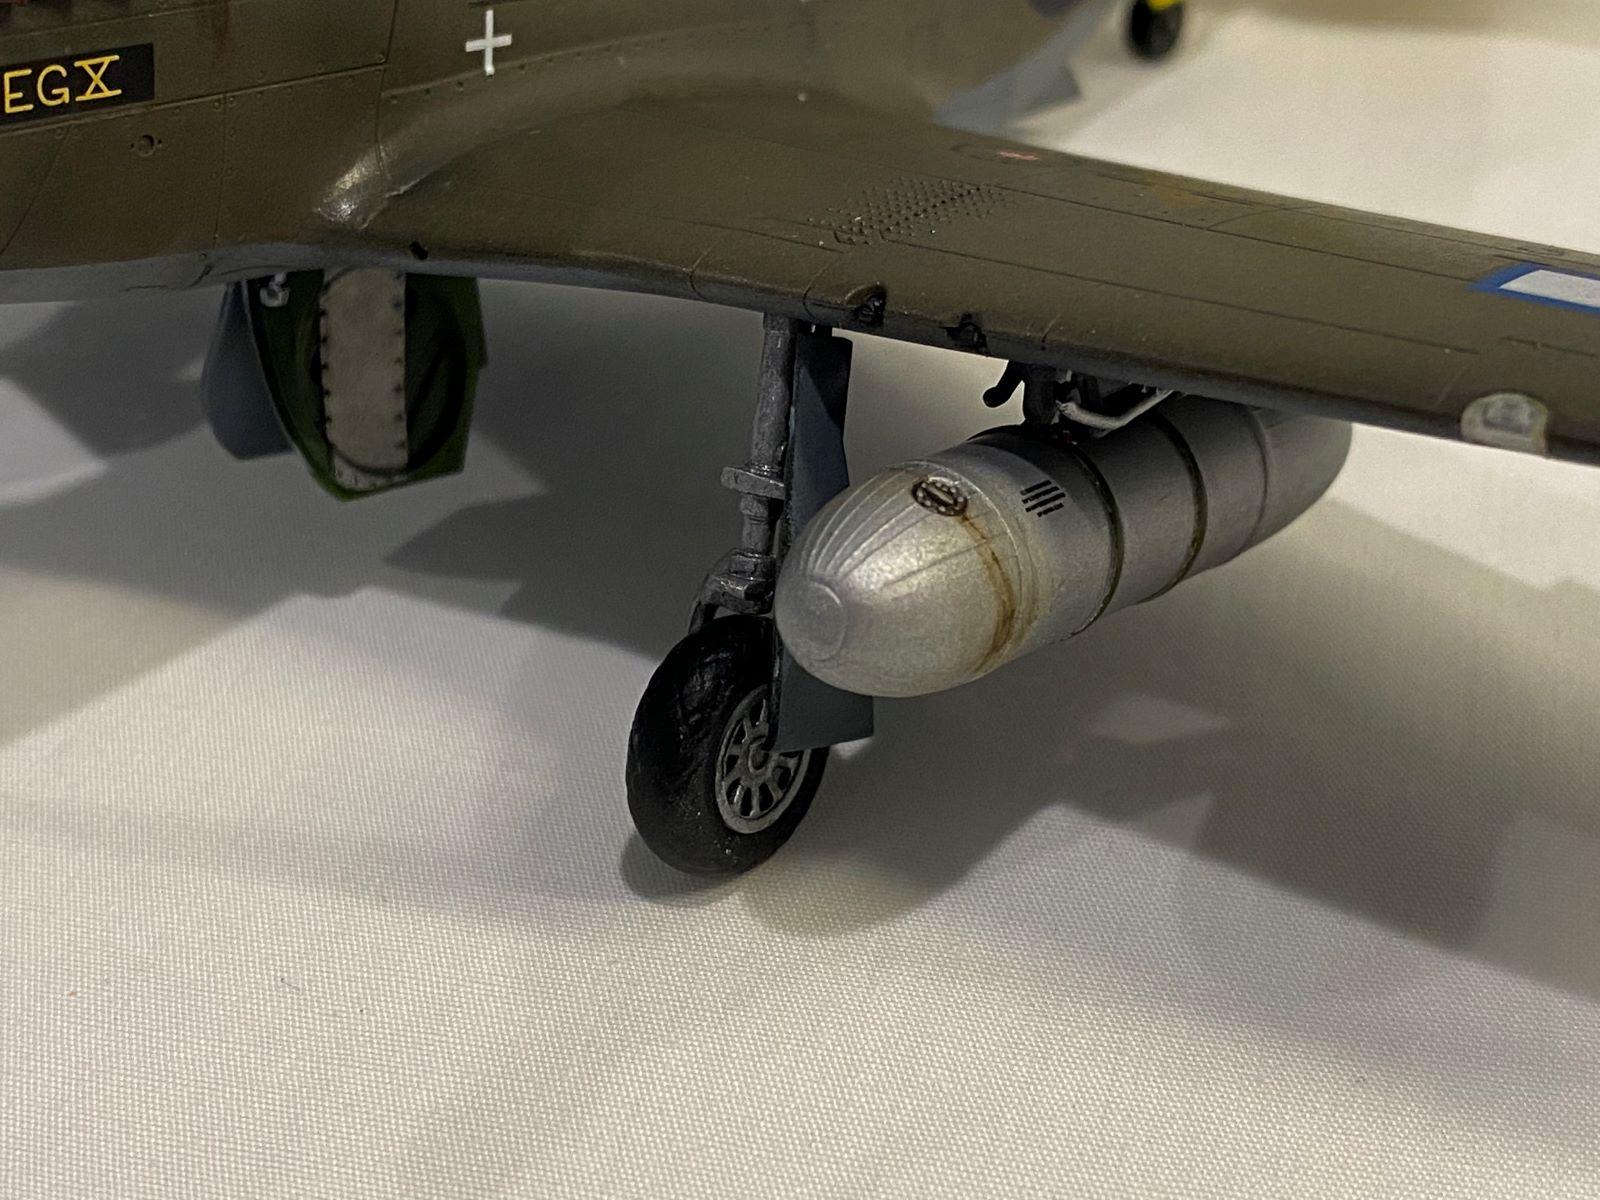
First, let me say I am not an expert on P-51s, so all of the expertise is in the kit. If you have built the Tamiya P-51B, you know this kit all goes together well. I used almost no filler. Tamiya paints were used throughout. I used artist oils to add a wash and do a little weathering. The only additional work I did on the plane was to add some simulated piping between the drop tanks and the wing. I ran into a little trouble with the DK Decals. The first set of squadron codes I applied to the fuselage shattered into 20 pieces. At that point, there wasn't much to do except remove all the pieces and try the second code. The "WD" squadron code went on the left side perfectly. You won't see any photos of the right side of the plane since there are no codes on that side. I managed to locate another set of decals in Australia, and they are winging their way here as we speak. When they arrive, I will finish the other side of my plane.
Overall, a really fun build and once again, a very gratifying experience to build a plane with a group of very good and supportive modelers. Thanks to Spiros and John, and I look forward to seeing your Mustangs here soon.

-

- 1. You can just see the piping from the wing to tank.


Good to see you’re keeping busy, @gblair, lots of historical information there, nice model from the classic Tamiya kit, let’s hope the Australian transfers finish the job.
Thanks, George (@chinesegeorge). I have two chances to get it right when the new decals arrive, so hopefully success is in the future. If I totally blow it, then I have a spot in my display case that only allows viewing from the left side. :o)
Nice looking Mustang, George @gblair ! And an interesting historical event I’d never heard of.
Thanks, Jay. I probably would never have considered these decals if I didn't have a family connection to the area. Turned out to be a pretty cool story.
That airplane must have been a real hand-me-down, since by the time the 52nd FG re-equipped with P-51s in late March/early April 1944, they were getting P-51Cs from the Dallas factory that were unpainted. Somehow that must have come from the 8th AF - I wonder if it might have been a 4th FG airplane that experienced problems when they were in Italy in late June 1944 during their USSR shuttle mission? They did leave three airplanes behind with damage.
Excellent work on this and a great result George @gblair.
Thanks, Tom (@tcinla). The decals also come with markings for a P-51C on the same mission. According to the decals it was a P-51C-10-NT 43-25101 from the 5 FS, 52 FG flown by 2LT AF Watkins. The paint scheme on the P-51C is natural metal. I didn't do any research on this second Mustang, but it may fit into your thoughts about these Mustangs.
Nice work, George. That sure is an unusual Mustang. I bought the 1/72 version of that sheet to do one of the Russian B-25s and the PE-2 offered on it at some point.
Thanks, John. I assumed that the 1/72 version of the decals had the same planes, but I just checked them out and was surprised to find that they contain totally different planes. Apparently there is a lot more to the story of the revolt.
Ok @j-healy - thanks for answering a questions I was about to ask - are there 1/72 decals for this! Love the scheme and have plenty of B's to do one like this!
Excellent allover, George! Yet another of your amazing models. Love all effort you put into it. Thank you so much for joining us to our little Mustang group - it was pure pleasure, an honor really.
And, yes, looking forward to see the other side too!
Thanks, Spiros. Yours already looks great with the initial paint. Looking forward to the decals and finish. Take care of the tail wheel!
Your build turned out exquisite. Great job! I love the look of the P-51B.
Thanks, Keith. Appreciate the kind words. I like the early P-51s also.
This turned out wonderfully, George @gblair
The colorful markings are beautifully done, like the rest of the build as well. A pity about that decal but at least you were able to locate some new ones. It was a pleasure to have you taking part of the groupbuild and seeing you delivering the first finished Mustang. Mine is the same kit and it will be hard to achieve this level of modelling but I do have a reference now. Thanks for the warning on the tail wheel.
Thanks, John (@johnb). I have had decals crack or break before, but never in so many pieces. Completely unrecoverable. It was a fun kit and I know yours will be awesome. I guess one of the hazards of having a scale tail wheel is that it is supported by one plastic rod. The kit is designed so that you can leave the tail wheel off until the end. I figured it was safe to add after painting, but I guess the wash and weathering were too much for it.
Nice looking Mustang with different markings, George @gblair. You have done a great job on the build, painting and overall finish.
I hope your other set of decals works out with no issues.
Thanks, Bob. I have two chances with the next set. Hopefully enough to get the job done.
Very nice result and cool history surrounding the real plane. Great job!
Thanks, David. Interesting and obscure part of WW2 history.
Top work George @gblair! 👍 Great backstory as well! 😃
Thanks, Gary. I would have completely overlooked the decals if the story hadn't caught my eye. Who would have thought someone would make decals for such a relatively unknown event?
George,
Between the family history, the article, the mission and the build the article turned out to be a satisfying read. The build turned well it's all good.
Thanks, Stephen. I appreciate the kind words. Your P-51s are coming along nicely.
Starting a nice little collection of planes from the uprising George?
I think just this one, Erik. The story grabbed me for this P-51. I am still slowly working on my collection of airplanes from the Spanish Civil War, and I want to convert a Hurricane into a Russian 2-seater. So many models, not enough time.
Terrific, George @gblair. Always wondered about DK decals. So many models, so little time. Kind of a curse as well.
Thanks, Eric. I have used DK Decals before and didn't have any trouble with them. I can understand if I was doing a bunch of manipulating and the decals broke apart, but this one broke up immediately after I put it on the plane. All the rest worked fine. I have a ton of unbuilt models, and my wife once asked me if I had become a collector. Nope, I still plan to build every one of them.
Fantastic - looking for the 1/72 version of these decals! Great work on this. UPDATE: Decals purchased...
Thanks, Greg. Where did you find the decals? After looking at the planes in the 1/72 decals, I was thinking I might need to do a 1/72 kit. Which one/ones are you thinking about doing?
A fantastic build George!
Thanks, Robert. After you did your 101, I am really thinking about doing something in the Century Series next.
Excellent build and unique history.
Thanks, Dan.
More Photos John! I love Your build! Mustang is always cool. Especially mark B! I found Also this decal sheet in 1:72 scale. Great painting job!
Thanks, Bernard. The build photos are available in the Aircraft Work in Progress thread started by Spiros (@fiveten) and John (@johnb). I have some more decals coming to repair the codes on the right side that disintegrated, but I don't plan on reposting after I add the missing decals. Cheers.
Great build and article!
Thanks, Chas. Glad you liked it.
Hello George, George R Blair Jr (@gblair)
Sorry I wasn't around for this one. I'm feeling much better now, so maybe I can play catch up and get back in the groove here. Once again, you have worked your magic and built up a great looking Pony. I especially enjoyed the read. When there's a family connection, it brings our models closer to home with that personal touch. It shows.
Good luck with the decals too.
I definitely pressed the "like" button.
Thanks, Louis. I'm glad you are back, even it it will take a while to be 100%. You can see in the photos that I went with a dark chromate green on the gear doors, with the center panel being natural metal. I don't know for sure, but this looks like a "rub" strip for the wheels. I have flown a plane or two that had a natural metal strip like this one. Their whole purpose was to provide a place for the main wheel to sit if it was still spinning after takeoff. A tire that was still spinning after retraction after could do some real damage in the gear well. I have heard of older planes where pilots were required to apply the brakes prior to retracting the gear. Technology later took care of this automatically. I don't know if that's the case here, but that's my story and I am sticking to it.